Transcript
Precautions before installation
NSA-03
NO:000009
User's Manual
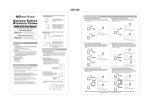
Thank you for purchasing Beat-Sonic Electronic Adapter, NSA-03
Please read carefully and follow these instructions before installing this product.
適合車種
適合年式
NISSAN AVENIR
NISSAN WINGROAD
NISSAN X-TRAIL
NISSAN ELGRAND
NISSAN STAGEA
NISSAN SKYLINE SEDAN
NISSAN SKYLINE COUPE
NISSAN SERENA
NISSAN PRESAGE
NISSAN LIBERTY
2000/6〜2005/9
2001/10〜2005/11
2000/11〜2007/8
1997/5〜2007/10
2001/10〜2007/6
2001/6〜2006/11
2003/1〜2007/10
2001/12〜2005/5
2001/8〜2006/5
2001/5〜2004/12
- Remove the negative battery terminal of the battery.
- In order to protect the interior of the vehicle, cover the interior parts around
the work areas with protective tape.
- After installation, confirm that brake lamp, headlight, turn signals, and the wiper
blades are operating properly.
※ Before installing the new head unit or bavigation, confirm that the OEM audio and navigation is functioning
properly without any complications or issues.
備考
except The BOSE system, 5.1ch system and Rider[S]
(2004/8〜)
except The BOSE system
except The BOSE system
except The BOSE system
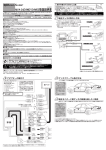
To Detach OEM Head Unit (NISSAN ELGRAND)
. 1 (please
ask the dealer how to detach the other vehicle model)
1. Remove the AV controller.(Clips x 2)
■Product Features
1.This kit is used to replace OEM audio unit to a double-din aftermarket head unit or an after-market navigation system.
2.OEM navigation/TV may remain in use.
3.If using the deck without AUX input, TV sound is output from only front-left speaker.
4.CAR WING and Hands Free Phone may remain in use
AV controller
■Precautions
1.Holographic sound system and Super-sound system needs other NISSAN 2DIN PANEL SET.
2.SERENA, ELGRAND E50 series, LIBERTY, AVENIR and X-TRALE can install only 1DIN, so
do dot remove the OEM navigation.
3.Only when install to ELGRAND E50 series, Do not connect this 16PIN harness to the
vehicle's harness.
4.TV audio sounds only when the audio is OFF from the front-left sperker.
5.the OEM monitor shows a navigation screen moniter when switching the tuner ON after
installation.
6.Steering wheel audio controls become disabled after installation.
2. Remove the Cigar Lighter and Ciger Panel.
(Hook x 2)
Ciger Panel
Ciger Lighter
■Size
※ SIZE:40.0×26.5×122.0 (only unit) ・Weight 250g (only unit)
■Included in the kit
NSA unit,six pin harness, Urethane seats (2), antena change code, warranty document and user's manual.
■During Installation
- Make necessary precautions to not disturb vital parts related to operation of
vehicle and the body.
- Do not install when moisture or dust is present.
3. Remove the Audio ASSY.
Remove the OEM audio
from the Audio ASSY.
(Screws x 4)
※ Please note before installation that we cannot take responsibility
to the damage caused by abuse or improper installation.
Beat-Sonic Co., Ltd. ADDRESS: 472-5 Koushin Fujieda Nisshin Aichi 470-0112 JAPAN
TEL +81-0561-73-9000 FAX +81-0561-74-5554
URL : http://www.beatsonic.co.jp E-mail : [email protected]
.2
※1
.3
Interface Installation
Amp-Remote
named different by the each makers
・Amp-Remote・Power control
・P.CONT OUT・System control
・Control + B remote・REMO
・Remote on code
※2 Please conect these between
both Amp-Remote,
Kenwood sound cruising system、
Holographic sound system and
Super-sound system
6PIN coupler
on vehicle side
to the new head unit.
(Screws x total8)
Aftermarket
Head Unit
Slide the under panel at the bottom
of the holders(R and L) and tighten
the screws
REAR
R
L
L
※2
Place of the urethane
1.Urethane
FRONT
R
HOLDER(R)
HOLDER(L)
2. Place the urethane under the deck.
L
R
Installation of the New Head Unit (NISSAN ELGRAND)
1. Using the screws, temporaly install the R and L brackets
●Please do not use a remote amplifier of a new
head unit when you
need not put out the TV
voice the deck when it is
off, connect the accessories power supply, and
connect the diverging
line with a remote amplifier of the adaptor.
●The TV voice keeps going out of the TV tuner
when the navigation is
selected.
L
6PIN
coupler
Audio ASSY
HERE
R
2.Under Panel
Black/BODY GROUND
3. Fix the Front Panel and New Head Unit using the screws.
(Screws x 3)
※1
Blue・White/Amp-Remote
Front Panel
Red/Accessories power
Amber/Illumination power
Yellow/Battery power
Blue/Antenna remote
NSA-03
TV voice volume
MAX
min
10PIN
coupler
4. Connect all the cables to the right places.
10PIN coupler
on vehicle side
Not applicable depending on the model and year type.
Never use it in ERGRAND E50 Series
16PIN
coupler
16PIN coupler
on vehicle side
8PIN
coupler
8PIN coupler
on vehicle side
Connect to the AUX input
Please put the main unit
(NSA-03) in this part.
.4
Oparation
With the new head unit installed, confirm that all functions are operating properly.