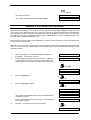
1
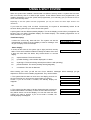
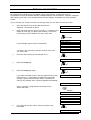
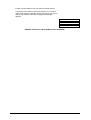
ADVISOR CD 7203 CD95/15003 User Manual Software from version: V6.0 142360999-2 COPYRIGHT SLC BV 1996. All rights reserved. No part of this publication may be reproduced, transmitted, stored in a retrieval system, or transmitted in any form, or by any means - electronic, photocopying, recording, or otherwise - without the prior written permission of SLC BV. DISCLAIMER SLC BV makes no representations or warranties with respect to the contents hereof and specifically disclaim any implied warranties of merchantability or fitness for any particular purpose. Further SLC BV reserve the right to revise this publication and to make changes from time to time in the contents hereof without the obligation of SLC BV to notify any person of any such revision. CONTENTS INTRODUCTION ............................................................................................................................... 4 USING THE KEYPAD........................................................................................................................ 5 The CD3008 keypad ....................................................................................................................... 5 The display ..................................................................................................................................... 6 The LEDs ....................................................................................................................................... 6 USING A SINGLE ALARM SYSTEM................................................................................................. 7 Arming a system............................................................................................................................. 7 Arming a system with open zones................................................................................................... 8 Disarming a system ........................................................................................................................ 9 Disarming a system after an alarm ................................................................................................10 USING A SPLIT SYSTEM ................................................................................................................11 Arming a split system ....................................................................................................................12 Arming a split system with open zones ..........................................................................................13 Disarming a split system................................................................................................................15 Disarming a split system after an alarm .........................................................................................16 UPLOADING AND DOWNLOADING IN THE CD72 AND THE CD95 ...............................................18 OVERVIEW OF THE OPTIONS AVAILABLE...................................................................................19 Option list for the CD72/95/150......................................................................................................19 User Manual for CD72/95/15003 Page 3 INTRODUCTION Thank you for choosing an ARITECH security system. When properly maintained, the system will provide years of reliable operation. This manual explains how to use the ARITECH CD72 and CD95 series for every day use. There is a more detailed manual available for managers which explains how to carry out a wider range of operations. These instructions apply to both the CD95 and CD150. The CD95 is a burglar alarm system which can detect an (attempted) break-in using connected detectors, magnetic contacts, etc., generating an alarm. The CD72 can be divided into two independent systems, and the CD95 into eight independent systems. The manual uses symbols to show when you must enter information into the keypad, and when the system emits a beep. Examples of these symbols are shown below: You need to enter information into the keypad. What you have to enter is on the code + ü right of the symbol. In this example you should enter your code and then press the Accept key (ü ü ). Beeeep The buzzer on a key switch or keypad emits a long beep. Short beeps can also be emitted - this is indicated with the text ‘Beep Beep’. Your system has been programmed with one or two entrance times and one exit time. These are preset amounts of time that let you enter and leave the premises through specific routes without activating an alarm. Be sure you know which routes you can use to leave and enter the premises. Entrance time: _________________ seconds Exit time: _________________ seconds Second entrance time: _________________ seconds Page 4 User Manual for CD72/95/15003 USING THE KEYPAD This chapter describes the alarm system keypad. THE CD3008 KEYPAD The keys These keys are used to enter your code. Always begin with zero (0) and then enter your code. After entering the code, you can carry out the operations assigned to it. 0-9 The options assigned to a code can be adjusted by the installer or manager. á When you are in an option list, this key can be used to go backwards in the list. During arming you can exclude zones. See Special keys. â This key has several functions. When you are in an option list, you can use it to move forward through the list. The other options are listed under Special keys. ü This key is the Accept key. It is used to confirm that the option shown in the display should be implemented. X This is the Reject key. It is used to indicate that the option shown has not been changed or that you want to exit the option list. Special keys The following key combinations can be programmed by the installer. They may not be active in your system. 1 áâ Pressing these keys simultaneously will activate a personnel attack alarm. A report can then be sent over the phone lines to the central station, and the bells and flashing light may be activated. ââ 1 Press the ‘â â ' key twice to see which zones are still open. All the open zones are displayed or the message ‘All Closed’ appears. áá 1 Press the ‘á á ‘ key twice to see which zones are inhibited. All the inhibited zones are displayed or the message ‘ appears. If the system is split you must indicate which system you want information about. Systems which are armed or have been triggered cannot be selected. User Manual for CD72/95/15003 Page 5 THE DISPLAY The display is the link between you and the security system. The text messages displayed show where and when faults or alarms have occurred. The display can also show a list of operations from which you can select. Examples of the messages which can appear include: TUE 23 APR 07.40 The date and time are always displayed, regardless if the system is armed or not. You can ask the installer to replace it with another message, if you want. Arm Menu If you press Accept (ü ü ), you enter an option list. This option list can be used to determine the method used arm the system. Area 1 Arming The system is being armed. Leave the secured area now. Area 1 Armed The system is armed. Not all the messages may appear on your display: it depends how the system has been programmed. It can show you only the messages you want to see, or those you are authorised to see. THE LEDS There are three coloured LEDs (light emiting diodes) on the keypad that let you quickly see if there is a problem. Green LED Power The mains power is on. If it has not been illuminated for a hour and a power cut is not apparent, contact your installer. Yellow LED Trouble If the yellow LED is on, there is a problem in the panel. The type of problem is shown in the display. Contact your installer. Problems that may occur include: ♦ ♦ ♦ ♦ Battery fault Fuse fault Line fault (if a dialler is connected) RKP fault (problem with keypads) EEPROM fault (problem in the system) Red LED Alarm The alarm is activated. The bells, keypad buzzers and flashing light may also be active. If a dialler is connected, the alarm is reported to the central station. When you enter your code, the system disarms, the bells and the flashing light are switched off, and the central station receives the report that the alarm has been deactivated. The red LED will also illuminate if you disturb an alarm zone during the exit period, and the bells and dialler will be activated. Page 6 User Manual for CD72/95/15003 USING A SINGLE ALARM SYSTEM This chapter explains how to switch on and off an alarm system for premises with only one alarm system. These instructions also apply to users who only have access to a single alarm system in the premises, although several systems may actually be present. Depending on how the system has been programmed, you may not need to do all the steps shown in the instructions. If you enter the wrong code 10 times consecutively, the system is automatically locked for 90 seconds. During this time you cannot access the system. ARMING A SYSTEM Before you can arm, that is switch on, the alarm system, all intrusion zones must be secure. If a zone in the premises is ‘open,’ that is its doors, windows, etc. are not properly closed, you will not be able to set the alarm in that zone, and the message ‘Open zones’ will appear on the display. It will also show you which zone(s) are open. You must then check that the doors, windows, etc. protected by the zone(s) shown on the display are properly closed. 1. Go to the keypad. The current date and time appear on the display. An example is shown. 2. Press the key 0 and then enter your code. A ‘*’ appears in the display for every key you press. Use the 0 key to cancel an incorrect entry and to restart a new entry code. TUE 23 APR 07.39 Enter Code 0 + code Enter Code **** Arm Menu 3. Press the Accept key. ü Normal Set 4. Press the Accept key again. ü If the system cannot be armed because there are area(s) in the premises which are not properly secured, the message ‘Open Zone(s)’ will appear and a list of the zone(s) not closed. Press the 0 key to quit and check the doors, windows, etc. of the zone(s) identified. Normal Set á For information about excluding open zones, refer to the section ‘Arming a system which has open zones’ on page 8. The alarm is being set. System Arming The buzzer begins to beep. You must now exit the protected area by the designated route. Leave now User Manual for CD72/95/15003 Page 7 Beeeep The alarm is now set. System Armed The current date and time automatically appears. TUE 23 APR 07.40 ARMING A SYSTEM WITH OPEN ZONES When arming (switching on) the system, you may get the message ‘Open Zone(s)’ along with a list of the zones in the premises that have not yet been closed. You should close these zones and then retry arming the system. However, occasionally you may not be able to close an open zone because, for example, a door lock or magnetic contact may be malfunctioning. You can exclude this open zone from the system (called inhibiting a zone). Only use this exclusion option when absolutely necessary as any inhibiting of zones will reduce the security level of your system. Although you can exclude an open zone when the tamper alarm has been triggered (identified by the letter ‘T’ in front of the open zone listed), you will not be able to arm the system until the tamper alarm has been rectified. 1. Go to the keypad. The current date and time appear on the display. An example is shown. TUE 23 APR 08.21 2. Press the key 0 and then enter your code. A ‘*’ appears in the display for every key you press. Use the 0 key to cancel an incorrect entry and to restart a new entry code. Enter Code 0 + code Enter Code **** Arm Menu 3. Press the Accept key. ü Normal Set 4. Press the Accept key again. ü Normal Set á System Arming 5. The system has identified zones in the premises that are not properly closed. Open Zone(s) It then proceeds to list the open zone(s). In this example, zone 2 ‘Hall’ is open. 002 Hall Press á to exclude a zone from the system. á Inhibit Zone ___ Page 8 User Manual for CD72/95/15003 USING A SPLIT SYSTEM When the system was installed it was divided into different security areas. A system that has more than one security area it is called a split system. These different areas were programmed by the installer. Depending on how the system was programmed, your code may give you access to one or more of the security areas. Depending on how the system has been programmed, you may not need to do all the steps shown in the instructions. If you enter the wrong code 10 times consecutively, the system is automatically locked for 90 seconds. During this time you cannot access the system. A split system has two different standby displays. This is the display you see when you approach the keypad. They are called ‘Time/Date display’ and ‘Status display.’ The installer programmes one of these versions in your system. Time/Date display: It shows the current day, date and time. The system can also be programmed to present a second display to show a message, such as your company name for example. TUE 23 APR 07.40 Status display: It shows all the areas in the system (up to eight) and their security status. There are five different labels to identify the status of an area. If there are more than four areas, they will be shown in a second display. [1] square brackets. The area is armed. [1] (number flashing). Area number displayed is in alarm. [1] =2= equal signs. The area is being armed (the exit time is still operating). <3> pointed brackets. The area is partially armed (partguard). 4 =2= <3> 4 no brackets. The area is disarmed. After entering your code, you will see one of two ‘selection’ messages. Which message you get depends on which one the installer programmed. They are as follows: 1. The system lists the status of each area, one display per area. At the end of the list you can enter the area number you want to access. If you do not enter a number, the standby display will reappear. Area 1 Armed Area 2 Disarmed Enter Area No. OR 2. The system lists the status of all the disarmed areas (underscore scrolls underneath the numbers). If there are more than four areas, they will be shown in a second display. You can then enter the area number you want to access. If you do not enter a number, the standby display will reappear. User Manual for CD72/95/15003 [1] 2 <3> 4 Enter Area No. Page 11 ARMING A SPLIT SYSTEM As explained at the beginning of the chapter “Using a split system,” a split system can be programmed to show two different standby message displays, and two different ‘selection’ messages after entering your code. The instructions below use the displays “Time/Date” and “Area [number] armed.” If your code lets you access more than one security area, you can select one of them to arm. 1. Go to the keypad. The current date and time are displayed. An example is shown. 2. Press the key 0 and then enter your code. A ‘*’ appears in the display for every key you press. Use the 0 key to cancel an incorrect entry and to restart a new entry of the code. TUE 23 APR 07.40 Enter Code 0 + code Enter Code **** In this example, areas 1 and 2 are disarmed. Area 1 Disarmed Area 2 Disarmed You have a few seconds to enter the number of the area you want to arm. 3. Enter Area No. Enter the area number (in this example it is 1). 1 Arm Menu 4. Press the Accept key. ü Normal Set 5. Press the Accept key again. ü If you want to exclude zones in the area (open zones), press the arrow key (↑). This feature is explained in the section “Arming a system which has open zones.” Otherwise do nothing: the message ‘Area 1 Arming’ appears automatically. Normal Set á Area 1 Arming Area 1 is arming. If programmed, the buzzer for the system will begin. Beeeep Leave Now Area 1 Armed Area 2 Disarmed Enter Area No. 6. If you also want to arm area 2, enter the number 2 into the keypad. 2 Arm Menu Page 12 User Manual for CD72/95/15003 7. Press the Accept key again. ü Normal Set ü Normal Set á Area 2 is arming. If programmed, the buzzer for the area will begin. Area 2 Arming Beeeep You must exit the protected area by the designated exit route. Leave Now Area 1 Armed Both areas are now armed. Area 2 Armed Enter Area No. TUE 23 APR 07.41 ARMING A SPLIT SYSTEM WITH OPEN ZONES When arming (switching on) the alarm, you may get the message ‘Open Zone(s)’ along with a list of the zones in the premises which have not yet been closed. You should close these zones and then retry arming the alarm. However, occasionally you may not be able to close an open zone because, for example, a door lock or magnetic contact may be malfunctioning. You can then exclude this open zone from the system (called inhibiting a zone). A split system lets you control open zones in specific areas of the premises. Only use this exclusion option when absolutely necessary as any inhibiting of zones will reduce the security level of your system. Although you can exclude an open zone when the tamper alarm has been triggered (identified by the letter ‘T’ in front of the open zone listed), you will not be able to arm the system until the tamper alarm has been rectified. As explained in section “Arming a split system,” a split system can be programmed to have two different standby message displays, that is the message you see when you approach the keypad, and two different messages immediately after entering your code into the keypad. The instructions below use the displays “Time/Date” and “Area [number] armed.” If your code lets you access more than one security area, you can select one of them to arm. 1. Go to the keypad. The current day, date and time are displayed. An example is shown. TUE 23 APR 08.21 2. Press the key 0 and then enter your code. A ‘*’ appears in the display for every key you press. Use the 0 key to cancel an incorrect entry and to restart a new entry of the code. Enter Code User Manual for CD72/95/15003 Page 13 If there are other alarms, they are shown one after another. A summary of the status of the areas appears. If you wish to make more changes, enter the number of the area you want to change. Otherwise the standby message automatically appears. Area 2 Armed Enter Area No. TUE 23 APR 07.40 RECORD THE FAULT OR ALARM IN YOUR LOGBOOK ! User Manual for CD72/95/15003 Page 17 UPLOADING AND DOWNLOADING IN THE CD72 AND THE CD95 The CD72 and CD95 series has the option of controlling, modifying and programming the alarm system remotely by the installer. With the use of a modem messages can be sent from the control panel to a personal computer (PC), called uploading, and from a PC to the control panel, called down loading. Uploading and downloading is therefore a quick and handy aid to easily discovering and solving problems. A connection can be established in the following ways: 1 . By dialling into the alarm system. The installer dials in to your alarm system. The dialler will then accept and check whether the connection can be established. The dialler then calls the installer back. This ensures that nobody other that the installer can gain access. When the connection has been established ‘OK’ appears in the display. 2. By entering a up/down (U/D) load code. This is a code which you can enter when the display is showing the time and date. If the code is correct, ‘ appears in the display and the dialler then calls your installer and establishes a connection. When the connection has been established ‘U/D code’ appears in your display. You can no longer control your system from that moment until the time and date reappear in the display. Page 18 User Manual for CD72/95/15003 OVERVIEW OF THE OPTIONS AVAILABLE The following flowchart provides an overview of all the options available from the CD72 and CD95/150 alarm systems. It also shows the keypad keys you need to press in order to arrive at the options. Options listed below in grey are only available for the CD95/150 alarm system. The symbols used to represent the keys are as follows: ü Accept X Reject ↓ Move forward ↑ Move backward OPTION LIST FOR THE CD72/95/150 There are nine main menu options in this system. Depending on how the system has been programmed, your code may not give you access to all of the options. If you want to access more options than you currently are able to, contact your installer. The menu options let you carry out the following operations: Name of menu option What it lets you do 1. Arm Menu There are four sub-options, each allowing you to carry out a different operation: • Normal Set Set the alarm • Partguard Set the alarm with zones excluded by the installer • Set (No Buzzer) Set the alarm with no exit time • Forced Arm inhibited, Set the alarm with all open zones except exit/entry zone(s) and access zone(s) • Delay AutoArm Delay time of auto alarm • AADly Until [time] Set time of auto alarm • AA Ignore Off Ignore next auto alarm • Set Manager Slot Programming of an extra holiday slot • Previous Menu Return to menu 2. Inhibit Exclude open zones from a security area 3. Walk/Bell/Ch Test Test if detectors, internal/external bells are OK/ switch chime on or off 4. Light Menu Turn on external/internal lights 5. Unlock Unlock a door 6. E. Log/Time/Date Engineers log, listing all events in the system, print log, and changing the standby date and time 7. Change Codes Change own code(s) (if programmed other codes and user names) 8. Operator Log Detailed list of activation and system operations. This log will be cleared each time the system is armed 9. Finished? Exit to time and date display User Manual for CD72/95/15003 Page 19 Flowchart of the CD72/95/150 User Options Page 20 User Manual for CD72/95/15003 User Manual for CD72/95/15003 Page 21 Page 22 User Manual for CD72/95/15003 User Manual for CD72/95/15003 Page 23 Page 24 User Manual for CD72/95/15003