1
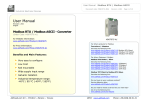
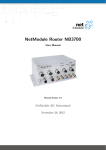
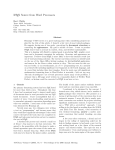
Telkom VPN-Lite router setup
User Manual
Billion 400G
Contents
Introduction......................................................................................................................................................... 3
Before you start .................................................................................................................................................. 4
VPN-Lite Setup Using Windows Utility ............................................................................................................ 5
VPN-Lite Setup using your web browser ......................................................................................................... 7
VPN-Lite Manual Setup Using Telnet ............................................................................................................. 11
Firmware Upgrade ............................................................................................................................................ 15
TELKOM VPN-Lite Ver: 2.3 250908
Page 2
Introduction
Welcome to the Telkom VPN Lite router setup user manual. In this manual you will receive information
on how to setup the Telkom VPN Lite service on your Billion 400G using the setup utility, the router’s
graphical user interface (GUI) and Telnet commands (advanced user only).
o
TELKOM VPN-Lite Ver: 2.3 250908
To ensure that the utility works correctly please temporarily
disabled all software firewall applications. These
applications may interfere with the processes needed to
successfully complete the router setup. Examples of these
applications/programs include: Norton, PC-Cillin, Bit
Defender, McAfee.
Page 3
Before you start
o
This manual assumes that the Billion 400G is in its
factory default state. Thus:
LAN IP
=
10.0.0.2
It is recommended to use the utility to setup VPN-Lite
on your Billion 400G. The routers graphical user
interface or manual setup method is to be used by
experienced users only.
o
Please ensure that your pc has DHCP enabled.
o
Register VPN-Lite service.
To enable you to configure the Telkom VPN-Lite service on your Billion Router you first need to
register for the VPN-Lite service on the Telkom website (www.telkom.co.za).
On the VPN-Lite registration site you will be able to configure and manage your VPN-Lite sites as
shown in the image below.
Here you will retrieve vital information like site Usernames and LAN Subnets and Site Password to
configure the VPN-Lite sites. In the below setup sections you will be required to enter these values.
Please ensure that you have all the correct information for each site before you start any of the setup
sections mentioned in this document. Below is an image to show you what information on the VPNLite setup site needs to be retrieved to enable you to setup you VPN-Lite. You can find this screen in
the Manage Sites section.
TELKOM VPN-Lite Ver: 2.3 250908
Page 4
VPN-Lite Setup Using Windows Utility
You can download the VPN-Lite utility program form the VPN-Lite website by selecting the Download
section. After you successfully downloaded the utility just run the file to start the setup process.
On start up you will be requested to provide login information to connect to the router. By default the
router login name will be admin and the login password will be admin. The default IP address for the
router is 10.0.0.2 but if this has changed unselect the Use default IP check box and enter the current
IP address of your router.
After a successful login the following screen will appear. Here you can setup your Internet Account
information, VPN Lite and with the advance settings you can change your DHCP settings.
TELKOM VPN-Lite Ver: 2.3 250908
Page 5
Internet Service Provider Account Setup
Select “Activate Internet Account configuration” tick box to set your Internet username and password.
You can now enter your ISP username and password to connect to the internet. Your service provider
will provide you with this information.
VPN Lite – Local Site Configuration
Before you start with this section, please make sure you have registered on the VPN-Lite service
website and that you have received your VPN-Lite account and IP information for the local site (this
will be one of your branches or offices where you will install the VPN-Lite service). Please refer to the
Before you start section in this document on page 4 for additional information.
To change these settings select “Activate VPN Lite configuration”.
By using the information retrieved from the Telkom VPN-Lite setup website (see page 4) enter your
site username, site password and site la nip range using the IP slash notation as it appears on the
Telkom VPN-Lite website.
Advance Settings
In the advance settings you can enable or disable the router’s DHCP settings. Please remember that
if you disable the DHCP settings you will loose connection to your router after the settings have been
updated, as the static IP address would have been changed to another IP range. You can also set
your DHCP start and end range.
To save the settings press Save Settings and wait for the application to complete the setup process.
TELKOM VPN-Lite Ver: 2.3 250908
Page 6
VPN-Lite Setup using your web browser
This section will guide you through the relative steps to setup you VPN-Lite service using the routers
graphical user interface browser.
Connection to the router using your web browser
Open a web browser like Internet Explorer or Firefox. In the internet address bar type in http://10.0.0.2
and press enter. You will be prompted to supply a username and password. The user name is admin
and the password is admin.
Setup your VPN-Lite
After the router’s graphical user interface was successfully loaded in your web browser select
Advanced – Configuration – WAN – WAN Profile in the menu on the left of the screen. The following
screen will appear on the right.
Click on “Multiple Session-Second Session” and check the enable tick next to “Multiple SessionSecond Session”. The section will now expand as shown in next image.
TELKOM VPN-Lite Ver: 2.3 250908
Page 7
You will require you VPN-Lite site username and password that you retrieved from the Telkom VPNLite setup site. You can change the Description field to VPNLite, Disable the Nat setting and enter
your VPN-Lite site Username and Password. Press Apply to save the settings.
The screen will reload with “Multiple Session-Second Session” as enabled.
In the menu in the left press Configuration – Advanced – Static Route the following screen will appear
in the right.
You need to setup 3 Static Routes for your VPN-Lite service. On the current screen type in 10.0.0.0 in
“Destination” 255.0.0.0 in Netmask and select MPPP-0 as a Interface to add the first Static Route as
shown below.
Now press Add to add the first Static Route. The following screen will appear with the first Static
Route in a list.
TELKOM VPN-Lite Ver: 2.3 250908
Page 8
Repeat the process as shown for the next to Static Routes in the following diagram.
Destination
172.16.0.0
192.168.0.0
Netmask
255.240.0.0
255.255.0.0
Interface
MPPP-0
MPPP-0
Configure your router IP address
In the menu on the left select Configuration – LAN – Ethernet. The following screen will appear on the
right.
On the Telkom VPN-Lite setup site you would have received a LAN Subnet address that could look
like this 10.0.1.0/24. Your router’s LAN IP would then be 10.0.1.2 and your Subnet Mask will be
255.255.255.0. Change the IP Address and the Subnet Mask on the screen and press the Apply
button.
Your routers IP address is now changed to the new IP entered in the previous step. To ensure that
your PC can still communicate with your Billion router on it’s new LAN IP address, you should release
and renew your PC’s IP address. In XP or Vista press the Start button. Select All
Programs\Accessories\Command Prompt. A DOS prompt screen will appear
Type the following and press enter: ipconfig /release
You should now wait for your IP to be released.
Then type: ipconfig /renew.
Your PC’s IP will now be renewed and within the new range to enable you to connect to your Billion
router’s new LAN IP address. You can now close the Command Prompt screen.
To reconnect to your router select the link with the new IP address displayed in your Internet Browser.
TELKOM VPN-Lite Ver: 2.3 250908
Page 9
Your Internet Browser will now reconnect to your Billion router.
Now in the bottom right corner press the SAVE CONFIG button. The following screen will appear.
Press the Apply button. Your settings will now be saved and you can start to use your VPN-Lite
service.
TELKOM VPN-Lite Ver: 2.3 250908
Page 10
VPN-Lite Manual Setup Using Telnet
The following section will guide you to setup you VPN-Lite servise using the Telnet command line interface.
Before you start please refer to the Before you start section in this document see page 4.
1. IP Management:
a. Telnet to the Billion 400G using the router’s LAN IP address (default = 10.0.0.2) using this
command: “telnet 10.0.0.2”.
This will access the Billion 400G’s CLI interface allowing you to send setup commands. On
successful connection, you will be prompted for a login and password (defaults: admin &
admin). See screenshot below.
Enter your administration login & password. On successful authentication you will arrive at
the admin prompt. (See screenshot below.)
b. Setting the DHCP Server: This task is optional. If you want your Billion 400G to act as a DHCP
server – distributing IPs to your LAN PCs – please perform this step.
Set the router’s DHCP range to the correct target range using this command:
Syntax:
dhcpserver subnet 1 add iprange <Target range network address> <Target
range subnet>
Example:
dhcpserver subnet 1 add iprange 1 10.0.17.0 255.255.255.0
This router will now distribute IPs to connected PCs from the range 10.0.17.1 -> 10.0.17.254
Note:
Alternatively, if you prefer to use static IPs on your network and you wish to disable the
router’s DHCP server feature, please run this command: dhcpserver disable
TELKOM VPN-Lite Ver: 2.3 250908
Page 11
c. Set your router’s LAN IP address: Please run the following command to set your router’s LAN
IP address to within the correct target IP range. (Note that if using DHCP server, this LAN IP
must be in that same IP range).
Note that your telnet session will become unresponsive after you execute the command and will
eventually terminate. This is due to the router’s altered LAN IP that was originally used to setup the
Telnet connection, but has now been changed.
Syntax:
Example:
ip set interface iplan ipaddress <LAN IP> <Subnet>
ip set interface iplan ipaddress 10.0.17.2 255.255.255.0
Please see the correct LAN IP target range for your local site indicated on the VPN-Lite web
page screen shot below.
Note that the router uses the subnet syntax instead of the slash notation (/24) used to display
the LAN IP range on the website. Use the table below to translate the slash notation to the
subnet mask syntax.
d. Setting your PCs IP address: Your router’s LAN IP has now been altered but your PC’s IP is
probably still in the old range – thus making a connection impossible. Please make sure that
your PCs IP is updated to the new range, either by DHCP or setting it statically.
TELKOM VPN-Lite Ver: 2.3 250908
Page 12
Once your PC’s IP is again within the same range as your router’s LAN IP, continue with the
following steps.
2. Setting up the VPN-Lite solution:
e. Telnet to the Billion 400G: Please repeat step 1a but this time with the router’s new updated
LAN IP. Once you received the “admin>” prompt, please continue with the next steps.
f.
Running the script: The script below sets up the VPN-Lite service on your Billion 400G. Please
re-type or paste each of these commands into the telnet session that has been opened to the
router in step 2a above (while substituting the <angle brackets>).
o
o
o
o
Actual commands that need to be run on the telnet
session are indicated in blue.
Please note that bold words enclosed with <angle
brackets> are user parameters and have to be provided
by yourself. Make sure that you substitute all <angle
brackets> with your own user specific parameters,
before you start executing the script below.
Please make sure that all commands are run
successfully. It is not recommended to copy and paste
the whole script at once as possible telnet buffer
limitations might cause certain commands not to be
pasted correctly.
Words following “Comment:” are comments to the user,
and not valid commands.
Comment: Remove current connection:
ip delete interface ipwan
Comment: The above command will generate some warnings/errors – this is normal.
transports delete wanlink
Comment: Setup bridge transport and interface:
rfc1483 add transport @wanlink a1 8 35 llc bridged
bridge add interface ipwan
bridge attach ipwan @wanlink
Comment: Setup Internet Connection:
pppoe add transport wanlink dialout eth 1 pppoe
pppoe set transport wanlink username <ISP account username>
pppoe set transport wanlink password <ISP account password>
pppoe set transport wanlink createroute enabled
pppoe set transport wanlink autoconnect disabled
pppoe set transport wanlink idletimeout 0
ip add interface ipwan
ip attach ipwan wanlink
Comment: Setup VPN-Lite Connection
pppoe add transport wanlink2 dialout eth 2 pppoe
pppoe set transport wanlink2 username <VPN-Lite Local site account username>
pppoe set transport wanlink2 password <VPN-Lite Local site account password>
pppoe set transport wanlink2 createroute disabled
pppoe set transport wanlink2 autoconnect disabled
pppoe set transport wanlink2 idletimeout 0
pppoe set transport wanlink2 discoverdns primary disabled
pppoe set transport wanlink2 discoverdns secondary disabled
ip add interface ipwan2
TELKOM VPN-Lite Ver: 2.3 250908
Page 13
ip attach ipwan2 wanlink2
Comment: Add NATting for Internet Connection
security add interface ipwan external
nat enable ipwan ipwan internal
Comment: Add static routes to private IP ranges facilitating communication with remote VPN-Lite sites:
ip add route vpnlite1 10.0.0.0 255.0.0.0 interface ipwan2
ip add route vpnlite2 172.16.0.0 255.240.0.0 interface ipwan2
ip add route vpnlite3 192.168.0.0 255.255.0.0 interface ipwan2
Comment: Save configuration and restart device:
system config save
system restart
g. After your Billion 400G has rebooted, the VPN-Lite solution will be setup and ready for use.
TELKOM VPN-Lite Ver: 2.3 250908
Page 14
Firmware Upgrade
Connect to your router
Open a web browser like Internet Explorer of Firefox. In the address bar type in http://10.0.0.2 and
press enter. You will be prompted to supply a username and password to logon to the router. User
name = admin Password = admin.
Firmware Upgrade
In the left menu select Configuration – System – Firmware Upgrade. The following screen will appear
on the right.
Press the Browse button to select the firmware file and then press Upgrade to start the firmware
upgrade process. A progress screen will give indication on the progress of the upgrade do not switch
off the router or disconnect any cables at this stage.
On completion of the upgrade you will be prompted to restart the router as shown below. If you select
Current Settings your router will restart with your current settings on the new firmware. If you select
Factory Default Settings your router will restart and all your current settings will be lost. Select one of
the tow options and press the Restart button to apply the new firmware update.
TELKOM VPN-Lite Ver: 2.3 250908
Page 15