1
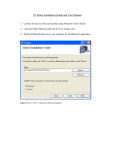
www.tgelectronics.no
Vidhaugen 114
7550 Hommelvik
Tele:73979017-91795392
e-post: [email protected]
OPERATION AND MAINTENANCE
SINGLE PHASE PREPAID SMART METER
WITH IC CARD AND SOFTWARE
ROLLINS MARINE AND CARAVAN SERVICES
TRETTON MANOR BARNS, LOWGATE, TYDD ST MARY,
WISBECH, CAMBRIDGESHIRE, PE13 5PD
ENGLAND
Tel. +44 (0) 1945 871412
Email: [email protected]
Web: www.rmcs.co.uk
CONTENTS
I.
Technical Parameters
Page 2
II.
Function and Application
Page 2
III.
Dimensions
Page 5
IV.
Wiring Diagram
Page 5
V.
Single Phase Prepaid Meter: Customer User Manual
Page 6
VI.
Top Up Options
Page 7
VII.
Software User Instructions
Page 9
VIII. Site Manager – User Manual – Single Master Control
Page 10
IX.
Site Manager – User Manual – Dual Master Control
Page 11
X.
FAQ
Page 12
1
I. Technical Parameters:
Working Voltage:
Rated Current:
Impulse Constant:
Frequency:
Accuracy Class:
230V
5(63)A
1000imp/kWh
50Hz
1.0
Display Mode:
Working Temperature:
LCD 6+2
-20—55℃
Storage Temperature:
-25—70℃
Power Consumption:
≤1.2W & 1.2VA
Average Humidity:
≤75%
Start Current:
0.4 %IB
II. Function and Application:
1. This is a prepaid meter, which can work when you charge the meter through IC card.
2. When the remaining energy is 0, the relay will disconnect in order to remind the user to charge
the IC card. After that, the relay will close.
3. If there is no credit in the recharging card, the LCD screen will display No Credit when you insert
the card.
4. Memory the user: When the remaining energy in the meter is 0, any recharging card can
recharge the energy into this meter, then the meter will record the information about this card. If
the remaining energy in the meter is not 0, other cards can't be used to recharge energy and
refund money except this card. If this meter has remaining energy, but other recharging cards are
used to recharge energy, the LCD screen will In Use in order to remind the user that there is a user
using this meter now.
5. LCD will display remaining energy, total energy, latest purchasing energy and so on, and indicate
the forward and reverse current. LCD functions are below:
(1) Remain energy
(2) Total energy
2
(3)Latest purchasing energy
(4)There is no credit in the IC Card/ the remaining energy in the meter is 0
(5)Illegal user
(6)Alarm when the remain energy is not enough
(7)Purchasing energy successfully
(8)Insert clearing card
3
(9)The purchased energy exceeds the hoarding threshold
(10)Encryption card failure
(11)Fail to purchase energy
(12)Current running in forward
(13)Current running in reverse
(14)Communicate with meter by PC or infrared equipment
(15) The relay trips
(16) insert the card, meter confirm the data is correct.
4
(17) insert the card, meter confirm the data is wrong.
12. Button: The user can check the data through the button; If the meter is not in the button status,
it will display the remaining energy all the time.
When you press the button and don't move your finger, the meter will enter into page mode
automatically. Through page, you can check: a. Remaining energy; b. total consumed energy; c.
latest purchasing energy.
13. Communication: Please check the Communication Protocol
III. Dimensions:
IV. Wiring Diagram:
5
Single Phase Prepaid Smart Meter: Customer User Manual
Introduction
The Single Phase Prepayment Smart Meters are programmed with the unit price of electric and
credit that is added to the User Card. Credit can be refunded from the meter using a Refund Card.
Main Features of Meter
Easy to follow screen instructions
User Button to view: Remaining Energy, Total Consumed
Energy and Latest Purchasing Energy.
Auto Disconnect when credit reads 0
Refundable credit
User Step by Step Guide
Purchase a User Card, with the credit of your choice from
reception.
Insert User Card into meter and remove card when you
hear a click, signaling the credit has energized the meter.
Your credit will now be displayed on the meter’s screen
and is now ready for use.
Connect hook up plug to socket for use of credit.
You can view the Remaining Credit, Total Consumed
Energy and Latest Purchasing Energy by pressing the red
button to view each screen.
Note:
1) Once credit has run out electric supply will stop and User card should be topped up.
2) Remaining credit left on meter can be refunding by inserting the Refund Card and
returning to reception for your refund.
3) LCD Functions/ Screen Instructions:
Remaining energy
Latest purchased energy
Meter is in Use
Meter is successfully
credited
Total energy
No credit in the meter
Remaining energy is not
enough
Credit is Cleared
6
Top Up Options
Option 1: Multi User Cards – For Limited PC Access.
This option is best suited for static caravan home owners, and long term marina and caravan park
tenants. It’s also a good option if the master computer is inaccessible. This option allows the
tenant to top up their meter, without having to wait till all the remaining credit has gone and the
meter has disconnected power.
Please follow these steps:
1. Create the required number of user cards (1 for each desired monetary value) and a refund
card. You will have to create 1 user and 1 refund card, and then create supplement user
cards.
E.g. Meter 001:
User Card 001 - £5.00
User Card 001 - £10.00
User Card 001 - £15.00
Refund Card 001
2. New customer requires £10.00 worth of electricity ‘User Card 001 - £10.00’ is issued and
customer inserts this into their meter.
3. Existing customer has £3.00 worth of electricity remaining and requires another £15.00,
you issue the ‘User Card 001 - £15.00’ and customer inserts this into their meter, this
should now read £18.00.
Notes: 1). Ask for user cards back each time.
2). When the customer is leaving all user cards must be returned before issuing them with
a refund card.
3). When each monetary user card is spent, it should be return to the office and topped
up to its desired monetary value.
Option 2: Single User Cards - Limited PC Access
This option is best suited for static caravan home owners, and long term marina and caravan park
tenants. It’s also a good option if the master computer is inaccessible.
Please follow these steps:
1. Create multiple users (User & Refund Cards), with various monetary values (e.g. £5, £10,
e.tc.).
2. New customer requires £10.00 worth of electricity, User Card with £10.00 is issued and
customer inserts this into their meter.
3. Existing customer has £1.00 worth of electricity remaining requires another £10.00, you
issue a new user card with £10.00 on it and instruct the customer to wait till the remaining
credit on the meter has been used before inserting the new user card.
Notes: 1). When the customer is leaving their user cards must be returned before issuing them
with a refund card.
7
Option 2: Single User Cards – Unlimited PC Access
This option is best suited for touring caravan owners, and short term marina and caravan park
tenants.
Please follow these steps:
4. Create a user card and a refund card.
E.g. Meter 001:
User Card 001
Refund Card 001
5. New customer requires £10.00 worth of electricity ‘User Card 001’ is issued and customer
inserts this into their meter.
6. Existing customer has £1.50 worth of electricity remaining and requires another £10.00,
you collect the user card from the customer and top it up to £10.00 and the customer
inserts this into their meter, this should now read £11.50.
Notes: 1). When the customer is leaving their user card must be returned before issuing them
with a refund card.
Notes:
•
You can’t avoid clearing an existing user’s remaining credit by using a ‘Set Number Card’ to
top up, unless you use the refund card first.
8
Software User Instructions
9
Instruction for using the software for the single
phase prepaid meter
1. Install and unload the software
Click IC Card Setup.exe twice, and figure 1-1 will show up. The default
destination folder is disk C. If you want to install it to another disk, click Browse,
choose the disk then click Install. After installing, figure1-2 will show up.
Figure1-1
Figure1-2
Unload the software. Open the control panel, double-click change or
remove programs and go to figure 1-3. Choose ICCard management system,
click the delete button on the right side, figure 1-4 will show, then click yes to
unload the software. During this process, figure 1-5 will show and ask if retain
the database. If choose No all the data will be deleted. When figure 1-6 shows,
click OK, then unload successfully.
Figure1-3
Figure1-4
Figure1-5
Figure1-6
Run the software
2.Run
Double-click
to get into the software(Figure2-1).
Figure2-1
3. Login the software
Click Login under Help(Figure3-1), then go to(Figure3-2). Type in correct
operator and password, then figure 3-3 will show. In the menu will show you
the operator name, authorities and the COM port(Figure3-4). If login as
Administrator, you could operate all the items(Figure3-5A). If login as Seller,
you could not operate the items under Manage(Figure3-5B)
Note 1: The default account and password are both "admin". In order to
make sure the safety, please change the account and password. The process
is as follow: login under "admin", type in operator name and
password(Figure3-2), choose New Password, type in the new password 2
times, then click confirm.
Note 2: When login the software the first time, please set the content in
figure 7-1、7-2、7-3 and 7-4
Figure3-1
Figure3-2
Figure3-3
Figure3-4
Figure3-5A
Figure3-5B
4. Manage the customers
4-1. Create new customers
Under Account, click Establish account(Figure4-1), then go to (Figure4-2),
type in the information for the customers. Click Composition to go to the
window for setting the unit price of kWh, then click Confirm then back to figure
4-2, click Add. After creating the customer, click Print to preview the invoice
and click
to print out the invoice(Figure4-4).
Note 1. When the reader beep twice and the window(Figure4-5), the customer
IC card is created
2. Figure4-6 shows the type of the IC card (Figure4-6), which means the
customers' information is saved. The card you input to the reader is not a new
card. You need to use a new card to make a card in Figure4-6
3. Figure4-7 means card reader connect failure
Figure4-1
Figure4-2
Figure4-3
Figure4-4
Figure4-5
Figure4-6
Figure4-7
4-2.Logout account
Click logout account under Account, then go to figure4-9. Input the IC
card that needs to be logout to the reader, then click read to read the
information on the IC card. Click Logout, figure4-10 will show up, then click OK.
When figure4-11 show up, the account is logout successfully.
Note: if there is kWh inside the IC card, the card could not be logged out.
You need to refund the kWh inside the IC card first.
Figure4-8
Figure4-9
Figure4-10
Figure4-11
4-3. Modify account
Click Modify account under Account(Figure4-12), then figure4-13 will
show up. The IC card needs to be input to the reader first, then click Read to
read the information on the IC card. Modify the related information, then click
Write.
Figure4-12
Figure4-13
5. IC Card management
5-1.Buy electricity
Click Buy electricity under IC Card(Figure5-1), then go to figure5-2. Before
buy the electricity, input the IC card to the reader. Click Read to read the
information in the IC card, then input the amount to the Money column. The
software will count how much it could buy according to the unit price. If need to
add the additional fee, input the name and amount to Surcharge name and
Surcharge respectively. The software will count the total amount automatically.
Input the money that the customer pays to the Cash column. The software will
show the change automatically, then click Write. When figure5-3 shows up, the
IC card is charged successfully.
Figure5-1
Figure5-2
Figure5-3
5-2. Refund electricity
Click Refund electricity under IC Card(Figure5-4), then go to figure5-5.
Before refund the electricity, input the IC card to the reader then click Read to
read the information on the card. Then click Write, figure5-6 will show up,
which means refund electricity successfully.
Figure5-4
Figure5-5
Figure5-6
5-3.Format card
Click Format Card(Figure5-7) under IC Card, then go to figure5-8. Click
Format, when figure5-9 shows, click OK to format the card. When figure5-10
shows, it means format the card successfully.
Figure5-7
Figure5-8
Figure5-9
Figure5-10
5-4. Supplement card
Click Supplement card(Figure5-11) under IC Card, then go to figure5-12.
Before supplement card, input the IC card to the reader, choose the
information that needs to supplement. Click Write, when figure5-13 shows, it
means supplement card successfully.
Figure5-11
Figure5-12
Figure5-13
6. Statistics
6-1. Daily report
Click Daily report(figure6-1) under Statistics, then go to figure6-2. There
are four tag, including sale, refund, supplement and logout. Choose anyone of
them, then choose a date in Appoint Date. The recorded information for this
date will show. If need to print out, click Print to preview the information, then
click
at the left corner to print out the information.
Figure6-1
Figure6-2
6-2. Summarize repot
Click summarization repot(figure6-3) under Statistics, then go to figure6-4.
The operation is almost the same as for Daily report. Before searching, please
input the relative condition to the right columns, then click Search. If need to
print out the information, click Print to preview the information, then click
at the left corner to print out the information.
Figure6-3
Figure6-4
6-3. Search receipt
Click search receipt(figure6-5) to go to figure6-6, then input the receipt No.
Click search to find the information. If need to print out, click Print to preview
the information, then click
at the left corner to print out the information.
Figure6-5
Figure6-6
7. System management
The system management could only be operated under administrator
account.
7-1.Set the unit price for the electricity
Click set unit price of using type(figure7-1) under Manage to go to
figure7-2.
1) Set the unit price: input the relative information at the bottom column in
firure7-2, then click Add. When there is new information in the above table, it
means add the unit price successfully.
2) Modify the unit price: choose a column in the table, then click Modify. Input
relative information in the bottom column, click Confirm. Figure7-3 will show to
confirm the modification. Click yes to confirm and this column will be modified.
3) Delete unit price: choose the column that need to delete, then click Delete,
figure7-4 will show to confirm the delete command.. Click Yes to confirm.
Figure7-1
Figure7-2
Figure7-3
Figure7-4
7-2 Set account
Click set work number password(figure7-5)to go to figure7-6
1) Add operator: input relative information, choose the "seller or administrator"
in select permission. When the added operator is in the above table, the new
operator is added successfully.
2) Modify operator: Choose the operator that needs to modify, click Modify.
Input the information to the relative column, when figure7-7 shows, click Yes to
confirm. When the modified operator is in the above table, the operator is
modified successfully.
3) Delete operator: Choose the operator that need to delete, then click Delete.
When figure7-4 shows, click Yes to confirm. When the deleted operator is not
in the above table, the operator is deleted successfully.
Note: There are 4 Administrator that could created at most. And the name of
the administrator could not be changed after created.
Figure7-5
Figure7-6
Figure7-7
Figure7-8
7-3. Set communication port
Click set communication port under Manage, then go to figure7-10. The
default COM port is COM1. Choose the correct COM port from Choice Port(the
system will choose the correct COM port automatically). Click test to check it
the chosen port is the correct one. It takes about 1 minute. When connect
correctly, the reader will beep. If not, figure7-11 will show up.
Figure7-9
Figure7-10
Figure7-11
7-4. Set price of IC card
Click set price of IC card(figure7-12) to go to figure7-13. The default price
is 0, Input the card price then click confirm. Then figure7-13 will close
automatically.
Figure7-12
Figure7-13
7-5. Make special card
Click make special card(figure7-14) under Mange to go to figure7-15
1) Clear Card: Choose clear card, then input a new IC card to the reader.
Click write card, when figure7-16, click OK to confirm. When figure7-17
shows, it means make clear card successfully.
2) Set Number Card: input the electricity, then input a new card to the
reader. Click write card to go to figure7-18. Click Ok, when figure7-19
shows, it means make clear card successfully.
Note: Clear card and Set number card is made only for testing.
Figure7-14
Figure7-15
Figure7-16
Figure7-17
Figure7-18
Figure7-19
Site Manager – User Manual – Single Master Control
10
log Out Customer
1) Go to ‘Account’, then Click onto
‘Logout account’ (Here you Remove the
Customer’s details).
2) Insert User Card and Click ‘Read’,
then Click ‘Logout’, it will ask if your
sure, Click ‘Yes’. Remove User Card and
insert Refund Card and repeat above. It
should come up with Logout Successful. 3) Client has now been removed from
the data base and cards can be re‐issued. Important Notes
All monetary values are listed in Pounds (GBP, £).
Electrical Load will automatically disconnect when credit reads 0. To create a ‘Clear Card’ go to ‘Manage’, Click ‘Make special card’, then Click Clear Card, Insert a formatted card and Click ‘Write Card’. Using for clearing down meters that have remaining credit left. We suggest you place a refundable deposit on the User Card to ensure the customer returns it. This can be done during the ‘Buy electricity’ / ‘Write User Card’ operation. IC Card price must be set in IC Card Setup under ‘Manage’. ROLLINS MARINE AND CARAVAN SERVICES
TRETTON MANOR BARNS, LOWGATE,
TYDD ST MARY, WISBECH, CAMBRIDGESHIRE,
PE13 5PD, ENGLAND
Tel. +44 (0) 1945 871412
Email: [email protected]
SITE MANAGER
SMART CARD METER USER MANUAL
Single Master Control
This user manual will assist you in installing and maintaining the software required for the Smart Metering System. Web: www.rmcs.co.uk
It will detail how to set up the software, add new customers, add credit and refund credit. Please follow the instructions over leaf for information. Setting Up Software
Setting Up Unit Price
Software can only be installed on XP Windows or later versions.
1) Go into ‘Manage’, ‘Set unit price of
using type’, then Enter electricity unit
price and click ‘Add’.
1) Once computer has started up insert
USB Memory stick into a USB Port. 2) Open ‘My Computer’. 3) Open USB Drive with Software on.
4) Click ‘YTLcard2.1.0.6 ‐ New’ to start
Set Up. 5) Assign software to folder you want it
to go on your computer, then Click
‘Install’. (11.9MB is required). 6) When ‘Silicon Laboratories’ comes up insert USB connection from ‘Card Reader into the USB Port and follow on screen instructions. 7)Click ‘Finish’ . Program will automatically start. Close ‘Read Me.pdf’ and continue. YOU HAVE NOW INSTALLED THE SOFTWARE. log in… 1) Go to ‘Help’, ‘Login’, (Default is ‘admin’ for Operator and ‘admin’ for Password). To change Click on ‘New Password’. 2) Enter details then press ‘Confirm’. 1. A
2. Kwh
3. Price
Click ‘Back’
4) Enter ‘Cash’ received from Customer,
then Click on ‘Write’.
YOU HAVE NOW CHARGED THE USER CARD. PASS CARD TO USER & INSTRUCT USER TO
INSERT IT INTO THEIR METER.
RETAIN REFUND CARD IN OFFICE (MAKE SURE
YOU MARK WITH USER ID)
Adding New Customer’s
1) Go to ‘Account’, then Click onto
‘Establish an account’ (Here you Enter the
Customer’s details).
2) Enter ‘User name’, ‘User id’, User
phone’, ‘Composition’ (Unit charge) and
‘Address’. 3) Insert card before you Press ‘Add’. 4) When instructed take out ‘User Card’
and insert another card to create
‘Refund Card’.
YOU HAVE NOW CREATED A NEW USER. Remove Card and Click ‘Back’
Adding Credit
1) Go to ‘IC Card’, then Click on ‘Buy Electricity’ (Here you can Top ‐ Up).
2) Insert User Card, then Click ‘Read’.
3) Under ‘Buy electricity’ enter required
credit amount. Refunding Customer
1) Customer return’s User Card. 2) Issue Refund Card to customer, instructing them to insert it into the meter and return to the office. 3) Insert Refund Card into Card Reader go to IC Card and Click onto ‘Refund Electricity’.
4) Click on ‘Read’ and card details will be displayed on the screen along with refund amount. 5) Click ‘Write’ and credit will be removed. You can now credit the customer the remaining balance plus the deposit from the User Card. Plus if they request a receipt, you can Click on Print. Remove Card and Click ‘Back’
Site Manager – User Manual – Dual Master Control
11
2.6 log Out Customer
1) Go to ‘Account’, then Click onto ‘Logout account’ (Here you Remove the Customer’s details).
2) Insert User Card and Click ‘Read’, then Click ‘Logout’, it will ask if your sure, Click ‘Yes’. Remove User Card and insert Refund Card and repeat above. It should come up with Logout Successful. 3) Client has now been removed from the data base and cards can be re‐issued. 3 Important Notes
All monetary values are listed in Pounds (GBP, £).
Electrical Load will automatically disconnect when credit reads 0. To create a ‘Clear Card’ go to ‘Manage’, Click ‘Make special card’, then Click Clear Card, Insert a formatted card and Click ‘Write Card’. Using for clearing down meters that have remaining credit left. We suggest you place a refundable deposit on the User Card to ensure the customer returns it. This can be placed during the ‘Buy electricity’ / ‘Write User Card’ stage. IC Card price must be set in IC Card Setup under ‘Manage’. If cards are lost or you need them to log out someone from the data base you can create a supplement card: Go into ‘IC Card’ then into Supplement Card’. From here you can search the user from ‘Number, Name, ID or Phone’, then click on the one you need, insert a new card and click either User Card or Refund Card and it will be created. ROLLINS MARINE AND CARAVAN SERVICES
TRETTON MANOR BARNS, LOWGATE,
TYDD ST MARY, WISBECH, CAMBRIDGESHIRE,
PE13 5PD, ENGLAND
Tel. +44 (0) 1945 871412
Email: [email protected]
Website: www.rmcs.co.uk
SITE MANAGER
SMART CARD METER USER MANUAL
Dual Master Control
This user manual will assist you in installing and maintaining the software required for the Smart Metering System. It will detail how to set up the software, using 2 Card Readers in separate locations, add new customers, add credit and refund credit. 1.1 Setting Up Software
2.1 Log in
2.4 Adding Credit
Software can only be installed on XP Windows or later versions.
1) Go to ‘Help’, ‘Login’, (Default is ‘admin’ for Operator and ‘admin’ for Password). To change Click on ‘New Password’. 1) Go to ‘IC Card’, then Click on ‘Buy Electricity’ (Here you can Top ‐ Up).2) Insert User Card, then Click ‘Read’.
3) Under ‘Buy electricity’ enter required credit amount.
4) Enter ‘Cash’ received from Customer, then Click on ‘Write’.
1) Once computer has started up insert USB
Memory stick into a USB Port. 2) Open ‘My Computer’. 3) Open USB Drive with Software on.
4) Click ‘YTLcard2.1.0.6 ‐ New’ to start Set Up. 5) Assign software to folder you want it to go on
your computer, then Click ‘Install’. (11.9MB is required). 6) When ‘Silicon Laboratories’ comes up insert USB
connection from ‘Card Reader’ into the USB Port and follow on screen instructions. 7)Click ‘Finish’ . Program will automatically start. Close ‘Read Me.pdf’ and continue. YOU HAVE NOW INSTALLED THE SOFTWARE. 2) Enter details then press ‘Confirm’. 2.2 Setting Up Unit Price
1) Go into ‘Manage’, ‘Set unit price of using type’, then Enter electricity unit price and click ‘Add’.
1. A
2. Kwh
3. Price
Click ‘Back’
2.3 Adding New Customer’s
1.2 Dual System Set Up
For using 2 PC’s in separate locations
1) Install software using instructions from point 1.1.
2) Keep both data bases the same for Card Numbers and User ID Details. If Card numbers are not matching log in and out Cards following point 2.3 and 2.6 until Card Numbers are matching. 3) If data bases are kept identical Electricity can be purchased or refunded at either location.
4) If one data base misses log out the other PC can create a Supplement Card to log out the client with.
5) Daily Report Sheets can be used to keep data base up to date from 1 PC to the other. 6) Both PC’s must be used in the (Admin mode) for the duel system to work. 1) Go to ‘Account’, then Click onto ‘Establish an account’ (Here you Enter the Customer’s details).
2) Enter ‘User name’, ‘User id’, User phone’, ‘Composition’ (Unit charge) and ‘Address’. 3) Insert card before you Press ‘Add’. 4) When instructed take out ‘User Card’ and insert
another card to create ‘Refund Card’.
YOU HAVE NOW CREATED A NEW USER. Remove Card and Click ‘Back’
YOU HAVE NOW CHARGED THE USER CARD. PASS CARD TO USER & INSTRUCT USER TO INSERT IT INTO THEIR METER. RETAIN REFUND CARD IN OFFICE (MAKE SURE YOU MARK WITH USER ID)
2.5 Refunding Customer
1) Customer return’s User Card. 2) Issue Refund Card to customer, instructing them to insert it into the meter and return to the office. 3) Insert Refund Card into Card Reader go to IC Card and Click onto ‘Refund Electricity’.
4) Click on ‘Read’ and card details will be displayed on the screen along with refund amount. 5) Click ‘Write’ and credit will be removed. You can now credit the customer the remaining balance plus the deposit from the User Card. Plus if they request a receipt, you can Click on Print. Remove Card and Click ‘Back’
FAQ
12
Smart Card Metering
FAQ
1.1 Missing User/ refund Card?
For lost cards and logging out customers.
1) Go into ‘IC Card’, then click onto ‘Supplement Card’.
2) Select your preferred method of finding the user; Card Number, User Name, User ID or User
Phone.
3) Type in this information and click ‘search’.
A list of 1 or more users shall appear in the table above.
4) Select the User you require.
5) ‘Insert a new card into the Card Reader.
6) Click on either User Card or Refund Card button, depending on which one is required.
7) User Card/ Refund Card will now be created.
1.2 Multiple Use User Card
For testing meters.
1) Go into ‘Manage’, then click onto ‘Make Special Card’.
2) Select ‘Set Number Card’
3) Type in quantity of electricity and number of uses required.
4) Insert a new card into the Card Reader.
5) Click ‘Write Card’.
6) Set Number Card Has been Created
Smart Card Metering
FAQ
1.3 Changing unit rate for existing customers?
For changes in electricity unit rate per kWh. Not to be used when setting up new customers.
1) Go into ‘Manage’, then into ‘Set unit price of using type’, click onto the type you want to
change, then click ‘modify’ and add new rate e.g. 0.16, then click onto ‘Confirm’, then click back.
2) Insert existing customers ‘User Card’ into Card Reader.
3) Go into ‘Account’, then into ‘Modify account’, then click ‘Read’.
4) Click ‘Composition’, then click onto the changed type, then click ‘Confirm’.
5) Click ‘Write’
6) Now you can follow the top up instructions.