1
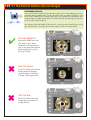
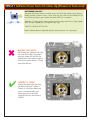
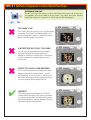
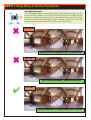
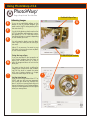
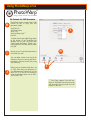
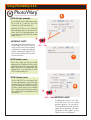
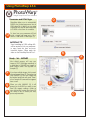
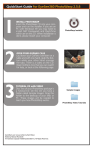
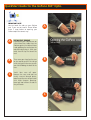
QuickStart Guide for the GoPano 360° Optic.
IMPORTANT NOTE
You can break the tabs on your GoPano
case if you are not careful. Please follow
these 3 steps below to opening your
GoPano optic the correct way.
A
PUT ON FLAT SURFACE
Please place your GoPano case on
a flat surface like a table. Press the
GoPano against the table with one
hand grabbing the end where the
red plastic dust plug is. With your
other hand lift up the tab on the
end.
B
Then move your hand up the case
to the top tab and lift the tab up
while trying to lift the case up with
your hand holding the back of the
case.
C
Viola! Your case will open.
Because the case and tabs are
freshly vacuum formed plastic,
opening up the case will get easier
with more frequent openings.
Never pull too hard on the tabs as
they will break.
A
B
C
QuickStart Guide for the GoPano 360° Optic.
A
SET THE FOCUS TO MACRO
(A) See the close up flower icon?
Press this until you see the Flower
Icon on the back of your camera. This
sets the camera to focus on the mirror.
Turn VR OFF.
VR (Vibration Reduction) is a feature
available on a lot of cameras but is
incompatible with the GoPano optic.
B
FLASH. Turn OFF.
You will see a circle icon with a
LIGHTNING bolt in the center.
C
Turn DIAL to M for Manual.
D
F-Stop for Point & Shoot Cameras
Use an F-stop between F6.1 and F7.4
F-Stop for SLR Cameras
Use an F-stop of F22 or higher.
E
Choose Close Up or Macro Mode
If your point and shoot camera has a
Macro close up mode (Flower or Face
icon), use it to focus on the mirror.
F
Shutter Speed
Set this to the desired setting that
works with your indoor or out door
lighting.
Typically indoor settings will be*
1 (second)
1/15
1/30
1/60
Outdoor Settings will be*
1/125
1/250
1/300
*Experiment and write down the settings that work best for you. Lighting
will always play a big role in how
good your images come out. Practice
will pay off with great looking
panoramas.
NOTE: Belo w are in str uction s f or t he N iko n P5000 and
P5100. B ut all p oint an d sho ot cam er as n eed to b e set t o
t h e s a m e s e tt i n g s .
C
E
B
C
A
F D
IMPORTANT NOTE
If your camera has a close up mode (Flower
or Face icon) use it to focus on your mirror.
Press the shutter lightly to get it to focus on
the mirror. Your image should be clean and
sharp like the example above - not blurry.
TIP# 1 • The Perfect GoPano (Donut Image)
SHUTTERBUG SAM SAYS:
If your circular donut images are not coming out right, 90% of the problems can all be
attributed to one problem that’s so easy to resolve. You are simply ZOOMING in too
much, or NOT zooming OUT enough. Below are visual examples of two problems and
the ideal (correct) image. Please follow the GOOD example for zooming out and your
results will be a whole lot better.
Your camera make and model will vary but this is what you are aiming for when using
your GoPano optic. Try to make your circular image like the first camera below.
PICTURE PERFECT!
You need to ZOOM out a few
click stops so your donut
image kisses the top and bottom. If you exceed the top and
bottom a hair, that’s ok, just
don’t go TOO big.
WAY TOO SMALL!
If you don’t make your GoPano
circular image big enough,
you’ll have poor resolution or
a “funky” looking panorama.
WAY TOO BIG!
You’ll lose field of view with
images that are zoomed out
too big like this.
TIP# 2 • GoPano Focus. Turn On Close Up (Flower or Face icon)
SHUTTERBUG SAM SAYS:
Your point and shoot camera has to be set to a CLOSE UP icon (Nikon, Sony, Olympus,
Kodak, Minolta, Panasonic Lumix, Canon G6 or G9, etc.) Find the Tulip (Flower) or the
Face (Close Up) icon on your camera and make SURE this is turned on.
See below. The top camera is circle is perfect, but the image seems blurry. F-stop is good,
other settings are good you just forgot one tiny step.
TURN THE CLOSE UP SETTING ON.
Note the bottom donut image looks perfect, sharp and clear. This is your goal.
BLURRY. NOT GOOD.
NOT having your Flower or Close Up
Face icon turned ON is the reason
why your image will look like the
example here. Your camera needs to
focus on the mirror which is 170mm
away from the lens.
PERFECT & CRISP
Most every camera has the Close
Up Macro setting. It is either a
Flower or a Face icon. Make sure
yours is turned on. When you
barely press the shutter, the
image will be crisp and focused
like this.
TIP# 3 • GoPano Exposure Control Best Practices.
SHUTTERBUG SAM SAYS:
The BEST way to get the most out of your GoPano one shot system is to set your camera (regardless of make or model) to M for manual. Then adjust the Shutter Speed to
the desired setting that is optimum for INSIDE and OUTSIDE photography.
TOO DARK. YUK!
The F-stop is fine, the Close Up is on. But the image
is too dark. The reason: The Shutter speed is too
fast. This image was taken at 1/250th of a second
which is why the image is a bit dark.
A BIT BETTER, BUT STILL TOO DARK
OOPS! TOO MUCH. OVER-EXPOSED
You can see a bit more detail but this image is
still a bit too dark. The Shutter speed was
reduced to 1/60th of a second, but as you clearly
see, this needs to be a longer exposure, not a
shorter one.
This is a full second and is resulting in the room
being over exposed. In some rooms, 1 second
will be perfect, but for this shot, 1 second is just
too much. Reduce your shutter speed a bit if you
see over exposed donut images like this.
PERFECT!
The shutter speed was reduced to 1/15th of a
second and for the light in this room, it resulted
in a picture perfect shot. You will need to experiment and write down settings that work for you
for both inside and outside shots.
TIP# 4 • Fixing Noisy or Grainy Panoramas.
SHUTTERBUG SAM SAYS:
The single biggest problem in seeing noise or grain in your panoramic images is the fact
that your ISO (Film Speed) is set to AUTO or the wrong setting. ISO on digital cameras
simulates film speed. So for fast action shots, you would normally choose film rated at
ISO 400 or even 800. But for panoramas and the GoPano, you want the lowest film
speed (ISO) possible. We like 64 or 100. NEVER set your ISO to AUTO.
ISO = AUTO
NOT BAD, BUT SOME PANORAMAS WILL BE INCONSISTENT.
ISO = 800
YUK! TOO MUCH GRAININESS. LOOKS PIXILATED, TOO.
ISO = 100
PERFECT PANORAMA. SEE THE DIFFERENCE? THIS IS ISO=100.
1
PhotoWarp™ QuickStart User Manual
2
3
INSTALL PHOTOWARP
Insert the PhotoWarp CD into your computer
and run the installer. If you are on PC with
Windows XP, you may need to install .NET
Framework and QuickTime which are on this
CD. When Installation is done, please restart
your computer.
PhotoWarp Installer
OPEN YOUR GOPANO CASE
Lay down your GoPano cannister on a table
and with one hand, grab the bottom while
your other hand unsnaps the tabs. There is a
video on the CD: Open GoPano.mov that you
can watch for help, or look at the following
page.
TUTORIAL CD with VIDEO
Disc Two of your PhotoWarp package is a
Tutorial CD. On this CD you have a folder
called Sample Images. Drag this folder to the
desktop of your Mac or PC. These images will
be needed to teach you how PhotoWarp
works.
QuickStart user manual written by Bart Wilson
Edited by Michael Rondinelli
All materials Copyright ©2008 EyeSee360 Inc. All Rights Reserved.
Sample Images
PhotoWarp Video Tutorials
QuickStart Guide for EyeSee360 PhotoWarp 2.5.6
PhotoWarp
®
Drag & Drop Virtual Tour Software
What is PhotoWarp?
PhotoWarp is a an easy to use, drag and drop
panoramic software program for the Mac or PC.
It allows you to process one-shot panoramic
images from EyeSee’s GoPano and the Kaidan
360 One VR.
PhotoWarp supports other one shot optics such
as RemoteReality, BeHere, 0-360 and the EGG.
If you hate to read manuals, this Quick Start
guide is for you. This step-by-step guide will
allow you to get up to speed and understand
how to use PhotoWarp with your one-shot 360
optic in under an hour.
System Requirements
PhotoWarp (the CD enclosed) has installers for both
the Macintosh and Windows operating systems.
Below are the suggested minimum hardware and
system component requirements;
Macintosh
• G3, G4, or G5
• 512MB of RAM or more
• Mac OS 10.3, 10.4, or 10.5 (LEOPARD)
• QuickTime 7 or better*
Windows
• Windows XP Home or Pro, Windows VISTA
• 512 of RAM or more
• QuickTime 7 or better*
• .NET Framework*
*Complete installer for .NET framework and
QuickTime are on the PhotoWarp CD.
**Note if you lose your installer CD, you can download
PhotoWarp from the EyeSee360.com Website. Be sure
to write down your license key below for safe keeping.
You will find your license key on the CD-ROM packaging that came with your PhotoWarp disc.
My PhotoWarp License Key #
Run Your Installer
PhotoWarp can be installed from the CD or you can download
PhotoWarp from the EyeSee360.com website. Be sure you have your
License Key # before you download it from the website. You are
authorized (1) copy of PhotoWarp for (1) computer. For additional
licenses, please contact us @ [email protected]
Installation for Windows
PhotoWarp requires the .NET framework and QuickTime 7 to be
installed on your PC before PhotoWarp installation can run. These
installers are on your CD. If you run into difficulty installing
PhotoWarp onto your PC, you can go to your My Computer > The
open your CD-ROM and select the installers manually. Please
RESTART your PC after you install .NET Framework, QuickTime and
PhotoWarp. If you are still running into installation problems, please
see our Support page on our website at www.EyeSee360.com
Installation for Macintosh
PhotoWarp can be used on Intel and Non-intel computers including
G3, G4 and G5 models. We recommend you upgrade your Mac to
the latest version of QuickTime 7.X.
Look for Shutterbug Sam
The RED CAMERA indicates a
critical function in order to avoid
a mistake. Be sure to read these
steps very carefully.
QuickStart Set Up for PhotoWarp 2.5.6
PhotoWarp
®
Drag & Drop Virtual Tour Software
First Time Set Up
When you launch PhotoWarp for the first time,
you will be prompted to tell it how your GoPano
is connected to your camera.
You have a few options.
A
CHOOSE NONE: Step Ring Only
If you have a Nikon Canon, Kodak, Olympus
Sony or other point and shoot camera with a
step ring and/or an adapter tube connecting
your GoPano to directly to your camera.
CHOOSE SLR Bracket
If your camera cannot connect to your GoPano
optic. This includes SLR Digital Cameras such as
the nikon D50, D80, D100 and the Canon EOS
line of cameras, too.
Mirror Distance
Set your mirror distance to 170mm.
B
Choose Optic
If you have the GoPano (black optic) choose
GoPano (2nd icon down in pull down menu)
If you have the BLUE Kaidan 360 One VR optic,
choose the top icon: 360 One VR M3.
SLR Bracket
SLR Bracket
The image shown (right) shows the Kaidan 360
One VR attached to the Kaidan SLR Bracket. Your
SLR camera glides up and down on the plate so
the lens of your camera is close to the optic and
can focus on the mirror.
The GoPano optic will attach to the Kaidan SLR
Bracket in the same manner as the Kaidan 360
One VR optic.
If you have the Kaidan
SLR Bracket, select this
option when you run
your installer or initial
set up of PhotoWarp.
Using PhotoWarp 2.5.6
PhotoWarp
®
Drag & Drop Virtual Tour Software
Preview Window
Launch PhotoWarp
When you launch PhotoWarp you will be
prompted to drag and drop your 360
images from your camera into the main
window.
D
The image appears in the main window. A
circle indicates the position of the mirror in
the image. If the circle appears with a
Green color the mirror was automatically
located. A Yellow or Red circle means the
automatic location may be incorrect. You
can manually position the circle over the
mirror by dragging. The circle will appear
Blue when positioned manually.
NOTE: ON WINDOWS, the CENTER DOT IS
BLUE NOT WHITE.
For Mac Users, go to the menu:
View > Preview
For PC Users, go to the menu:
View > Show Preview
Note the smaller floating window now
appears. This allows you to SEE your
panoramic images and correct mistakes
before we UNWARP them.
D
Locating the Mirror (IMPORTANT)
(D) The center dot or mask should be centered on the mirror, and the blue circle*
should touch the edge of the mirror, not
the sunshade or housing. Drag in the middle to recenter, drag the blue circle (or use
the mouse wheel) to change the diameter
to match the mirror.
This should be done before adjusting the
tilt constraint. (E)
E
Using PhotoWarp 2.5.6
PhotoWarp
®
Drag & Drop Virtual Tour Software
Fix Black Eclipse-Top
E
F
F
Calibrating Images
G
If you see a partial black eclipse on the
bottom in the (E) Preview Window, you
need to adust the Tilt setting and/or pull in
the outer circle (F).
You do this by placing a check mark on the
LEFT tilt check box and entering in a number typically -47 to -52. Note the circle in
the center enlarges or contracts depending
on the number you insert.
You only need to barely cover the black
stem so do NOT make your dot too big or
too small.
Adjust (F) as necessary. You want to crop
the mirror so that you do not see any black
on the Preview window.
G
*
F
Fix Black Eclipse-Bottom
Fixing the top eclipse.
If you see any black in the top portion of
your Preview window, then you have to
adjust your outside circle (G) so that it
trims the image and does not cut into the
black part.
You want to trim the circle to define the
image on the GoPano mirror and the black
cap. Pull the circle in toward the center
until your Preview window no longer
shows the black eclipse in the top.
Set the Auto Rotate
Slide the Auto Rotate slider either LEFT or
RIGHT and you will see your panoramic
tour slowly spin inside the Preview window. If you do not see any black eclipse in
the top or bottom of your Preview window,
then you finished panorama will look good
when you unwarp them.
*
G
F
Using PhotoWarp 2.5.6
PhotoWarp
®
Drag & Drop Virtual Tour Software
File Formats for 360 Panoramas
H
PhotoWarp supports a wide range of file
formats for you to enjoy your 360
panoramic images.
QuickTime VR
Java Zoom Viewer
Java PT GUI
Java Pure Player (ivp)**
Flash VR
J
To select a format you might like, go down
to the bottom of the PhotoWarp Job
Window and you will see three tabs:
Source Format and Output. Output is normally grayed out until after you’ve output
your job.
I
H
Next go to your Format Menu then choose
the format you want.
You can delete formats from the job by
clicking in the icon in the tray and choosing Format > Remove Format (or by using
the Delete key).
J
Make sure your resolution slider bar is set
to 100% then select your dimensions of
your 360 panorama (output size). You can
even TYPE in a size you like instead of
using the pull down menu such as 600 X
300 or 600 X 450.
I
** Pure Player supports Flash and Java.
When in PhotoWarp only the Java version
will show up, but on your web site it will
default to Flash first.
Using PhotoWarp 2.5.6
PhotoWarp
®
Drag & Drop Virtual Tour Software
K
QTVR Cylinder (example)
If you selected QTVR Cylinder (most popular) as part of (I) and (H), next click
Compression in the tabs above (K).
Selecting 50%-100% for the slider bar
will create great results. If you want a consistent size for all saved panoramas, you
can set the size you want and click the box
Target File Size.
IMPORTANT ALERT!
Shutterbug Sam says be careful. If you
set the Target File Size with a size too
small, your tours may come out grainy
or pixilated. Try saving your panorama
without checking the Target File Size
Box if you do not have any issues with
file size restrictions.
L
QTVR Cylinder (cont.)
Next, select Image tab and you should
experiment with checking off Auto Levels
and Sharpen image. This automatically will
adjust the levels of your panoramas and
Sharpen them. It’s a good idea to select
100% for best quality, too.
QTVR Cylinder (cont.)
The last tab QTVR has some special features for web designers. If your client does
not want visitors to the website to SAVE
the QTVR panorama to the users’ computers place a check mark in the Protection
box -- Disallow Save. This prevents anyone
from saving copies of the panorama from
the website.
M
IMPORTANT ALERT!
Shutterbug Sam says this is not 100%
fool proof. There are now media
extraction plug ins you can add to
FireFox and Mac users with safari can
option click to download any media
contained in web pages, so the
Disallow Save is not hack proof.
Using PhotoWarp 2.5.6
PhotoWarp
®
Drag & Drop Virtual Tour Software
O
Panoramas and HTML Pages
PhotoWarp allows users to automatically
EMBED your finished panoramas into an
HTML page. This is ideal if you are going
to burn the files and 360 panoramas onto
a CD-ROM or host them on a website.
O
To show how your panorama will look
inside a simple web page, go to File >
Format > Add format > Web Script. (O)
IMPORTANT TIP
Some knowledge of HTML editing skills
will be required to link your panoramas
to maps, create hot spots and more
interactive features. Please watch the
videos on the PhotoWarp Tutorial Disc 2.
R
P
Ready... Set... UNWARP
Most digital cameras will save your
images as DSC123456.jpg something. Its
a good idea to RENAME your images to
plain English names like log-cabin for
example. (P)
P
If you have multiple images, click on each
one, and rename them (P). Then when you
click UNWARP (Q), all of your images will
be batched processed and saved. There’s
also a Rename All command that appears
here as well.
Q
When you click UNWARP (Q) it will
prompt you for WHERE you want to save
them. We suggest creating a folder on
your desktop and saving them there. (R)
This makes it easy to locate your final,
processed panoramas.
R
P
Q
PhotoWarp 2.5.6 Extras...
PhotoWarp
®
Drag & Drop Virtual Tour Software
Where to Get More Help...
Voyager is dedicated to helping you create
great panoramas. Our tools are simple to
use and affordable to own.
If you want to learn a lot more about how
to use our products with other cameras or
how to start making money by shooting
virtual tours for real estate... we invite you
to join our online forum. It’s easy and its
free.
Just visit our website at Voyager360.com
and click the forum tab. Create a username and a password and join our community.
You’ll find lots of people and plenty of
answers to your questions about
panoramic photography from people
who’ve already been there and done that.