1
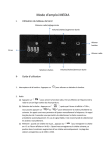
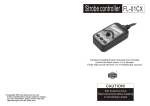
User manual
ENGLISH
RAYS STROBES
(SF-300/SF-300D)
Version 1.0
CONTENTS
Warning
1
Important
2
Rock Strobe (SF-300/300D)
3
Features
3
Inspection
4
Setting Up
4
Remote Control Operation SF-300
5
DMX Control Operation SF-300D
6
Troubleshooting
7
Lamp Replacement
9
Figure 1 SF-300 Functions
11
Figure 2 SF-300D Functions
12
Appendix–1 DMX Dip Switch Value Guide
13
Hanging-Bracket Installation (SF-300/300D)
14
Product Specifications
14
If the supply cord is damaged, it must be
replaced by the manufacturer, its service
agent or similarly qualified persons in
order to avoid a hazard.
Read the manual
Indoor use only
This symbol indicating separate collection for electrical and
electronic equipment
Warning!
This product involves electric voltage,
chemicals, glass, etc. Observe safety
precautions.
• Disconnect mains power supply before removing glass plate or servicing.
• Let unit cool before handling. Keep away from liquids and flammables.
• Do not mount on flammable surface. Keep distance of 30 cm to illuminated surface.
• Keep distance of one meter between this product and other electrical products.
• Do not look directly at lamp flash. Avoid direct skin exposure.
• Strobe tubes contain poisonous chemicals. Discard used strobe tubes appropriately. Keep out of reach of children and animals.
• This appliance must be earthed (grounded). Secure front cover before connecting to mains power supply.
• Keep air vents clear to avoid overheating.
Product contains no user serviceable parts. Refer servicing to qualified technicians only.
Important
This apparatus is fitted with a BS 1363 13Amp
plug, fitted with a BS 1362 5A fuse. Replace the
fuse with same rating.
The wires in the mains lead are colored in
accordance with the following code:
BLUE----“NEUTRAL” (N)
BROWN----“LIVE” (L)
GREEN----“EARTHED” (E)
1. The blue wire must be connected to the terminal, which is marked with the letter “N” or colored BLACK.
2. The brown wire must be connected to the terminal, which is marked with the letter “L” or colored RED.
3. The green wire must be connected to the terminal, which is marked with the letter “E” or colored GREEN.
Rays Strobe (SF-300/SF-300D)
Rays Strobe is an indispensable standard accessory for medium and
large ballrooms. With I-type xenon lamp, Rays Strobe can emit a 300
watt powerful flashes by a flashing rate of 1-18 times per second.
Synchronous control can be achieved with input of analog signal. The
unprecedented design of elegant streamline profile greatly attracts
the public. Freewheeling adjustment function of flashing rate and
powerfully rapid flashes excites the atmosphere. Rays Strobe can
be of analogical control or of DMX signal control. For SF-300, it can
be used either with the one-channel strobe controller (SF-01CX)
or with the four-channel strobe controller (SF-34CX) to control the
flashing rate. For SF-300D, it can be used with different kinds of
DMX controllers for programming, or be used with DS-1 simple digital
controller to provide simple operation mode that saves a lot of time.
Features
SF-300
• Manual or remote (analog) control Speed.
• Attractive, heat dissipating case.
• Precision engineering, components.
• Long-life strobe tube.
SF-300D
• DMX512 control Speed.
• Manual control Speed.
• Thermal safety switch.
• Attractive, heat dissipating case.
• Precision engineering, components.
• Long-life strobe tube.
Inspection
Every Rays Strobe (SF-300/300D) is thoroughly tested at the
factory and shipped in perfect condition. Please notify your dealer
immediately if damage occurred during shipping.
Setting Up
Rays Strobe (SF-300/300D) is shipped complete, ready to use. The
bracket is installed before shipping, the unit can be hung in any
position. Simply use a 20kg rated or stronger C clamp to attach the
bracket to firm trussing. Allow enough space on all sides for proper
cooling.
Manual Control Operation
SF-300
1. Plug strobe power cord into appropriate mains power supply.
2. Turn the flash speed knob (See figure 1) on unit back to adjust the flash speed.
SF-300D (All Dip 1-9 “OFF”)
1. Plug strobe power cord into appropriate mains power supply.
2. Turn the flash speed knob (See figure 2) on unit back to adjust the flash speed.
Remote Control Operation SF-300
For best result, use SF-01CX or SF-34CX controllers. Abide by
controller user manual specifications regarding the number of
strobes that can be linked to one controller.
1. Plug one end of a mono (not stereo) microphone signal cable with standard 1/4-inch mono microphone jacks (4 of figure 1) into the signal input connector on back of unit. Plug the other end of the cable into the signal output socket on the controller.
2.If desired, connect another strobe: Plug one end of another signal cable in to the signal output socket (4 of figure 1) on the back of the first strobe; plug the other end of the signal cable to the signal input socket on the back of the second strobe. Follow the same procedure to link more strobes, if desired.
3.Set all strobe manual control knobs to the OFF (no flash) position.
4.Refer to your strobe controller user manual for operating.
DMX Control Operation SF-300D
(Any of DMX Dip 1-9 “ON”)
Use DMX Dip switches 1-9 to set the unit to the desired
DMX512 address. Refer to the DMX chart in Appendix-1.
1. Connect the DMX 512 controller cable to the input socket (6 of figure 2) of the strobe unit. Make sure the signal cable polarity is correct. Connect power lines. Your SF-300D is now ready for operation with your DMX controller.
2. To use single trigger: go to “STOP” first, then to “TRIGGER”, one flash results. Do the same process repeatedly for repeated single flash.
Troubleshooting
Rays Strobes (SF-300/300D) are designed for years of troublefree use. However, incorrect voltage, power surges, or other
mishaps cause equipment failure. If such problems do occur,
always refer servicing to qualified technicians.
SF-300
- Problem: The strobe doesn't flash on manual control.
Solution:
• Check power connections. Plug the mains power cord into proper power supply socket.
• Check fuse, replace fuse only with the same type and size. Retry strobe flash under manual control.
• Lamp may be broken, replace the lamp. If not, electronic component (triac or trigger coil) may need replacing. Refer servicing to a qualified technician.
-Problem: The strobe doesn't flash on remote control.
Solution:
• Disconnect remote control cable. Test strobe under manual control. Follow instruction above.
• If strobe flashes in manual control but not under remote control, replace the signal cable. Use a cable that has worked properly with other strobes.
If strobe still doesn't flash under remote control, check to see
if other strobes operate properly with this controller. Refer
servicing of strobe and controller to a qualified technician.
SF-300D
-Problem: Strobe does not flash when it should.
Solution:
• Check DMX signal. Is the DMX dip switch setting correct?
• Get a working DMX strobe and signal cable. Link properly to controller. Test. If this strobe flashes properly, the first strobe is malfunctioning.
• Check fuse, replace fuse only with the same type and size. Retry strobe flash under manual control.
Lamp Replacement
• Before opening unit covers, make sure that the unit is cool and not
connected to power source.
• Install/replace bulb (ST-300).
DO NOT TOUCH GLASS WITH BARE HANDS.
If you do touch the glass with bare hands, clean it with alcohol
using a cotton ball or soft cloth.
1Unscrew the side panels.
2Hold the metallic pieces at
both sides of the safety glass
and pull up.
3Unscrew the cable of the tube
from the terminal.
4Hold the ends of the tube and
take it off from the tube clip.
Lamp Replacement
5Replace with a new tube.
6Screw the cable of the tube
on the terminal.
7Put the safety glass back.
8Screw the side panels.
NOTE:
Strobe tubes should be replaced by qualified technicians only.
10
Figure 1 SF-300 Functions
1. Fuse, replace fuse only with the same type and size.
2. Power Input, to make double sure of the proper mains
power supply before plugging.
3.Speed Control (1-18 flashes per second).
4.Signal jacks
To run units synchronousely, connect SF-01CX or SF-34CX
controller to the strobe light using a 1/4" mono cable, and use
the second signal jack to connect to additional units using 1/4"
mono cables.
11
Figure 2 SF-300D Functions
1. Fuse, replace fuse only with the same type and size.
2. Power Input, to make double sure of the proper main
power supply before plugging.
3. DMX and Function dip switch.
4. Speed control (1-18 flashes per second).
5. DMX 3 pin XLR output.
6. DMX 3 pin XLR input.
12
Appendix-1 DMX Dip Switch Value Guide
This is a brief guide to DMX dip switch value settings. DMX products
must have their own “address” to receive DMX signals. Addresses on
SF-300D are set by flipping appropriate DMX dip switches.
To do this, you need to know the DMX dip switches have the
following values: #1=1; #2=2; #3=4; #4=8; #5=16; #6=32; #7=64;
#8=128; #9=256. And you need to know that DMX address settings
are the sum of the dip switch values.
For example, standard DMX addresses for four ST-300D, each of
which has one channel (see page 5), follow:
Unit 1
Unit 2
Unit 3
Unit 4
Address Value
1
2
3
4
DMX Dip Switches “ON"
#1
#2
#1 & #2
#3
Explanation: Since each unit has one channel, each address advances
one values (see address value above).
Once address values are figured out, add DMX dip switch values to
obtain the appropriate address (Any of Dip 1-9 “ON”) for each unit.
Flip appropriate DMX dip switches on each unit.
13
Hanging-Bracket Installation
(SF-300/300D)
A: Bracket
B: Bracket Knob
C: Washer
Product Specifications
Model
SF-300
SF-300D
Lamp
ST-300
ST-300
Flash Rate
1~18 fps
1~18 fps
Signal Connector
1/4” (6.35mm) mono
microphone jack
3 Pin XLR
Control Mode
0-10V DC trigger
01CH, DMX 512 signal
Dimension (LxWxH)
278x140x220
278x140x220
Weight
1.96kg
2.11kg
100V 50/60Hz
or 120V/60Hz
or 230V,240V/50Hz
T10A/250V
100V 50/60Hz
or 120V/60Hz
or 230V,240V/50Hz
T10A/250V
T3.15A/250V
T3.15A/250V
Applicable Voltages
Fuse(100V,120V)
Fuse(230V)
Pulse Power Consumption 300W
14
300W
RA
YS
ST
RO
BE
S