1
10.DMX512 Operate
Thefixturehave14 DI\,D(channels.The following is functionlist:
Channel
Value
0-63
C o n t r o lmo d e
64-127
r28-r91
t92-255
0-40
4t-86
2
Colour
87-r28
t29-t70
t7t-2r2
213-2s1
252-255
0-42
43-85
a
J
Gobogroup
86-r28
129-171
t72-214
215-255
4
Gobochange
0-255
5
Speed
6
Rotate
0-255
0-63
64-127
128-19r
t92-255
0-63
64-127
192-255
7
8
D o t R o t a ti n s
Move
0-63
64-t27
128-t9l
192-255
9
l0
Extend
Zoon
Drawing speed
t 2 S c a ns p e e d
lt
13 C o l o u rs p e e d
Size
Auto- mode(Channel 1&2 valid\
M u s i c - e d i t m o d e ( A l l c h a n n e lv a l i d )
M a n n l e - e d i tm o d e ( A l l c h a n n e lv a l i d )
No beam
Red
Yellow
Green
R.G.Y colorchanse
Color flow
Open
G o b og r o u p l : 3 2 g o b o s
G o b og r o u p 2 : 3 2 g o b o s
G o b og r o u p 3 : 3 2 g o b o s
Gobogroup 4:32gobos
Gobogroup 5:32gobos
G o b o g r o u p 6 : C a r t o o n s ( 4s e g u e n c y )
l)
32gobos(0-2ss)18:(0-3
4 s e g u e n c y( 0 - 2 5 5 ) i 8 : ( 0 - 3 l )
l2 classspeed(0-255)/23:(0-l l)(from slow to fast)
No function
Horizontal rotating
Verticalrotating
Horizontal& Vert cal rotating
No function
Rotating
R o t a t i n g& D o t t i n g
No function
Hor izontalm ovement( Y line)
V e r t i c a lm o v e m e n t( X l i n e )
Horizontal & Vertical movement
0-63
No function
64-127
E x t e n d i n gi n H o r i z o n t a l
Extending in Vertical
Extending in Horizontal & Vertical
r28-191
t92-255
0-85
86-t69
170-255
0-255
0-255
0-255
0
l4
Function
I &2 valid)
Auto- M usicmode( Channel
t-255
No function
Zoom from small to laree
Zoom from largeto small
255 classspeed(from slow to fast)
255 classspeed(from fastto slow)
255classspeed(from fastto slow)
Orisinalsize
42 classsize(l-255)/6:(0-42)
l-19 smaller20originalsize2l-42 enlarge
11.Specification
F Voltage:AC230V50Hz
F Totalpower: 25W
} Scanner:Simplescanner
) C o o l i n gmo d e :A i rco o l i n g
) Scanangel : 0-* 30"
> DMX Channel:l4 CHS
) Laserlight porver:Red
Laser Class38 650nm
Green Laser Class38 532nm
> Controlrnode:Musci mode,Auto-mode,Master/slave
mode,DMX5l2
) Net lveight: 6 kg
} D i m e n s i o n : 3 2x02 7 0 x 1 3 0m m
12. Maintain
) Maintenanceshould be performed every 15-day period. by using a spongewhich is
dippedwith alcohol,ratherthan wet cloth or otherchemicalliquid, to cleanthe mirror.
F Warning:Power must be disconnectedbeforemaintenanceor repair.Do not look at the
light sourcedirectly.
ATI.ENTION: DISCONNECT INPTJTPOWER BEFORE MAINTAIN.
DON'T LOOK STRAIGHTTY AT THE LIGIIT SOURCES.
NOTE: I)cln't seperatelaser machine from laserporverand repairethem by yourself
otherwiseno good repair servicewill be supplied.
Powcrslvrtch
rDt
2 2 t ) vA C
IN
lol
tDt
fll
E
S C A NP C B
o ll
lff
X s c a nn t o t o r
c=
o
oNoooooooooo
^N9^
^
=pd o o o o o o o oo
4o<l o o o o o o o oo
o>oooooooooo
ooo'ooooooQoo
o
o o l6odvdrcSUIQPdYo
o o o o o o o o o oo
o o o o o o o o o oo
o o o o o o o o o oo
Y s c a nm o t o r
S C A NP C B
F,
(J)
II
L
-,1
tD
f)
r.+
a5
d {
El
26
;E
e--
--l
_,iP
t?
nr C) [g
-
oo
oe
Ft
[JoF
FlrC
f.\
I
:H
qrn
O^
l?8osl
nffi
vUllU
R e m o t ec o n t r o l
conn€ctot
Oo
E@
,_-....--
L@ilr_ElL)
ffi
ffi
f-,^.'l
a*,.i
tttttttl
ffi'lffiffiffi
EBEW
I 'ti
^L!
p,:'i'erlft)
f"-"]
*--
(t*.gr
Powersupply
LrliLrilr1-19
alutl|r
14. Trouble shooting
Problem
No powerto motor
N o r e s p o n s et o
m u s i co r i t i s
difficult be
a c t i v eb y m u s i c
X,Y scannerno
strengthor no
patternor scanner
shaking
N o b e a mo r b e a m
d i m o r b e a mc a n ' t
c l o s e ,b u t o t h c r
f u n c t i o n sO K
Cannot control
other functionOK
Suchaslaserdiode
and thns
Causation
S o l u t i o nw a y
D a m a s e dF u s e
Fuse
D a m a g e dp o w e rs u p p l y
+ l5v
09-00-2001-01
I 6 - 0 3 - 0 0l0- 0 0
D a m a g e dm i c
MIC
I 6 - 0 3 - 0 0 l0- 0 0
D a m a e e dc o n t r o lP C B
Contr olPCB
Damagedpotentiometer
Potentionmeter
S e r i e sn u m b e r
26-2A-LTt2V2-00
04-03-0
I 0 4 - 0I
D a m a e e d8 9 C 5 1 6 R DI C
8 9 C 5 I 6 R DI C
D a m a g e ds c a n n e r
S u p e rs c a nm o t o r
0 0 - 8 9 c 51 6 R D - 0 0
l 5 - 0 1- 2 2 1 5 - 0 0
D a m a g e d8 9 C 5 l 6 R D I C
8 9 C 5 I 6 R DI C
00-89c5l6RD-00
D a m a s e dc o n t r o lP C B
ControlPCB
D a m a g e dp o w e rs u p p l y
+t5v
26-2A-LT12V2-00
l 6 - 0 3 - 0 0 r0- 0 0
D a m a g e ds c a nb o a r d
Scan board
Dirty lens
C l e a ri t w i t h a l c o h o l
D a m a s e dl a s e rd i o d e
G r e e nl a s e rd i o d e
26-2A-FASTSCAN-OC
07-01-0030-08
R e d l a s e rd i o d e
0 7 - 0 3 - 0 2 5 0 I- 0
D a m a s e dc o n t r o lP C B
ControlPCB
26-2A-LT12V2-00
Controlmode
s e t t i n ei n c o r r e c t
Pleaserefcrto the
usermanualfor
furtherinstruction
Controlmode
s e t t i n si n c o r r e c t
Pleasereferto the
usermanualfor
furtherinstruction
D a m a g e dc o n t r o lP C B
C o n t r oP
l CB
D a m a g e dp o w e rs u p p l y
+ l5v
D a m a s e d a d d r e s sb o a r d l T 6 a d d r e s sc o d e b o a r
26-2A-LTt2V2-00
I 6 - 0 3 - 0 0 10- 0 0
26-2A-LT6SW-00
A p p e n di x :
ILDA DB 25FPINOUTS DB 25 definens
I
-1
X+
)
Y+
-5 to +5V
-5 to +5V
3
I n te n si ty/Bl a n ki n g *
0V to +2.5V
4
l n te rl o ck A
C o n n e c t e dt o p i n 1 7 i n s i d et h e Q m 2 0 0 0
5
R e d*
0V to +2.5V
6
G r e e n -F
0v to +2.5v
Blue*
0V to +2.5V
8
D e e pb l u e *
0V to +2.5Y
9
Yellow*
0V to +2.5V
10
Cyan*
0V to +2.5V
n
Z+
D e p t hZ ( n o ti n t e n s i t y )-,5 t o + 5 V
t2
Not connected
l3
Shutter
0v to +5v
t4
X_
15
Y-
-5V to *5V
-5V to *5V
t6
I n t e n s i t y / Bl a n k i n g-
-2.5V to 0V
17
I n t e r l o c kB
l8
Red-
C o n n e c t etdo p i n 4 i n s i d et h e Q m 2 0 0 0
-2.5V to 0V
t9
Green-
20
Blue-
-2.5V to 0V
-2.5V to 0V
2l
D e e pb l u e -
-2.5V to 0V
22
Y e l l o w-
- 2 . 5 V r o0 V
23
Cyan-
24
Z-
-2.5V to 0V
-5V to +5V
)\
Ground
C a b l es h i e l d
1)Opentheboxforchecking''t
' ' ' ' '
2)lnstallation'''''''''''
o''''
3 ) A t t e n t i o n '' ' ' ' ' ' ' ' ' ' ' ' ' ' ' '
.'
4)Warning'o"""to"".
5)Structureofthefixture' ' ' ' t ' ' ' '
Page1
aatooaaaaoaa
aaaaatoaaaaa
Page1
aaaaoaaaaaaa
P a g e2
oaaoaaoaaaoa
Page 2
P a g e3
aaaoaaaaaaaao
6)ScanmotorReplacement'o o ' ' ' '
aaaaaaoaaaaao
Page 4
7 ) A d j u s t a b l e m i r r o r h o l d e r '' ' o ' o ' e
aaaaaaaooaaat
P a g e5
B)Laserdiodgreplacement'''
9)Controlboardinstruction'''
10)DMXS12Operate''''''''''''
' "
' ' "
' ' o ' ' ' ' ' ' o ' P a g e6
' ' ' ' ' ' o ' ' ' ' ' ' ' ' ' '
o''''''
o''''
P a g e7
P a g e8
' o ' ' ' ' ' '
11)Specification'o ' ' ' ' ' ' ' ' ' o ' ' ' ' ' ' '
Page9
' ' ' ' ' '
12)Maintain. . . . . . . . o . . . . . . ' ' ' ' ' o ' '
P a g e9
13)Electrical diagram
' o ' o ' o o ' ' ' ' ' ' ' ' ' ' ' ' ' ' ' ' o
P a g e 10
1 4 ) T r o u b l es h o o t i n g ' ' ' ' ' ' ' ' ' ' ' ' o ' ' ' ' ' ' ' ' ' ' ' ' P a g e 11
l. Open the box for checking
I n o r d e r to u se th i s p ro d u ct safety and r easonablefor the user s,pleaser ea d ov er
t h i s m a n r t a lc a r e f u l l y b e f o r c u s e a n d t h e o p e r a t i o nm u s t s t r i c t l y a c c o r d i n gt o t h i s
r n a n u a lt o a vo i d a n y d a ma g eto th e pr oduct and per sonalsafety.
O n c e a f t e r r e c e i v e d t h i s p r o d u c t s p l e a s e t a k e a n d p u t c a r e f u l l y .A n d c h e c k
c a r e f u l l y t h at w h e th e r th e p ro d u ct was dam agedor not dur ing the tr anspor tati onand
p l e a s ec h e c kt h e f o l l o w i n g t h i n g s\ , v e r e n c l o s e d :
l . I u n i t l a se rl i g h t
l. I unit laserlight
3. I pc Pin3 signal cable
4. lpc usermanual
2. Installation
I . P l e a s ec h e c k t h c v o l t a g e w h e t h e r i s t h c s a m e w i t h t h e o n c s h o w e d
on the
e q u i p r r r c notr n o t .
2 . [ t r n u s ta s k f o r t h e t e c h n i c a lp e r s o na n d s e t t h e l i g h t s a f e t yr , v h e ni n s t a l l a t i o nA. n d
l e t t h c l i g h t b e a ma t t h e s u i t a b l ea n g l e .
3 . W h e n i n s t a l l t h i s e q u i p m e n t p l e a s e m a k e s u r e t h e r e ' s n o f l a r n m a b l es u r f a c e s
( d e c o r a tde t h i n g s , e t c ) l v i t h i n a t l e a s t l . 5 M a n d m a i n t a i n m i n i m u m d i s t a n c eo f
0 . 5 N lf i o m t h e e q u i p m e n t o t h e w a l l s .
4 . P l e a s et n a k e s u r e t h a t t h c r e ' s n o o t h e r e q u i p m e n t o r d e c o r a t i n g m a t e r i a l s
o b s t r u c t e dt h e e x h a u s tf a n a n d t h e v e n t - p i p e .
5 . P r o c l u c tssh o u l db c i n s t a l li m r n o b i l i t y .
6 . I n c a s eo f s a f e t y ,i t ' s v e r y i r n p o r t a n t h a t t o c o n n e c t h e e a r t hr v i t h l i n e .
3. ATTENTION
)Please do not open the bottom cover yourself without permission. Operateit
accord the user manual. Pleasecall the technicianin case the machine broken
down.
FDo not use it under the damp and rain.
DPay attentionto preventthe light from strongbump.
FPreventthe dust into the product
)Keep the vent-pipewell while working.
)Keep the plug insertwell beforeput into power.
FDon't look the light directlyto preventmakesomedestroywith eyes.
FDon't light or extinguishfrequently,otherwisethe life spanof the light tubewill be
shortened.
FIn view of the specialcharacters,after operatedthe light an hour the productshall
be pausedabout l5 minutesbeforebe usednexttime.
FKeep the spacebetweenlight equipmentsand the lighted things more than one
rneter.
FDon't touch the productand draw the power line if you hand wet.
FDon't openthe cover for therehaveno partsthe usercan repair.
)Don't operatethe light without lamps.
P tf the semiconductorlaser doesn'tas light as before or there have some destroy
with lens or otherparts,pleasecontactthe distributorin time.
F When you want to retransferthe products,you'd betteruse the original package
to shockproof.
4. Maintain
' Please
usecottonstickdippedalcoholto wipethe mirrorsat regular.Do
not usethe wet clothor chemicalimpregnant
to cleanthe mirrors.
' Pleaseuse the soft cloth to clean the surface of product.
ATTENTION: Disconnectinput power beforemaintain.
Don't look straightlyat the tight sources.
NOTE: Don't seperatelaser machine from laser power and repaire them by
yourselfotherwiseno good repair servicervill be supplied.i
5. Structureof the fixture
__---@
---@
f+\
--\
q...-.
€\-
F i g 5 -I
No.
I
2
J
Description.
S c a nm i r r o r
A d j u s t a b l em i r r o r s t a n d
A d d r e s sc o d eP C B
No.
ll
z
G r e e n I a s e rd i o d e
4
5
6
1
8
C o d eb o a r d
S i g n a ls w i t c h P C B
5
6
7
8
t9
Washer
Dustproofm irror
l0
L e n sh o l d e r
P o w e rs u p p l yo f r e dl a s e rd i o d e
P o w e rs u p p l y o f g r e e nl a s e rd i o d e
D N I Xp l u gs i g n a l
9
shutter
J
4
X , Y s c a nb o a r d
Description.
R e d l a s e rd i o d e
M a l eI L D A 2 5 p l u g
Powerinput plug
Powerswitch
Fan
6. Scan m otor Replacement
( 1 )S t e p s :
l . U n s c r e rU
v K M 6 s c r e wa n dp l u go u t m a l es i g n a lc o n n e c t o r .
2.Disassemba
l el l M 4 x 1 0s c r e wf r o m X , Y s c a n n esr o c k e st o t h a ts c a nm o t o r sc a n
b e t o o k o u t ,p u t i n a n dr o t a t es c a n n esr o c k e t o a d j u s t h e s c a na n g l e .
3. After adjust,fix M4 x l0 screws,plug
in malesignalconnectorandthenfixUK
M6 screws.
U K M 6 s c r e w( w i t h f e m a l s c r e w )
i g n a lc o n n e c t o r ( M a l e )
M4 X l0 screw
X s c a nm o t o r
M4X
F i g 6 - l S c a nm o t o r i n s t a l ld i a g r a m
(2) Optical system:
R G B m i x b e a mb e re fl e cte dout bv X.Y scanmir r or s.
White
R G Bm i x b e a m
F i g 6 - 2 O p t i c a lS y s t e md i a g r a m
7. Adj ustablemirror socket
(1) Steps
l . L o o s es e t s c r e r vo f X , y a n d t h e n a d j u s tm i r r o r s o c k e tt o
s u i t a b l ep o s i t i o nb y X , y
a d j u s t a b l es c r e w s .
2 . A d j u s tZ a d j u s t a b l es c r e wa t s a m et i m e .
3. Fix X,Y setscrew.
N o r E : M a k e s u r ea l l b e a m st h r o u g ha d j u s t a b l em i r r o r
s o c k e tb e o n e p o i n t w h e ny o u
a d j u s tX , y , Z l i n e w i t h a d j u s t a b l es c r e w .
Y setscrew
Z a d j u s t a b l es c r e w
s e t s cr 9 w
F ' i g 7 -I A d j u s t a b l em i r r o r s o c k e ts t r u c t u r e
( 2 ) R G B L a s e r b e a m sm i x s y s t e m :
M i r r o r s o c k e tl : T r a n s m i t r e d b e a m , r e f l e cgt r e e nb e a m , a n d
thenmix out yellow
b e a mt h r o u g hm i r r o r s o c k e tl .
G r e e nb e a m
Yellowbeam
Redbeam
Mirror I
F i g T- 2 R G B l a s e rb e a m sm i x s y s t e m
8. Laser diode rePlacement
Methods:
D i s a s s e m b l rev h o l el a s e rs y s t e m( i n c l u d ep o w e r s u p p l y , l a s edr i o d e )a n d t h e n
r e p l a c en e w o n e a t o r i g i n a lp o s i t i o n .
N o t e : k e e pl a s e rd i o d e , p o w e sr u p p l ya n d c a b l e sb e c o m p l e t l ya n d d o n ' t t r y t o
d a m a g e , d e s trooy r cu t th e m so th a t it can be r epair ed( cr efer figS- 1) .
Correct
W ons M ethod
F i g 8 -I
o
p o w e rs u p p l yo f g r e e nl a s e rd i o d e
rn
( J./
r e d l a s e rd i o d e
a)
p o w e r s u p p l y o f r e d l a s e rd i o d e
@
G r e e nl a s e rd i o d e
v
9. Control board instruction
-la"
|
o
@lles
Frontpanel
Back panel
IEC regulation)
RemoteLock: In the eventof removal,laserwill not emit any beam.(E.U.
G\
@
Security key switch: Power switch
ILDA DB 25 F Connector:signal input connectionport of the laserperform
softwarethat in accordancewith the ILDA standard.
(4)
DI\D( IN/OUT: International standardDMX512 signal input/output
@
@
@
@
@
@
MIC: Soundreceiver
SignalLED: SignalLED
@
PowerLED: PowerLED
POWER SWITCH: Power switch
POWERfN: Powercord,fuseinside
MIN-MAX:
Sound control
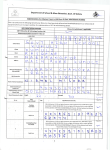
ADDRESS: Addresscodeswitch.The 10thcodeis switchcode.If the 10thcodeis
OFF,the 1-9 codesare function code.If the lOth codeis ON, the fixture oan be
controlledby DMX512 signaland othercodesare DMX addresscodes.Pleaserefer
to following two picturesabout setting.
F u n c t i o nc o d es e t t i n g :
Addressswich
S w i t c hf o r D M X c o n t r o lm o d e .T h e s e t t i n g
i n t h e p i c t u r ei s D M X s i g n a lu n a c c e p t a b l e . .
M u s i cm o d e
123.1
56784
Auto mode
EEEIEEEEE
S l a v em o d e
EEEgEEE
1234567
D M X c o d es e t t i n g :
Algorism
-
Binarycode
LSS----i IUSB
r 00000000
Address
swich
S w i t c hf o r D l v l X c o n t r o lm o d e .T h e s e t t i n s
1234567a9n
!IEEIEIEIII
r23456789
EEEEIIEII
r 1 0 11 0 0 0 0
iSiiifliEiYs