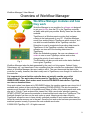
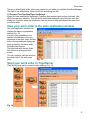
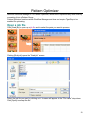
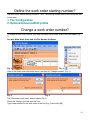
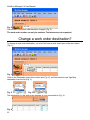
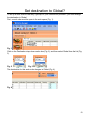
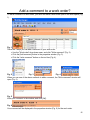
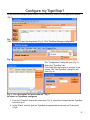
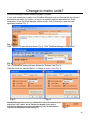
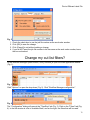
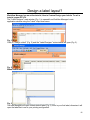
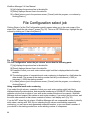
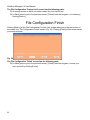
1
07-2009 / E1 Workflow Manager Manual CONTACT: TigerStop LLC, Assembly Plant, 12909 NE 95th Street, Vancouver, WA 98682 U.S.A. Tel: 360 448-6102 ● Fax: 360 260-0755 ● Website: www.tigerstop.com ● Email: [email protected] © 2009 TigerStop LLC WFM Version 5.4 Table Of Contents Introducing Workflow Manager .....................................................................................................5 New Features: Workflow Manager 5.4 … .....................................................................................5 Overview of Workflow Manager ....................................................................................................9 Workflow Manager System Requirements..................................................................................11 Workflow Manager File Requirements ........................................................................................13 Running Workflow Manager on Windows Vista ..........................................................................15 Concept ......................................................................................................................................17 Installation ..................................................................................................................................17 Installation Troubleshooting ........................................................................................................18 Uninstalling Workflow Manager ..................................................................................................19 Quick Start ..................................................................................................................................21 Workflow Manager Interface .......................................................................................................31 What is a work order?.................................................................................................................31 Pattern Optimizer........................................................................................................................33 Grid context menu ......................................................................................................................37 Scheduler ...................................................................................................................................38 Starting Scheduler ......................................................................................................................38 Scheduler Interface.....................................................................................................................38 Open a job file?...........................................................................................................................39 Open a Pattern Group job file? ...................................................................................................41 Load a work order?.....................................................................................................................43 Edit a work order?.......................................................................................................................45 Print a work order? .....................................................................................................................47 Save a work order?.....................................................................................................................47 Download a work order?.............................................................................................................49 Define the work order starting number?......................................................................................51 Change a work order number? ...................................................................................................51 Change a work order destination? ..............................................................................................52 Set destination to Global?...........................................................................................................53 Add a comment to a work order?................................................................................................55 Configure my TigerStop? ............................................................................................................57 Change my TigerStop parameters? ............................................................................................58 Change TigerServer's Location?.................................................................................................61 Change my cut list program?......................................................................................................63 Change to metric units?..............................................................................................................65 Change to inches?......................................................................................................................67 Change the Color Scheme? .......................................................................................................69 Make work order and job file number the same? ........................................................................70 Change my cut list filters?...........................................................................................................71 iii Workflow Manager 5.4 User Manual Change the Item/Part sort?.........................................................................................................72 Turn label printing on and off? ....................................................................................................73 Print a different label file? ...........................................................................................................74 Start or stop TigerServer?...........................................................................................................77 Make sure TigerServer is running correctly? ..............................................................................79 Design a label layout? ................................................................................................................81 Configure a custom job file? .......................................................................................................85 File Configuration Wizard ...........................................................................................................85 File Configuration browse .......................................................................................................86 File Configuration delimiter .....................................................................................................86 File Configuration length .........................................................................................................87 File Configuration quantity ......................................................................................................87 File Configuration select job....................................................................................................88 Create Column Headers .........................................................................................................89 Choose your sort.....................................................................................................................89 File Configuration key fields ....................................................................................................90 Main Screen Display ...............................................................................................................91 File Configuration Custom Link ...............................................................................................91 File Configuration Finish .........................................................................................................92 Turn debug mode on and off?.....................................................................................................93 Registry entries...........................................................................................................................95 Directory structure ......................................................................................................................97 Filter files ....................................................................................................................................97 Profiles........................................................................................................................................98 Work order number.....................................................................................................................99 Log files ......................................................................................................................................99 Cut list files ...............................................................................................................................100 TigerServer Data Collection for Reporting ................................................................................100 Troubleshooting ........................................................................................................................103 Index.........................................................................................................................................105 iv Introducing Workflow Manager TigerStop is pleased to introduce Workflow Manager 5.4 Workflow Manager 5.4 is the essential tool for sending work orders to all the TigerStops in your shop. Its intuitive interface, familiar work environment and versatility make it the standard for any manufacturer that desires maximum efficiency and increased productivity. In short, Workflow Manager 5.4 is the software solution that makes your business more profitable. Key Benefits Workflow Manager is easy to install, easy to set up, and easy to use. When Workflow Manager is first installed on your PC it will automatically search for the most popular cabinet and cut listing software programs in the market today. Once a program is detected, any new job file that is opened in Workflow Manager will automatically be sorted, based on that program's defaults. Workflow Manager lets you modify and even create work orders within the program. After the work order is completed and ready to be processed, the Scheduler is used to manage work flow, allowing each work order to be scheduled for production and sent to multiple saws, areas or plant stations simultaneously. Once the work order has been scheduled for processing, it can be accessed at the TigerStop controller. With a continuous connection between TigerStop and the local PC, there is practically no limit to the number of work orders that can be processed and sent to TigerStop. See also: System Requirements, File Requirements. New Features: Workflow Manager 5.4 … Compared to TigerLink 3.2 Workflow Manager is a major upgrade from TigerLink 3.2. Workflow Manager was re-written from the ground up with a new interface that includes an integrated label designer for label printing purposes. With Workflow Manager you only have to create a “link” to TigerStop once, not over and over again as in the TigerLink 3.2. Cut list values can be directly edited within Workflow Manager as well as configured to communicate with one or more TigerStops. Along with Workflow Manager, the product package includes a program called Scheduler. With Scheduler you can set work order priorities, decide which work orders go to which TigerStop, monitor the progress of a work order, and much more. Compared to TigerLink 5.1 The option "Change name" has been removed from the "Work Order" drop-down menu in the TigerLink main window. The File configuration screen "select the job column" has been modified. 5 Workflow Manager 5.4 User Manual Significant layout changes occurred in the "TigerLink configuration" dialog screen accessed from the main window at the "Options" drop-down menu. The original 7 tab structure was reduced to 5 tabs. There were no changes to four tabs: TigerStop, TigerServer, Language and Filters. A new fifth tab, Settings, was introduced for some of the functions in the three tabs that were eliminated. Compared to TigerLink 5.2 The "Optimize" check box was moved back to the top of the main screen from the "Options/TigerLink configuration" drop down. The "Active" check box on the main screen has been renamed to "Send". Functionality remains the same. The "Destination" drop-down on the main screen now has a new category "Global" as well as a list of all TigerStops set up. "Work Order type" is a new drop-down on the main screen that allows the user to select one of five part list types to apply on a "per part list" basis, rather than a "per machine" basis as previously. The part list types are: Set Point, Push Feed, Pattern Push, Pattern Set (Pull), and Pattern Group. The three pattern types are new with Workflow Manager 5.4. The navigation bar includes a new button, Pattern Optimizer. Configuration Screen Comparisons Configuration screen, TigerStop tab TigerLink 5.1 Workflow Manager 5.4 TigerLink 5.1 and 5.2 "Machine type" and "Optimize" columns have been eliminated from the "TigerStop" tab. The "Machine type" field was moved to the "Work order type" drop-down on the Workflow Manager main screen. The "Optimize" field has been moved to a check box at the main screen. Cutlist program tab - Eliminated > Setting tab TigerLink 5.1 "Cutlist program" tab eliminated. Some features moved to the Settings tab: "Work order program" 6 New Features drop-down combo box, "Use job number from file" check box, "Metric check box. "Source directory" eliminated. (Location of job files.) Language tab, TigerServer tab, Filters tab No changes in Workflow Manager Printing tab - Eliminated > Item/Part sorted by… This screen opens when a work order is grabbed and loaded into the main window. TigerLink 5.1 "Printing" tab eliminated. These functions moved to the "Item/Part sorted by PART" window: "Printing is off" check box changed to "Enable printing" check box. "Label file to print" browser changed to "Label file" browser. Functionality is the same. Misc tab - Eliminated > Setting tab TigerLink 5.1 "Misc" tab eliminated. These functions moved to the Settings tab: "Show the splash screen" check box, "Show tooltips" check box, "Show upload dialog" check box, "Select background color" drop-down. Functionality is the same. 7 Workflow Manager 5 User Manual Overview of Workflow Manager Workflow Manager modules and how they work Workflow Manager is one module of a software set designed to get your job files from the PC to the TigerStop controller as easily and quickly as possible. Briefly, these are the other modules: TigerServer is a Windows service routine that is always running in the background of your PC. Workflow Manager sends your working data to TigerServer which stores it, so it can later be made available at the TigerStop controller. Scheduler is used to manipulate the working data stored in TigerServer. At the TigerStop controller, the machine operator can view all of the working data stored in TigerServer. Within the Scheduler program, the user can release work orders to one or more TigerStops, delete work orders, change the priority of work orders, etc. The Scheduler can also provide work order status feedback Fig. 1 from a given TigerStop. Workflow Manager takes the data generated by the user's cut list program, Cabinet Vision, Cabnetware, etc., and transforms it into something that the controller can understand. While the data is in Workflow Manager, the user is able to edit it. The user then sends that data to the controller. In reality, however, the data is really sent to TigerServer, even though it is visible from the controller. It is important to know that the controller does not actually contain any cut list information yet. The work orders that are sent to TigerServer are initially set to UNRELEASED status. Work orders must be set to RELEASED status before TigerStop can view or download them. Once work orders have been set to RELEASED status, the machine operator can view a list of available work orders at the controller by pressing [PRGM]>[PRGM]. This lets the machine operator scroll through a list of all available work orders in order of the priority each work order was set to. Priority 1 work orders will be viewed first. With a work order selected, pressing [START]>[START] will cause the controller to download that work order from TigerServer. The machine operator can then run the work order as usual. Keeping work orders stored in TigerServer allows the user to have virtually unlimited numbers of work orders rather than be limited by controller memory, as in the past. Once the first work order has been processed, the machine operator is ready to process the next available work order. © 2006-2009 TigerStop LLC. All rights reserved. 9 Workflow Manager System Requirements 1. To use Workflow Manager the following is necessary: 2. An IBM PC or compatible, running Microsoft Windows XP Professional. See 2 below for what is needed to run Windows XP Professional. 3. The TigerStop must be enabled for downloading. 4. Currently, an available Com Port is required with a 232 serial interface. Future releases will allow for alternative connections. 5. Connect to the controller using a DB9 serial cable. See Fig. 1 below for the cable pin out. 6. A serial extender may be required if the distance between the computer and the TigerStop is greater than 50 feet. For more information on the serial extender, see the Serial Extender product guide. 7. Here's what is needed to run Windows XP Professional: 8. PC with 300 MHz (megahertz) or higher processor clock speed recommended; 233 MHz minimum required (single or dual processor system); Intel Pentium/Celeron family, or AMD K6/Athlon/Duron family, or compatible processor recommended 9. 128 megabytes (MB) of RAM or higher recommended (64 MB minimum supported; may limit performance and some features) 10. 1.5 gigabytes (GB) of available hard disk space 11. Super VGA (800 × 600) or higher-resolution video adapter and monitor 12. CD-ROM or DVD drive 13. Keyboard and Microsoft Mouse or compatible pointing device 14. If running Workflow Manager on a Windows Vista system, see Running on Windows Vista. Serial Cable Pin-Out Fig. 1 11 Workflow Manager File Requirements Workflow Manager file requirements are as follows: The file type must be an ASCII text file. The file must be character delimited. We recommend using the comma as the delimiter. The length value must be in decimal format (example: 123.456). The quantity field must in integer format. If a quantity field is not specified, Workflow Manager will assume a quantity of 1 per line. All the data for one cut must be in one row (example: material, 123.456, 1) There must be a carriage return at the end of every line of data. 13 Running Workflow Manager on Windows Vista Overview of Workflow Manager Workflow Manager is a software suite designed to manage the creation of cut lists and to transmit them to the TigerStop controller. In its most basic form, Workflow Manager… Translates the user's cut list file, generated by a third party vendor, into a form that TigerStop can utilize. Selects the parts from the cut list that are going to be cut using TigerStop. Manipulates — Workflow Manager lets the user manipulate the cut list information. Transmits the cut list information to the TigerStop controller. Problems Workflow Manager was designed and built for the XP Professional edition of the Microsoft Windows Operating System (OS). At the time that the program was designed and coded, Windows Vista (Fig. 2) had not been released and little information was available concerning any basic changes in the new OS. After the final release of Vista it was found that the security model for the OS had been revamped. As a result of this change, two major difficulties arose regarding the operation of Workflow Manager on a Vista system. Fig. 2 Vista does not allow users or programs to write files to the Program Files folder or sub-folders. Workflow Manager writes files to its own folder throughout the process of translating job files and sending files to TigerServer. Vista prevents programs and users access to parts of the system registry that were previously available. As a result, Workflow Manager may or may not be able to read or write to various registry entries when the program runs. Solutions Workflow Manager can be run on a Vista OS very easily. There are two possible solutions. These instructions apply to Windows Vista Home Premium Edition which, due to networking feature constraints, is the minimum Vista edition that can be used to run the Workflow Manager, and the settings were checked/made with an Administrator account. 15 Workflow Manager 5.4 User Manual Solution 1 Solution 2 This is the first and easiest solution. Every time Workflow Manager is run, right-click on the program icon and select the “Run as Administrator” option. The second solution is to disable the User Account Control. Open Control Panel and run User Account applet. Limitations and benefits Select Turn the User Account Control on or off. The downside to this approach is that you have to remember to run as Administrator every time the program is run. Uncheck Use User Account Control … and click The upside is that you do not have to OK. make any global changes to the OS. Restart your computer. Limitations and benefits The downside to this approach is that you have to make a system-wide change to the OS. The upside is that you do not have to remember to run that program as Administrator every time. 16 Concept Workflow Manager is installed the same way you install any other Windows application. You will insert the installation CD into your computer's CDROM drive. If auto-play is enabled, the installation will automatically start. If auto-play is not enabled, you must run the setup manually. The following instructions will step you through the installation process. Installation The Workflow Manager installation program, SETUP.EXE, is a Windows program. It is located in the root directory of the Workflow Manager CD. Windows XP Professional must be loaded as the operating system before Workflow Manager can be installed. Before installing, see also System Requirements. 1. Power up your computer and let it go through its routines. When your Windows desktop appears, you are ready to install TigerLink. 2. Insert the Workflow Manager CD into the CD-ROM drive. When the CD is inserted into the CD-ROM with Windows XP Professional running, the program should start automatically and run through the installation steps. If it does not, try re-inserting the CD, or continue at step 3. 3. From the Start Menu, select "Run…" 4. In the Run dialog box (Fig. 1), type: D:/SETUP. If your CD drive is not designated by D, change the drive letter in the command line above, substituting the drive letter you are using. Fig. 1 5. When you have typed the appropriate command line, click [OK]. After the files are copied from the CD to your computer, SETUP searches the computer hard drive for signs of known cut listing programs. If one is found, SETUP will ask if you want that program to be set as the default, and program will apply it accordingly. 6. SETUP does not automatically install TigerServer. You will be asked if you would like it installed. At the dialog box (Fig. 2), click [Yes] to install TigerServer. 17 Workflow Manager 5.4 User Manual Fig. 2 7. Installation is concluded. The reboot dialog box appears (Fig. 3). You should click [Yes], unless you have a good reason to delay the reboot. For example, you should not have any other programs open and running when you reboot your computer. Then click [Finish] to complete the process and restart your computer. You MUST restart your PC to complete the installation of TigerServer and to allow Workflow Manager to function properly. Fig. 3 Installation Troubleshooting This topic provides information on common problems and their solutions. Please read this topic before contacting Installation Support. Program will not run Confirm the computer meets the minimum system requirements. See System Requirements. Program runs but has errors If you are unable to view Workflow Manager or are experiencing other program errors, follow this procedure: 1. Uninstall Workflow Manager. See Uninstalling Workflow Manager. 2. Re-Install. See Installing Workflow Manager. For More Information http://www.tigerstop.com/tech.html provides help with installation or other issues you may have and includes all the latest downloads to your software. 18 Uninstalling Workflow Manager These procedures are effective only if Workflow Manager is installed using the Workflow Manager Setup program. To uninstall Workflow Manager from the Windows XP Professional desktop environments: 1. Click the green [Start] button in the lower left corner of your Windows XP Professional desktop. 2. Select Settings > Control Panel. 3. Double-click Add/Remove Programs. 4. Click Install/Uninstall. Then select Workflow Manager from the list of programs that can be automatically removed. 5. Click the [Remove...] button to uninstall Workflow Manager. If Workflow Manager does not show in the list or if the automatic uninstall fails, uninstall Workflow Manager manually. 19 Workflow Manager 5 User Manual Quick Start The Workflow Manager desktop icon To start Workflow Manager 5.4, double click the Workflow Manager icon found on your desktop, or locate it in the TigerLink subgroup in the Start Menu, under Programs. If it is there, select the icon, hold down the LEFT mouse button, and drag the icon out on to your desktop. The result of this action will be to create a shortcut of TigerLink on your desktop. The Workflow Manager splash screen When Workflow Manager first starts up, a splash screen is displayed that contains various options (Fig. 1). Fig. 1 The options shown in the splash screen are as follows: 1. Continue — This opens Workflow Manager. 2. www.tigerstop.com — This links to the TigerStop corporate web site. 3. Exit — This closes Workflow Manager without using it. 4. Scheduler — This opens Scheduler. 5. Help — This opens the Workflow Manager User Manual. Open Workflow Manager the First Time Click [Continue] to open the main application window (Fig. 2). Fig. 2 The pop up advises: 21 Workflow Manager 5.4 User Manual "Workflow Manager is currently set to use the default profile. The default profile is a very simple profile that will allow you to start working with Workflow Manager now. You also have the option of configuring your own set of rules to make Workflow Manager read your job files. To use the default profile, you can simply enter the information into the grid as if it were a Microsoft Excel spreadsheet. Or, you can use Microsoft Excel to build your work orders. See the default.csv file in the TigerLink Example files folder for an example." Select a profile You select a profile by clicking one of the three buttons at the bottom of the pop up. Click "Use default" to use the default profile. Click "Select other" to select an alternate work order profile. Click "Decide later" to continue on without making any changes. Open the main Workflow Manager window Click [Continue] to open the main application window (Fig. 2a). The empty bottom half of the screen has been cut off to save space. Fig. 2a Configure Workflow Manager First thing to do is configure the application to your work environment. Along the top of the main application window is a row of drop-down menus (Fig. 2b). Below the drop-down menus is a tool bar (Fig. 2c). Fig. 2b Fig. 2c Click "Options" to open the drop-down (Fig. 3). Click "TigerLink configuration." Fig. 3 22 Quick start Select your default cut listing software The Configuration dialog box will open. There are five tabs across the top to organize the configuration of Workflow Manager functions (Fig. 4). The "Settings" tab is where you select the cut listing software you want to use as your default, from the dropdown combo box labeled "Work order program." Fig. 4 If your software is not listed, or if you use Microsoft Excel to generate your cut lists, you will have to configure Workflow Manager to interpret your files manually. For this example, we are selecting Cabinet Vision as our default cut listing software (Fig. 5). Fig. 5 Add the TigerStops you will be communicating with The next thing that Workflow Manager needs to know is the TigerStops that you will be communicating with. The "TigerStop" tab is where you set this up. Select the "TigerStop" tab. On a first install, the screen should be blank, no TigerStops configured. Click [Add] from the buttons to the right of the screen (Fig. 6). Fig. 6 The "Add TigerStop" dialog opens (Fig. 7). 1. From the "Comport" drop-down combo box, select the Comport that the TigerStop is hooked up to. 2. In the "Name" text box, give the TigerStop an appropriate name such as "Frame saw". 3. From the "Baud rate" drop-down combo box, select the baud rate that EXACTLY matches the baud rate setup for that TigerStop. The baud rates MUST Fig. 7 match exactly. 23 Workflow Manager 5.4 User Manual TigerStop version up to 4.72 the default baud rate is 115200. Version 5.03 and later the default baud rate is 57600. Open a job file There are five function buttons on the left side of the main screen (Fig. 8a). Click [Grab job] to open up a job file and to select the parts you want to process. Fig. 8a Clicking [Grab job] opens the "Grab job" screen (Fig. 8b). Fig. 8b Select the job file you want by clicking on it. Its name will appear in the "File name" drop down. Click [Open] to accept the file. 24 Quick start Select the parts you want to process The "Item/Part sorted by Partname" dialog box opens (Fig. 9). If there is no tab, it will be created automatically when you populate the Selected parts window, as "Tab 1". Select ALL the parts in the part list by clicking [>>]. See Fig. 11 for the result. Fig. 9 Define the sort for your job file data Click the "Options" drop-down, and click "Sort" to access data sort related actions (Fig. 10a). The Sort menu lists the fields (in the user's data file) that can be selected to display in the "Parts list" window. Usually, this will be the "Partname" field. Fig. 10b Rename the tab containing your job file data Click the "Options" drop-down, and click "Tab" to access tab related actions (Fig. 10b). Fig. 10a Click [Rename tab] to give the tab a more appropriate title. Another dialog box opens (Fig. 10c). Here we are simply renaming the tab to Frames to indicate that these parts belong to our frames group. Click [OK]. Fig. 10c 25 Workflow Manager 5.4 User Manual Select a destination TigerStop for your work order Now we have a Frames tab (Fig. 11). Select a destination TigerStop in this window if desired. Selecting the destination here will assign the same destination to ALL the work orders at this tab. Fig. 11 Each tab can be assigned to separate destinations. The destination TigerStop can be changed for each work order individually in other areas of the program. Let's assign our destination TigerStop now. The drop-down combo box (Fig. 12) will list all TigerStops defined for this system. If you have only one TigerStop, or if only one has been defined, there will only be one destination in the drop-down. "Global" will always be there. The TigerStop selected will be the only one that can run this work order. If "Global" is selected, any TigerStop can access the work order. Fig. 12 Enable printing and specify a label file If you will be printing labels, check the "Enable printing" check box, and specify the label file. 26 Quick start There is a default label folder, which was created for you when you installed Workflow Manager. The path to the default label folder should look something like this: C:\Program Files\TigerStop\TigerLink\Default. When you have selected the destination TigerStop and enabled label printing (optional), click [OK] to accept your selection. This tab will be saved and displayed every time you open this dialog box. TigerLink takes the information from the previous step and extracts the parts from your work order. View your work order in the main application window The main application window now displays the parts in spreadsheet fashion (Fig. 13). Just as in any spreadsheet, the headers are labeled to show you properties of the work order, and the cells of the spreadsheet display the parts grouped by the same width, thickness and species. The light blue cells are key fields that cannot be changed at this screen. You can, however, edit the values in the white cells of the work order Fig. 13 here. Send your work order to TigerServer Click [Send] since we do not want to edit anything (Fig. 14). Fig. 14 27 Workflow Manager 5.4 User Manual Verifying the work orders to send to TigerServer The "Verify work orders to upload" dialog box opens (Fig. 15), to let you have another chance to send work orders. You can uncheck work orders that are not quite ready to go to the TigerServer. If you want to bypass this dialog box in the future, uncheck "Show dialog." Work orders with an INACTIVE status are NOT sent to TigerServer. Fig. 15 When you have made your selections, click [OK] and TigerLink will send the work orders to TigerServer, and start the Scheduler. The Scheduler can also be opened by clicking on the Scheduler button navigation bar. in the The Scheduler application window The Scheduler application window opens (Fig. 16). The status of all work orders is set to UNRELEASED, as shown in the farthest column on the right as "UR." The default application window is actually on the "Unreleased" tab (Fig. 19). The status of any work order can be changed by using the drop-down combo box in the status column. The status of a group can also be changed be selecting multiple work orders and using a right click menu, which is explained in detail below. Fig. 16 Selecting multiple work orders Left click and drag the mouse to select two or more work orders (Fig. 17). Fig. 17 28 Quick start Changing the status of multiple work orders After selecting multiple work orders, right click the mouse, and the right click menu will appear (Fig. 18). The three options beginning "Set to…" refer to status. Click the desired status. All work orders selected will be set to the same status, and the dialog will close. Fig. 18 Destination tabs At the bottom of the Scheduler application window are tabs corresponding to the TigerStops defined for this system. These are destination tabs (Fig. 19). When the status of work orders is changed to RELEASED, they are moved to their destination tabs. Unreleased work orders are at the Fig. 19 "Unreleased" tab, which is what you see when the Scheduler application window first opens. Once work orders have been released, they are visible at the controller. 29 Workflow Manager Interface Working with the Toolbar Tool bars are a great shortcut to commonly used features. To invoke the action of the tool bar buttons, click with the left mouse button on the tool you need. If you are not sure which tool you need, place the mouse pointer on top of a button without clicking and a tool tip will remind you what the button does. Fig. 1 Working with the drop-down Menus To choose a menu item, just click on it with the mouse, OR hold down the ALT key and press the underscored character of the menu item. For example, ALT-F opens the File menu. To view all the drop-down menus in rapid succession, just click on anyone of them, and then glide the cursor across the others. As the cursor moves over a menu item, the drop-down will automatically display. Fig. 2 Continue to Drop-Down Menus, File. Working with the grid context Menu If the grid is populated, the user can access a drop-down context menu by right clicking the mouse with any cell selected on the grid area. Changes made using a context menu function will affect and be referenced to the cell selected. If a context menu function is grayed out, it is not available. Continue to the Grid Context Menu … Fig. 3 What is a work order? A work order is the file that contains the list of parts to be processed. Files from cut listing software (job files) are converted into the work orders seen in Workflow Manager. See also: File Requirements A work order can also be manually created in Workflow Manager. The work order is displayed inside the work space after it has been sorted through the Part Select process. The work order contains individual tabs for similar parts. Each tab has independent properties and can be edited or deleted individually. In the Workflow Manager main window parts are displayed in rows (lines) with column headers. These headers are obtained from the original file with the headers of sort columns highlighted. Sort columns cannot be edited or updated. All other information can be modified. 31 Pattern Optimizer New with Workflow Manager 5.4 is Pattern Optimizer, which best fit optimizes any work order by converting it into a Pattern Group. Pattern Optimizer functions within Workflow Manager and does not require TigerStop to be enabled for optimizing. Open a job file Click [Grab job] to open up a job file and to select the parts you want to process. Clicking [Grab job] opens the "Grab job" screen. Select the job file you want by clicking on it. Its name will appear in the "File name" drop down. Click [Open] to accept the file. 33 Workflow Manager 5.4 User Manual Select the parts to process and set the destination The "Item/Part sorted by Partname" dialog box opens. If any changes are necessary to the sort, make them. Set the destination for the list, either Global or a specific TigerStop. Click [OK] to accept and open the job file. Uncheck the Optimize check box. 34 Scheduler Interface Initiate Pattern Optimizer Click the Pattern Optimizer button. The pattern optimizing warning dialog will appear. Click [Yes] to proceed. This operation can still be reversed later on. 35 Workflow Manager 5.4 User Manual Enter materials available in the Optimize spreadsheet The first time the Optimize screen pops up, it will be empty. Enter your materials, stock lengths, quantities available and prices. The column widths are adjustable as in Microsoft Excel by dragging the left side of a column in the header row. Check the box in the Use column for every material you want to use. Some boxes may remain unchecked. Enter the Trim cut, the Drop length, and the Kerf. The data in this spreadsheet must reflect accurate inventory of available stock in order to optimize, but it is NOT decremented by use; in other words, it is NOT an inventory system. When you have finished entering data at this screen, click [Create Optimized Patterns]. Generate and view the Pattern Optimizer result Pattern Optimizer generates the Pattern Group resulting from your selections and the result appears in the Workflow Manager main window. Row and Layout are pattern references. Material and Stock Length derive from the Optimize dialog. Length is part length. Part Reference is the part line number in the original list before optimization. This screen is the last chance to discard the results of Pattern Optimizer. 36 Scheduler Interface Accept or reject the pattern optimized work order This is Pattern Optimizer's solution. If you like the result and want to use it, click [Accept]. If you do not want to use the result, click [Cancel], and your original data will be unchanged. The work order data reordered by Pattern Optimizer Work Order type has changed to Pattern Gp. Only the tab that was selected was optimized. Continue at… Send your work order to TigerServer Grid context menu If the grid is populated, the user can access a drop-down context menu by right clicking the mouse with any cell selected on the grid area. Changes made using a context menu function will affect and be referenced to the cell selected. Cut – Cuts the selection and places the data on the clipboard. Copy – Copies the selected data. Paste – Pastes the data from the clipboard to the selection. Delete row – Deletes the currently selected row or rows. Add row – Adds a new row to the work order. Add column – Adds a new column to the work order. Delete column – Deletes the selected column. Change key value – Allows the user to change a key value for this work order. Only enabled when the user has selected a cell in a key value column (tinted light blue). Delete work order – Deletes the work order. 37 Workflow Manager 5.4 User Manual Scheduler Workflow Manager has an online tutorial, The Scheduler. To exit a tutorial, press ALT+F4. Introduction Scheduler is the software component of Workflow Manager that lets the user manipulate work orders after they have been sent to TigerServer. Scheduler also acts as a work flow monitor. If a particular department is backed up, the user can reroute work orders to another TigerStop for processing. That way work keeps flowing through production. Scheduler can also query TigerServer and update the status of work orders in the system. Starting Scheduler Start Scheduler from the Workflow Manager splash screen Scheduler can be started from the Workflow Manager splash screen (Fig.1) by clicking "Scheduler." Fig. 1 Start Scheduler from the Scheduler desktop icon It's probably faster and easier to start scheduler from its desktop icon . Step through Scheduler by starting at the Scheduler Main Window in the Screen Shot Library. Scheduler Interface Working with the Toolbar Tool bars are a great shortcut to commonly used features. To invoke the action of the tool bar buttons, click with the left mouse button on the tool you need. If you are not sure which tool you need, place the mouse pointer on top of a button without clicking and a tool tip will remind you what the button does. Working with the drop-down Menus To choose a menu item, just click on it with the mouse, OR hold down the ALT key and press the underscored character of the menu item. For example, ALT-F opens the File menu. To view all the drop-down menus in rapid succession, just click on anyone of them, and then glide the cursor across the others. As the cursor moves over a menu item, the drop-down will automatically display. 38 Open a job file? To open a job file, use the "File" drop-down menu, and click "Grab job" (Fig. 1), or click the [Grab job] button on the navigation bar (Fig. 2). Fig. 2 Fig. 1 The "Grab job" window will open (Fig. 3). Fig. 3 In this example, we are working with a Cabinet Vision file. Notice that only Cabinet Vision files (file extension *.cut) are displayed. Click [Open]. The "Item/Part sorted by Partname" window opens (Fig. 4). Fig. 4 The parts from the job file you just opened will be displayed on the left. Parts that you have previously selected will appear on the right. If you have previously selected a destination TigerStop for these parts, that will be saved and displayed too. Click [OK] and Workflow Manager will process the data. 39 Open a Pattern Group job file? Set the cut list program to "PartnerPak+Cutting Instructions". Fig. 2 Fig. 1 Select PartnerPak+Cutting Instructions at the drop-down window (Fig. 1), and click OK (Fig. 2) to save it. Now, when you go to grab a job, only those files of the correct type will appear. To open a Pattern Group job file, use the "File" drop-down menu, and click "Grab job" (Fig. 1), or click the [Grab job] button on the navigation bar (Fig. 3). Fig. 4 Fig. 3 The "Grab job" window will open, allowing you to select the right work order (Fig. 5). In this example, we are working with a PartnerPak file. Notice that only PartnerPak files (file extension *.txt) are displayed. Click [Open]. The "Item/Part sorted by Filename" window opens (Fig. 6). Notice the Item/Part sorted by… window is not "…sorted by Partname", but "…sorted by Filename" (Fig. 6). For Pattern Group work orders, the file path will appear in the left window instead of a list of parts. Click the [>>] button to select the entire file. Fig. 5 41 Workflow Manager 5.4 User Manual Click [OK] and Workflow Manager will process the data (Fig. 7). Fig. 6 Fig. 7 Pattern Group work orders are already optimized. Do NOT click Pattern optimizer Pattern Work Orders should not be edited In Pattern Group work orders, the first row of each pattern is yellow, and the other rows are gray, to indicate they cannot be edited without corrupting the pattern. A warning will pop up to alert the user of this fact. The user can still edit the work order, but as soon as the warning is acknowledged, the cells change from gray to white (Fig. 8) to indicate they can be edited. Fig. 8 Once a pattern group work order has been downloaded to the TigerStop controller, it cannot be edited, only deleted. 42 . Load a work order? To load a previously saved work order into the work space (Fig. 1) … Fig. 1 … use the "File" drop-down menu, and click "Open work order" (Fig. 2). Fig. 2 The "Select a Work Order file" dialog box (Fig. 3) will list all of the work orders saved on the system. Fig. 3 Select the work order file that was previously saved (Fig. 4), and click [OK]. Fig. 4 43 Workflow Manager 5.4 User Manual Your work order is read in and displayed (Fig. 5). Fig. 5 Notice that a new part group tab was also automatically created. 44 Edit a work order? Work orders that have been loaded into the Workflow Manager main window can be edited there. There are two ways to edit a work order, the Edit drop-down menu, and selecting a cell or group of cells inside the main window, and right clicking for a menu of edit operations. Edit drop-down menu Select a function in the Edit drop-down menu by holding the cursor over it and clicking. You can also select some of the functions with keyboard shortcuts. If a function is grayed out, it is not available for items in your active window. 4. Cut – Cuts whatever is selected to the clipboard. 5. Copy – Copies the selected to the clipboard. 6. Paste – Pastes the contents of the clipboard. 7. Delete row – Deletes the entire row selected. 8. Delete column – Deletes the entire column selected. Select a cell and right click 9. Cut – Cuts the selection and places the data on the clipboard. 10. Copy – Copies the selected data. 11. Paste – Pastes the data from the clipboard to the selection. 12. Delete row – Deletes the currently selected row or rows. 13. Add row – Adds a new row to the work order. 14. Add column – Adds a new column to the work order. 15. Delete column – Deletes the selected column. 16. Change key value – Allows the user to change a key value for this work order. Only enabled when the user has selected a cell in a key value column (tinted light blue). See also Grid Context Menu. 17. Delete work order – Deletes the work order. See also Drag and copy work cell values 45 Print a work order? To print the currently displayed work order, click the Print button in the navigation bar. CAUTION! The currently displayed work order can be a very large file. Every column and every row of data will be printed. This could run into hundreds of pages! To make a work order printable, reduce the number of field columns by configuring the view. Save a work order? 1. To save a work order, use the "File" drop-down menu, and select "Save work order" (Fig. 1). Fig. 1 Fig. 2 2. A dialog box will prompt you to enter a file name (Fig. 2). Enter it, click [OK] and your work order will be saved. 47 Download a work order? DnLd, Download, is a List function that gives TigerStop seamless access to your part lists stored in Scheduler. TigerStop must be enabled for Download. The instructions below explain how to use DnLd. Work orders must already be sent to Scheduler. Have you done the following? Added the TigerStops being Selected the cut listing Opened a job file? used? software? Selected the parts to cut? Selected destination or global? Sent the work order to TigerServer? Released work orders? When your work orders are at the Scheduler, you can download them to TigerStop. Start at the Ready Screen. 18. Press [D] to access List. 19. Press [D] to access the DnLd function. Next, the DL Style screen displays. At DL Style you can view and change, if necessary, the parameter governing how the downloaded part lists will be viewed and accessed from Workflow Manager. This parameter is set up at the Part List menu. 20. If the download style is correct, press [D] to confirm. 21. To change the DL style, press [B] or [C] to trigger password prompt. 22. Enter the password, and press [=]. 23. Press [B] or [C] to scroll through the available download styles. Pri-Global = Global tab, ordered by assigned priority. WO#-Global = Global tab, ordered by work order number. WO#-Local = Local tab, ordered by work order number. Pri-Local = Local tab, ordered by assigned priority. 24. When the desired DL style displays, press [D] to save selection. The controller advances to one of two screens, depending on the DL style selected, by work order or by priority: Select by Work Order Number Select by Priority 49 Define the work order starting number? The work order default starting number is 1000. The starting number can be defined by the user in two ways: 1. File Configuration 2. Options/Advanced/Edit profile Change a work order number? To change a work order number, you must first have a work order open in the work space (Fig. 1). See also Make Work Order and Job File Number the Same. Fig. 2 Fig. 1 Click on the Work order drop-down menu, and then on "Change number" (Fig. 2). Fig. 3 Fig. 4 The "Renumber work order" window opens (Fig. 3). Check the "Apply to just this work list" box. Type a new number for the work order in the box (Fig. 4) and click [OK]. 51 Workflow Manager 5.4 User Manual Fig. 5 The number of the work order has been changed (Fig. 5). The work order number can only be numbers. Text names are not supported. Change a work order destination? To change a work order destination, you must first have a work order open in the work space (Fig. 1). Fig. 1 Click on the Destination drop-down combo box (Fig. 2), and then select a new TigerStop destination from the list (Fig. 3). Fig. 2 Fig. 3 The destination for this work order changes to your new selection (Fig. 4). Fig. 4 52 Set destination to Global? To set up a work order so that any TigerStop on your network can process it, you must change the destination to Global. First, a work order must be open in the work space (Fig. 1). Fig. 1 Click on the Destination drop-down combo box (Fig. 2), and then select Global from the list (Fig. 3). Fig. 2 Fig. 3 The destination for this work order changes to Global (Fig. 4). Fig. 4 53 Add a comment to a work order? To add a comment to a work order, you must first have a work order open in the work space (Fig. 1). Fig. 1 There are 3 ways you can add a comment to your work order. Use the "Work order" drop-down menu, and click "Write comment" (Fig. 2). Click the [Add comment] button in the properties window (Fig. 3). Click the "write comment" button on the tool bar (Fig. 4). Fig. 3 Fig. 4 Fig. 2 When you use one of the above methods to add a comment, the "Write comment" window will open (Fig. 5). Fig. 5 Write your comment in the window, and click [OK]. Fig. 6 Your comment will be displayed in the properties window (Fig. 6) for the work order. 55 Configure my TigerStop? At the Workflow Manager splash screen, click [Continue] to open the main application window (Fig. 1). Fig. 1 Click "Options" to open the drop-down (Fig. 2). Click "Workflow Manager configuration." Fig. 2 The "Configuration" dialog will open (Fig. 3). Select the "TigerStop" tab. Click [Add] from the buttons to the right of the screen. The "Add TigerStop" dialog box will open (Fig. 4). Fig. 3 - On a first install, the screen should be blank, no TigerStops configured. Fig. 4 1. From the "Comport" drop-down combo box (Fig. 5), select the Comport that the TigerStop is hooked up to. 2. In the "Name" text box, give the TigerStop an appropriate name such as "Frame saw" (Fig.6). 57 Workflow Manager 5.4 User Manual 3. From the "Baud rate" drop-down combo box, select the baud rate that EXACTLY matches the baud rate setup for that TigerStop. The baud rates MUST match exactly. If the controller baud rate has not been changed from factory default, it will be 115200 for TigerStops up to version 4.72, and 57600 for TigerStops version 5.03 and later. Fig. 5 Fig. 6 Change my TigerStop parameters? At the Workflow Manager splash screen, click [Continue] to open the main application window (Fig. 1). Fig. 1 Click "Options" to open the drop-down (Fig. 2). Click "Workflow Manager configuration." Fig. 2 The "Configuration" dialog will open (Fig. 3). Select the "TigerStop" tab. You will see a list of configured TigerStops (Fig. 4). 58 Change My TigerStop Parameters Fig. 3 Fig. 5 Fig. 4 1. Select the line containing the TigerStop you want to edit (Fig. 5). 2. Click [Edit]. 3. The "Edit TigerStop" dialog (Fig. 6) will open, containing 3 parameters: 4. Comport 5. Name 6. Baud rate 7. Edit the parameters you want, and click [OK]. 8. Click [Cancel] to exit without saving changes. In the example below (Figs. 6, 7), the baud rate has been changed from 57600 to 9600. Fig. 6 Fig. 7 59 Change TigerServer's Location? At the Workflow Manager splash screen, click [Continue] to open the main application window (Fig. 1). Fig. 1 Click "Options" to open the drop-down (Fig. 2). Click "Workflow Manager configuration." Fig. 2 The "Configuration" dialog will open (Fig. 3). Select the "TigerServer" tab (Fig. 4). On a first install, the default location of TigerServer will be on the same computer as the Workflow Manager software, displaying Localhost. If TigerServer has been installed on a computer other than the one that Workflow Manager is installed, the name of the host computer must be changed. Fig. 3 Fig. 4 1. From the drop-down combo box (Fig. 4), select the name of the computer hosting TigerServer. The drop-down will display all the computers on your network. 2. Click [OK] to accept the new location of TigerServer, and exit the screen. 61 Change my cut list program? At the Workflow Manager splash screen, click [Continue] to open the main application window (Fig. 1). Fig. 1 Click "Options" to open the drop-down (Fig. 2). Click "Workflow Manager configuration." Fig. 2 The "Configuration" dialog will open at the "TigerStop" tab (Fig. 3). Click on the "Settings" tab (Fig. 4). You will see a drop-down combo box labeled "Work order program." This means "cut list program." Fig. 3 Fig. 4 1. Click the drop-down to view cut list programs available and select a different program (Fig. 4). 2. Click [OK] to save the change, or… 3. Click [Cancel] to exit without making a change. 63 Change to metric units? Workflow Manager's default measuring system is inches. If your work orders are in metric units, Workflow Manager must be informed that the values it encounters are metric, not inches, so that it can express material requirements in linear millimeters. At the Workflow Manager splash screen, click [Continue] to open the main application window (Fig. 1). Fig. 1 Click "Options" to open the drop-down (Fig. 2). Click "Workflow Manager configuration." Fig. 2 The "Configuration" dialog will open. Select the "Settings" tab (Fig. 3). Click the check box labeled "Metric" to change to metric units (Fig. 4). Fig. 3 Fig. 4 Workflow Manager does not do any mathematical conversion between metric and inches. If the "metric" box is checked, the lengths of your pieces, expressed in millimeters, will simply be added up, and your total material requirements displayed as linear mm (Fig. 5). Fig. 5 65 Change to inches? If you were running metric work orders, and then have to run some work orders in feet and inches, you have to change Workflow Manager back to inches, which is its default measurement system, so that it can express material requirements in linear feet. At the Workflow Manager splash screen, click [Continue] to open the main application window (Fig. 1). Fig. 1 Click "Options" to open the drop-down (Fig. 2). Click "Workflow Manager configuration." Fig. 2 The "Configuration" dialog will open. Select the "Settings" tab. Uncheck the check box labeled "Metric" (Fig. 3) to change the display back to inches (Fig. 4). Fig. 3 Fig. 4 Workflow Manager does not do any mathematical conversion between metric and inches. If the "metric" box is NOT checked, the lengths of your pieces, expressed in inches, will simply be added up, divided by 12, and your total material requirements displayed as linear feet (Fig. 5). Fig. 5 67 Change the Color Scheme? At the Workflow Manager splash screen, click [Continue] to open the main application window (Fig. 1). Fig. 1 Click "Options" to open the drop-down (Fig. 2). Click "Workflow Manager configuration." Fig. 2 The "Configuration" dialog will open at the "TigerStop" tab (Fig. 3). Click on the "Settings" tab (Fig. 4). You will see a drop-down box labeled "Select background color." Fig. 3 Fig. 4 1. Click the drop-down box to view available background colors (Fig. 5) and select a different color. 2. Click [OK] to save the change (Fig. 6), or… 3. Click [Cancel] to exit without making a change. 69 Workflow Manager 5.4 User Manual Fig. 6 Fig. 5 See also Custom Background Colors Make work order and job file number the same? At the Workflow Manager splash screen, click [Continue] to open the main application window (Fig. 1). Fig. 1 Click "Options" to open the drop-down (Fig. 2). Click "Workflow Manager configuration." Fig. 2 The "Configuration" dialog will open at the "Cutlist program" tab. Click on the "Settings" tab (Fig. 3). You will see a check box labeled "Use job number from file." 70 Print a Different Label File Fig. 3 1. 2. 3. 4. Check the check box to use the job file number as the work order number. Click [OK] to save the change. Click [Cancel] to exit without making a change. If you do NOT want the job file number to be the same as the work order number, leave the box unchecked. Change my cut list filters? At the Workflow Manager splash screen, click [Continue] to open the main application window (Fig. 1). Fig. 1 Click "Options" to open the drop-down (Fig. 2). Click "Workflow Manager configuration." Fig. 2 The "Configuration" dialog will open at the "TigerStop" tab (Fig. 3). Click on the "Filters" tab (Fig. 4). In the left window is a list of available filters, and on the right, the filters that will be used. 71 Workflow Manager 5.4 User Manual The available filters are automatically set up for off-the-shelf cut list programs, but if you created a profile using the File Configuration Wizard, they come from the Sort selection screen. Fig. 3 1. 2. 3. 4. 5. 6. Fig. 4 [>] adds any filter selected from the "Available filters" to the "Selected filters" list. [>>] adds ALL filters to the "Selected filters" list. [<] removes any filter selected from the "Selected filters" list. [<<] removes ALL filters from the "Selected filters" list. Click [OK] to save the change, or… Click [Cancel] to exit without making a change. Change the Item/Part sort? Whenever a work order is loaded into Workflow Manager's main application window, the Item/Part Sort screen (Fig. 1) displays first, to allow the user to view and, if necessary, change the sort method for the work order. The most commonly used sort method is "Sort by Partname," but that is not the only way a work order can be sorted. For example, Pattern Group work orders will use "Sort by Filename" as the sort method. If you want to change the sort method of a work order, it must be changed here, at the Item/Part Sort screen. There is no way to access this screen again, once the work order is open in the main window, except by reloading the work order. Fig. 1 72 Fig. 2 Print a Different Label File 1. To change the sort, click "Options" and then "Sort" (Fig. 2) to open a drop-down menu listing all available sort methods. Fig. 3 Fig. 4 2. Select an alternate sort in the drop-down. The name of the Item/Part Sort window changes to match your selection, and the left window fills with the available parts (or materials, or jobs, or thicknesses, etc., Fig. 3). 3. Use the arrow buttons between the two windows to move the desired sort criteria to the left window. [>] adds any sort item selected from the "Part list" to the "Selected parts" list. [>>] adds ALL sort items in the "Part list" to the "Selected parts" list. [<] removes any sort item selected from the "Selected parts" list. [<<] removes ALL sort item from the "Selected parts" list. 4. Click [OK] to save the change, or… 5. Click [Cancel] to exit without making a change. Turn label printing on and off? At the Workflow Manager splash screen, click [Continue] to open the main application window (Fig. 1). Fig. 1 Label printing is turned on or off on a "per cut list" basis at the Part/Item sorted by Partname screen (Fig. 2), which opens whenever you open a job file. 73 Workflow Manager 5.4 User Manual Fig. 2 Check the box "Enable printing" to turn label printing on. Uncheck the box to turn label printing off. Print a different label file? At the Workflow Manager splash screen, click [Continue] to open the main application window (Fig. 1). Fig. 1 Label files are specific to a job file, so to print a different label file, you must open its job file. To open a job file, use the "File" drop-down menu, and click "Grab job" (Fig. 2a), or click the [Grab job] button on the navigation bar (Fig. 2b). Fig. 2b Fig. 2a The "Grab job" window will open (Fig. 3). 74 Print a Different Label File Fig. 3 In this example, we are working with a Cabinet Vision file. Notice that only Cabinet Vision files (file extension *.cut) are displayed. Click [Open]. The "Item/Part sorted by Partname" window opens (Fig. 4). Fig. 4 Place a check mark in the "Enable printing" check box, and using the […] browse button, look for the label file that you want to print (Fig. 5). 75 Workflow Manager 5.4 User Manual Fig. 5 Select the label file, Click [Open] to accept the file, or [Cancel] to exit without saving your selection. Fig. 6 The label file appears in the "Label file" window. Click [OK] to accept the file, or [Cancel] to exit without saving your selection. 76 Start or stop TigerServer? TigerServer can be manually started and stopped. Fig. 1 Fig. 2 1. From your Windows desktop, click [Start], select "Settings" and "Control Panel" (Fig. 1). 2. When the Control Panel window opens (Fig. 2), select "Administrative Tools." 3. When the Administrative Tools window opens (Fig. 3), click "Services" to start it, and when the Services (Local) window opens, scroll down to "PAI TigerServer. Fig. 3 Fig. 4 4. Select PAI TigerServer. If the service is currently running (Fig. 4), you will have the option of stopping the service. If the service is not currently running, you will have the option to start the service. Possible communication conflicts If you are using another peripheral, such as a digital camera, that downloads to the same port as TigerServer, you must stop TigerServer, to be able to use the other peripheral. TigerServer then must be restarted. Both actions can be done using the links Stop the service, and Restart the service (Fig. 4). 77 Make sure TigerServer is running correctly? TigerServer has a debug mode built into it. To see the commands that TigerServer is acting on, from your Windows desktop, click [Start], select "Run" and, when the Run dialog opens (Fig. 1), type “cmd” in the run box, and click [OK]. Fig. 1 This will start a command shell session similar to a DOS window (Fig. 2). Most of the old DOS command set is available. Change to the TigerServer directory. The default installation path is: cd "\Program files\TigerStop\TigerLink\TigerServer” NOTE: Your installation path may differ. Fig. 2 Once you have successfully changed to the TigerServer directory (Fig. 3), start TigerServer in debug mode, “TigerServer /debug”. Fig. 3 Fig. 4 If the TigerServer is currently running, the service will be temporarily suspended while the debug is running. 79 Workflow Manager 5.4 User Manual Fig. 5 Press the [ESC] to exit the program. 80 Design a label layout? Workflow Manager has an online tutorial, How to Custom Design your Labels. To exit a tutorial, press ALT+F4. The "Label Designer" main window (Fig. 1) is opened from Workflow Manager's main application window using the "Label" drop-down menu. Fig. 1 Click on "Design a label" (Fig. 2) and the "Label Designer" main window will open (Fig. 3). Fig. 2 Blank default label Fig. 3 The label designer will open a blank default label (Fig. 3) if this is your first label; otherwise it will open the label that is set in your printing configuration. 81 Workflow Manager 5.4 User Manual The size of the labels for a 2” printer is 2.20” wide by 1.25” high. If you have a 4” printer, you will have to adjust the size of the label. See the Label Designer tutorial for how to do this. The items under “List of variables” are the fields you can use to print your labels. All the fields that you are working with will be displayed in the lower window (Fig. 4). Drag and drop fields from the variable list to the design window To print a field, simply drag-and-drop that field from the list of variables in the lower half of the label designer into the design window in the upper half. Fig. 4 Adjust field sizes as they will display on the label Fig. 5 When you have dragged the field over the label design area, you will a marquee bounding box for that field (Fig. 5). At this point you can resize the field, or you resize it after you locate its final position on the label. Display the field name by releasing the mouse button Fig. 6 When the mouse button is released, the field name will be displayed (Fig. 6). With the field selected, grab the border of the field box. The cursor will turn into a movement cursor when you are in the right position. While you hold the left mouse button down, you will be able to move the field around on the label. When you are satisfied with the position of the label, release the mouse button. 82 Design a Label Layout Final positioning of the label fields Fig. 7 The field will print on the real label just as it appears on the virtual label. To see how the label will look when printed on a printer, switch to the layout preview mode (Fig. 8). Fig. 8 The field will be displayed as it would appear on a real label along with actual data to help with positioning the field better. If there is nothing after the = sign, do not worry, the data would come from one of your cut list files if you had previously opened one. Notice that the field box has resizing handles on it. Grab the lower right handle and resize the field so you can see the entire field (Fig. 9). Fig. 9 Repeat for all of the fields that you want to appear on the label. You will probably want to Save As, using another filename so you can keep a clean copy of the original label. Be sure to save your label! Also be sure to set this label file as the one you want printed in the Printing configuration. 83 Configure a custom job file? If the user is not using "off the shelf" cut listing software, but instead uses spreadsheet or other software to generate a cut list, Workflow Manager has a built-in utility that customizes the way that it reads job files. It's a simple process and needs to be done only once (unless the file structure changes). To configure a custom job file, use the File Configuration Wizard. A complete step by step guide to this utility begins at Fig. 17 "File Configuration Wizard" in the Workflow Manager Reference: Screen Shot Library. Workflow Manager also has an online tutorial, How to Configure Your Files. To exit a tutorial, press ALT+F4. File Configuration Wizard Use the File Configuration Wizard ONLY if you are creating a cut list using a spread sheet program such as Microsoft Excel, or a cut listing program that is NOT in the drop-down list of Work Order programs at the Configuration screen. Workflow Manager has an online tutorial, How to Configure Your Files. To exit a tutorial, press ALT+F4. The File Configuration Wizard is a series of help screens. To get to it, you start at Workflow Manager's main application window using the "Options" drop-down menu. Click on "Options" and then move the cursor over "Advanced" which will display a drop-down containing three more options. Click on "File configuration" and the "File Configuration Wizard Introduction" screen (Fig. 17) will open. Fig. 17 File Configuration Wizard Introduction screen This is just an opening screen. It gives you instructions on backing out of it, so you can check the standard defaults. When once you have checked to see that the program you use to generate cut lists is NOT listed in the standard defaults, you come back to this screen and continue by clicking [Next>>]. As usual, [Cancel] backs you out of this screen. 85 Workflow Manager 5.4 User Manual File Configuration browse Clicking [Next>>] at the File Configuration Wizard screen takes you to the first screen of the wizard, the "browse for data file" screen (Fig. 18). Fig. 18 File Configuration 'browse for data file' screen 1. […] lets you look for the file you want to use. When you find it, it will automatically fill in the window labeled "Browsing for your data file." 2. You can also enter a path and file name manually into the window. 3. [<<Back] returns you to the previous screen, [Cancel] exits the program, or continue by clicking [Next>>]. File Configuration delimiter Clicking [Next>>] at the File Configuration browse screen takes you to the next screen of the wizard, the "select delimiting character" screen (Fig. 19). Fig. 19 The File Configuration 'select delimiting character' screen has the following parts: 4. The window labeled "Line of data from your file" displays a line of data from the file that was selected at the previous screen. 5. The selection cursor is shown above highlighting the comma after JOB. 6. [<] moves the selection cursor one character to the LEFT. 7. [>] moves the selection cursor one character to the RIGHT. 8. [Up] displays the previous line in the data file. 9. [Dn] displays the next line in the data file. 86 Configure a Custom Job File 10. [<<Back] returns you to the previous screen, [Cancel] exits the program, or continue by clicking [Next>>]. File Configuration length Clicking [Next>>] at the File Configuration delimiter screen takes you to the next screen of the wizard, the "select the length column" screen (Fig. 20). Highlight the length column by clicking on it, then click [Next>>]. Fig. 20 The File Configuration 'select the length column' screen has the following parts: 11. [Up] displays the previous line in the data file. 12. [Down] displays the next line in the data file. 13. [<<Back] returns you to the previous screen, [Cancel] exits the program, or continue by clicking [Next>>]. File Configuration quantity Clicking [Next>>] at the File Configuration length screen takes you to the next screen of the wizard, the "select the quantity column" screen (Fig. 21). Highlight the quantity column by clicking on it, then click [Next>>]. Fig. 21 The File Configuration 'select the quantity column' screen has the following parts: 87 Workflow Manager 5.4 User Manual 14. [Up] displays the previous line in the data file. 15. [Down] displays the next line in the data file. 16. [<<Back] returns you to the previous screen, [Cancel] exits the program, or continue by clicking [Next>>]. File Configuration select job Clicking [Next>>] at the File Configuration quantity screen takes you to the next screen of the wizard, the "select the job column" screen (Fig. 22). This is an OPTIONAL step. Highlight the job column by clicking on it, then click [Next>>]. Fig. 22 The File Configuration 'select the job column' screen has the following parts: 17. [Up] displays the previous line in the data file. 18. [Down] displays the next line in the data file. 19. A sample of what your work order number might look like is displayed below the data window. 20. The starting number of sequential work order numbering is displayed in a field below the data window. The arrows at the starting number field let you decrement (<1000) or increment (>1000) the starting number. 21. [<<Back] returns you to the previous screen, [Cancel] exits the program, or continue by clicking [Next>>]. Using sequential work order numbering If you select the job column, a sample of what your work order number might look like is displayed below the data window, and sequential numbering is DISABLED. Workflow Manager captures only the first six digits of your work order number, which must be numeric. Workflow Manager does not support text names as work order numbers. If you select the job column, and the work order number in that column consists of letters, it will display as 0 (Fig. 22). If you do NOT select the job column, Workflow Manager will use a sequential number to identify work orders, starting with 1000. By not selecting the job column and enabling sequential numbering, you can use an auto-generated sequential number, or you can insert a number of your choice in the starting number box as the starting number of a sequence. 88 Configure a Custom Job File Create Column Headers Clicking [Next>>] at the File Configuration select job screen takes you to the next screen of the wizard, the "Create Column Headers" screen (Fig. 23a). This screen lets you use the field names from your cut list data as the column headers, or create new column headers. Fig. 23a The File Configuration 'Create Column Headers' screen has the following parts: 22. Check box labeled "Use my field names…", if checked will use the field names assigned by your cut listing software (Fig. 23b), if unchecked, you can enter new names on the appropriate lines in the "Name" window on the right. If you do assign new names, when you're done, clicking [Next>>] saves and exits this screen. 23. [<<Back] returns you to the previous screen, [Cancel] exits the program, or continue by clicking [Next>>]. Fig. 23b Choose your sort Clicking [Next>>] at the Create Column Headers screen takes you to the next screen of the wizard, the "Choose your sort" screen (Fig. 24). This screen lets you create separate work orders for your original job file data, based on sorting criteria you choose. 89 Workflow Manager 5.4 User Manual Fig. 24 The File Configuration 'Choose your sort' screen has the following parts: 24. Check boxes in the "Use as filter" window, if checked, will use the column in the "Name" window as filters. 25. [<<Back] returns you to the previous screen, [Cancel] exits the program, or continue by clicking [Next>>]. File Configuration key fields Clicking [Next>>] at the Choose your sort screen takes you to the next screen of the wizard, the "Select key fields" screen (Fig. 25). Fig. 25 The File Configuration 'Select key fields' screen has the following parts: 26. The window on the left lists the filters you selected at the previous screen. 27. The window on the right is where you select up to three filters to be key fields. 28. [<<Back] returns you to the previous screen, [Cancel] exits the program, or continue by clicking [Next>>]. 90 Configure a Custom Job File Main Screen Display Clicking [Next>>] at the File Configuration key fields screen takes you to the next screen of the wizard, the "Main Screen Data Display" screen (Fig. 26). It is at this screen that you select which fields will appear in Workflow Manager's main window. Fig. 26 The File Configuration 'Main Screen Display' screen has the following parts: 29. The window on the left lists the fields in your job file. 30. The window on the right is where you select which fields will be visible at Workflow Manager's main window. 31. All the check boxes in the white window are checked by default. Uncheck any box to remove the field from the main window. In the example (Fig. 26) two fields have been unchecked. 32. [<<Back] returns you to the previous screen, [Cancel] exits the program, or continue by clicking [Next>>]. File Configuration Custom Link Clicking [Next>>] at the Main Screen Display screen takes you to the next screen of the wizard, the "File Configuration Custom Link" screen (Fig. 27). It is at this screen that you add a name to your custom link. Fig. 27 91 Workflow Manager 5.4 User Manual The File Configuration 'Custom Link' screen has the following parts: 33. An empty window in which you enter a name for your custom link. 34. [<<Back] returns you to the previous screen, [Cancel] exits the program, or continue by clicking [Next>>]. File Configuration Finish Clicking [Next>>] at the File Configuration Custom Link screen takes you to the next screen of the wizard, the "File Configuration Finish" screen (Fig. 28). Clicking [Finish] at this screen saves your work and exits. Fig. 28 The File Configuration 'Finish' screen has the following parts: 35. [<<Back] returns you to the previous screen, [Cancel] exits the program, or save your work and exit by clicking [Finish]. 92 Turn debug mode on and off? Debug mode is turned on and off at the "About Workflow Manager" screen (Figs 1,2) which is opened from Workflow Manager's main application window using the "Help" drop-down menu, and clicking "About Workflow Manager." Besides looking at the version numbers, use this screen also to check to see whether debug mode is turned on or off. For more information about debug mode, see Log files. Fig. 1 - About Workflow Manager window, with Debug Off Fig. 2 - About Workflow Manager window, with Debug On How to turn debug mode ON and Off Hold down the Alt key and hit the F10 key on your computer keyboard. This is a toggle to turn debug mode ON or OFF 93 Registry entries WARNING! Editing the registry can seriously damage your computer system. Do not edit the registry manually unless you are very sure of what you are doing! The registry entries for Workflow Manager are located in HKLM\Software\TigerStop\Product Manager\Version 1.0 HKEY_LOCAL_MACHINE ____Software ________TigerStop ____________Product manager ________________Version 1.0 ____________________Configuration AppPath FirstRun LastFileOpened String—The application path String—Flag if the app has run for the first time or not String—Path to the last file opened Configuration CutlistExtension CutlistProgram Debug Definition EnableRefresh EnableSplash Fade JobFromFile Lang file Language PrintEnable PrintLabel RefreshTime ResourceDLL Sequence ServerName ShowToolTip ShowUploadDlg SourceDir UOM String—The extension for the job files String—The name of the cut list program String—TRUE if in debug mode String—The name of the cut list definition file String—TRUE if auto refreshing is enabled String—TRUE if the splash screen is to be shown DWORD—1 if the Scheduler jobs fade from view BOOL—TRUE if the job numbers are taken from the job file String—The name of the language file String—The display language String—TRUE if printing is enabled String—Path and name of the label file to print String—Time in minutes to refresh the display String—The name of the resource DLL DWORD—The sequence number for work orders String—The name of the server computer DWORD—1 if tool tips are to be shown String—TRUE if the dialog is to be shown String—The directory where job files are kept BOOL—0 for English, 1 for metric 95 Directory structure The default installation directory is C:\Program files\TigerStop\TigerLink. \cutlists \def \default \filters \language files \logs \temp \tigerserver \tutorials Saved cut list files are stored here Definition files are stored here Original files are stored here Part select filter files are stored here Language files are stored here Log files for debugging are stored here Temporary files are stored here The TigerServer files are stored here The tutorials are stored here Filter files The filter files are plain ASCII text files (*.flt files) that Workflow Manager uses to populate the Item/Part sorted by PART window. Each tab that is created will be saved as a different file. Upon entering the Item/Part sorted by PART window, all of the filter files are read, the tabs created, and the parts are displayed. The structure of the file is very simple. Note that the lines in the files are not numbered. The numbers below are just used for illustration purposes. This is an example filter file: 1. Frames 2. Frame saw 3. Bottom rail 4. Top rail 5. Rail What does it mean? Line 1 is the name of the tab as the user named it. In this case Frames. Line 2 is the destination TigerStop, if the user has assigned a destination. If a destination has not been assigned, then this line will be blank. Lines 3, 4 and 5 are the parts that the user has previously selected that are used to populate the selected parts side of the Parts select window. 97 Workflow Manager 5.4 User Manual Profiles A profile is what is used by Workflow Manager to read the various kinds of data files. The profile is stored in an .ini file as plain ASCII text. A typical profile looks like: [Custom] Name=Custom HeadersInFile=1 Delimiter=, Extension=.csv Headers=Filename|JOB|PART|QUANTITY|MATERIAL|RMCAB#|SEC#|WIDTH|LENGTH|TOTAL-FT|THICKNESS NumberOfColumns=10 IgnoreComma=0 IgnoreBlanks=1 IgnoreNonData=1 EnableNoise=0 NoiseLevel=3 Length=LENGTH Quantity=QUANTITY Job=JOB Filters=No filters selected Visible=11111111111 What does it mean? Name – is the name of the profile HeadersInFile – the data files contain the header information Delimiter – the field delimiter that the file uses Extension – the file extension for the job files Headers – a listing of the fields headers NumberOfColumns – the number of fields that are in your job file IgnoreComma – tells the parser to ignore commas embedded within the data IgnoreBlanks – tells the parser to ignore blank lines IgnoreNonData – tells the parser to ignore lines that contain more fields than the NumberOfColumns EnableNoise – tells the parser to limit the amount of data that is to be displayed NoiseLevel – Tells the parser the number of blanks fields that are allowed to be displayed. Lines of data that contain this number or more empty fields will be ignored Length – the name of the field that contains the length information Quantity – the name of the field that contains the quantity of the items Job – the name of the field that contains the job number data Filters – is the name of the field or fields that will be used to filter the data 98 TigerServer Data Collection for Reporting KeyFields – the fields that the will be used to uniquely identify the cutlist Visible – is an indication if the column will be visible or not. 1 = show the field, 0 = do not show the field. Work order number There are 2 parts of the work order number (Fig.1) to help identify it from other work orders. Fig. 1 The first part of the work order number is a sequential number starting at 1000, though the starting number can be user-defined. It could be any number. The user can also choose to have the job number be the work order number. The second part of the work order number is a sequential number identifying the order in which the work order was created. Log files What is a log file? A log file is an aid to troubleshooting, but it may not lead you to the exact problem. It will narrow the scope greatly though. Log files are created by date in the form of mdyyyy. Log files from previous days are deleted by Workflow Manager. How and when is a log file created? While debug mode is on (toggle ON and OFF using Alt + F10), each function that is called writes an entry into the log file when it begins and when it ends. This can slow down execution of the program so use debug mode sparingly. Each entry into the log file is day and time stamped so we can follow the execution of the program and narrow down where the defect/problem could be. If the program crashes in the middle of a function call, that function will record that it began but there will not be a corresponding entry that the function exited. When debug mode is turned ON, the log file can grow very large, very quickly. The best thing to do is to turn the debug mode on right BEFORE the problem occurs and then turn the debug mode off. That will keep the log file down in size and only provide the information that we really need. The easier it is to go through the log file, the quicker it will be to solve the problem. This is an excerpt from a log file: 7/7/2005 - 10:55:52 End of CProductManagerView::OnBnClickedGrabFile 7/7/2005 - 10:56:5 CMainFrame::OnWindowPosChanging 7/7/2005 - 10:56:5 CProductManagerView::SetupButtons 7/7/2005 - 10:56:5 End of CProductManagerView::SetupButtons 7/7/2005 - 10:56:5 End of CMainFrame::OnWindowPosChanging 7/7/2005 - 10:56:5 CMainFrame::OnWindowPosChanging 99 Workflow Manager 5.4 User Manual 7/7/2005 - 10:56:5 CProductManagerView::SetupButtons 7/7/2005 - 10:56:5 End of CProductManagerView::SetupButtons 7/7/2005 - 10:56:5 End of CMainFrame::OnWindowPosChanging Cut list files The cut lists are saved in the cut list directory with a .tsc extension. The file is a binary file, unsuitable for viewing in notepad or other text viewers. Along with the .tsc file, an .rs file is created that contains the cut list data for the .tsc file. The .rs file is a plain ASCII text file that we write ourselves whenever a cut list is saved. The .rs file is read into the program database when the user wants to load the cut list back into memory. TigerServer Data Collection for Reporting TigerServer Data Collection for Reporting is a new feature that provides expanded feedback data to TigerServer in an Access database format that can be retrieved by the user and utilized to build customized reports. Every time a cut is made, the database is automatically updated, that is, a new database record is made for each reset of the part list. Location of the database Fig. 1 The database file, CutData.mdb, can be found in the TigerServer directory created when the program was installed (Fig. 1). If the user has not installed the program files to another location, the default is: C:\Program Files\TigerStop\TigerLink\TigerServer To open the database, click the file name. Open a cut list table in the database Your database program (Microsoft Access is shown in this example) will start and the tables of the database file will be listed (Fig. 2). Click on the name of a table to open and view it. 100 TigerServer Data Collection for Reporting Fig. 2 View a cut list table created in the database The database table displays the cut list up to the last cut that was made (Fig.3). Fig. 3 The user can use this information to create various reports, as needed. View a cut list report The user has to set up reports that display the data needed for various purposes. Once the report has been setup (Fig. 4), it is easily opened for viewing and printing (Fig. 5). Fig. 4 101 Workflow Manager 5.4 User Manual Fig. 5 102 Troubleshooting What does this mean? “The server cannot be started. Workflow Manager may not work correctly.” When Workflow Manager starts up, it checks to make sure TigerServer is running. If TigerServer is not running, Workflow Manager will attempt to start it. If the attempt is not successful, you are notified that TigerServer is not running and you may not be able to perform all of the functions as if the TigerServer was running. “TigerServer is not running or is an incorrect version. Workflow Manager exiting.” When Workflow Manager starts up, it queries TigerServer for its version number. This verifies that TigerServer is running and is compatible with Workflow Manager. Some earlier versions of TigerServer will not operate correctly with later versions of Workflow Manager. Make sure that your system is running the latest version of Workflow Manager and TigerServer. “No cutlists available. PM Server offline.” 6. There are several possibilities that cause this problem: 7. Verify that TigerServer is in fact running. 8. Verify that the controller is plugged into the correct comport on the computer. 9. Verify that the controller is level 3 or above. 10. Verify that TigerServer is configured to open the comport that the controller is attached to. 11. Verify that TigerServer is using the correct baud rate. The baud rate must match the controller’s baud rate. 12. Verify that the work orders have been sent to the TigerServer. 13. Verify that the work orders were set to RELEASED status in the Scheduler. 14. This problem has also been seen when the computer contained more than one copy of TigerServer. Search the computer for TigerServer.exe and delete the extra copies. "There was a problem reading the input file. The information displayed may not be correct. Check the source file for errors." This error means that Workflow Manager has encountered some kind of error while reading your job file. If Workflow Manager displays a partial listing of your file, then you probably have a character in one of the fields that is causing the read operation to terminate prematurely. The most likely cause for this error is a double quote character. CSV files generally denote character strings within double quotes. For example: 103 Workflow Manager 5.4 User Manual "DRAWER SIDE","",2,"1/2 WHITE MELAMINE","1-1","1-1",4.125,22,"",1,0,"","","WHITE PVC","","","E31Z00Q0","","","","","","" The character strings are contained within double quotes, e.g., “DRAWER SIDE” ,while numbers do not have quotes around them. TigerLink strips the quote characters out of the strings while processing the job file, because the quotes are not needed. Now what would happen if a quote character was inside one of the strings? ,"1/2" WHITE MELAMINE", Here we have added a double quote character indicating that the material is 1/2 inch in one of the dimensions. Workflow Manager reads the line and begins parsing the data out. We know that the comma separates the data fields so we find the first comma and the subsequent double quote character. Those characters are expected to be there. Now right after the 2 we find another double quote character but we do not have an expected comma afterwards. Workflow Manager does not know what to do with that situation, so it displays the error message. Removing the extraneous double quote character, 1/2 WHITE MELAMINE, should cause Workflow Manager to read the file normally again. What is error 3265? Error 3265 means that we tried to read a value from the database that does not exist. Workflow Manager reads the label print data from the database and sends that information along with the work order. We get an error 3265 when the field names in the database and the "fieldname" in the label file do not match. Disabling the printing in the configuration will work around the problem. See figure 9. You can open the label designer and delete the offending field from the label. Make sure that the label file in the print configuration is the correct label file. Also the label designer cannot process quite a few characters. The “legal” character set for the label designer is a – z, A – Z, . (period), and _ (underscore). Any of the illegal characters are supposed to be replaced with an underscore which may or may not cause the text on the screen to appear strange. Why does my label print nothing but an “=” or just blank labels? There are a couple of things that cause this error. The first thing is that the printer is printing as it should, but the fields it is printing are blank. If the fields are supposed to be blank, turn the printer off. If you really do want labels to be printed, the most likely reason that the labels are not printing correctly is that the printing configuration is not correct. Ensure that the printing is enabled in the configuration AND you have specified the label file to be printed. What happened to the “xxx” field in the label designer? Did you change it? It used to be there and now it gone! No. We did not change the field. The field names for the label designer are taken from your cut list definition file. If the field was there and now it's gone, the user most likely changed the field to something else. 104 Index A Add ........................................................... 55 Comment .............................................. 55 C Change ....................... 51, 52, 63, 65, 67, 69 Color Scheme ....................................... 69 Cut List Program ................................... 63 Inches ................................................... 67 Metric Units ........................................... 65 Work Order Destination......................... 52 Work Order Number.............................. 51 Comment .................................................. 55 Add........................................................ 55 Configuration browse................................ 86 Configuration Custom Link ....................... 91 Configuration delimiter.............................. 86 Configuration Finish.................................. 92 Configuration key fields ............................ 90 Configuration length.................................. 87 Configuration quantity............................... 87 Configuration select job ............................ 88 Configuration Wizard ................................ 85 Configure .................................................. 85 Custom Job File .................................... 85 Configure My TigerStop ............................ 57 Copy Work Cell Values ............................. 45 Create Column Headers ........................... 89 Custom Job File........................................ 85 Cut list files ............................................. 100 D Debug ....................................................... 93 Design ...................................................... 81 Label Layout ......................................... 81 Different Label File.................................... 74 Print....................................................... 74 Directory structure .................................... 97 DL Style .................................................... 49 Download............................................ 43, 49 Drag ..........................................................45 E Edit ............................................................45 Work Order ............................................45 Edit My TigerStop Parameters...................58 Enable Printing..........................................73 G Global..................................................26, 53 Grab Job ...................................................24 Grid Context Menu ....................................37 I Inches........................................................67 Change ..................................................67 Installation Troubleshooting.......................18 Installing ....................................................17 J Job File......................................................39 Open......................................................39 Job File Number ........................................70 Same .....................................................70 L Label Layout..............................................81 Design ...................................................81 Label Printing ............................................21 Load ....................................................43, 49 Work Order ............................................43 Log files.....................................................99 M Main Screen Display .................................91 Make Sure TigerServer Is Running Correctly ...............................................................79 Make Work Order ......................................70 Metric Units ...............................................65 Change ..................................................65 O Open .........................................................39 Job File ..................................................39 Optimizing .................................................33 105 Workflow Manager 5.4 User Manual Pattern Group ....................................... 33 Overview..................................................... 9 P Pattern Group ..................................... 33, 41 Optimizing ............................................. 33 Printing ..................................................... 74 Different Label File ................................ 74 Profiles...................................................... 97 Q Quick start ................................................ 21 R Registry entries......................................... 95 Requirements ........................................... 13 S Same ........................................................ 70 Job File Number.................................... 70 Save ......................................................... 47 Work Order............................................ 47 Scheduler ................................................. 38 Interface ................................................ 38 Starting.................................................. 38 Scheduler Interface................................... 38 Sort ........................................................... 72 Starting ............................................... 38, 77 Scheduler .............................................. 38 Stop TigerServer ....................................... 77 106 System Requirements ...............................11 T TigerServer Configuration .......................100 Data Collection ....................................100 Turn Label Printing On ..............................73 U Uninstalling TigerLink ................................19 W Work Order......31, 43, 45, 47, 51, 52, 70, 99 Comments .............................................55 Destination.............................................52 Edit ..................................................37, 45 Load.......................................................43 Numbering .................................51, 70, 99 Print .......................................................47 Save ......................................................47 Starting Number.....................................51 Work Order Destination.............................52 Change ..................................................52 Work order number .............................51, 99 Change ..................................................51 Workflow Manager ................................5, 17 Installing ................................................17 Introducing...............................................5 Workflow Manager Interface .....................31