1
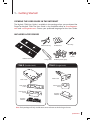
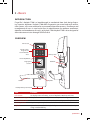
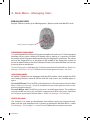
Keylock 7700
Simple Card Reader for Door Access &
Time Attendance System
User Guide
CONTENTS
3-4
CHAPTER 1 • GETTING STARTED
Viewing the User Guide in the Internet
Included Accessories
Included Printed Materials
Activating Keylock 7700
Registering Warranty
5-7
CHAPTER 2 • BASICS
Introduction
Overview
Reactivating Keylock 7700
Keypad
How to Access Main Menu
Setting of Date and Time
Setting Language
Cleaning
Restarting and Resetting Keylock 7700
8-10
CHAPTER 3 • MAIN MENU-MANAGING USERS
Enrolling User
Verifying User
Deleting User
Access Level/Privilege
11-13
CHAPTER 4 • DOOR ACCESS OPTIONS
Enabling Alarm
Number of Tries Allowed
Lock (Period of Door Opening)
Verification Mode Setting
Type of Visitor Mode
Card Only Option
Deleting Logs
Clearing All Data
Clearing Admin Privilege
Delete S Logs
14
CHAPTER 5 • MANAGING USB FLASH DISK
Using USB to Download/Upload Data
Using USB to Download Logs
Using USB to Download Users
Using USB to Upload Users
Using USB to Update Firmware
15-16
CHAPTER 6 • SYSTEM INFORMATION
Browsing Attendance Logs
Device Information
1 • Getting Started
VIEWING THE USER GUIDE IN THE INTERNET
The Keylock 7700 User Guide is available in the package when you purchased the
FingerTec Keylock 7700. The User Guide is also available online at www.fingertec.
com and user.fingertec.com. Choose your preferred language for the User Guide.
INCLUDED ACCESSORIES
Mechanical Key
AA Batteries
Allen Key
Screws
Rubber Cushion
7700 D (Double Latch)
Door Latch
Latch Front
Panel
Door Frame
Panel
Long Shaft
RFID Keychain (5pcs)
7700 S (Single Latch)
Door Latch
Door Frame
Panel
Keyhole
Blocker
Keyhole
Blocker
Note: Each package will only include accessories relevant to the latch type chosen.
CONTENTS
3
INCLUDED PRINTED MATERIALS
• FingerTec Comprehensive DVD
• Quick Start Guide
• Pamphlet
• User Enrollment Template Form
• Warranty Card
ACTIVATING KEYLOCK 7700
Insert four AA batteries to the back of Keylock 7700 and
push the Power Up button to start up Keylock 7700. 4
AA Batteries can last up to approximately 4000 standard
operations.
REGISTERING WARRANTY
Make sure that you register your Keylock 7700’s warranty with us at www.fingertec.com/ver2/english/e_warranty.htm.
4
CONTENTS
2 • Basics
INTRODUCTION
FingerTec’s Keylock 7700 is a breakthrough in mechanical door lock design featuring superior attributes. Keylock 7700 offers fingerprint, password and card verification systems, all in one machine for a convenient operation process. Enrollment and
management of users is now hassle-free. An administrator can perform enrollment,
deletion and amendment of user(s) at Keylock 7700. Keylock 7700 is also designed to
allow data transmission through USB flash disk.
OVERVIEW
LCD Screen
Touch Screen
Keypad and
Card Induction
Area
Battery Slots
Power Up Button
Fingerprint
Scanner
Handle
USB Port
Keyhole
Backup Battery Connector
Item
Function
LCD Screen
To display status of battery, status of Keylock 7700, date and time.
Touch Screen Keypad To input instructions to Keylock 7700 and perform configuration.
Card Induction Area
To read the card information based on the card system of Keylock 7700.
Power Up Button
To power up the Keylock 7700 device from idle mode.
Keyhole
Open the cover to find the keyhole if you want to unlock the door by
using a mechanical key.
CONTENTS
5
Item
Function
Fingerprint Scanner
To scan fingerprint for confirmation of identity.
Battery Slots
To insert four pieces of standard AA batteries for power.
USB Port
To connect the USB extension provided to download/upload data
from/to Keylock 7700.
REACTIVATING KEYLOCK 7700
Keylock 7700 is an energy-saving device. Right after every use, Keylock 7700 will return to its idle status. Press the Power Up button to reactivate Keylock 7700.
KEYPAD
Item
to 9
Function
To input the number 0-9.
To input the number 8 / To move up in
the Menu.
To input the number 0 / To move down
in the Menu.
To return to the previous instruction.
To access to the main menu/ To select or
confirm instructions.
HOW TO ACCESS THE MAIN MENU
It is required to enroll the administrator’s fingerprint template into Keylock 7700 before proceeding to enroll for normal users. If the administrator’s fingerprint template
is deleted, new user enrollment will not be possible anymore. However, a normal
user can assign himself as an administrator to access the system menu and enroll
new users.
6
CONTENTS
To Register as an Administrator:
Press the Power Up button to activate Keylock 7700. Hold the OK button for 2 seconds
and you will arrive at the Main Menu.
Press Menu > User Manage > Enroll Admin > Choose between these 3 enrollment
types: Enroll FP/ Enroll Password / Reg RFID > Follow the instructions given on the
screen > Press OK to save the enrollment.
Once the administrator is enrolled in Keylock 7700, any attempt to access the Main
Menu will prompt the terminal to display Admin Affirm. The administrator’s fingerprint, password or card is required to access the Main Menu.
SETTING OF DATE AND TIME
Keylock 7700 is designed for time attendance and door access control. To make sure
that the date and time is accurate, hold the OK button for 2 seconds to access the
Main Menu > Select Options > System Option > Date Time > Set the Date and Time >
Press OK to save the configuration.
SETTING LANGUAGE
Select the preferred language for Keylock 7700. Hold the OK button for 2 seconds >
Select Options > System Option > Select Language > OK.
CLEANING
To clean Keylock 7700’s surface, wipe it with a dry cloth. As for the fingerprint scanner, you can clean it with a microfiber cloth. Avoid using chemical-based products to
clean the device.
RESTARTING AND RESETTING KEYLOCK 7700
In the event Keylock 7700 stops responding, it is required to restart or reset Keylock
7700.
RESTART: Every Keylock 7700 comes with two sets of mechanical keys for emergency
purposes. Use the mechanical key to unlock the door, remove the back plate and take out
one of the batteries. Insert the battery back to the battery slot and access the Main Menu
again.
RESET: Please be advised that once Keylock 7700 has been reset to its original factory
settings, the previous configurations will no longer be available. To reset to original factory settings, hold down the OK button to proceed to the Main Menu > Select Options
> System Option > Scroll down and choose Advanced Option > Reset Options > OK. If
the Main Menu is locked and the administrator is not available, please contact support@
fingertec.com to obtain the instructions on how to bypass the administrator’s privilege
before resetting Keylock 7700.
CONTENTS
7
3 • Main Menu – Managing Users
ENROLLING USER
Keylock 7700 can contain up to 500 fingerprints, 500 passwords and 500 RFID cards.
Center point of a fingerprint
FINGERPRINT ENROLLMENT
It is recommended to enroll two fingerprint templates for each user ID. One fingerprint
template will be used as default and another one as backup. It is necessary to check
the quality of the fingerprint before performing the fingerprint enrollment. The center
point of the fingerprint has to be placed in the middle of the fingerprint scanner to
ensure an optimal and successful enrollment. Please ensure that the hands are not wet
or too dry prior to enrollment.
To enroll fingerprint: Hold down the OK button to proceed to the Main Menu > Select User
Manage > Enroll User > Enroll FP (Follow the instructions given onscreen) > OK (Save).
CARD ENROLLMENT
All Keylock 7700 devices are equipped with the RFID module, which enables the RFID
card reading function. However, MiFare and HID card systems are available upon request.
To enroll RFID card: To enroll RFID card, hold down the OK button to proceed to the Main
Menu > Select User Manage > Reg RFID and follow the instructions given onscreen to complete the enrollment process.
To enroll MiFare card: The MiFare card system is available upon request. The enrollment
menu for the MiFare card system is different compared to the RFID card system. Hold down
the OK button to proceed to the Main Menu > Select User Manage > FPCard Mgmt.
CREATE PIN CARD
This function is to create an identification card without storing any fingerprint templates into the card. Hold down the OK button to proceed to the Main Menu > Select
User Manage > FPCard Mgmt > Create PINcard (Follow the instructions onscreen).
8
CONTENTS
ENROLL FP CARD
Before the FP Card enrollment, it is required to create a new FP Card using the Create
FPcard function below. After creating the FP Card, hold down the OK button to proceed to the Main Menu > Select User Manage > FPCard Mgmt > Enroll FPcard (Follow
the instructions onscreen).
CREATE FP CARD
This function is to create a card that is ready to receive fingerprint templates. Hold
down the OK button to proceed to the Main Menu > Select User Manage > FPCard
Mgmt > Create FPCard (Follow the instructions onscreen).
EMPTY CARD
This function is used to empty the contents in a card. To delete the contents in the
card: Hold down the OK button to proceed to the Main Menu > Select User Manage
> FPCard Mgmt > Empty FPCard.
When you see Copy Successful on the LCD screen, the card has been emptied successfully and can now be reused again.
(MiFare model only)
PASSWORD ENROLLMENT
There are various types of verification methods in Keylock 7700. The password can
be used alone or in combination with fingerprint verification to offer an enhanced
security solution. The password can consist of a combination of numbers from 0-9
and the maximum length of the password is 6 digits.
To enroll password: Hold down the OK button to proceed to the Main Menu > Select
User Manage > Enroll User > Enroll Password (Follow the instructions given onscreen) >
OK(Save).
To enroll fingerprint and password: Hold down the OK button to proceed to the Main
Menu > Select User Manage > Enroll User > Enroll FP & Pwd (Follow the instructions given
onscreen) > OK(Save).
(MiFare model only)
VERIFYING USER
Verification Method
Description
1:N (One to Many)
1:N verification does not require any input of your user ID. Simply
activate Keylock 7700 by pressing the Power Up button, place your
finger on the scanner and Keylock 7700 will verify your identity.
Password Verification
Press the Power Up button to activate Keylock 7700. Insert the password and press OK for verification.
Card Verification
Press the Power Up button to activate Keylock 7700. Wave the card
at the card induction area for verification.
CONTENTS
9
Here are some tips to ensure smoother and more stable fingerprint verifications:
• Make sure the finger is placed at the middle of the scanner.
• It is recommended to use the index finger for enrollment. Keylock 7700 accepts all
fingers but the index finger is the most convenient one.
• Make sure the finger is not wet, too dry, injured or dirty.
• Place the finger gently on the scanner.
• Avoid direct sunlight or very bright light.
Voice / Message
Description
“User ID XXXXX”
Identity verification is successful, Keylock 7700 stores the transaction logs and opens the door.
“Try Again Please”
Identity verification has failed because the finger is not properly positioned or the template is not available in Keylock 7700.
“Admin Affirm”
The administrator privilege is required to access the Main Menu.
“Wrong password!”
Identity verification has failed because the password is incorrect.
“Invalid Card”
The card is not enrolled or it is damaged.
DELETING USER
The administrator can delete users at Keylock 7700. To delete the user(s), hold down
the OK button to proceed to the Main Menu > Select User Manage > Delete User >
Enter the user ID.
Keylock 7700 will prompt to delete the fingerprint or password before deleting the
user. Press OK to proceed to delete the user.
ACCESS LEVEL/PRIVILEGE
Keylock 7700 offers three types of access level or privilege.
Privilege
Description
Supervisor
The Supervisor has full authority over Keylock 7700. The Supervisor
can access the Advance Option menu to reset options, delete attendance log, clear all data and also clear admin privilege. All these
functions are exclusively for the Supervisor privilege only.
Administrator
The Administrator privilege enables access to the Main Menu to enroll users and configure systems and settings.
However the Administrator privilege does not have access to the
Advance Option menu.
Normal User
10
CONTENTS
The Normal User privilege enables the user to verify user identity.
The Normal User privilege does not have access to the Main Menu
to perform configurations.
4 • Door Access Options
ENABLING ALARM
Keylock 7700 is equipped with a buzzer to alert users when an unauthorized user is
trying to access the Main Menu. This function works in sync with the Illegal Times settings in Keylock 7700. When an unauthorized person fails to verify his identity more
than the allowed number of tries, Keylock 7700 will trigger the warning buzzer. To
enable or disable the buzzer, hold down the OK button to proceed to the Main Menu
> Select Options > Operate Opt > Operate Alarm > Y/N.
NUMBER OF TRIES ALLOWED
You can set the number of tries allowed for the Main Menu in Keylock 7700 as a security measure. When a user exceeds the number of tries, the buzzer will trigger a
warning if the buzzer is enabled. The default number of tries is 10 and the range is between 0-99. Hold down the OK button to proceed to the Main Menu > Select Options
> Operate Opt > Illegal Times > Insert the allowed time before the warning buzzer is
triggered. Once the warning buzzer is triggered, Keylock 7700 will shut down. Upon
activation, it will perform a 30 seconds countdown and no operations can be carried
out during the 30 seconds countdown period. Keylock 7700 will resume its operation
after the 30 seconds countdown.
LOCK (PERIOD OF DOOR OPENING)
The door lock can be disabled for a specific period of time upon verification. The default time duration is 5 seconds and the range is between 0-99 seconds. Once the
door lock disabled period is finished, the lock will reactivate and it will not respond
when you turn the door handle. Hold down the OK button to proceed to the Main
Menu > Select Options > Operate Opt > Lock > Insert the number.
VERIFICATION MODE SETTING
The Verification Mode is a configuration to determine the security level of the user’s
verification to gain access. There are 3 types of verification modes:
0 - Only the administrator has access.
1 - All users have access.
2 - All users must perform 2 types of verification to gain access. For example: fingerprint and password verification, the Mifare card and fingerprint verification, the RFID
card and password verification, the RFID card and fingerprint verification and etc. All
users must enroll with 2 different verification methods.
NOTE: The above settings only take effect when the Card Only feature is set to N.
CONTENTS
11
TYPE OF VISITOR MODE
You can set the Visitor Mode according to your own requirements. For example,
some doors might be required to be closed at all times and accessed only through
identity verification. This door mode is known as Normal Close or NC.
For doors that are required to be opened upon verification, it is known as Normal
Open or NO.
Determine the Visitor Mode: Hold down the OK button to proceed to the Main Menu > Select
Options > Operate Opt > Normal Open > Y/N.
CARD ONLY OPTION
Should you wish to use the Card Only option for Keylock 7700 without using any
other verification methods, hold down the OK button to proceed to the Main
Menu > Select Options > Operate Opt > Card Only > Y/N.
(MiFare model only)
DELETING LOGS
The transaction logs are stored in Keylock 7700 upon successful identity verification. Once the transaction data is deleted, there is no way to retrieve it again. Please
reconfirm before executing this function. Hold down the OK button to proceed to
the Main Menu > Select Options > System Option > Advanced Option > Del Attlogs > OK.
CLEARING ALL DATA
Clear All Data will not only delete the transaction data, it will also delete all users
information including fingerprint templates, passwords and enrolled cards. Please
reconfirm before executing this function as it cannot be undone. Hold down the
OK button to proceed to the Main Menu > Select Options > System Option > Advanced Option > Clear All Data > OK.
CLEARING ADMIN PRIVILEGE
Keylock 7700 offers two types of user privileges, the Supervisor and Normal User
privilege. Clearing the administrator privilege will change the Supervisor privilege
to Normal User privilege. Thus the Main Menu will no longer require the administrator’s verification to access it, making Keylock 7700 vulnerable as everyone can
access the Main Menu. The enrollment of the administrator will be required again
in order to enroll new users. Please reconfirm before executing this function. Hold
down the OK button to proceed to the Main Menu > Select Options > System Option > Advanced Option > Clear Privilege > OK.
12
CONTENTS
DELETE S LOGS
S logs stands for scanner logs. The scanner logs keep track of the number of verification times regardless of successful or failed verifications. To delete the scanner logs:
Hold down the OK button to proceed to the Main Menu > Select Options > System
Option > Advanced Options > Delete SLogs > OK.
(MiFare model only)
CONTENTS
13
5 • Managing USB Flash Disk
USING USB TO DOWNLOAD/UPLOAD DATA
The USB flash disk is used to download and upload data from Keylock 7700. This is the
only way of communication between Keylock 7700 and the computer. To determine
the compatibility of USB flash disks, please refer to the following link: fingertec.com/
newsletter/HL_74.html.
Insert the USB flash disk into the USB port located at the back of the Keylock 7700 terminal. Please refer to page XX. Once the USB flash disk has been inserted into the USB
port, hold down the OK button to proceed to the Main Menu > Select USB Mgmt.
USING USB TO DOWNLOAD LOGS
The transaction logs stored in Keylock 7700 can be downloaded into the Software software via the USB flash disk. Hold down the OK button to proceed to the Main Menu >
Select USB Mgmt > D/Load Log.
USING USB TO DOWNLOAD USERS
To download users from Keylock 7700 to the Software software: Hold down the OK
button to proceed to the Main Menu > Select USB Mgmt > D/Load User.
USING USB TO UPLOAD USERS
To upload users from the software to Keylock 7700: Hold down the OK button to proceed to the Main Menu > Select USB Mgmt > U/Load User.
USING USB TO UPDATE FIRMWARE
To upload firmware to Keylock 7700: Hold down the OK button to proceed to the Main
Menu > Select USB Mgmt > Update Firmware.
14
CONTENTS
6 • System Information
BROWSING ATTENDANCE LOGS
You can browse the transaction data stored in Keylock 7700 and you can also choose the
designated user of your choice. Hold down the OK button to proceed to the Main Menu
> Select System Info > Browse AttLogs, select the User ID > OK.
Information About Used Space
Information
Description
User Count
The number of users created and stored in Keylock 7700.
FP Count
The quantity of the fingerprint templates stored in Keylock 7700.
Att Log
The quantity of the transaction logs stored in Keylock 7700.
Admin Count
The number of administrators enrolled in Keylock 7700.
Pwd User
The number of users enrolled with password in Keylock 7700.
S Logs
The scanner log keeps track of the number of verification times regardless of successful or failed verification.
Reg RFID
The number of RFID card enrolled with Keylock 7700. (RFID model
only)
Information About Free Space
Information
Description
FPCnt(100)
The quantity of fingerprint templates in 100s that can still be enrolled into Keylock 7700. E.g.: FPCnt (100) 5 = 500 templates.
Log
The quantity of transaction logs that can still be stored into Keylock
7700.
S Logs
The quantity of times S Logs can still be stored into Keylock 7700.
CONTENTS
15
DEVICE INFORMATION
The Keylock 7700 terminal’s information can be obtained here. However the information is not editable.
16
Information
Description
FPCnt(100)
The quantity of fingerprint templates in 100s that can still be enrolled into Keylock 7700. E.g.: FPCnt (100) 5 = 500 templates.
Log
The total quantity of transaction logs that can be stored in Keylock
7700.
S Logs
The total quantity of times the scanner can be used.
Manu Time
Manufacturing time of the Keylock 7700 terminal.
Serial Number
Serial number of the Keylock 7700 terminal.
Manufacturer
The manufacturer name: FingerTec.
Device Name
The terminal’s model name: Keylock 7700.
AlgorithmVersion
Algorithm version of the Keylock 7700 terminal.
Firmware Version
Firmware version of the Keylock 7700 terminal.
CONTENTS
OTHER RESOURCES
Information About FingerTec
TO LEARN ABOUT
GO TO?
Company and the products www.fingertec.com
The latest updates
Facebook Fan Page: FingerTec Worldwide
Twitter: FingerTec
To subscribe for FingerTec newsletter:
info.fingertec.com/subscribenewsletter
Technical Tips and Latest
Product Updates and
Upgrades
user.fingertec.com
Email
[email protected] (Sales)
[email protected] (Technical)
Register for Warranty
info.fingertec.com/productwarranty
FingerTec Accessory
accessory.fingertec.com
Copyright Notice & Disclaimer
COPYRIGHT NOTICE
All rights reserved. No part of this book may be reproduced or transmitted in any form or
by any means, electronic or mechanical, including photocopying, recording, or by any
information storage and retrieval system, without written permission from FingerTec
Worldwide Sdn Bhd. Every precaution has been made to supply complete and accurate
information. Information in this document is subject to change without prior notice.
DISCLAIMER
No person should rely on the contents of this publication without first obtaining advice
from a qualified professional person. The company expressly disclaims all and any liability and responsibility to any terminal or user of this book, in respect of anything, and of
the consequences of anything, done by any such person in reliance, whether wholly or
partially, upon the whole or any part of the contents of this book.
FINGERTEC WORLDWIDE SDN BHD
© 2013 FingerTec Worldwide Sdn. Bhd. All rights reserved. • 062013