1
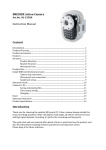
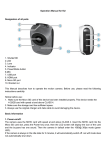
Desktop T&A Device User Manual (V1.1) Desktop T&A Device User Manual (V1.1) Contents 1 Notice to Users ....................................................................................... 1 2 User Enrollment and Verification.............................................................. 2 3 4 2.1 Enrolling Fingerprints ............................................................. 2 2.2 Enrolling Passwords .............................................................. 4 2.3 Enrolling ID Cards* ................................................................ 5 2.4 Enrolling Mifare Cards* .......................................................... 7 2.5 Deleting Users....................................................................... 8 2.6 Fingerprint, Password and Card Verification ........................... 9 Other Functions............................................................................... 13 3.1 Time Setting ........................................................................ 13 3.2 Language Setting ................................................................ 13 3.3 Power Management............................................................. 14 3.4 Embedded EM Card Reader (Optional) ................................ 15 3.5 Embedded Mifare Card Reader (Optional)............................ 15 3.6 Checking In/Out................................................................... 16 3.7 Automatic Test..................................................................... 16 Attendance Management ................................................................. 17 I Desktop T&A Device User Manual (V1.1) 1 Notice to Users Thank you for using this device. Read the User Manual carefully before using the product to avoid damage. About usage Install the device before enrolling fingerprints and performing identification. Install Enroll Enroll Install Identify Identify Recommended fingers Use your forefinger, middle finger, or fourth finger. Avoid using your thumb or little finger, because usually you cannot flexibly use them to press the collection window. Correct way to press your finger 1) Correct way of pressing your finger: Horizontally press your finger on the fingerprint collection window Align the center of your fingerprint to the 1 center of the window as possible as you can Desktop T&A Device User Manual (V1.1) 2) Several wrong ways of pressing your finger: Vertical Deviated Slanted Too low Fittings Fitting Quantity USB Switch line power 1 1 Converter Backup battery 1 1 Recommended operation steps Recommended operation steps: Step 1: Install and power on the device. Step 2: Enroll the administrator and common employees. That is, enroll their fingerprints, passwords, and ID cards or Mifare cards. 2 Desktop T&A Device User Manual (V1.1) Step 3: Perform verification. That is, check that the enrolled fingerprints, passwords, and ID cards or Mifare cards are usable. Step 4: Let employees press the machine for attendance record. Step 5: Connect a PC and use relevant attendance management software to download data, allocate departments, arrange shifts, and perform other operations. Step 6: Set attendance management rules by using the attendance management software, query attendance information, and print reports. 3 Desktop T&A Device User Manual (V1.1) Appearance Device panel: Bicolor LED Screen Fingerprint Sensor Keypad loudspeake LED indication: When the device works normally, the LED blinks in green light once every other second. When the verification succeeds, the LED gives green light. Otherwise, the LED gives red light. 1 Desktop T&A Device User Manual (V1.1) Keypad: The keypad contains number keys, the poweron/poweroff key, the ESC key, the OK key, and six function keys. The function keys are Enroll FP, Enroll PW/Card, Del User, Time Set, IN/▲, and OUT/▼, as shown in the following figure. Enroll PW/Card key Enroll FP key TimeSet key Del User key Checkout status/Pagedown key Checkin status/Pageup key OK key Number keys Poweron/pow eroff key ESC key Number keys: Press them to enter an employee ID, a password, or time. Powe key: Press it to power on or power off the device. ESC key: Press it to return to the previous directory or exit to the initial interface. Enroll FP key: Press it to directly enroll fingerprints. PW/Card key: Press it to enroll a password, a sensor card, or a Mifare card. Del User key: Press it to delete a user. TimeSet key: Press it to set the time and the scheduled alarm clock. IN/▲ key: Press it to check in or switch to the previous page. OUT/▼ key: Press it to check out or switch to the next page. 2 Desktop T&A Device User Manual (V1.1) Initial interface The initial interface is displayed on the screen after the device is powered on, as shown in the following figure. CheckIn Or “Check Out” 10:12 090514 1 THU Desktop T&A Device User Manual (V1.1) 2 User Enrollment and Verification When using the device for the first time (that is, the administrator is not yet enrolled), press the enrollment key to enroll the administrator and common users. To guarantee security of device management, it is recommended that the administrator be enrolled first. Only one administrator can be enrolled by default. The administrator number is 8888. When no administrator is enrolled, anybody can press the enrollment key to enroll users. When the administrator has been enrolled, however, the administrator's verification is required after one presses the enrollment key to enroll a user. @ Note: After the administrator is enrolled, all menu operations must be confirmed by the administrator. 2.1 Enrolling Fingerprints 1) Press the Enroll FP key. The fingerprint New Enroll User ID: 00001 ESC OK enrollment interface is displayed. Note: The user ID consists of five digits. If the input ID is shorter than five digits, the device automatically adds 0s to the beginning of the input ID. For example, 00001 is displayed on the screen if the input ID is 1. New Enroll 000010 Place Finger… ESC/Exit 2) Input the user ID to be enrolled in the number input column. Note that the input ID must range from 1 to 65534. Then, press the OK key. "Place 2 Desktop T&A Device User Manual (V1.1) Finger" is displayed on the screen. 3) Press your finger for three times correctly. After New Enroll 000010 ESC OK(Save) the fingerprint is successfully enrolled, press the OK key to save the result or press the ESC key to exit without saving the result. If the enrollment fails, the system gives a prompt. Go to step 2) to proceed with the enrollment. New Enroll Continue? ESC OK 4) If you press the OK key, the interface as shown on the left is displayed. Press the OK key to continue to enroll users (repeat the previous steps), or press the ESC key to enter into the Backup Enroll interface. Backup Enroll Continue? User ID: 00001 ESC OK Backup Enroll 000011 Place Finger… ESC/Exit 5) Input the user ID to be backed up in the number input column. Note that the input ID must range from 1 to 65534. Then, press the OK key. 6) Press your finger for three times correctly. After the fingerprint is successfully enrolled, press the OK key to save the result or press the ESC key to exit without saving the result. If the enrollment fails, the system gives a prompt. Go to step 5) to proceed with the enrollment. 3 Desktop T&A Device User Manual (V1.1) Backup Enroll Continue? ESC OK(Save) 7) If you press the OK key, the interface as shown on the left is displayed. Press the OK key to continue to back up user IDs, or press the ESC key to exit the Backup Enroll interface and proceed with new enrollment (the operation steps are the same as those described previously). 2.2 Enrolling Passwords 1) Press the Pwd/Card key. Note: Three scenarios exist. a) If the device is not equipped with any embedded ID card module or Mifare card module, the procedure proceeds to step 2) after you press the Pwd/Card key. b) If the device is equipped with an ID card module, the interface as shown in the following left figure is displayed: Press the IN▲ or OUT▼ key, select Enroll Pwd, and then press the OK key. c) If the device is equipped with a Mifare card module, the interface as shown in the following right figure is displayed: Press the IN▲ or OUT▼ key, select Enroll Pwd, and then press the OK key. Menu Enroll Pwd Reg RF ID Enroll Pwd New Enroll? ESC Menu Enroll Pwd FPCard Mng 2) Press the OK key to proceed to the next step. The left figure shows the displayed information. OK 4 Desktop T&A Device User Manual (V1.1) 3) Input the user ID to be enrolled in the number New Enroll input column. Note that the input ID must range User ID 00006 ESC OK from 1 to 65534. Then, press the OK key. “Input Pwd” is displayed on the screen. Press the ESC key to exit to the menu interface. New Enroll 4) Input your password (that consists of one to Input Pwd ***** ESC OK New Enroll five digits) in the Input Pwd column. 5) Input the password again the Pwd Affirm Input Pwd ***** Pwd Affirm ***** column, and then press the OK key. Save the enrolled data to finish the password enrollment process. 2.3 Enrolling ID Cards* 1) Press the Pwd/Card key. The menu as shown Menu Enroll Pwd Reg RF ID in the left figure is displayed. Press the IN▲ or OUT▼ key, select Reg RF ID, and then press the OK key. 2) Press the OK key to make new enrollment, or Reg RF ID New Enroll? ESC press the ESC key to enter into the Backup OK Enroll interface. 5 Desktop T&A Device User Manual (V1.1) New Enroll User ID: 00010 ESC OK New Enroll Show the card User ID: 00010 ESC OK 3) Input the user ID to be enrolled in the number input column. Note that the input ID must range from 1 to 65534. Then, press the OK key. 4) Show your card according to the prompt. The left figure shows the information displayed after the card number is read. New Enroll Card: 16650449 User ID: 00010 ESC OK 5) Press the OK key to proceed to the next step. New Enroll 00010C 6) Press the OK key to save the enrolled data and ESC Note: In 00010C, the letter C stands for the ID card. OK(Save) finish the ID card enrollment process. @ Note: The ID card is an optional function. To customize devices with the ID card function, consult our business representatives or presales technical support engineers. For more information, refer to the ID Card User Guide. 6 Desktop T&A Device User Manual (V1.1) 2.4 Enrolling Mifare Cards* 1) Press the Pwd/Card key. The menu as shown Menu Enroll Pwd FPCard Mng in the left figure is displayed. Press the IN▲ or OUT▼ key, select FPCard Mng, and then press the OK key. FPCard Mng Create PINCard Enroll FPCard Create FPCard 2) Press the OK key to proceed to the next step. The following figure shows the displayed information. Reg FPCard Unreg FPcard Empty FPCard Dup FPCard Move To FPCard Card Only Y Create PINCard: Create a PIN card for a user already enrolled in the device. The user can record his or her attendance simply with this card instead of fingerprint verification. Enroll FPCard: Save the enrolled fingerprint in a fingerprint card. Then, the fingerprint is directly saved in the card but not in the device. The user can complete identity verification by card + fingerprint. That is, the user can show the card and then press the finger to verify the identity. Create FPCard: Copy the enrolled fingerprint (saved in the device) to a fingerprint card. The user can complete identity verification by fingerprint only or by card + fingerprint. 7 Desktop T&A Device User Manual (V1.1) Reg FPCard: To use a fingerprint card of one device on another device, you must first register this fingerprint card to this device. Unreg FPCard: To prohibit the use of a fingerprint card on a certain device, you can deregister the fingerprint card from the device. Empty FPCard: Clears all the data, including fingerprints and user IDs in a fingerprint card. Dump FPCard: Copies the fingerprint in a card to the device. After the fingerprint is copied to the device, the user can complete identity verification directly by fingerprint. Move To FPCard: Moves a fingerprint in the device to a fingerprint card. Then, the fingerprint exists in the card only but no longer in the device. Card Only: If this option is set to Y, a user passes the identity verification as long as the user passes the number card verification. Otherwise, the user also needs to verify the fingerprint after passing the number card verification. @ Note: The Mifare card is an optional function. To customize devices with the Mifare card function, consult our business representatives or presales technical support engineers. For more information, refer to the Mifare Card Operation Guide. 2.5 Deleting Users Users enrolled in the system can be deleted. Del User User ID 00001 ESC OK 1) Press the Del User key. The Del User interface is displayed, as shown in the left figure. Input the user ID to be deleted, and then press the OK key. A voice prompt "Thank you" is heard, indicating that the user has been successfully deleted. 8 Desktop T&A Device User Manual (V1.1) After the user is deleted, the Del User interface is displayed again for you to delete the next user. Press the ESC key to exit. 2.6 Fingerprint, Password and Card Verification The attendance records of a user can be stored in the device only after the user successfully passes the fingerprint or password verification. l Fingerprint verification (1) 1:1 fingerprint verification (staff ID + fingerprint) Match the fingerprint currently obtained by the collector with the fingerprint associated with the user ID input on the keypad. Step 1: Input the staff ID of the user to be verified in the initial interface. Step 2: The user correctly places a finger on the collector. Step 3: The device gives a prompt "Thank you", indicating that the fingerprint verification is successful. Otherwise, the device gives a prompt "Please try again". Go back to step 1 and try again. (2) 1:N fingerprint verification Match the fingerprint currently obtained by the collector with all the fingerprints saved in the device. Step 1: The user correctly places a finger on the collector. Step 2: The device gives a prompt "Thank you", indicating that the fingerprint verification is successful. Otherwise, the device gives a prompt "Please try again". Go back to step 1 and try again. l Password verification Step 1: Input the staff ID of the user to be verified in the initial interface, and then press the OK key. Step 2: Input the password. Step 3: The device gives a prompt "Thank you", indicating that the password 9 Desktop T&A Device User Manual (V1.1) verification is successful. Otherwise, the device gives a prompt "Error Pwd". Go back to step 1 and try again. l Mifare card verification (1) If you have selected Create PINCard during Mifare card enrollment, press the Pwd/Card key to enter the FPCard Mng menu, and then press the IN▲ or OUT▼ key to select and set Card Only to Y. The verification process is described as follows. Access the initial interface, and place the number card above the sensing area. Note that the number card cannot be far away from the sensing area. Verify User ID 00001 Verified Otherwise, the device may fail to detect the number card. The following figure shows the message displayed on the screen. If the Mifare card is enrolled by other means such as fingerprint card enrollment and Card Only is set to Y, the verification process is the same. (2) If Card Only is set to N, the verification process is different, as described below: Access the initial interface, and place the number card above the sensing area. Note that the number card cannot be far away from the sensing area. Verifying FPCard 00009 Place Finger…… Any key to Cancel Otherwise, the device may fail to detect the number card. The following figure shows the message displayed on the screen. Place the finger on the collector. The interface as shown in the following 10 Desktop T&A Device User Manual (V1.1) figure is displayed. Verifying FPCard 00009 Remove Finger Any key to Cancel Wait about 0.5 second. If the verification is successfully, the device gives a voice prompt "Thank you". The following figure shows the information displayed on the screen after the verification is successful. Verifying FPCard 00009 User ID 00009 Verified! If the verification is unsuccessful, the device gives a voice prompt "Please try again". Then, the screen display is as follows: Verifying FPCard 00009 Please try again Any key to Cancel This interface lasts for about 0.5 second, and then the system returns to the initial interface. (3) Card + password verification Step 1: Show the Mifare card in the sensing area. Note that the distance should not be great. Otherwise, the device may fail to identify the Mifare card. Step 2: The user ID is displayed on the screen of the device, and "Place Finger" is given, indicating that the card has been successfully read. Otherwise, the device gives a prompt "Not Enrolled". Go back to step 1 and try again. 11 Desktop T&A Device User Manual (V1.1) Step 3: Press the OK key in the interface as shown in the following figure on the left. 1:1FP Match User ID 00009 Place Finger…… ESC OK Pwd Affirm User ID 00009 Input Pwd ***** Step 4: The interface shown in the above figure on the right is displayed. Input the password. Step 5: The device gives a prompt "Thank you", indicating that the verification is successful. Otherwise, the device gives a prompt "Error Pwd". Go back to step 4 and try again. l ID card verification If the card of a user has already been enrolled in the device, the user needs only to show his or her card in the sensing area for identity verification. 12 Desktop T&A Device User Manual (V1.1) 3 Other Functions 3.1 Time Setting Press the TimeSet key. The time setting interface is displayed. Scheduled 08:00 2009730 9:38:55 ESC OK Press the IN▲ or OUT▼ key to navigate and modify the time. You can navigate to the scheduled alarm clock position to set the alarm clock. As shown in the above figure, the scheduled alarm clock is set to 08:00. You can press the Del User key at any position of the scheduled alarm clock to disable the scheduled alarm clock. Then, the scheduled alarm clock time becomes :. Press the OK key after setting the alarm clock. The device gives a voice prompt "Thank you", saves the settings, and then automatically exits the time setting interface. 3.2 Language Setting You can set the language for the information displayed on the screen and can also set the type of voice prompt. Press four 5s, and then the TimeSet key. The language selection interface is displayed. Language *** 13 Desktop T&A Device User Manual (V1.1) Press the IN▲ or OUT▼ key to change the language type. After selecting the language type, press the OK key. Then restart the device according to the system prompt so that the language settings take effect. @ Note: Consult our business representatives or presales technical support engineers if you need other languages. 3.3 Power Management The device is equipped with USB interface power and backup batteries. When the USB interface power adapter is supplying power to the device, the backup batteries are charged at the same time for no less than eight hours. Once the power supply is cut off or the USB interface power is unavailable, the device automatically switches to the backup batteries to obtain power. The backup batteries fully charged enable the device to run for three hours. A battery icon is designed at the upper right corner of the screen for users to check the status and remaining power of the backup batteries. When the device is using only the backup batteries for power supply, the icon shows the remaining power of the backup batteries. When the device is using both the UBS interface adapter and the backup batteries for power supply, the icon shows the charging status and remaining power of the backup batteries. When the device is using only the USB interface power adapter, the icon is not displayed. When the battery icon shows 0 grids, the battery icon blinks and the buzzer sounds every other second to give a sound alarm that lasts for five minutes. 14 Desktop T&A Device User Manual (V1.1) 3.4 Embedded EM Card Reader (Optional) The device has an embedded noncontact RF EM card reader, which can read cards at a distance of 5 cm. The card reader supports 1.88 mm, 1.05 mm, and 0.88 mm ID/EM cards working at the frequency of 125 kHz. The following figure shows the sensing area of an EM card reader. Sensing area 3.5 Embedded Mifare Card Reader (Optional) The device has an embedded noncontact RF Mifare card reader, which can read cards within a distance of 35 cm. The card reader supports noncontact Mifare smart cards working at the frequency of 13.56 MHz. The following figure shows the sensing area of the Mifare card reader. 15 Desktop T&A Device User Manual (V1.1) Sensing area 3.6 Checking In/Out To check in, press the IN key. "IN" is displayed at the bottom of the LCD screen. Then proceed with fingerprint or password verification. To check out, press the OUT key. "OUT" is displayed at the bottom of the LCD screen. Then, proceed with fingerprint or password verification. 3.7 Automatic Test In the initial interface, press four 6s and then the TimeSet key. A prompt is displayed, as shown in the following figure. FLASH Test Pls Keep Pwr On Continue? ESC OK Press the OK key to enter into the automatic test mode. The test sequence is FLASH test, TFT test, Voice test, FP Reader, Key test, and RTC test in turn. Ensure the stability of the power supply during the tests, especially 16 Desktop T&A Device User Manual (V1.1) during the FLASH test. Otherwise, damage may be caused to the system hardware. 4 Attendance Management The device records only the checkin/checkout time. The report statistics are processed by attendance management software. The device is directly connected by a USB line to a PC. For details about the connection method, refer to the Quick Start Guide. For details about attendance management software operations, refer to the Attendance Management Software User Manual. 17