1
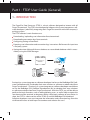
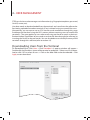
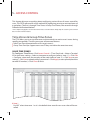
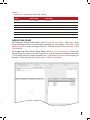
User Guide
Version 1.0.0.1
CONTENTS
Part 1 : FTDP User Guide (General)
4
Chapter 1 • INTRODUCTION
5
Chapter 2 • INSTALLATION
6
Chapter 3 • TERMINAL MANAGEMENT
Adding FingerTec Terminals
Via TCP/IP Connection
Via RS232/RS485 Connection
Via URL
Configuring Terminals
Deleting a Terminal
8
Chapter 4 • USER MANAGEMENT
Downloading Users from the Terminal
Uploading Users to Terminal
Deleting Users from the Terminal or Software
Adding Users Manually into the Software
Exporting User Information
12
Chapter 5 • ACCESS CONTROL
Time Zones & Group Time Zones
Valid Time Zones
Group Time Zones
Different Verification Methods
Reviewing Users’ Time Zone
15
Chapter 6 • TRANSACTION MANAGEMENT
Downloading Transaction Logs from the Terminals
Searching for Transaction Logs
Exporting Transaction Logs
Part 2: FTDP for Home Users
16
Chapter 7 • FTDP for Home Users
18
INFORMATION ABOUT FINGERTEC
3
Part 1 : FTDP User Guide (General)
1 • INTRODUCTION
The FingerTec Data Processor (FTDP) is a basic software designed to interact with all
FingerTec terminals. The FTDP was developed to help ease the system integrator or software developer’s job of fully integrating their FingerTec terminals with their company’s
existing systems.
The FTDP software’s main functions are:
Downloading / uploading user information from/to terminals
Downloading transaction logs from terminals
Configuring settings of terminals
Exporting user information and transaction logs into various file formats for input into
a 3rd party system
Storing data into a Microsoft Access database as a centralized database which is accessible by using the ODBC Manager
1
2
4
5
7
8
9
0
MENU
3
ESC
6
OK
Microsoft Access
Database
FTDP
F i n g e rT e c D a t a P r o c e s s o r
FTDP
FingerTec Terminals
TCM
S
3rd party
system
TCM
S
ODBC
Manager
Previously a system integrator or software developer had to use the BioBridge SDK (Software Development Kit) to develop their own solutions or software to obtain data from
FingerTec terminals. ” Previously, a system integrator or software developer would have
to use the BioBridge SDK (Software Development Kit) to develop their own solutions
or software to obtain data from FingerTec terminals. With the FDTP, you will be able to
perform the basic functions such as adding/deleting users, as well as able to export the
raw data out of the terminal, to be processed by a third party software of your choice. In
short, the FDTP is a basic version of the TCMS v2 and the BioBridge SDK combined.
Software developers can now integrate the information and transaction logs from the
via Microsoft Access to build up or customize a total solution for users”
4
2 • INSTALLATION
Follow these steps to install the FTDP in your PC successfully.
Double click on the “FingerTec Data Processor.exe” icon to run the installation file.
The installation process will initialize automatically. Click Next.
Read and understand the license agreement and select “I accept the terms in the license agreement”. Click Next to proceed.
Click Next to install the software into the recommended path. Click Change if you wish
to specify the location to install the program.
Click Install to proceed. Wait while the installation process completes.
Click Finish to when the process is completed.
A new icon labeled “FingerTec Data Processor” will be displayed on the desktop.
Double click the icon to run the software.
A login interface prompt will request a password when you try to run the FTDP. The default password is 123. Insert the password and click Login to enter the FTDP.
5
3 • TERMINAL MANAGEMENT
To enter the terminal management page, click on Terminal. You can add, edit, and delete
terminals from this page.
Adding FingerTec Terminals
VIA TCP/IP CONNECTION
To Add: Click Add > Insert the terminal’s IP address > Check that “Port No.” value is 4370
> Check that “COMM Key” value is 0 > Assign a name to the terminal > Click Connect to
start connection.
Connection by serial port: RS232/RS485
Click on the Comm check box if you are connecting to a terminal via the RS232 or RS485 wires.
VIA RS232/RS485 CONNECTION
To Add: Define the Comm Port > Define the Baud Rate > Check that “COMM Key” value
is 0 > Assign a name to the terminal > Click Connect to start connection.
Connection by URL
You can click on URL if you are connecting to the terminal via the Internet.
6
VIA URL
To Add: Define the URL > Check that “Port No.” volue is 4370 > Check that “COMM Key”
volue is 0 > Define the “DNS” > Assign a name to the terminal > Click Connect to start connection > Check for the correct terminal details > Click Save.
Terminal details
Configuring Terminals
The FTDP enables you to configure the settings in a terminal via the software.
To Configure Settings: Click Advance Settings > Click Get Settings > Define settings
(Refer to TCMS v2.2 manual, page 15) > Click Set Settings to upload settings to terminal.
Deleting a Terminal
Deleting a terminal from the FDTP is simple. Just select the terminal you wish to delete
and click Delete.
7
4 • USER MANAGEMENT
FTDP can also be used to manage user information (e.g. fingerprint templates, password,
Card ID, names, etc).
User data needs to be downloaded from the terminals and saved into the software before bering uploaded into other terminals (if any) without having to re-enroll the users.
Alternatively, you can opt to use an OFIS scanner to do enrollment through this page.
Enrollment can be done using the OFIS scanner without requiring users to enroll at the
terminal(s). The same applies to users who enroll using passwords or cards as their verification method. Enrollment of password or card can be done through the software, by
inserting the Card ID or the passwords. You can also delete users directly from any of the
terminals through this software (refer to section 4.5).
Downloading Users from the Terminal
To Download User: Click Users > Click Download > A pop-up window will appear >
Double click the IP address /name of the terminal to upload to > Select user IDs to download or click “All” to select all users > Click on the data fields to be downloaded > Click
Apply to start download.
8
All users are now downloaded into the software, and their basic information is displayed on the screen. You can insert the User Name (users’ short names to display on
terminal during verification, max 9 characters) and Name (users’ full names). You can
opt to insert passwords for users as their alternative verification to the terminal (max 5
digits for normal terminals, 8 digits for color screen). You can also insert the Card ID into
the Card No column to register a user for card verification. You will have to upload the
new settings to the terminal(s) for it to take effect.
To Edit User: Select user > click Edit > Insert information > Click Save when done.
Uploading Users to Terminal
To Upload Users to Terminal: Click Upload > A pop-up window will appear > Double click the IP address /name of the terminal to upload to > Select user IDs to download or click “All” to select all users > Click on the data fields to be downloaded > Click
Apply to start download.
Deleting Users from the Terminal or Software
There are 2 methods that you can use to delete users:
Deleting from the terminal - Deleting users from any of the terminals would delete the
users’ information that is available in the terminal(s) ONLY but the information in the
software is still intact for future use.
Deleting from the software - Deleting users from the software is risky because once the
deletion is performed; the user information is not available anymore for future download. However, the user information available in the reader will not be affected unless
the software is connected to the terminals and the changes are updated after the deletion is done. Be very sure before performing deletion of users from the software.
If you would like to delete users completely from the software as well as the terminal(s),
you will have to:
Step 1 Delete the user(s) from all terminals.
Step 2 Delete the user(s) from the software.
To Delete Users from All Terminals: Click Delete Users > Select Delete Terminal User
> A pop-up window will appear > Double click terminals to select > Select the user IDs
to delete or select “All Users” to delete all users > Check data fields to be deleted > Click
Apply to start deleting.
To Delete Users from the Software: Click Delete Users > Select Delete Local (PC)
User > A pop-up window will appear > Ignore the “Terminal” column > Select the user
IDs to delete or select “All Users” to delete all users > Check data fields to be deleted >
Click Apply to start deleting.
9
Adding Users Manually into the Software
With this function you can add users manually through the software, and upload it to any
terminal(s).
To Add Users via Software: Click Add User (PC) > Insert the relevant information >
Privilege : “User”(refer to terminal manual) > VerType : FP/PW/RF > (Fingerprint, Password, RFID Card) Select Valid checkbox > Click Save when done.
A new user is now created. This user, however, does not have a fingerprint enrolled into
the software yet. You can enroll the user’s fingerprint at a terminal, or by using a FingerTec OFIS scanner.
To Enroll Fingerprint with OFIS Scanner: Plug scanner into PC > Select user ID to
enroll > Click Enroll FP > Click Enroll New > Click a finger that is to be enrolled > Place the
finger on the scanner 4 times, as instructed by software > Click OK > Click Enroll New to
enroll another finger or Exit to end the process.
Now the user’s completed information with the fingerprint template can be uploaded to
a terminal for future verification.
Exporting User Information
The FTDP allows you to export user information into 4 different file formats: .txt; .xls; .xml;
and .html. The exported file can then be imported into a 3rd party software or system.
To Export User Information: Click Export > Select users to export (right click and click
on select all to select all users) > Arrange output details as wished (refer to ‘note 1’ below)
> Select the output file format > Click ‘…..’ to define the location of the export file > Click
Export > Click OK to finish.
Note 1
FTDP allows you to customize the arrangement of the output file format. For example,
if you would like the Name to appear in the first column, select “Name” and click the UP
arrow repeatedly until it moves to the top of the list.
10
Note 2
If you are going to export using the txt file format, you can select the delimiter by [;], [,],
[TAB] or [/]. The delimiter acts to separate every data field.
11
5 • ACCESS CONTROL
This chapter discusses everything about configuring various forms of access control for
users. The FDTP software has a few methods for tightening security to restricted areas of
a workplace. The first is through Time Zones & Group Time Zones, the second is through
Different Verification Method.
**This chapter only applies to terminals with an access control feature. Kindly skip this section if your terminal
does not come with this feature.
Time Zones & Group Time Zones
The FTDP allows you to assign time zones to the terminals, to restrict users’ access during
specific time periods. There are two types of time zone features:
Valid Time Zone (time period for users to gain access)
Group Time Zone (to support more users if they are within the same time zone).
VALID TIME ZONES
To Configure Time Zones: Click Access Control > “Time Zone” tab > Select a Terminal
ID for time zone setting > Select a time zone to configure (refer to ‘note 1’) > Click Edit
> Configure a time zone for everyday of the week (refer to ‘note 2’) > Click Save to save
settings > Click Yes to upload settings to terminal > Click Apply to start upload (check the
terminal ID number) > Click Close to finish.
Note 1
Do NOT select time zone 1 as it is the default time zone for new users that will be enrolled.
12
Note 2
Time Zone 2 - Example of Time Zone setting:
DAYS
TIME PERIOD
FUNCTIONS
Sunday
23:59 – 00:00
No access
Monday
10:00 – 16:00
Only can access from 10:00am to 4:00pm
Tuesday
10:00 – 16:00
Only can access from 10:00am to 4:00pm
Wednesday
10:00 – 16:00
Only can access from 10:00am to 4:00pm
Thursday
10:00 – 16:00
Only can access from 10:00am to 4:00pm
Friday
10:00 – 16:00
Only can access from 10:00am to 4:00pm
Saturday
23:59 – 00:00
No access
GROUP TIME ZONES
To Configure Group Time Zones: Select Time Zone Group tab > Click Add > Insert
name of group time zone > Inset time zone schedule (e.g. Time Zone 2) > Click Save > Click
Update Terminal to send settings to terminal > Check terminal ID and click Apply > Click
Close to finish.
To Assign User into a Group Time Zone: Click User Access Control tab > Click on the
created Group Time Zone (e.g. with Time Zone 2) > Select users to be included in time zone
> Click the left arrow to include selected users > Click Update Terminal to send settings to
terminal > Check terminal ID and click Apply > Click Close to finish.
13
Different Verification Methods
Check with your terminal’s hardware user manual or with your FingerTec reseller to make
sure that your model comes with the Different Verification Method. Kindly skip this section if your terminal does not come with this feature.
To Configure Different Verification Methods: Click User Access Control tab > Click User Verify Type > Select verification method(s) > Select users for the different verification method
> Click the left arrow to include selected users > Click Update Terminal to send settings to
terminal > Check terminal ID and click Apply > Click Close to finish.
Note
By default, all users use FP/PW/RF (user verifies by fingerprint, FP; password, PW; or
cards, RF).
REVIEWING USERS’ TIME ZONE
You can review the users in a terminal to make sure they are grouped in the correct Time
Zone, Group Times and Different Verification Methods.
To Review Users’ Group Settings: Select Check User tab > Select Terminal ID to download
user information from > Click Download Users > Click Apply > Click Close to finish.
14
6 • TRANSACTION MANAGEMENT
Downloading Transaction Logs from the Terminals
To download transaction logs and users’ activities, you must first connect to the terminal
concerned and then perform the download.
To Download Transaction Logs from Terminals: Click on Transaction > Click Download >
Select the terminal ID that you wish to download from > Optional: Click Delete Terminal
Data After Download to delete the transactions from the terminal ID after the download
> Click Download > Click Exit after the progress bar reaches “100%”.
Searching for Transaction Logs
Certain scenarios will arise where there will be a need to search for specific transaction
logs according to date, terminal ID, or user name. To perform this kind of search, follow
the steps below.
To Search for Transaction Logs: Click on Transaction > Click Search > Define search criteria
by terminal ID, user ID, user name or date > Click Search.
Exporting Transaction Logs
You can export transaction logs into 4 different file formats (.txt, .xls, .xml and .html). The
exported file can use as an input to 3rd party software.
To Export Transaction Logs: Click Transaction > Click Search > Define transaction logs by
terminal ID, user ID, user name or date > Click Export > Arrange output details as wished
(refer to note) > Select format for the export file > Define location of export file > Click
Export > Click OK on pop up to finish.
Note 1
FTDP allows you to customize the arrangement of the output file format. For example,
if you would like the User Name to appear in the first column, select “User Name” and
click the UP arrow repeatedly until it moves to the top of the list (refer to Note 1 diagram
in Exporting User Information, Chapter 4).
Note 2
If you are going to export using the txt file format, you can select the delimiter by [;],
[,], [TAB] or [/]. The delimiter acts to separate every data field (refer to Note 2 diagram in
Exporting User Information, Chapter 4).
15
Part 2: FTDP for Home Users
7 • FTDP FOR HOME USERS
An Introduction
Congratulations! You have chosen to secure your home with FingerTec access control
devices. Now that your device is installed and is in its place, it is time to learn how to
manage and maintain the device.
The FingerTec Data Processor (FTDP) is a basic software designed to upload and download various information from a FingerTec device without much hassle. The download
and upload can be done by a connected LAN cable, or to keep wires at a minimum, a USB
flashdisk can also be used to transfer data between the device and the FTDP.
As a home user, there are several important functions that you will need to know and
perform as you use your device. To start off, you’ll first need to install the FTDP into a
computer in your home, and then add your device into the software’s database.
For instructions on installing the FTDP, see page 5 of this manual.
Adding Your Device into the FTDP
To start viewing access records using the FTDP, you will have to add the terminal into
the FTDP first.
To add a terminal via USB flashdisk: Click Add > Select to USB flash disk > Fill in Device ID,
Serial number and model > Press Save to save settings.
To add a terminal via TCP/IP cable: Click Add > Insert the terminal’s IP address > Check
that “Port No.” value is 4370 > Check that “COMM Key” value is 0 > Assign a name to the
terminal > Click Connect to start the connection.
Downloading & Viewing Access Records in the FTDP
Now that your terminal is installed and your family members and other users are enrolled into your device (for user enrollment, refer to your hardware user guide/ quick
start guide), you can now use the FTDP to download access records from your device.
Everytime a user verifies at the reader to enter the premises, a record is kept in the device
with information of the time & date of verification, and the user ID that verified at the terminal. To view a history of all the records, you’ll have to first download it into the FTDP
To download access records: Click on Transaction > Click Download > Select your device
to download from > Optional: Click Delete Terminal Data After Download to erase the
records after downloading it into the FTDP > Click Download > Clock Exit when done.
16
Now you can view all the activity that has been occurring in your FingerTec device. You
can also search for specific transaction logs according to date or user name, using the
steps illustrated below.
To search for records: Click Transaction > Click Search > Define search criteria by user ID,
user name, or date > Click Search.
Erasing Access Records in Your Device
Each FingerTec device comes with a maximum memory limit for storing the access
records. To make sure that there is always available memory in the terminal, it is recommended that you delete the access records in your terminal from time to time. The
records can be deleted via the FTDP if you are using a TCP/IP connection, or it can be
deleted directly in the terminal for those using the USB flashdisk method for communication.
The process of erasing the access records from the device via the FTDP is similar to the
process of downloading the access records.
To erase access records (TCP/IP): Click on Transaction > Click Download > Select your
device to download from > Click the checkbox Delete Terminal Data After Download
to erase the records after downloading it into the FTDP > Click Download > Clock Exit
when done.
17
INFORMATION ABOUT FINGERTEC
TO LEARN ABOUT
GO TO?
Company and the products
www.fingertec.com
The latest updates
Facebook Fan Page: FingerTec Worldwide
Twitter: FingerTec Worldwide
To subscribe for FingerTec newsletter:
info.fingertec.com/subscribenewsletter
Technical Tips and Latest
Product Updates and
Upgrades
user.fingertec.com
Email
[email protected] (Sales)
[email protected] (Technical)
Register for Warranty
info.fingertec.com/productwarranty
FingerTec Accessory
accessory.fingertec.com
COPYRIGHT NOTICE & DISCLAIMER
COPYRIGHT NOTICE
All rights reserved. No part of this book may be reproduced or transmitted in any form or
by any means, electronic or mechanical, including photocopying, recording, or by any information storage and retrieval system, without written permission from FingerTec Worldwide Sdn Bhd. Every precaution has been made to supply complete and accurate information. Information in this document is subject to change without prior notice.
DISCLAIMER
No person should rely on the contents of this publication without first obtaining advice
from a qualified professional person. The company expressly disclaims all and any liability
and responsibility to any terminal or user of this book, in respect of anything, and of the
consequences of anything, done by any such person in reliance, whether wholly or partially, upon the whole or any part of the contents of this book.
FINGERTEC WORLDWIDE SDN BHD
18
© 2012 FingerTec Worldwide Sdn. Bhd. All rights reserved. • 012012