1
PoserPhysics 2012 (Service Release 1) User Manual
© Physicalc Software 2012
1.
Introduction
PoserPhysics2012 is a plug-in for Poser which enables gravity, joints and
collisions to be applied to the elements in your Poser scene. It provides rigid
body and ragdoll simulations. PoserPhysics2012 uses the ODE physics engine
as the basis for animating your scene.
The PoserPhysics2012 version of PoserPhysics has been designed for Windows
and Mac Poser 9 and Poser Pro 2012 and later (32 and 64 bit).
1.1. Useful Links
PoserPhysics Blog - http://poserphysics.blogspot.com.au/
PoserPhysics Website - http://www.physicalc-software.com/
PoserPhysics Facebook Page - http://www.facebook.com/poserphysics
PoserPhysics Twitter Feed - http://www.twitter.com/poserphysics
For assistance, email [email protected].
Content Paradise The PoserPhysics Content Paradise product page. You can
purchase PoserPhysics 2012 here!
ODE Physics Engine PoserPhysics uses this engine to run the physcis
simulation. The ODE Documentation may be useful to get a better understanding
of advanced options, such as joints and motors
PyODE Documentation The link between PoserPhysics and ODE is provided by
a custom version of PyODE. Refer to this library documentation if you want to
access ode objects directly from python.
Physicalc Software For additional PoserPhysics support.
1.2. What's New in PoserPhysics2012?
PoserPhysics2012 adds the following new features from the original
PoserPhysics:
•
•
•
•
•
•
Works on Poser9/Poser Pro 2012.
All new interface (substantially easier to use).
Simulation can now be terminated prior to their completion by pressing the
Cancel button.
More robust ragdolls. Joint limits are more refined to get ragdoll movement
more realistic. More figures are now supported.
Gravity can now be adjusted through the UI. Use gravity at approximately
-2 to give the effect for size.
Friction of objects can now be adjusted.
•
Prop can be joined to create more complex shapes. Fixed (immoveable),
ball and hinge joints are supported. Parent a prop to another prop to join
them together. Remember to click the "Reparent" button prior to rerunning the simulation.
1.3. What’s New in PoserPhysics 2012 Service Release 1
New Features:
•
•
•
•
•
•
•
•
Universal Joints have been added. The UniversalX is like a ball joint, but
with no SPIN/TWIST in the X Axis direction (as the props are positioned in
frame 1). UniversalY has no spin in the Y direction, and UniversalZ has
no spin in the Z direction. Universal joints are great for simulating things
like chain links.
The system will now ignore Invisible props (since this adversely effect the
simulation).
You can now join a prop to the GROUND for fixed joints, and other joints
where the anchor point is "This Prop Origin” or “This Prop Endpoint”.
Added joint rotations around the Child origin and endpoint, and also the
midpoint between the parent (Join To Prop) endpoint a child (This Prop)
origin. The later is the most useful for linked chains and rope. The
original "Origin" and "Endpoint" selections have changed to "Join To Prop
Origin" and "Join To Prop Endpoint". Use the "This Prop Origin" or "This
Prop Endpoint" for prop balljoints to the GROUND so the prop rotates on
it's own Origin or Endpoint point. See
http://poserphysics.blogspot.com.au/2012/07/joint-anchors-tutorial.html for
details.
Added Cylinders. Use the PoserCylinder to add cylinder elements to your
scene. IMPORTANT: The ODE does not support Cylinder to Capsule
or Cylinder to Cylinder collisions. So the PhysicsCylinder will only
bounce (collide) off boxes, spheres and static trimesh shapes. The
cylinder has been included for use as car wheels, where cylinder to
cylinder and cylinder to capsule collisions are generally not required.
Added Damping to the simulation, so that objects do not spin or roll
forever. In the unlikely event you need to change the default settings,
change the PoserPhysics-LinearDamping and PoserPhysics>AngularDamping parameters on the UNIVERSE actor.
For joining props, you NO LONGER USE THE POSER PARENTING
system. Instead, simply select the prop to join the current prop to in the
"Join To" combobox in the Prop/Figure Settings tab of the PoserPhysics
window. Any parented prop in your scene will be unparented when the
simulation is run.
If a prop has other prop joined to it, you can click the “Create Group”
button to make a Poser Grouping prop with the current prop, and all props
joined to this prop in the group. You can then scale, rotate and move the
group as required.
•
•
•
•
Added the setGravity(gravity) function to the API. Removed the
PoserPhysicsEngine(gravity = ?) option - simply call as
PoserPhysicsEngine() now.
Motors have been added. These are a special type of Hinge joint, which
has twist force applied. Select the MotorX, Y or Z joint type. The velocity
of the rotation is set in the PoserPhysics->Velocity dial for that actor, and
the acceleration is set by the PoserPhysics->MaxForce dial. For a simple
sample, load a box, lift it a little, join it to the GROUND, set to MotorX,
anchor point Child Endpoint.
A new ragdoll keyframe movement type has been added called "Locked".
This mode creates the ragdoll, but locks the joints in a fixed position.
There is an additional dial added to the ragdoll called PoserPhysicsLockedSoftness, which is you set this to anything other than the -1 default,
applies this value to the CFM of the joints. In effect, you can make the
joints rigid (with a value of -1 or 0), or flexible (with a value of say 0.001).
This is experimental at this stage, so use at your own risk! See
http://poserphysics.blogspot.com.au/2012/06/locked-ragdolls.html for a
sample.
A force prop has been added. Load the PhysicsForce prop from the
Primitives folder, parent it to a ragdoll or prop, and then set the force
amount and frame to apply that force in the parameter dials for that prop.
See http://poserphysics.blogspot.com.au/2012/07/poserphysics-forceprop.html for details.
Fixes:
•
•
•
•
•
There is now user input validation of the numeric input fields of the
PoserPhysics dialog.
You can now no longer have two PoserPhysics windows open at the same
time
Fixed the instance where checkbox inputs were not being saved in the
Scene Settings tab
The capsule has been renamed to PoserCapsule. Delete the capusle.pp2
(not ppZ!) file from the primitives folder. The standard Poser capsule and
cylinders are not supported - use the PhysicsCapsule and PhysicsCylinder
instead.
Fixed an instance when the old version of PoserPhysics had been
installed on Poser 9/Poser Pro 2012, stopped the new version from
working.
1.4. How does it work?
PoserPhysics is extremely easy to use – and running PoserPhysics2012 from the
User Interface requires no programming or physics knowledge. You can simply
set-up a scene with figures and props, click the Run Simulation button, and your
scene will be animated. As the simulation runs, it stores the prop and figure
positions as keyframes in the Animation Palette, so you can play the simulation
back in real-time, or render the simulation as a movie.
More advanced users may wish to create additional behavior, such as joints and
motors, which can be accessed through the PoserPhysics Python API which
does require some coding skills.
1.5. Poser Elements in the Physical World
Any Figure or Prop can be used in the PoserPhysics simulation. The way they
are used depends on the type of prop or figure. For example, box and sphere
props can be moveable in the physics simulation. Human figures can be
automatically simulated as Ragdolls, and large scenery figures are stationary in
the scene, providing an environment for other objects to bounce off.
Props in the scene that are not the Ball, Box or Capsule primitives have their
shape specified (as box, spherical or capsule) prior to the simulation, so that it's
collision shape is known. The Square Hi-Res (ClothPlane) primitive will be used
statically (it is not moveable), but can be bent with magnets to make terrains.
In summary
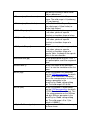
Object Type
Moveable
Collision Detections
Boxes and Spheres
(Poser Primitives)
Yes
Yes
(Spheres must be perfectly
round. Any scaling in the X, Y or
Z axis will be cleared)
Capsule (PoserPhysics
Primitive)
Yes
Yes
Cylinder
Yes
Collides against boxes, spheres
and trimesh objects. Not
against other cylinders or
capsules.
ClothPlane (Poser
Primitive)
No
Yes
(ClothPlane can be scaled and
molded with magnets to make
terrains)
All Other Props
Figures
Yes
Yes
(their shape is simulated as a
box , sphere and capsule if they
are moveable)*
Yes
(ragdoll simulation
if the figure has a
hip actor)
Yes
* Some objects are not well simulated by a box, sphere or capsule. For example,
cylindrical, torus and conical shaped props will not be realistically simulated by
the system.
Any of the items above can also be controlled in the scene by Poser's keyframe
animation system. So a ball can fly through a scene controlled by keyframes, and
hit (and push away) normal moveable physics objects.
Props that are parented to other props will have that parenting removed in the
simulation – and those props will be parented to the Universe. See below for
details on where props are parented to figures.
Capsules
In the Props\Primitives folder, there is a new prop called PhysicsCapsule. It is
recognized by PoserPhysics as the capsule primitive. A capsule is a cyclinder
with round ends. Any other props that are not boxes, spheres or capsules can
have there simulation shape set to box, sphere or capsule. In the case of
capsules, they face the Z axis (ie. They roll along the X axis).
Cylinders
In the Props\Primitives folder, there is a new prop called PhysicsCylinder. It is
recognized by PoserPhysics as the cylinder primitive. Cylinders will not collide
against other cylinders or capsules. They are however extremely useful for
simulating car wheels.
Ragdoll Physics
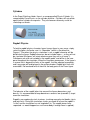
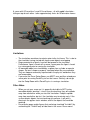
To build a ragdoll physics character from a human figure in your scene, simply
select the figure, and make sure it is “Moveable” (which is the default for
Figures). Then when the physics simulation is run, a ragdoll character will be
build from the figure. Ragdoll characters do not include fingers – so they will not
be simulated (the figures will retain whatever pose they are in at frame 1).
Collarbones are also not included in the ragdoll model, and will be in the zero
pose throughout the simulation. When the simulation commences, if the figure is
in a pose that is beyond the limits of the ragdoll, it will be adjusted accordingly,
and a message will be displayed in the python window. Ragdoll joint limits are
around 80% for bend and twist of those for the body parts of the Poser figure.
The behavior of the ragdoll takes into account the figures bounciness and
density. It is recommended to keep bounciness amounts low (around 0.2) to get
accurate simulations.
Ragdolls are complex physical structures, involving many physical bodies, joints
and joint limits. During the simulation, checks are made to ensure the ragdoll is
“in-tact” and the simulation has not “exploded” (ie. The ragdoll pieces have
separated - as would happen to a real human body if enough force is applied).
When a ragdoll “explosion” occurs, the simulation will stop, and an error will be
reported. In such cases, adjustments of the figure Bounciness and Density will
usually rectify the problem. There are other parameters in the Global Settings
which also help manage ragdoll simulations.
The ragdoll physics simulator has been designed to work with most human Poser
figures. Since it builds the ragdoll dynamically – according to the figures
skeleton, it may work with non-human figures, although this will depend on the
skeleton structure.
Ragdoll physics has been tested on many figures, including the P5 and P6
human figures, and the DAZ Unimesh figures, and is compatible with all these
figures. The system requires that the figure have a “hip” actor parented to the
figure Body in order to build a ragdoll for that figure. So it will work with some of
the Poser animals (those that have a “hip” actor).
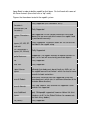
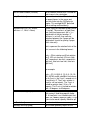
Figures that have been tested in the ragdoll system:
Jessi and James (P6
Characters)
Fully Supported (incl Glamorous Jessi)
Kate and Ben (P6
Characters)
Fully Supported
Cartoon Characters
(P5)
Not Supported. All the cartoon characters have head
bones that are reversed, which means the ragdoll head
is positioned incorrectly.
DAZ Unimesh (Gen 3)
Fullly Supported. The breast actors on The Girl are not
Figures (V3, M3, SP,
included in the ragdoll setup.
Freak etc)
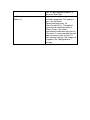
DAZ Generation 4
Figures (V4, M4 etc)
Fullly Supported.
Apollo Maximum
Supported. The ragdoll skeleton for Apollo excludes his
toes, so his feet will occasionally penetrate objects.
Miki
Fully Supported
Terai Yuki
Fully Supported
Project Human
Figures
Tested on H.I.M. and H.E.R. and they are supported although their body parts do not have any limits set, so
the ragdoll bone are not limited - which can lead to some
unrealistic body contortions.
Poser 6 Robots
Brainstem, Hard and Helix not supported (since they
have body parts which twist in a different direction to the
skeleton bone direction)
Poser 6 Animals
Cat, Dog, Dolphin, Lion and Wolf all supported. Other
animals not supported.
Poser Additional
Figures
Mannequin supported. Skeleton not supported (due to
jaw). Stickpeople supported, however reduce the Joint
Hardness to 0.2 in the Global Settings (to compensate
for their skinny bodies)
Elle (Neftis)
Fully Supported.
Poser 7 Animals
Not Supported. The ragdoll system has been design for
humanoid figures, and does not support the Poser 7
animals
Poser 9 Human
Figures
Fully Supported.
Antonia
Not Supported at this stage. This figure uses nonconvential rigging.
Where the ragdoll figure has another figure conformed to it, the conformed figure
will not be included in the physics simulation – it will simply follow the movements
of the figure it is conformed to. For example, you can conform hair and clothing to
Jessi, and when the simulation is run, Jessi will have ragdoll physics applied to
her, and her hair and clothing will follow her body movements. Note however that
the geometry of the conforming figures will not be built into the ragdoll system.
Some figures do not fit the ragdoll system (for example complex figure based
props). These figures can be enabled in the scene, but cannot be moveable (ie.
They are stationary though-out the simulation). If you wish to have these figures
moveable, convert their geometry to a prop, and set the prop as moveable.
Where you have props parented to a figure, these props will be excluded in the
ragdoll physics for the figure. For example, if your figure is wearing a hat, the hat
will not be included in the ragdoll simulation, however it will move correctly with
the figure's head.
So in summary, both props parented to a figure (hair, shoes, hats, weapons), and
other figures conformed to a figure (clothing, hair, etc) will follow the figure, but
not be included as separate bodies in the ODE physics space. This means that
you can parent dynamic hair and clothing to your figures, run the PoserPhysics
simulation, and then run the hair and cloth simulations.
Simulation Speed
In general, the simulation speed is incredibly quick. A single sphere in a scene
will simulation through 100 frames in 1 to 2 seconds. Adding a human figure to
the scene slows the simulation down – to around 1 frame per second.
A scene with 5 CasualJessi's and 5 CasualJames - all with ragdoll siimulation falling on top of each other - takes approximately 4mins for 50 animation frames.
Limitations
•
•
•
•
The simulation sometimes terminates prior to the last frame. This is due to
the simulation having started with two or more objects overlapping
Props parented to a figure's hand will be ignored in the simulation.
Furthermore, figure’s hands will no move, so pre-pose the figure’s hands
in a nature pose prior to running the simulation.
All moveable object are simulated by a sphere, box, cylinder or capsule
shapes. So torus shapes are poorly simulated when they are moveable.
They are however accurately represented in the physics world when they
are Immoveable.
If you enter the Poser Setup Room, you MUST save and then reload your
scene prior to running PoserPhysics on that scene. Similarly, do not go
into the Setup Room whilst PoserPhysics is running a simulation.
Other Notes
•
•
When you set your scene up, it is generally desirable to NOT having
moveable objects touching – since if they are touching, they will explode
away from each other when you start the simulation. If object explode
away from each other too fast, the simulation may terminate early. If the
system detects objects that are touching at frame one, it will print a
warning in the python status window, and list the objects that could be
touching.
Do not make props and/or figures that are being simulated "Invisible" (by
unchecking the "Visible" box) to hide them in the scene. Poser moves
invisilbe objects away from the camera's view, so PoserPhysics will not
simulate them correctly. To hide simulated objects, go into the Material
Room, and set the Transparency and Transparency_Edge to 1 for their
materials.
Note: The ODE physics engine calculates the physics simulation. So the realworld accuracy of the simulation is dependent on ODE, and not Poser or the
PoserPhysics add-on.
Acknowledgements
Open Dynamics Engine
Copyright (c) 2001-2004, Russell L. Smith.
All rights reserved.
ODE is provided by the copyright holders and contributors "as is" and any
express or implied warranties, including, but not limited to, the implied warranties
of merchantability and fitness for a particular purpose are disclaimed. In no event
shall the copyright owner or contributers be liable for any direct, indirect,
incidental, special, exemplary, or consequential damages (includeing but not
limited to, procurement of substitute goods or services; loss of use, data, or
profits; or business interruption) however caused and on any theory of liability,
whether in contract, strict liability, or tort (including negligence or otherwise)
arising in any way out of the use of this software, even if advised of the possibility
of such damage.
2.
User Interface
2.1. Starting the PoserPhysics interface in Poser
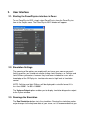
To run PoserPhysics2012, simply select PoserPhysics from the PoserPhysics
item in the Scripts menu. The PoserPhysics2012 window will appear.
2.2. Simulation Settings
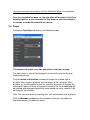
The meaning of the options are explained if you hover your mouse over each
field. In practice, you should not need to change Joint Hardness, or Collision and
Joint Stiffness parameters, however they have been included for users with a
knowledge of the ODE physics simulator who want a high level of simulation
control.
NOTE: Collision and Joint Stiffness will be displayed in scientific format if it is
less than 0.0001. 1e-005 = 0.00001.
The Verbose Output option enables you to display simulation diagnostics output
to the Python window.
2.3. Runnings the Simulation
The Run Simulation button starts the simulation. Running the simulation makes
major changes to the keyframe data of your scene, so it it recommended that you
save your scene prior to clicking on the Run Simulation button. Do not perform
other Poser operations while the simulation is running.
Once the simulation has been run, the animation will be stored in the Poser
animation palette, so you can press the Play button to view the animation
in realtime, or render the animation as a movie.
2.4. Props
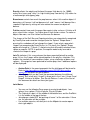
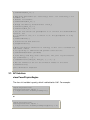
Clicking the Prop/Figure tab displays the following window.
This window will update every time you select a new figure or prop.
The above menu is what will be displayed if you currently have the Ball prop
loaded and selected.
Click the Include in Simulation checkbox to change the enabled state to
disabled. When a prop is disabled, it will not be part of the simulation. When
disabled, you have the option to clear the animation keyframes of the prop. Deselecting this option will mean that previous keyframes for the disabled prop will
be retained, and the prop will potentially move around the scene, however it will
not influence the animation.
Note: You should disable any rendering aids, such as backdrops and skydomes
Click the Moveable combobox to select between stationary, moveable and
keyframed options. See below for details.
Density affects the weight and friction of the prop. High density (ie. 10000)
makes for a heavy and “sticky” (ie. high friction) prop. Low density (10) makes for
a featherweight and slippery prop.
Bounciness controls how much the prop bounces when it hits another object. A
bounciness of 0 means it will not bounce at all, and 1 means it will bounce like a
superball! High density settings will also reduce the amount an object will
bounce.
Friction controls how much the prop slides against other surfaces. A friction of 0
gives a low friction surface. 1 or higher gives a high friction surface. To make an
object slide more, use 0 for friction and increase the bounce.
The shapes of the Ball, Box and Capsule primitives are automatically recognized
by PoserPython and cannot be changed (note the “Sphere" Shape above –
pressing this combobox will not change the shape). If you select a prop who's
shape it not recognized by PoserPhysics (ie. The cane), the “Sphere" Shape
option will change to “- Trimesh ()” and pressing that will enable selection of box,
sphere or capsule. NOTE: In practice, the capsule would rarely be used to
simulate the shape of a prop.
Join To indicates if this scene element has been parented (joined) to another
prop. If it has, the 2 props will be joined together in the physics simulation. This
enables the creation of some complex shapes, using a collection of boxes and
spheres. If the prop has been parented to another prop, then 2 additional options
will be displayed:
•
•
Anchor Point is the parent prop point that the child prop will be joined to.
Refer to http://poserphysics.blogspot.com.au/2012/07/joint-anchorstutorial.html for details on these options.
Joint Type which can be Fixed (no movement between the child and
parent), Ball (a ball joint), HingeX (a hinge joint in the X axis), Hinge Z and
HingeZ, Universal or Motor. See Service Release 1 notes at the start of
this document for details on these joint types.
Joint Notes
•
•
•
•
You can use the following Poser props to create joined objects - box,
sphere, hires sphere, PhysicsCapsule, PhysicsCylinder
The Original of a box is in the middle of the bottom face, and the EndPoint
is in the middle of the top of the box
Joined props should NOT be touching at frame 1 of the animation. If there
are, the animation will be unstable
Use multiple capsules, with ball joints to the Midpoint to create rope or
chain type objects.
•
•
•
You can parent non-primitive shape props (ie. a bowling pin) to a physics
moveable prop or group of joined props, and untick the "Include in
Simulation" to have that prop "follow" the movement of the simulated
props
If you parent (join) a prop physics controlled prop to a keyframed prop, the
physics controlled prop will NOT move with the keyframed prop.
Props cannot be joined to ragdolls.
Important: As stated above Moveable props are simulated by a bounding
box, sphere or capsule. When props are Immoveable, they are simulated by
their actual shape. So for odd shaped like the Poser Primitives Stairs or
Torus, where possible, make them Immoveable (rather than Moveable), so
objects accurately collide off them.
2.5. Figures
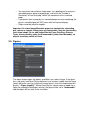
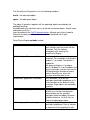
The above image shows the options available if you select a figure. If the figure
has a hip actor, and PoserPhysics believes it can create a ragdoll from the figure
(which will be the case for virtually all human figures), then the shape button will
display “- Figure (ragdoll)”. Where PoserPhysics cannot create a ragdoll for a
figure (for example a building or vehicle), the figure will be set to “Immoveable”,
and the object will be static in the simulation.
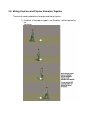
2.6. Mixing Keyframe and Physics Animation Together
There are 6 mode combinations for props and human figures :
1) Disabled - if the prop or ragdoll is not Enabled, it will be ignored by
the
simulation
2) Disabled (Clear) - With the Clear option set, the disabled prop will
have Poser it's frame animation clear during the
simulation
3) Immoveable - the prop/ragdoll will not move from it's start position no matter how much force is applied to it
4) Moveable (ODE) - the prop/ragdoll is moved by gravity and
collisions by the ODE physics engine
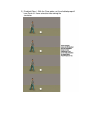
5) Moveable (Keyframed) - the prop/ragdoll is moved by Poser
keyframes, however as it moves, if it collides with other objects in
the scene, they will bounce of the prop/figure if they are moveable
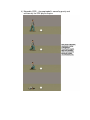
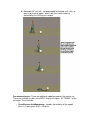
6) Moveable (KF until hit) - the prop/ragdoll keyframed, until it hits, or
gets hit by another object - when it will then switch to being
controlled by the ODE physics engine
For advanced users : There are additional ragdoll parameters that can be set.
These are available as dials in the BODY actor of the figure - AT FRAME 1 of the
animation. These include:
•
PoserPhysics-JointDampening - handles the felxibility of the ragdoll
joints. 0 = loose joints, 0.01 = stiff joints
•
•
•
PoserPhysics-BoneWidth - controls the width of the bones of the ragdoll.
0.8 makes very skinny bones (resulting in the ragdoll often exploding). 1.5
makes wide bones, and can be useful if you ragdoll is wearing conforming
clothing.
PoserPhysics-IgnoreFeet - by default, the Keyframed Until Hit moveable
mode IGNORES foot collisions (otherwise walk animations would trigger a
hit from the ground). To include feet in the hit body parts, set this
parameter to 0
PoserPhysics-JointLimitPercent - defaulted to 80%, this represents the
ratio of the physical limits of a joint angle verses the Poser limits for the
fugure. Generally it is better to have the physics joint limit less than the
Poser joint limit. Reducing this figure below 80% can often give more
realistic ragdoll movement, although there will be a slightly higher
probability of the ragdoll exploding
3.
PoserPhysics Python API
Advanced users may wish to have more control over the PoserPhysics2012
simulation, in which case, they can run the simulation via a python script rather
than the PoserPhysics2012 User Interface. If you run a simulation via the
PoserPhysics2012 API, you do not need to start the PoserPhysics2012 User
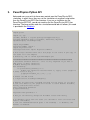
Interface. The base python code for a simulation would look as follows (this code
is provided in the Samples):
import poser
import os, sys
(folder, bundle) = os.path.split(poser.AppLocation())
sys.path.append(os.path.join(folder, "Runtime", "Python",
"poserScripts", "PoserPhysics"))
import PhysicsWxP9
from PhysicsWxP9 import *
import PhysicsToolsP9
from PhysicsToolsP9 import PhysicsToolsError
# This script assumes there are 3 box props in the scene. A pz3 copy of
the scene is in the Samples
# directory, and is called PythonAPISample.pz3
###################################################################
# Per frame callback function - this is only required if you want to
add joints or query simulation
# bodies during the simulation.
def callback():
if poser.Scene().Frame() == 6:
# When the simulation reaches frame 10, apply a left (negative
X axis) force on box_3
p.applyForce("box_3", [-12, 0, 0])
# Create the ODE world.
p = PhysicsTools.PoserPhysicsEngine()
# Extract any previously assigned settings for the props. If you don't
# call this function, all props will be set to their default moveable,
denisty and bounciness values.
print "importing defaults"
p.importDefaults()
PhysicsToolsP9.gVerbose = 1
# Now you can manually change the Moveable status and Density
# To disable a prop from the scene (ie. exclude it from collisions and
make it immoveable,
# call the setEnabled method (pass 1 for enabled, 0 to disable). The
default is Enabled.
p.setEnabled("box_1", 0)
# Make box1 immoveable (ie. stationary). Pass 0 for stationary, 1 for
moveable. The
# default is moveable.
p.setMoveable("box_2", 0)
# Change the density and bounciness of box_3
p.setDensity("box_3", 10)
p.setBounce("box_3", 0.2)
# You can also switch the groundplane on or off with the setGroundPlane
function. Use
# 0 to switch it off, or 1 to switch it on. The groundplane is on by
default
p.setGroundPlane(0)
# Initialise the ODE simultion
p.setupSimulation()
# While the physics simulation is running, it will call a callback for
each frame - which
# is a good way to add forces and perform other actions.
p.setPerFrameCallback (callback)
# Joint ball_2 and box_3 with a balljoint. The joint is positioned at
xyz coordinates 0, 0.1, 0.
p.createBallJoint("box_2", "box_3", [0, 0.3, 0])
# Run the simulation for all the animation frames in the scene
p.runSimulation()
print "Simluation Complete"
3.1. API Interface
class PoserPhysicsEngine
The class init variable is gravity, which is defaulted to -9.81. For example:
import PhysicsToolsP9
from PhysicsToolsP9 import *
p = PhysicsToolsP9.PoserPhysicsEngine()
or
import PhysicsToolsP9
from PhysicsToolsP9 import *
p = PhysicsToolsP9.PoserPhysicsEngine(gravity = -5)
The PoserPhysicsEngine class has the following members:
world – the ode world object
space – the ode space object
The above 2 variables, together with the ode body objects provided by the
getBodyFromProp
method below give significant access to the ode simulation objects. World, space
and bodies are of the
types described in the PyODE documentation, although you will only need to
reference this documentation when the methods below do not fill your
requirements.
PoserPhysicsEngine methods include:
importDefaults ()
Bring the PoserPhysics2012 prop and
figure settings from the scene into the
simulation. Call this method
immediately after creating the
PoserPhysicsEngine.
setEnabled (propName, enabled)
Enable or disable a prop or figure in the
simulation. Pass enabled = 0 to disable,
enabled = 1 to enable. The default is
enabled for
both props and figures. If a prop or
figure is disabled, it is not included in the
physics simulation, and you can use the
setClearAnimation function to control
whether PoserPhysics clears the
keyframe animation data or not.
setMoveable (propName, moveable)
Pass moveable = 0 to lock the
prop/figure specified in propName in it's
current location for the duration of the
simulation. Props/figures are moveable
by default.
setClearAnimation (propName, clear)
Set clear = 1 (the default) if you want
PoserPhysics to clear the keyframe
animation data for the specified
prop/figure when that object has been
disabled, otherwise, set to 0. Has no
effect on enabled props/figure.
setDensity (propName, density)
Set the density for the prop or figure
specified in propName. Denisty controls
the heaviness of the prop/figure, with
high density resulting in more friction
and less bounciness.
setBounce (propName, bounce)
Set the bounciness of the Prop or
Figure. The valid range is 0 (not boucy)
to 1 (very bouncy)
setFriction (propName, friction)
Set the friction of the Prop or Figure.
The valid range is 0 (low friction) to
infinite (high friction)
setToBoxShape (propName
Assign a trimesh prop (ie. any prop that
is not a box, sphere or capsule
Primitive) a simulation shape of a box.
setToSphereShape ()
Assign a trimesh prop (ie. any prop that
is not a box, sphere or capsule
Primitive) a simulation shape of a
sphere.
setToCapsuleShape ()
Assign a trimesh prop (ie. any prop that
is not a box, sphere or capsule
Primitive) a simulation shape of a
capsule. Note - the body of the capsule
points in the axis direction.
setGroundPlane (gp)
Set the ground plane on or off. Pass 1
for a ground plane, and 0 for no ground
plane.
setStartFrame (f)
Set the start frame of the animation.
Pass 1 to start the simulation at the first
frame.
setERP (erp)
Set the ODE global ERP parameter.
See the ODE documentation for details
of ERP (Error Reduction Parameter).
This is the same parameter as the Joint
Hardness parameter in the
PoserPhysics Global settings dialog
box. The valid range it 0.2 to 0.8.
setCFM (cfm)
Set the ODE global CFM parameter.
See the ODE documentation for details
of CFM (Constraint Force Mixing). This
is the same parameter as the Collision
and Joint Stiffness parameter in the
PoserPhysics Global settings dialog
box. The valid range is 0 to 1 (the
default is 0.00001).
setCyclesPerFrame (cycles)
Set the number of ODE simulation cycle
per Poser frame.
setPerFrameCallback (function)
Set a callback function that is called for
each frame in the simulation.
setupSimulation ()
Prepare the simulation. This takes all
the props/figures in the scene and
transfers them into the ODE physics
engine. This method MUST be called
prior to calling runSimulation().
createBallJoint (p1, p2, anchor,
collisions = 1, limits = None)
Create a ball joint between props names
p1 and p2. The anchor is of type [float,
float, float] and represents the x, y, z
coordinates of the join location. If
collisions is set to 0, then collision
detection between the 2 props will be
switched off (useful for joining 2 props
which intersect).
Limits represent the rotation limits of the
joint, are are in the following format...
limits = [[[first rotation axis][last rotation
axis]], first axis low limit, first axis high
limit, second axis low limit, second axis
high limit, third axis low limit, third axis
high limit]
For example
limits = [[[1, 0, 0],[0, 0, 1]], 0, 0, -10, 10,
-45, 45] will create a balljoint limit where
the first axis is the X axis, second axis is
Y and third is Z. The X axis rotation is
fixed (ie. will not rotate). The Y axis is
limited to rotation from -10 to +10
degrees. The Z axis is limited to rotation
from -45 degrees to 45 degrees.
createFixedJoint (p1, p2)
Create a fixed joint between the prop
with name p1 and the prop with name
p2. A fixed joint is an inflexible joint that
holds the 2 bodies together rigidly. To fix
a joint to the world, specifiy None for p2
runSimulation()
Run the simulation
getBodyFromProp (prop)
Get the ode geometry object for the
prop. The passed prop variable is of
type poser.ActorType.
applyForce(propname, force,
verbose=1)
Apply a force to a prop or figure actor
specified in propname. The specify a
figure, use the format
"Figurename/actorname" (ie.
"JamesCasual/rShin"). The method
should only be called from within a
callback. Force is the vector
representing the direction and intensity
of the force. It is recommended that you
apply a maximum force of up to 1.5
times the prop's density. Set verbose=0
to suppress the "Adding force to..."
message.
4.
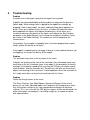
Troubleshooting
Problem
A python error is displayed saying that the ragdoll has exploded
Ragdolls are created by building and joining boxes to represent the parts of a
figures body. When enough force is applied to the ragdoll (for example, by
dropping it from a large height), the joints holding the body parts together can
break. There are a number of ways to fix this, a) reduce the amount of force
being applied to the figure, or b) reduce the bounciness of the figure, or c)
increase or decrease the density of the figure, or d) reduce the Joint Hardness
parameter in the Global Settings, or e) change the number of simulation Cycles
per Frame in the Global Settings. The solution you use will depend on the
circumstances.
For example, if your ragdoll is exploding after it has been dropped from a great
height, reduce the density of the figure.
If the ragdoll is exploding when you apply a force to it, either reduce the force you
are applying, or increase the density of the ragdoll.
Problem
The simulation stops prior to the last frame in the scene
If objects are touching at the start of the simulation, they will explode away from
each other at the first simulation frame. If one object is inside another (or heavily
overlaps), the explosion speed will be such that the ODE physics engine cannot
track to objects, and the simulation fails. PoserPhysics will give you a warning if
objects are touching at the start frame. If touching objects cause the simulation to
fail, simply move them so they are not touching a the first frame.
Problem
Object fall through planes in the scene
The Poser Primitives One Sided Square, Square and Square Hi-Res are all
planes (ie. not solid). Moveable objects will sometimes fall through planes when
they hit the plane straight-on (ie. from a perpendicular direction to the plane
surface). This is an issue with the ODE physics engine, and the work-around is to
either tilt the plane so the object is not hitting straight-on, or replace the plane
with a box primitive.
5.
Samples
The followings scenes are installed into your Poser runtime, and can be loaded
from the Library -> Scene -> PoserPhysics Samples folder.
PythonAPISample - These are the support files used in the Python API
documentation.
MotorizedVehicleSample – Load the pz3 file first, and then run the python script
of the same name. This sample demonstrates how to create motorized joints in
the PoserPython API.
BowlingBallSample – This is simply a pz3 file (there is no python file required).
Load the poser scene, run PoserPhysics, and click “Run Simulation” in the
Python Scripts window. The bowling ball is propelled by dropping it down an
incline (a ClothPlane bent with a magnet), and it crashing into the pins. In order
to have the ball knock over the pins, the ball has very high density, and the pins
very low.
PoolTableSample – This simulates the whiteball break on a pool table. Load
PoolTableSample.pz3 in Poser, run PoserPhysics, and then click "Run
Simulation" in the Python Scripts window. The white ball is keyframed to hit the
rack of balls. Once they collide, the white ball changes from framed animation to
ODE. Changing the frames per second significantly changes the way to
simulation runs.
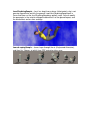
JessiSkydivingSample – Jessi has leapt from a plane. Unfortunately she is not
wearing a parachute and hits the ground. Load JessiSkydivingSample.pz3 in
Poser and then run the JessiSkydivingSample.py python script. You can modify
the parameter in the script to change the bounciness of the ground impact, and
the wind effects on her arms and legs.
JamesLeapingSample – James leaps through the air (Keyframed Animation),
and then hits 3 boxes, at which time ODE animation takes over.