1
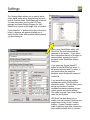
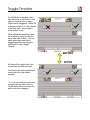
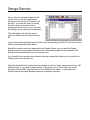
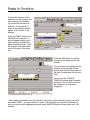
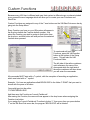
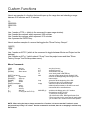
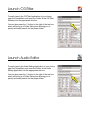
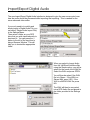
VM-ShortCuts
v 5.4
The Ultimate In
Video Machine Enhancements
INSTRUCTION MANUAL
(Revised February 20, 2001)
Copyright ©2001 Reel Media Productions
Getting Started
After installing VM-ShortCuts, a VM-ShortCuts icon will appear on your desktop.
Double click on this icon to start VM-ShortCuts, which will then automatically
launch VM-Studio. VM-ShortCuts can also be started by clicking on the
Windows START button, selecting PROGRAMS, VM-SHORTCUTS and then
VM-ShortCuts
Once VM-ShortCuts has successfully
launched and attached to VM-Studio,
you will see the new VM-ShortCuts
task bar sitting at the top of the screen.
You will also notice that the VM-Studio
title bar will be given the new name
“Enhanced VM-Studio”
The VM-ShortCuts menu bar can be
positioned anywhere on the screen.
This position will be saved when you
exit VM-ShortCuts.
As you pass the mouse pointer over the various VM-ShortCut buttons, the function of that
button will appear in the VM-ShortCuts title bar.
The first time you use VM-ShortCuts, you will want to use the SETTINGS button to customize
the various settings within the program.
Settings
The Settings Menu allows you to specify which
folder digital audio will be imported and stored in
as well as which folder QuickSlates will be stored.
You can also select your favorite CG/Paint
program and Audio Editing Program for VMShortCuts to launch at the single click of a button.
If you press the “<” button to the right of the input
boxes, a browser will appear allowing you to
easily find the folder that contains the information
you are looking for.
When using QuickSlates within VMShortCuts, the text is automatically
centered on the screen. If you would
like to reposition the text to fit better on
custom slates, change the X and Y
locations under QuickSlate Screen
Positions.
If you press the Toggle VIdeo/FX
button in the VM-ShortCuts menu, it
will protect all video and FX tracks. If
you would rather the tracks be
disabled, select Disable All instead of
Protect All..
If you would like to set up multiple
workbenches within VM-ShortCuts,
check this option. This will allow you to
set up any number of custom
workbenches each containing its own
unique project and movie settings.
This option is great if you have multiple
users on your system.
VM-ShortCuts also allows you to
create your own custom Functions and
assign them to any of the 7 custom
buttons. Custom Functions can be
made to perform large time consuming
tasks with the simple click of a button.
Video Protect
This button will toggle the protect/unprotect feature
of the video tracks. This allows you to adjust audio
clips and f/x in the timeline without affecting the
video tracks.
Video Disable
This button will toggle the disable/enable feature of
the video tracks. By disabling the video tracks, VM
will ignore the video and graphic clips while playing
back the movie.
Video/FX Protect
This button will toggle the protect/unprotect feature of
both the video tracks and the F/X tracks.
Audio Protect
This button will toggle the protect/unprotect feature
of the audio tracks. This allows you to adjust video
clips and f/x in the timeline without affecting the
audio tracks.
Audio Disable
This button will toggle the disable/enable feature of
the audio tracks. By disabling the audio tracks, VM
will ignore the audio clips while playing back the
movie.
Toggle Timeline
For VM-Studio to playback video
clips efficiently in the timeline, clips
cannot be placed back to back...
Clips must be staggered. While VM
is playing a clip in V1 it looks ahead
to the next clip in V2 and gets it
ready to play it next.
While editing and adjusting clips in
the timeline you may end up with
some clips back to back. You can
easily place them beck into a
staggering position by using the
VM-ShortCut called Toggle
Timeline.
BEFORE
All clips will be toggled from their
current track into the next track.
The timeline will now be optimized
to play back the clips without
stopping.
* If you do not want the audio track
to toggle with the video, use the
Protect Audio button to protect the
audio track from changing.
AFTER
Range Render
While rendering specific areas of the timeline, you may
have to wait from several minutes to several hours. If
you have a number of these areas to render, you must
wait for one to finish before setting up the next one.
To make this whole process less painful, we have come
up with a Range Render function. This allows you to list
ALL the different areas in the timeline that must be
rendered and then the software does all the work.
Now you can render over night and the finished product
will be waiting for you the next morning.
To use the Range Render feature, first select the
various areas in the timeline you wish to render.
Make notes of the IN and OUT points that appear at
the bottom of the timeline.
Press the Range Render button on the VM-ShortCuts
menu bar. The Range Render window will appear.
Press the Add button to add a range
to the list.
A box will then appear asking for the
IN and OUT points of the range you
wish to render. Enter the
appropriate data into this box and
press the Add button when done.
Continue this process for all the
clips your wish to be rendered.
Range Render
As you enter the various ranges into the
render queue, a list will be generated
showing you the IN and OUT points of all
the clips. You have the option of saving
this list to work on at a later time by
pressing the Save button, or you can load
an existing list by pressing the Load button.
The Clear button will clear the render
queue by deleting all the entries from the
list.
You can also delete individual clips from the list by first selecting the IN/OUT point from the list
and then pressing then Delete button.
After all the ranges have been entered into the Render Queue, you can start the Range
Render process by pressing the Render button. After each range has been rendered, VMShortCuts will automatically move onto the next one.
If you would like the render queue cleared once this process has finished, put a check in the
'Delete queue after Render' box.
Once the Range Render function has been started you will no longer have control of your VMStudio system. If you need to regain control of the system, turn on the Caps Lock on the
keyboard, hold the ESC key, then click on the VM-ShortCuts toolbar. It may take a few
seconds before the Range Render process is completely canceled.
Copy In Timeline
Select a clip or range of clips in the
timeline that you wish to copy to the
clipboard. When doing this, you will
notice that the IN and OUT points of
your selection appear at the bottom of
the timeline.
CLIP TO BE COPIED
After selecting your clips, press the
VM-ShortCuts COPY button. A box
will appear asking you to enter the IN
and OUT points of the clips you wish
to copy. Copy the IN and OUT from
the timeline into the IN and OUT of
the copy box. Press the ADD button
to add your selection to the clipboard.
This information will stay in the
clipboard even after VM-ShortCuts
has been shut down. The clipboard
will only change if new information is
copied to it.
* After copying information to the clipboard, the movie you are currently working on will be
renamed to 'NEW'. You can continue to work in VM using this new name but remember to
save your movie with its appropriate name (using SAVE AS) before shutting down your VM
session.
Paste In Timeline
To paste the contents of the
clipboard into the timeline, first
select where in the timeline
you would like the clip to be
inserted. The IN and OUT
points of the selected clip will
appear at the bottom of the
timeline.
PASTE CLIP
HERE
Press the PASTE button in the
VM-ShortCuts menu bar. A
box will appear asking you to
enter the IN point where the
paste function will start. Copy
the IN point from the timeline
into the IN point of the paste
box.
Press the ADD button to add the
contents of the clipboard into the
timeline.
The new clip will be pasted into the
timeline at the selected IN point
and all other clips will be pushed to
the right to make room for the new
clips.
NEW CLIP HAS BEEN ADDED
You can use the TOGGLE
TIMELINE function after the paste
process to 'flip' the clips around in
the timeline if you want them
staggered.
* After pasting information from the clipboard, the movie you are currently working on will be
renamed to 'NEW'. You can continue to work in VM using this new name but remember to
save your movie with its appropriate name (using SAVE AS) before shutting down your VM
session.
Custom Functions
Because every VM User is different and uses their system in different ways, we have included
a very powerful macro language which will allow you to create your own Functions and
ShortCuts.
Custom Functions are assigned to any of the 7 user buttons on the VM-ShortCuts menu bar by
going into the Setup Menu.
Every Function you have on your VM system will appear in
the drop box beside the Function button number. Just
select the Function you wish to assign to that button from
the drop box, and that button will now perform the selected
function when pressed.
To create and edit your own
Functions, press the VM-Function
button at the bottom of the Setup
menu. This will start the VMFunctions Editor.
The left side of the editor contains a
quick reference for some of the
commands while the right side of
the editor contains a text box where
you will enter the commands.
All commands MUST start with a '!' symbol, with the exception of launching an application,
which must start with a '*' symbol.
Example: You have an application called BRUSH.EXE in the folder C:\PAINT that you want to
launch with the press of a button.
You would type into the editor:
*C:\PAINT\BRUSH.EXE
And then save the Function as 'Launch Paintbrush'
After saving the Function, the name will now appear in the drop boxes when assigning the
Function to a button.
If you assign the 'Launch Paintbrush' Function to button '1', then every time you press button
'1' on the VM-ShortCuts menu bar, the program 'BRUSH.EXE' will be started.
Custom Functions
VM-ShortCuts comes with a number of pre-made Functions which you can use as examples
for creating your own custom Functions.
To load a Function into the editor, press the LOAD button at the bottom of the VM-Function
Editor.
You will be presented with the Load
VM-Function window. (All Functions
are stored in the 'Functions' folder)
Select any of the Functions listed
and press the OPEN button. The
Function will be loaded and
displayed in the VM-Functions
Editor.
There are some parts of the VM-Studio interface that can only be access with the mouse, so
we have included a MOUSE macro command. This allows you to set a predefined mouse
position on the screen and send a Mouse Click command. To find the exact mouse position
that you need, press the 'Mouse X-Y' button at the bottom of the Settings Menu.
There are some parts of the VM-Studio interface that can
only be access with the mouse, so we have included a
MOUSE macro command. This allows you to set a
predefined mouse position on the screen and send a
Mouse Click command. To find the exact mouse position
that you need, press the 'Mouse X-Y' button at the bottom
of the Settings Menu.
Move the mouse over the area you need coordinates for
and the X and Y position will be displayed for you.
In this example, if we needed to press the REC button in
the VM-Studio timeline, our mouse location for this
would be 21,354.
The macro to press the left mouse button at this location
would look like this:
!MOUSE2,2,L
Custom Functions
Here is an example of a function that would open up the range box and selecting a range
between 2:00 minutes and 2:15 minutes.
!\^r
!00020000
!00021500
!13
Line 1 sends a CTRL-r (which is the command to open range window).
Line 2 sends the numbers which represent 2:00 minutes.
Line 3 sends the numbers which represent 2:15 minutes.
Line 4 presses the ENTER key.
Here is another example of a macro that toggles the "Show Factory Groups".
!\@\[F6]
!\@gf
Line 1 sends an ALT-F6 (which is the command to toggle between Movie and Project on the
desktop)
Line 2 sends an ALT g f (which selects "Group" from the project menu and then "Show
Factory Groups" from the drop down menu)
Macro Commands:
\[TAB]
\[UP]
\[DOWN]
-tab key
-up arrow
-down arrow
\[LEFT] -left arrow
\[RIGHT]
-right arrow
\[PAGEUP]
-page up
\[HOME]
-home
\[DEL]
-delete
\[BACK]-backspace
\[INS]
-insert
\@
-alt key
\^
-ctrl key
\+
-shift key
\[F1]
-F1 key (can be F1-F12)
a-z
A-Z
0-9
13
wait
loop
loopp
MOUSEx,y,L
-any key from a-z
-and key from A-Z
-and number from 0-9
-on a line by itself is ENTER key
-causes a slight pause (this is needed if VM
screens are not appearing fast enough for the
macro script)
-place this at the beginning of the VMFunction to have it run multiple times
-same as loop but forces the project
window (bottom window) to be the focus so all
commands will be executed there
-positions the Mouse at the X,Y location
and performs a LEFT CLICK.
L=Left Click, R=Right Click
LD=Left Double Click, RD=Right Double Click
*There is a utility in the menu that will easily allow
you to find the X,Y location of the mouse pointer.
NOTE: When using the loop or loopp command in a Function, it is best to test the Function in a test
project and loop it only 2 or 3 times. One the command is executed, there is no stopping it until the loop
has finished.
Multi Workbench
Wether you have a number of different editors who use
your VM-Studio or many projects on the go, you many find
the need to better organize your VM workbench and
projects.
VM-ShortCuts gives you the ability to setup any number of
custom workbenches, each with its own default movies
and projects.
To enable the multi workbench feature, select the Setup
button on the VM-ShortCuts menu bar to open the Setup
Window. Then check the box labeled Multi Workbench.
The next time VM-ShortCuts is started you will be
presented with the Multi Workbench startup box.
Select the workbench you wish to start with and
press the Open button. That workbench will
then be opened along with its last used project
and movie.
The first time you use the Multi Workbench
feature, you will have one workbench to start
with labeled VM-Studio Default. Each
workbench you add will be based on this default
workbench. This is also the only workbench
you will NOT be able to delete.
To add a new workbench, press the Add
button. You will be presented with the
Create New Workbench dialog box. Enter
the name you wish to call the new
workbench into the Filename box. Press
the Save button.
Your new workbench will now appear in the
Multi Workbench window.
To remove a workbench, select the
appropriate workbench and press the
Delete button. That workbench will then be
removed.
* This feature will only work when VM-ShortCuts launches VM-Studio. DO NOT run VMShortCuts with this feature enabled if VM-Studio is already running. Files may be corrupted.
Device Setup Panel
Often while “Power Editing” you will need to
open the Device Setup window to make
changes to your video decks and how VMStudio will use them.
To quickly open this menu with a single click,
just press the Device Setup button on the VMShortCuts tool bar.
Record Output Panel
Another menu that can be quickly opened with
a single click of a button is the Output Setup
Menu.
Just press the Record Output button on the
VM-ShortCuts tool bar.
Launch CG/Titler
To easily launch the CG/Titler Application of your choice,
open the Setup Menu and enter the Folder of the CG/Titler
Software into the appropriate text box.
You can also press the '<' button to the right of the text box
which will bring up a Folder Dialog box allowing you to
quickly and easily search for the proper folder.
Launch Audio Editor
To easily launch the Audio Editing Application of your choice,
open the Setup Menu and enter the Folder of the Audio
Editing Application into the appropriate text box.
You can also press the '<' button to the right of the text box
which will bring up a Folder Dialog box allowing you to
quickly and easily search for the proper folder.
Import/Export Digital Audio
VM-ShortCuts offers a quick and easy way to import and export both mono and stereo digital
audio. This is accomplished by providing you with simple interface to the WAVCONV software
which is shipped with VM-Studio. (This means WAVCONV.EXE must be present in the
VM-ShortCuts folder)
To Import a Stereo WAV File:
"
"
"
"
"
"
"
"
"
"
Select WAV as the audio source.
Check the box stating that the WAV
is a Stereo WAV.
Press '<' to select the WAV file to
use (or type in the correct path).
Press '<' to select the destination of
the Left Channel on the DPR.
Press '<' to select the destination of
the Right Channel on the DPR.
Select 44100 to import the file at 44.1KHz
You do not have to worry about the 'Dest WAV' type since you are not exporting to a WAV file
Turn the filtering ON.
Select NTSC if you are using the NTSC version of VM-Studio or PAL if you are using the PAL version of
VM-Studio.
Press 'PROCESS' to import the WAV file.
To Export a Stereo DPR File:
"
"
"
"
"
"
"
"
"
Select DPR as the audio source.
Press '<' to select the destination folder of the WAV file.
Press '<' to select the source of the Left Channel on the DPR.
Press '<' to select the source of the Right Channel on the DPR.
Select 44100 to export the file at 44.1KHz
Select 'Stereo' under 'Dest WAV' to export as a stereo WAV file
Turn the filtering ON.
Select NTSC if you are using the NTSC version of VM-Studio or PAL if you are using the PAL version of
VM-Studio.
Press 'PROCESS' to export the DPR file.
NOTE: You can download the most recent copy of WAVCONV.EXE from http://www.reelmediaproductions.com/vmextras
if you are having problems with the conversion process.
Import/Export Digital Audio
The new Import/Export Digital Audio Interface is designed to give the user more control over
how the audio should be processed while importing and exporting. This is needed for the
more advanced video editor.
If your only need is to quickly and
simply import a Digital Audio File, you
can select ‘Simple Audio Import Only’
in the Settings Menu.
Then select a folder on your DPR
drive that you wish imported audio to
be stored to. You can press the ‘<’
button to the left of the input box to
bring a Browser Window. This will
help you in located the appropriate
folder.
When you select to Import Audio
from the VM-ShortCuts Mune Bar
using the Simple option, you will be
asked for the name of the WAV file.
Select the WAV and press OPEN.
You will then be asked if the WAV
file is in Stereo. If the WAV is a
Stereo WAV, press YES. If the
WAV is a MONO WAV file. press
NO.
The WAV will then be converted
into a DPR Audio file and placed in
the folder provided in the Settings
Menu.
Quick Slate
Quick Slate is a small utility that allows you to quickly and easily create background slates for
the start of your productions. The default slate is NTSC color bars but can easily be changed
to any custom background. Just save your favorite graphic as a 640x480 Windows Bitmap in
the VM-ShortCuts program folder with the name QS.BMP
To use Quick Slate, press the Quick Slate button on the VM-ShortCuts menu bar. A slate will
appear with the option of entering various information about your project. Fill in the boxes with
the appropriate information and press the PREVIEW button to generate the slate.
To save the slate to your hard drive, press the SAVE BMP button. The slate will be saved to
the folder specified in the Setup Menu.
Help / Misc.
If you need a quick reference to what the various buttons in the VM-ShortCuts menu bar do,
press the Help button. A quick reference screen will appear showing then menu bar with each
button labeled.
This screen will also contain who the product is registered to as well as the personal Serial
Number of the product.
If you would like to view the VM-ShortCuts manual, just press the Help button on this screen.
The VM-ShortCuts manual will automatically be launched.
There is also a Reset button which will move the VM-ShortCuts menu bar to its default starting
position at the top of the VM-Studio screen.
If you have any question regarding this product, you can view our Frequently Asked Questions
website at:
http://www.reelmediaproductions.com/vmshortcuts/faq
Or visit our Support Forum at:
http://www.reelmediaproductions.com/vmshortcuts/support
SOFTWARE LICENSE AGREEMENT
1. License Grant. REEL MEDIA PRODUCTIONS grants End User a non exclusive, non-transferable license: (a) to use the Software on a
single personal computer systems located at End User's site; and (b) to copy the Software solely for the purpose of installing it on End
User's computer and for backup and archival storage. End User agrees to reproduce the same copyright and other proprietary notices
appearing on the original Software on any copies. End User may not transfer, sell or distribute copies of the Software to others. End
User may assign its rights under this Agreement to a third party provided the third party agrees in writing to be bound by the terms of this
Agreement and End User transfers all copies of the Software and associated documentation to the third party or destroys any copies not
transferred.
2. No Other Rights. The Software is copyrighted by REEL MEDIA PRODUCTIONS and is proprietary to REEL MEDIA PRODUCTIONS,
which retains ownership of the Software. The license granted above is not a sale of the Software, and except as stated above, this
Agreement does not give End User and rights to patents, copyrights, trade secrets, trademarks or any other rights or license with respect
to the Software and documentation. End User agrees to hold the Software and documentation in confidence and to take reasonable
steps to prevent unauthorized copying or disclosure.
3. No Modifications or reverse Compilation. END USER MAY NOT MODIFY, TRANSLATE, DISASSEMBLE OR DECOMPILE THE
SOFTWARE OR DOCUMENTATION OR ANY COPY, IN WHOLE OR IN PART.
4. Limited Warranty. REEL MEDIA PRODUCTIONS warrants only to the End User (and not to any transferee) that the disk on which the
Software is recorded is free of defects in materials and workmanship under normal use, and the Software will perform substantially in
accordance with the accompanying documentation, for a period of ninety (90) days from the date of delivery to End User. If the disk is
defective or the Software does not perform substantially in accordance with the accompanying documentation, REEL MEDIA
PRODUCTIONS's entire liability and End User's exclusive remedy shall be, at REEL MEDIA PRODUCTIONS's option, to repair or replace
the Software at no charge, if it is returned to REEL MEDIA PRODUCTIONS within ninety (90) days after End User acquired it. If the defect
or nonconformance has resulted from accident, misuse, or misapplication of the Software, REEL MEDIA PRODUCTIONS shall have no
obligation to refund End User's license fee or repair or replace the Software.
REEL MEDIA PRODUCTIONS DOES NOT WARRANT THAT THE SOFTWARE IS ERROR-FREE OR WILL OPERATE WITHOUT
INTERRUPTION. THE ABOVE WARRANTY IS THE ONLY WARRANTY OR REPRESENTATION OF ANY KIND WITH RESPECT TO THE
SOFTWARE AND ANY ASSOCIATED DOCUMENTATION MADE BY REEL MEDIA PRODUCTIONS OR ANYONE ELSE INVOLVED IN THE
CREATION, PRODUCTION, DELIVERY OR LICENSING OF THE SOFTWARE AND DOCUMENTATION.
5. Limit of Liability. IN NO EVENT SHALL REEL MEDIA PRODUCTIONS OR ANYONE ELSE INVOLVED IN THE CREATION, PRODUCTION,
DELIVERY OR LICENSING OF THE SOFTWARE BE LIABLE TO END USER FOR ANY CONSEQUENTIAL, SPECIAL, INCIDENTAL OR
INDIRECT DAMAGES OF ANY KIND ARISING OUT OF THE USE OF THE SOFTWARE, EVEN IF REEL MEDIA PRODUCTIONS OR ANYONE
ELSE INVOLVED IN THE CREATION, PRODUCTION, DELIVERY OR LICENSING OF THE SOFTWARE HAS BEEN ADVISED OF THE
POSSIBILITY OF SUCH DAMAGES. IN NO EVENT WILL REEL MEDIA PRODUCTIONS BE LIABLE FOR ANY CLAIM, WHETHER IN
CONTRACT, TORT OR ANY OTHER THEORY OF LIABILITY.
6. Support. REEL MEDIA PRODUCTIONS will provide customer support and service to the End User. End User is eligible to obtain
licenses for new versions of the Software if and when any are introduced, at special upgrade or exchange prices. REEL MEDIA
PRODUCTIONS has no obligation to enhance or upgrade the Software or provide such enhancements or upgrades to End User.
7. Term. This Agreement shall remain in effect until terminated or set further below. End User may terminate this Agreement and the
license it grants at any time by destroying the Software and documentation and all copies or by returning them to REEL MEDIA
PRODUCTIONS. REEL MEDIA PRODUCTIONS has the right to terminate this Agreement and license it grants immediately if End User
fails to comply with any terms or conditions of this Agreement. End User agrees that upon and such termination by REEL MEDIA
PRODUCTIONS, End User will destroy the Software and documentation and all copies.
8. Integration. END USER ACKNOWLEDGES AND AGREES THAT END USER HAS READ THIS AGREEMENT, UNDERSTANDS IT, AND
THAT IT IS THE ENTIRE AGREEMENT BETWEEN REEL MEDIA PRODUCTIONS AND END USER WHICH SUPERSEDES AND PRIOR
AGREEMENT, WHETHER WRITTEN OR ORAL, AND ANY OTHER COMMUNICATIONS BETWEEN REEL MEDIA PRODUCTIONS AND END
USER RELATING TO THE SUBJECT MATTER OF THIS AGREEMENT. This agreement may be modified only by a written document
signed by REEL MEDIA PRODUCTIONS.