1
User’s Manual
GM862 Arduino Shield
Rev. 1.3
MCI-MA-0063
MCI Electronics
www.olimex.cl
Luis Thayer Ojeda 0115. Of. 402 ▪ Santiago, Chile ▪ Tel. +56 2 3339579 ▪ [email protected]
MCI Ltda.
Luis Thayer Ojeda 0115. Of. 402
Santiago, Chile
www.olimex.cl
Tel: +56 2 3339579
Fax: +56 2 3350589
® MCI Ltda. 2011
Attention: Any changes and modifications done to the device will void its warranty
unless expressly authorized by MCI.
Manual Code: MCI – MA - 0063
GM862 Arduino Shield User’s Manual
Page 3 of 13
INTRODUCTION .................................................................................................... 4
FUNCTIONALITIES ................................................................................................ 4
DEVICE PARTS ...................................................................................................... 5
QUICK INSTALLATION AND PROGRAMMING GUIDE FOR THE GM862
ARDUINO SHIELD.......................................................................................... 6
GM862_SMS EXAMPLE SOURCE CODE ............................................................. 8
GM862_LOAD_HTML EXAMPLE SOURCE CODE ................................................ 9
GM862_GPRS EXAMPLE SOURCE CODE ......................................................... 11
PORT MAPPING .................................................................................................. 13
DOCUMENT HISTORY ........................................................................................ 13
Luis Thayer Ojeda 0115 Of. 402 ▪ Santiago, Chile ▪ Tel. +56 2 3339579 ▪ [email protected]
www.olimex.cl
GM862 Arduino Shield User’s Manual
Page 4 of 13
INTRODUCTION
The main purpose of this document is to describe the GM862 Arduino Shield
functionalities.
This document covers all the functionalities supported by the shield. Basic
GM862 modem configuration procedures are also suggested.
The GM862 Arduino Shield enables de Arduino board to make phone calls,
send SMS messages, send GPRS data, activate I/O board pins and much more.
This merges the great amount of functionalities and flexibility of GM862 modems
with the easiness and simplicity of Arduino. These features enables the user to
develop projects on the following areas:
Telemetry and Telecontrol.
Intelligent security systems.
Intelligent automatic selling systems.
Vehicle fleet management systems.
FUNCTIONALITIES
The GM862 Arduino Shield basically provides adequate power for the Telit
GM862 modem, and also adapts the pins for working with Arduino.
Some specific features of this device are:
1)
2)
3)
4)
5)
6)
7)
8)
9)
5-9 [VDC] power regulation to 3.8 [VDC]
3 [A] maximum current consumption
Power indicator Led
GM862 modem status indicator Led
User configurable Led
GM862 ON/OFF button
Arduino reset button
GM862 modem ADC port connection
Dimensions: 76 x 54 [mm]
Luis Thayer Ojeda 0115 Of. 402 ▪ Santiago, Chile ▪ Tel. +56 2 3339579 ▪ [email protected]
www.olimex.cl
GM862 Arduino Shield User’s Manual
Page 5 of 13
DEVICE PARTS
ADC Jumper
LED PWR
GSM
Antenna
Connector
LED STAT
LED USER
ON/OFF Button
Arduino Reset
Button
GM862
Modem
Connector
GPS
Antenna
Connection
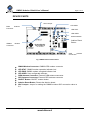
Fig.1 GM862 Arduino Shield board.
GM862 Modem Connector: GM862-GPS modem connector
LED STAT: GM862 modem operation indicator Led
LED PWR: GM862 modem energized indicator Led
LED USER: User configurable indicator
GSM Antenna Connector: External GSM antenna connector
GPS Antenna Connector: External GPS antenna connector
ON/OFF Button: ON/OFF modem button
Arduino Reset Button: Resets the Arduino board
ADC Jumper: Jumper for setting the GM862 modem ADC conversion value to
0 V.
Luis Thayer Ojeda 0115 Of. 402 ▪ Santiago, Chile ▪ Tel. +56 2 3339579 ▪ [email protected]
www.olimex.cl
GM862 Arduino Shield User’s Manual
Page 6 of 13
QUICK INSTALLATION AND PROGRAMMING GUIDE FOR THE
GM862 ARDUINO SHIELD
Before installing and programming the GM862 Arduino Shield a virtual serial
port must be installed, and also, some of the Shield pins have to be connected. This
is for communication with both the modem and PC, at the same time. This makes
the software debugging procedure more fluid than using the hardware serial port
only.
1. Download the example program here.
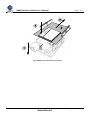
2. Install the Shield. See fig.2 for reference.
A. Connect the GM862 modem.
B. Align the shield in order to connect the shield side pins to the
corresponding pins of the Arduino.
C. Assembly the shield to the Arduino board ensuring ALL of the pins are
connected.
3. Insert SIM card into GM862 modem.
4. Connect 5-9 VDC Arduino board power supply.
5. Connect Arduino USB port to the PC.
6. If the FTDI drivers haven’t been installed, install them (Download here).
7. Open Arduino Alpha (Download here).
8. Open source code (Example source code introduced in section 5).
NewSoftSerial library must be in installed in Arduino\libraries\NewSoftSerial
9. Change the phone number you want to send a SMS.
10. Click Upload button in Arduino Alpha.
11. Wait until Stat LED is ON.
A. The modem behavior can also be seen by clicking the Serial Monitor
button, configuring a baud rate of 9600 bps.
At the end of this sequence, a text message was sent to the telephone number
indicated in the source code.
Luis Thayer Ojeda 0115 Of. 402 ▪ Santiago, Chile ▪ Tel. +56 2 3339579 ▪ [email protected]
www.olimex.cl
GM862 Arduino Shield User’s Manual
Page 7 of 13
C
A
B
L
TE
IT
D
Fig.2 GM862 Arduino Shield board assembly.
Luis Thayer Ojeda 0115 Of. 402 ▪ Santiago, Chile ▪ Tel. +56 2 3339579 ▪ [email protected]
www.olimex.cl
GM862 Arduino Shield User’s Manual
Page 8 of 13
GM862_SMS EXAMPLE SOURCE CODE
The following code was extracted from the library developed by http://tinkerlog.com
and modified for working with Arduino Duemilanove board.
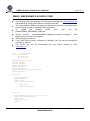
This code sends an SMS to a programmer-defined number, with a pre-defined text.
It also does the modem initialization and configuration.
To
upload
the
example
source
code,
open
this
file
scketch\GM862_SMS\GM862_SMS.pde
Search function “modem.sendSMS(“+569phone_number”,”message”)”. And
replace phone number and message.
Upload program to Arduino.
If you open Serial monitor configured to 9600bps, you can see the procedures
executed by Arduino.
The source files can be downloaded from the author website or from
www.olimex.cl.
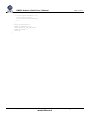
/*
File:
GM862_SMS.pde
Author: Moisés Campos
MCI Electronics
www.olimex.cl
*/
#include <NewSoftSerial.h>
#include <string.h>
#include "GM862.h"
#define BUF_LENGTH 100
#define txGprs_pin 3
#define rxGprs_pin 2
NewSoftSerial ser(rxGprs_pin,txGprs_pin);
GM862 modem(&ser);
void setup()
{
Serial.begin(9600);
modem.switchOn();
modem.init();
while (!modem.isRegistered())
{
delay(1000);
modem.checkNetwork();
}
}
void loop()
{
modem.sendSMS("+56998300000", "Hello World!");
digitalWrite(ST_LED_pin,HIGH);
delay(2000);
modem.switchOff();
while(1);
}
Luis Thayer Ojeda 0115 Of. 402 ▪ Santiago, Chile ▪ Tel. +56 2 3339579 ▪ [email protected]
www.olimex.cl
GM862 Arduino Shield User’s Manual
Page 9 of 13
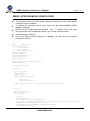
GM862_LOAD_HTML EXAMPLE SOURCE CODE
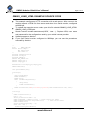
This example configures a HTTP connection with a web server. After connect, the
module request a HTML file from server and show it on Serial monitor, configured
at 9600 bps.
To upload the example source code, open this file scketch\GM862_LOAD_HTML\
GM862_LOAD_HTML.pde
Search function modem.settoInternet(“APN”, “user….). Replace APN, user name
and password for the configuration used by your mobile internet provider
Upload program to Arduino.
If you open Serial monitor configured to 9600bps, you can see the procedures
executed by Arduino.
/*
File:
GM862_SMS.pde
Author: Moisés Campos
MCI Electronics
www.olimex.cl
*/
#include <NewSoftSerial.h>
#include <string.h>
#include "GM862.h"
#define BUF_LENGTH 100
#define txGprs_pin 3
#define rxGprs_pin 2
NewSoftSerial ser(rxGprs_pin,txGprs_pin);
GM862 modem(&ser);
char generalBuffer[500];
void setup()
{
Serial.begin(9600);
modem.switchOn();
modem.init();
while (!modem.isRegistered())
{
delay(1000);
modem.checkNetwork();
}
modem.settoInternet("APN","username","password","www.roundsolutions.com", "80");
}
void loop()
{
modem.connecttoServer();
byte i = 0;
Serial.println("Load html...");
modem.sendd("GET / HTTP/1.0\r\n"); // search twitter for gm862
modem.sendd("Connection: keep-alive\r\n");
// write on the socket
modem.sendd("\r\n");
Serial.println("receiving ...");
while (i++ < 50) {
modem.receive(generalBuffer);
Luis Thayer Ojeda 0115 Of. 402 ▪ Santiago, Chile ▪ Tel. +56 2 3339579 ▪ [email protected]
www.olimex.cl
GM862 Arduino Shield User’s Manual
Page 10 of 13
if (strlen(generalBuffer) > 0) {
Serial.print("buf:");
Serial.println(generalBuffer);
i--;
}
}
Serial.println("done");
modem.closedConection();
digitalWrite(ST_LED_pin,HIGH);
modem.switchOff();
while(1);
}
Luis Thayer Ojeda 0115 Of. 402 ▪ Santiago, Chile ▪ Tel. +56 2 3339579 ▪ [email protected]
www.olimex.cl
GM862 Arduino Shield User’s Manual
Page 11 of 13
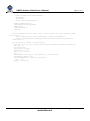
GM862_GPRS EXAMPLE SOURCE CODE
This example opens a TCP/IP socket, reads an analog input and sends data to
configured server in realtime.
To upload the example source code, open this file scketch\GM862_GPRS\
GM862_GPRS.pde
Search function modem.settoInternet(“APN”, “user….). Replace APN, user name
and password for the configuration used by your mobile internet provider
Upload program to Arduino.
If you open Serial monitor configured to 9600bps, you can see the procedures
executed by Arduino.
/*
File:
GM862_SMS.pde
Author: Moisés Campos
MCI Electronics
www.olimex.cl
*/ #include <NewSoftSerial.h>
#include <string.h>
#include "GM862.h"
#define BUF_LENGTH 100
#define txGprs_pin 3
#define rxGprs_pin 2
NewSoftSerial ser(rxGprs_pin,txGprs_pin);
GM862 modem(&ser);
char generalBuffer[100];
void setup()
{
Serial.begin(9600);
modem.switchOn();
modem.init();
while (!modem.isRegistered())
{
delay(1000);
modem.checkNetwork();
}
modem.settoInternet("APN", "username", "password", "domain", "port");
}
void loop()
{
modem.connecttoServer();
char iteracion =0;
while(iteracion < 4)
{
char tmp;
Serial.println("");
float temperature = float(analogRead(0));
temperature = processinSensor(temperature,-21.244,1.7908,-0.0278,0.0003,0,(100.0/1024));
strcpy(generalBuffer,"Temperatura Actual = ");
char *pTemporal = generalBuffer + strlen(generalBuffer);
ftoa(pTemporal,temperature,1);
Luis Thayer Ojeda 0115 Of. 402 ▪ Santiago, Chile ▪ Tel. +56 2 3339579 ▪ [email protected]
www.olimex.cl
GM862 Arduino Shield User’s Manual
Page 12 of 13
modem.transmittoServer(generalBuffer);
delay(5000);
iteracion++;
Serial.println(generalBuffer);
}
modem.closedConection();
digitalWrite(ST_LED_pin,HIGH);
delay(2000);
modem.switchOff();
while(1);
}
float processinSensor(float sensor, float a, float ax,float axx, float axxx,float axxxx,
float factor) {
sensor=(sensor*factor);//valor normalizado, y luego transformado en %
sensor= (axxxx*pow(sensor,4)+axxx*pow(sensor,3)+axx*pow(sensor,2)+ax*sensor+a);
return sensor;}
void *ftoa(char *a, double f, int precision){
float p[] = {0.0,10.0,100.0,1000.0,10000.0,100000.0,1000000.0,10000000.0,100000000.0};
char *ret = a;
char mantiza[10];
long heiltal = long(f);
ltoa(heiltal, a, 10);
while (*a != '\0') a++;
*a++ = '.';
long decimal = abs(long((f - float(heiltal)) * p[precision]));
ltoa(decimal, mantiza, 10);
for(;strlen(mantiza) < precision; precision--)
*a++ = '0';
strcpy(a , mantiza);}
Luis Thayer Ojeda 0115 Of. 402 ▪ Santiago, Chile ▪ Tel. +56 2 3339579 ▪ [email protected]
www.olimex.cl
GM862 Arduino Shield User’s Manual
Page 13 of 13
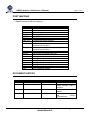
PORT MAPPING
GM862 Arduino Shield port mapping
Pin
DIGITAL 0
DIGITAL 1
DIGITAL 2
DIGITAL 3
DIGITAL 4
RESET
EAR_HF+
EAR_HFMIC_HFMIC_HF+
GPIO5
GPIO6
GPIO7
GPIO8
GPIO9
GPIO10
GPIO11
GPIO12
ADC
3.8V
Name/Function
Serial RX
Serial TX
SoftSerial RX
SoftSerial TX
ON/OFF Modem
RESET Ard
Handset ear output, phase +
Handset ear output, phase Handsfree microphone input; phase -,
nominal level 3mVrms
Handsfree microphone input; phase +,
nominal level 3mVrms
Configurable general purpose I/O pin
GP I/O pin or ALARM output pin
GP I/O pin or Buzzer output pin
Configurable general purpose I/O pin
Configurable general purpose I/O pin
Configurable general purpose I/O pin
Configurable general purpose I/O pin
Configurable general purpose I/O pin
ADC input
3.8V regulated voltage
DOCUMENT HISTORY
Revision
1.0
1.1
Date
August 12, 2010
September 22, 2010
Edited by
E. Martin
E. Martin
1.2
November 23, 2010
E. Martin
1.3
July 21, 2011
M. Campos
Description/Changes
Initial document version
Software Serial Port
usage example code is
included.
New
board
version
update.
Includes new examples
and
library
improvements.
Luis Thayer Ojeda 0115 Of. 402 ▪ Santiago, Chile ▪ Tel. +56 2 3339579 ▪ [email protected]
www.olimex.cl