1
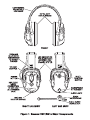
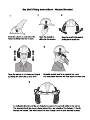
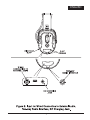
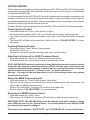
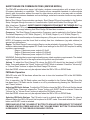
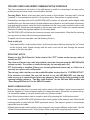
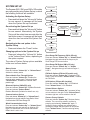
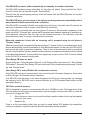
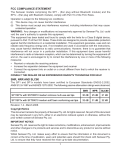
DOC00009 - Rev.02 - English
StorageConditions
The SDP and SM series earmuffs should be stored at room temperature (between 15C and 25C).
If storing for long periods (greater than 1 month) discharge the unit for at least 8 hours before storing
for maximum battery life.
Cushion Replacement
The SDP and SM series earmuffs contain replaceable cushions. Cushions should be inspected regularly
for signs of damage or wear and replaced as necessary. Contact your Sensear reseller or distributor for
replacement hygiene kits (P/N SMHK0000). Cushions can be removed simply by gripping the cushion
and pulling firmly to unclip from the baseplate. Replacement cushions may be pushed into clips around
the baseplate.
The SDP has been tested and approved according to
the methods described in the En352 series of standards.
EN352 Certification granted by:
Finnish Institute of Occupational Health (FIOH)
Work Environment Development
Protection and Product Safety
Topeliuksenkatu 41 a A
00250 Helsinki, Finland.
ENGLISH
1
FCC COMPLIANCE STATEMENT
The Sensear models comprising the SM1 - (Ear-muff without Bluetooth module), the SM1x - (Earmuff with Bluetooth module), and the SM1x SR – (Ear-muff with Bluetooth module as well as FM
transmit and receive capabilities), comply with Part 15 of the FCC Rules.
Operation is subject to the following two conditions:
(i) This device may not cause harmful interference
(ii) This device must accept any interference received, including interference that may cause
undesired operation.
WARNING: Any changes or modifications not expressively approved by Sensear Pty. Ltd. could
void the user’s authority to operate this equipment.
This equipment has been tested and found to comply with the limits for a Class B digital device,
pursuant to Part 15 of the FCC Rules. These limits are designed to provide reasonable protection
against harmful interference in a residential installation. This equipment generates, uses and can
radiate radio frequency energy and, if not installed and used in accordance with the instructions, may
cause harmful interference to radio communications. However, there is no guarantee that interference
will not occur in a particular installation. If this equipment does cause harmful interference to radio
or television reception, which can be determined by turning the equipment off and on, the user is
encouraged to try to correct the interference by one or more of the following measures:
• Reorient or relocate the receiving antenna
• Increase the separation between the equipment and receiver
• Connect the equipment into an outlet on a circuit different from that to which the receiver is
connected.
CONSULT THE DEALER OR AN EXPERIENCED RADIO/TV TECHNICIAN FOR HELP.
NRR AND SLC80
The SM1, SM1x and SM1x SR models have been certified to European Standards EN3521:2002, ANSI S12.6-1997 and AS/NZS 1270-2002. The following passive attenuation ratings were
observed;
SNR NRRSLC80
SM1/SM1x
29 dB
25 dB
28 dB
SM1/SM1x Helmet
29 dB
23 dB
27 dB
Revision: 1.2 – September 2009
Copyright Notice
This document remains the property of Sensear Pty. Ltd. All rights reserved. No part of this document
may be reproduced in any form, either in an electronic retrieval system or otherwise, without the
prior written consent of Sensear Pty. Ltd.
IMPORTANT NOTICE
Sensear Pty. Ltd. reserves the right to make corrections, modifications, enhancement, improvements
and other changes to it’s products and services and to discontinue any product or service without
notice.
Whilst Sensear Pty. Ltd. makes every effort to ensure that the information in this document is correct
at the time of publication, users and potential users should first check with Sensear Pty. Ltd. to
ensure that they have received the most up-to-date documentation.
2
Contents
OVERVIEW________________________________________________________ 4
GETTING STARTED_________________________________________________ 5
BLUETOOTH______________________________________________________ 6
Pairing and Connecting with a Cell Phone__________________________ 6
Using Bluetooth Functions______________________________________ 7
SHORT RANGE FM COMMUNICATIONS (SM1XSR MODEL) _______________ 8
FM RADIO OPERATION_____________________________________________ 8
TWO-WAY RADIO AND WIRED COMMUNICATION INTERFACE______________ 9
BOOM MICROPHONE POSITIONING AND USE _________________________ 10
VOX OPERATION AND PRIVACY MODE _______________________________ 11
EXTERNAL AUDIO PASS-THROUGH__________________________________ 11
SYSTEM SET-UP__________________________________________________ 12
LED INDICATORS_________________________________________________ 13
CHARGING ______________________________________________________ 13
TECHNICAL SPECIFICATIONS ______________________________________ 14
SIZE RANGES ____________________________________________________ 14
HELMET MOUNTS ________________________________________________ 15
MAINTENANCE AND CLEANING ____________________________________ 15
ACCESSORIES AND SPARE PARTS _________________________________ 16
DECLARATION OF CONFORMITY ___________________________________ 16
TROUBLE-SHOOTING _____________________________________________ 17
3
OVERVIEW
The Sensear SM1, SM1x and SM1x SR models hearing defense systems are state-of-the-art hearing
protectors. The systems have sophisticated electronics and algorithms to enhance speech in noisy
environments. As a result, Sensear SM1, SM1x and SM1x SR users do not need to remove their
hearing protection to hear speech in noisy environments.
In addition, the SM1x SR units incorporate FM short range connectivity, Bluetooth technology,
external audio pass-through and two-way radio connectivity. This enables users to communicate
to other SM1x SR users wirelessly, effectively answer a phone call, listen to an MP3 player or use
a two-way radio whilst wearing their hearing protection.
The SM1x unit is functionally identical to the SM1x SR in every respect, with the exception of the
FM short range connectivity. The SM1x communication features include Bluetooth technology,
external audio pass-through, face-to-face and two-way radio connectivity.
The SM1 unit is functionally identical to the SM1x in every respect, with the exception of the
Bluetooth connectivity function. The SM1 communication features include face-to-face and twoway radio connectivity.
The SM1 Ultra and SM1x (SR) Ultra models include a noise cancelling boom microphone for extreme
noise environments. Standard models may be upgraded by purchasing the Boom microphone
upgrade kit.
The SM1, SM1x and SM1x SR are available in over-the-head headband or helmet mount models.
Helmet mount adaptors are available for a wide range of helmets. See section Helmet Mounts.
The basis of the SM1, SM1x and SM1x SR units consists of advanced signal processing algorithms
that process sound. The output of these algorithms is referred to as the SENS processed sound. In
the SENS processed sound, the speech of nearby speakers is enhanced while at the same time,
the surrounding noise is suppressed. The SENS processed sound is the sound delivered to the
SM1, SM1x and SM1x SR users.
Noise reduction will be adversely affected by anything that impairs the seal of the earmuff cushions
against the head, such as thick spectacle frames, balaclavas, etc. Cushions may deteriorate with
use and should be renewed regularly.
4
GETTING STARTED
To fully utilise the functionality provided by the Sensear SM1, SM1x and SM1x SR models, please
ensure that the Sensear SM1, SM1x and SM1x SR are worn correctly. See Figure 1 for an illustration
of fitting the SM1/SM1x(SR).
It is recommended that the SM1/SM1x(SR) are fitted, adjusted and maintained in accordance with
Sensear’s instructions; the ear-muffs are worn at all times in noisy surroundings and the cushions
are regularly inspected for serviceability. If these recommendations are not adhered to, the protection
afforded by the ear muffs will be chemical impaired.
The basic functions of getting started with the Sensear SM1, SM1x and SM1x SR are described below.
Powering Up the Product
• Press and release the “Power” button shown in Figure 1.
• All the light-emitting diodes (LEDs) will turn on briefly and the system software will load.
• The system will play the welcome message, after which it will deliver the SENS processed
sound.
• The Green LED will flash at the normal rate. Refer to Section, “LED INDICATORS”, for more
information.
Powering Down the Product
• Press and hold the “Power” button for two seconds.
• All the LEDs will turn on.
• The system will play the goodbye message, after which it will shut down.
Adjusting the Volume of the SENS Processed Sound
• Press and release the “Volume Up” button to increase the volume.
• Press and release the “Volume Down” button to decrease the volume.
NOTE: SM1/SM1x(SR) models incorporate a volume limiting function which ensures that the
maximum noise exposure is limited according to EN352-4. In high noise environments, the
volume may be automatically reduced to ensure that the noise exposure does not exceed
safe levels. Refer to the Section, “Criterion Levels”, for further information.
Warning – The output of the level dependent circuit of this hearing protector may exceed
the external sound level.
Muting the SENS Processed Sound
• Press and release the “Power” button to enter “Quiet Mode”.
• The user will still be able to use the two-way radio and answer phone calls, however the user
will not hear the SENS processed sound.
• When in the “Quiet Mode”, the green LED will flash at the faster rate.
Refer to Section, “LED INDICATORS” for more information.
Restoring the SENS Processed Sound
• Press and release the “Power” button.
• When exiting the “Quiet Mode”, the green LED will return to flashing at the normal rate.
IMPORTANT NOTE: The SM1/SM1x(SR) cannot be powered down while charging is taking
place. While the user is in the “System Set-up”, or on a telephone call, the volume of SENS
processed sound cannot be changed.
Please refer to the Sections, “BLUETOOTH” and “SYSTEM SET-UP” for more information.
5
BLUETOOTH
Configuring the SM1x(SR) to be a Bluetooth headset for a cell phone is a two-step process.
Firstly, the SM1x(SR) must be paired with the cell phone. Secondly, the SM1x(SR) must be connected
to the cell phone. Pairing is required only once. When completed, each time the SM1x(SR) is powered
up, the SM1x(SR) automatically connects to the cell phone it was last paired with.
Pairing and Connecting with a Cell Phone
Pairing represents the exchange of a security key to enable secure communications between the
SM1x(SR) and the cell phone. To complete pairing, the following steps should be followed:
Step 1. Enter “Pairing Mode”, which makes the Bluetooth module on SM1x(SR)
discoverable:
• Press and hold the “Multi-Function” button for five seconds. The Blue LED will illuminate solid blue
and an audible message will be played. The user can now use a cell phone to find the Sensear
SM1x(SR) and commence the pairing process.
Step 2. Find the SM1x(SR) on a cell phone:
• Ensure that Bluetooth is enabled on the cell phone. Perform a search for Bluetooth devices on
the cell phone and select Sensear SM1x(SR) from the list of discovered devices.
Step 3. Enter the PIN (Passkey) on the cell phone:
• The PIN (Passkey) is “0000” (zeros). The pairing will then be completed. Note at this point, some
cell phones will automatically connect to the SM1x(SR). If so, Step 4 is not required.
Following pairing, the Sensear SM1x(SR) will be stored in the list of paired devices on your cell
phone. Similarly, your cell phone is stored in the memory of the SM1x(SR).
Step 4. Connect the SM1x(SR) to the cell phone:
• Press and hold down the “Volume Down” button for one second. An audible message will play,
notifying the user that the SM1x(SR) is attempting to connect to the cell phone. When connection
is completed successfully, the SM1x(SR) plays the message “Connection Completed” and the
Blue LED flashes at the normal rate. On some cell phones the user may have to “authorise” the
SM1x(SR) to complete the connection.
IMPORTANT NOTES:
The SM1x(SR) stores pairing information for only ONE cell phone at a time. Each cell phone
paired over-writes the previously paired phone in the memory of the SM1x(SR). Any cell
phone that is not registered in the memory of the SM1x(SR), regardless if it has previously
been paired, will require pairing with the SM1x(SR) again.
If pairing is not completed within two minutes after entering “Pairing Mode”, the system will
leave “Pairing Mode” and notify the user with a message.
NOTE: The SM1x(SR) can only enter the “Pairing Mode” if the two-way radio interface is
NOT operational. Ensure that the two-way radio is unplugged before attempting to enter the
“Pairing Mode”. Alternatively, leave the two-way radio plugged into the system, ensuring
that the radio is turned off.
NOTE: The SM1x SR can only enter the “Pairing Mode” if Short Range Communication is
NOT operational. Short Range Communication may be enabled in the User Menu, but must
be ‘OFF’ (simultaneous press on “Volume-Up” and “Volume-Down”) before attempting to
enter “Pairing Mode”.
6
Using Bluetooth Functions
The user must first have connected the SM1x(SR) to the cell phone to use Bluetooth functions on
the SM1x(SR).
The functions are described below:
Accepting an incoming call
• When the phone is ringing, press and release the “Multi-Function” button. Note that when the
phone is ringing, a ring tone will also be delivered by the SM1x(SR). In addition, the Blue LED
will flash at the faster rate.
• After accepting the call, a brief “Call Accepted” sound will be heard and the Blue LED will continue
to flash at the faster rate.
Rejecting an incoming call
• When the cell phone is ringing, press and hold the “Multi-Function” button for one second.
A “Call Rejected” sound will be heard and the Blue LED will return to flash at the normal rate.
If “Call Divert” is enabled on the cell phone, the caller will be directed to voicemail.
Ending an active call
• When the user is on a phone call, press and hold the “Multi-Function” button for one second.
A “Call Ended” sound will be heard and the Blue LED will return to flash at the normal rate.
Adjusting the Bluetooth phone call volume
• While the user is on a phone call, press and release the “Volume Up” button.
• While the user is on a phone call, press and release the “Volume Down” button.
Disconnecting the cell phone from SM1x(SR)
• Using the cell phone, navigate through the “Active Bluetooth Devices” menu, select the SM1x
and select “Disconnect”. The Blue LED will turn off.
7
SHORT RANGE FM COMMUNICATIONS (SM1XSR MODEL)
The SM1xSR provides short range, half duplex, wireless communications with a range of up to
50 meters dependent on conditions. This function allows compatible headsets to communicate
directly with one another without the need for other devices such as a two-way radio or cellular
phone. Obstacles between headsets such as buildings, metal and concrete structures may reduce
the available range.
Before Short Range Communication can begin, Short Range FM must be enabled in the System
Setup. Navigate through the menu to Communication Option and Enable Short Range FM.
After it has been “Enabled”, SHORT RANGE COMMUNICATIONS MUST BE TURNED ON. Turn
ON Short Range FM by simultaneously pressing “Volume up” and “Volume down”. The user will
then receive a message advising that Short Range FM has been turned on.
Frequency The Short Range Communication Frequency can be selected in the System Setup.
The default frequency is 101.3MHz (Region1), 107.9 MHz (Region 2) or 97.0 MHz (Region 3).
All SM1xSR units must be setup on the same frequency if they are to communicate with each other.
NOTE: A Frequency must be found that is entirely free from interference (eg radio stations) to
ensure best performance.
Region The Short Range Communication Region can be selected in the system Setup. The region
selection determines the appropriate RF Power Level settings for the SM1x SR required to satisfy
regulatory requirements.
Region 1 Maximum power output of 2.5mW
Region 2 Maximum power output of 0.064mW
Region 3 Maximum power output of 0.013mW
WARNING: Selecting the incorrect regional setting may violate regulatory requirements. The default
regional setting will be set to the region where the product was purchased.
Volume To adjust the Short Range FM volume the SM1x SR should first be placed in QUIET
Mode. Press and release the “Power” button until QUIET Mode is selected. Press the “Volume Up”
or “Volume Down” buttons to adjust the Short Range FM volume.
Note that SENS volume can only be adjusted when the SM1x SR is in SENS Mode.
FM Radio Operation
SM1xSR units with FM hardware allows the user to tune into broadcast FM in the 88-108MHz
frequency range.
Prior to operation, the FM Radio option must first be enabled in the System Settings. Once this
has been done, FM Radio can be turned on or off by simultaneously pressing the “Multifunction”
and “Power” buttons.
Adjusting FM Radio Volume To adjust the FM Radio volume the SM1x SR should first be placed
in QUIET Mode. Press and release the “Power” button until QUIET Mode is selected. Press the
“Volume Up” or “Volume Down” buttons to adjust the FM Radio volume.
Note that SENS volume can only be adjusted when the SM1x SR is in SENS Mode.
Selecting FM Radio Stations The FM radio is set to a default station of 94.5 MHz. To select a
different station the SM1x SR must first be placed in QUIET mode. Press and release the “Power”
button until QUIET mode is selected.
PRESS AND HOLD THE “VOLUME UP” BUTTON TO SCAN UP IN FREQUENCY TO THE NEXT
FM RADIO STATION. PRESS AND HOLD THE “VOLUME DOWN” BUTTON TO SCAN DOWN
IN FREQUENCY TO THE PREVIOUS FM RADIO STATION.
8
TWO-WAY RADIO AND WIRED COMMUNICATION INTERFACE
The 6 pin connector at the bottom of the right earcup is used for connecting to two-way radios,
mobile phones and other wired communications devices.
Two-way Radio Before a two-way radio can be used on this interface “two-way radio” must be
“enabled” in “communications options” in the system setup. See section on system set-up.
Connecting a two-way radio unit to the SM1/SM1x(SR) requires a 2-way radio audio adapter cable
available from your Sensear stockist. Several adaptors are available to suit a wide range of motorola,
icom and kenwood radios. Insert the six pin connector into the 2-way radio interface socket on the
SM1/SM1x(SR). Attach the audio adapter to the two-way radio unit. Contact your nearest sensear
distributor to obtain the required adapters for two-way radios.
The SM1/SM1x(SR) will deliver the incoming two-way radio transmission. Note that the incoming
two-way audio is mixed with the sens processed sound.
To speak over the two-way radio, use the following function:
Push-to-talk (ptt)
• Press and hold the “multi-function button”, which has the same effect as pressing the “ptt” button
on the two-way radio. Speak normally and the user’s voice will be sent through the sensear
system to the two-way radio.
IMPORTANT NOTES:
Always use the “Multi-Function” button and not the “PTT” button on the two-way radio, to
activate the PTT.
The volume of the two-way radio played back cannot be changed using the SM1/SM1x(SR)
volume controls. The volume is controlled only by the two-way radio unit.
PTT functionality is disabled if there is an incoming Bluetooth phone call, or if the user is
currently on a phone call via Bluetooth.
The two-way radio interface can be enabled/disabled as described in “SYSTEM SET-UP”.
If the interface is enabled, the user will be able to use the SM1/SM1x(SR) as a two-way
radio accessory to communicate on two-way channels. Note that the factory setting for the
communications options is “Two-Way radio Enabled” for the SM1 and SM1x models and
“Short RangeFM Enabled” for the SM1xSR models.
WIRED COMMUNICATIONS
Before a device other than a two-way radio can be used on this interface “wired communications”
must be “enabled” in “communications options” in the system setup. See section on system set-up.
For compatible cables to use with devices see your Sensear stockist.
Note: Wired communication can be turned on and off by pressing the “multifunction button”.
In this mode, the SM1/SM1x(SR) will deliver the incoming audio to the wearer’s ears. Note that the
incoming audio is mixed with the SENS processed sound. The wearer’s speech is continuously
transmitted over the cable.
Different devices that could interface to this connector may require different audio levels. Use the
“Wired Communications Levels” in the System Setup to adjust the outgoing audio volume.
9
BOOM MICROPHONE POSITIONING AND USE
The SM1 Ultra and SM1x(SR) Ultra are fitted with flexible boom microphones that allow 2-way radio
and mobile phone call operation in extreme noise situations. The standard SM1, SM1x and SM1xSR
may be upgraded by purchasing the Ultra Boom Microphone Upgrade – see ACCESSORIES AND
SPARE PARTS. The upgrade kit contains an Allan key, M5 nut and boom clamp.
Remove the rubber microphone attachment cover and attach the boom microphone and clamp as
shown in Figure 3. Lightly tighten M5 screw so that the boom position can just be adjusted by hand.
Place the ear-muffs on the head and adjust the boom position until the end of the microphone is
adjacent to the corner of the mouth. Remove the ear-muffs and tighten the M5 screw using the
Allan key provided, Insert the 2.5mm audio connector into the audio jack.
For optimum use, the boom microphone should be positioned within 5mm of the mouth.
10
VOX OPERATION AND PRIVACY MODE
The SM1, SM1x and SM1x SR support Voice Operated Switch (VOX) functionality, allowing hands
free operation of 2-way radios and Short Range FM (SM1xSR model). Note that this option is only
available if a boom microphone is attached.
By default the VOX setting is disabled. Follow the steps in SYSTEM SET-UP to enable the VOX.
Once enabled, the VOX function detects speech through the boom microphone and automatically
activates the radio transmitter.
If VOX has been enabled then speech may trigger the VOX, transmitting to all listeners on the same
frequency. In some situations this may not be desirable, if for example the speaker wishes to have
a private conversation with someone nearby.
In this situation the SM1/SM1x(SR) can be placed in “PRIVACY Mode”. PRIVACY Mode inhibits
transmission of the user’s speech over the Short Range FM communication channel.
By pressing and releasing the “Power” button the SM1/SM1x(SR) will cycle between, SENS, PRIVACY
and QUIET modes. Note that the PRIVACY Mode option is only available when VOX is enabled.
VOX operation is not recommended in windy conditions.
EXTERNAL AUDIO PASS-THROUGH
If the external audio pass-through has been enabled, (Factory setting is “Disabled” - see important
notes following), the SM1/SM1x(SR) can be used as a stereo headset to listen to audio from external
devices. External devices that can be used include iPods, other portable MP3 players, PC’s, laptops,
portable CD/cassette players, FM/AM radios and any other device with “line-out” audio output.
Connecting an external audio device to the SM1/SM1x(SR) requires an optional audio cable, available
from your Sensear stockist. Insert the 3.5mm end of the cable into the Audio socket on the SM1/
SM1x(SR). Insert the other 3.5mm end of the audio cable into the external audio device.
Note that the audio coming from external devices is mixed together with the SENS processed sound
and delivered to the user. External audio pass-through can also be permanently disabled.
To complete this, take the following steps:
Step 1
•
•
•
Step 2
When the SM1/SM1x(SR) is turned off, while pressing and holding down the “MultiFunction” button and the “Volume Down” button, press and release the “Power”
button.
Press and release the “Volume Up” button to confirm.
The user will then receive a message advising that external audio pass-through has
been permanently disabled. The SM1/SM1x(SR) will then shut down automatically.
When powered up again, all functions relating to external audio pass-through,
including System Set-up options, will have disappeared.
IMPORTANT NOTES:
Once permanently disabled, the external audio pass-through cannot be restored.
The volume of external audio cannot be changed using the SM1/SM1x(SR) volume controls.
The volume must be controlled on the user’s external audio device.
External audio pass-through can be temporarily enabled/disabled, as described in “SYSTEM
SET-UP”.
Note that the factory setting of the external audio pass-through is “Disabled”.
11
SYSTEM SET-UP
Battery Status
The Sensear SM1, SM1x and SM1x SR models
are configured by using System Set-up, in which
the following functions are available:
Extend Audio Passthrough Options
Activating the System Set-up
Bluetooth Options
• Press and hold down the “Volume Up” button
for one second. A message will be heard
when the System Set-up is activated.
De-activating the System Set-up
• Press and hold down the “Volume Up” button
for one second. Alternatively, the System
Set-up will be exited nine seconds after the
last button press. A message will be heard
when the user has exited the System Setup.
Communications
Options
Wired Communications
2-way Radio
Wired Communications Level
FM Radio Options
Short Range FM
Short Range FM
Frequency
Short Range
FM Region
VOX Options
Navigating to the next option in the
System Set-up
Volume Balance
Options
• Press and release the “Power” button.
Restore Factory
Defaults
Changing options in the System Set-up
• Press and release the “Volume Up” button
or the “Volume Down” button, depending on
the option required.
Short Range FM Frequency (SM1x SR only)
Press and release “Volume Up” or “Volume Down”;
Navigates through and selects the frequency for
Short Range FM Communication
The order of System Set-up options available
to the user is shown below.
Short Range FM Region (SM1x SR only)
Press and release “Volume Up” or “Volume
Down”"; Navigates through and selects Region 1,
2 OR 3.
Battery Status
Press and release “Volume Up” or “Volume Down”
Advises the battery status
FM Radio Options (FM And SR models only)
Press and release “Volume Up”; Enables the FM
Radio. Press and release “Volume Down”; Disables
the FM Radio
External Audio Pass Through Options
Press and release “Volume Up”; Enables the
external audio passthrough. Press and release
“Volume Down”; Disables the external audio
passthrough
VOX Options (if Boom Mic installed)
Press and release “Volume Up”; VOX Enabled
Press “Volume Down”; VOX Disabled
Bluetooth Options (SM1x(SR) only)
Press and release “Volume Up”; Enables Bluetooth.
Press and release “Volume Down”;
Disables Bluetooth (Suitable for aircraft use, etc)
Volume Balance Options
Press and release “Volume Up”; Increases left ear
volume relative to the right. Press "Volume Down";
Increases right ear volume relative to the left.
Communications Options
Press and release “Volume Up” or “Volume Down”;
Navigates through and enables 2-way Radio, Wired
Communications OR Short Range FM.
Restore Factory Defaults
Press and release “Volume Up”; Restores factory
defaults. The user will be asked to confirm by
pressing and releasing “Volume Up” again. If
confirmed, factory settings are restored and a
message is played and the system will shut down
Press “Volume Down”; Cancels restoring factory
defaults.
Wired Communications Level
Press and release “Volume Up” or “Volume Down”;
Navigates through and selects Low, Medium OR
High. This selects the level of Audio transmitted
Default level is set to Low.
12
LED INDICATORS
On the Sensear SM1/SM1x(SR) models, there are three LEDs: Red, Green and Blue.
Each LED has the following four modes of operation;
•Off
• Solid on
• Flashing at the normal rate. The normal rate is defined as once every 2.5 seconds
• Flashing at the faster rate. The faster rate is defined as 5 times per second.
The meaning of LED indicators for Sensear SM1, SM1x and SM1x SR is given in Table 1, below.
Off
Solid On
Normal Rate
Faster Rate
Red
Battery OK
Battery charging
Charge complete
Battery low
Green
SM1/SM1x turned off. N/A
SENS processed,
sound active.
SENS processed,
sound muted.
Blue
Bluetooth not
connected to a cell
phone.
Bluetooth
Incoming call,
connected to a cell outgoing call, or
phone.
active call.
Bluetooth “Pairing
Mode” engaged.
Figure 4: LED Indicators
CHARGING
Sensear SM1/SM1x(SR) models are supplied with an AC adapter that operates globally when fitted
with the appropriate electrical local adapter fitting.
To charge the Sensear SM1/SM1x(SR), take the following steps:
Step 1
Plug the Sensear AC adapter into an appropriate electrical power outlet.
Step 2
Insert the cable end of the Sensear AC adapter into the DC Power socket on the SM1/SM1x(SR).
While the battery is charged, the Red LED will turn on solid red. When the charging is complete,
the Red LED will flash at the normal rate.
Refer to the Section, “LED INDICATORS”, for more information.
13
TECHNICAL SPECIFICATIONS
Weight: ________________________ 422 g
Operational temperature: __________ 0 ºC - 40 ºC charging. 0ºC - 50 ºC discharging
Battery use: ____________________ 15 hours (Bluetooth disabled)
Battery charge: __________________ 7 hours
Cushions material: _______________ Polyurethane
Headband material: ______________ Acetyl
Helmet mount material: ___________ PVC
The Sensear SM1, SM1x and SM1x SR are active hearing protectors that allow audible contact
with your surroundings while providing protection from harmful noise.
WARNING: Performance may deteriorate with battery usage. The typical period of continuous use
that can be expected from the SM1 or SM1x(SR) is 15 to 18 hours.
SIZE RANGES
WARNING: Ear-muffs complying with EN352-1 and EN352-3 are of ‘small size range’, ‘medium
size range’ or ‘large size range’. Medium size range’ ear-muffs will fit the majority of wearers. ‘Small
size range’ or ‘large size range’ ear-muffs are designed to fit wearers for whom ‘medium size range’
ear-muffs are not suitable. The SM1, SM1x and SM1x SR headband may be adjusted for small,
medium or large size.
Clamping Force
The clamping force of the SM1, SM1x and SM1xSR have been measured in accordance with
AS1270. Initial measurements for the headband mount were 14.2 15.3 and 14.2 Newtons. Post-flex
measurements for the headband mount were 13.0 14.2 and 13.6 Newtons. Initial measurements
for the helmet mount were 11.2 10.7 and 10.7 Newtons. Post flex measurements for the helmet
mount 10.7 10.7 and 10.2 Newtons.
HELMET MOUNTS
The SM1, SM1x and SM1x SR were tested in combination with the following industrial safety helmets,
and may give different levels of protection if fitted to different helmets.These ear-muffs should be
fitted to, and used only with, the following industrial safety helmets: MSA VGard, Protector Tuffmaster
Lite, Protector Tuffmaster II, Protector Alsafe (Ansafe) 410, Protector HC600.
14
ATTENUATION VALUES
SM1, SM1x and SM1xSR with standard headband.
F(Hz)
Mf(dB)
63
125 250 500 1000 2000 3150 4000 6300 8000 H
19.1 20.0 23.1 26.9 27.6 30.6 37.8 38.7 39.5 39.8
Sf(dB)
4.3 3.3 2.6 2.7 2.2
Mf-sf(dB) 14.8 16.7 20.5 24.2 25.4
3.8
26.8
2.7
35.1
3.2
35.5
3.4
36.1
2.9
36.9
M
L
SNR
29 26 22 29
SM1, SM1x and SM1xSR with helmet mount.
F(Hz)
Mf(dB)
63
125 250 500 1000 2000 3150 4000 6300 8000 H
17.3 18.9 23.1 26.4 27.9 31.2 36.5 38.4 38.9 39.2
Sf(dB)
4.2 3.8 2.8 2.4 1.9 3.0
Mf-sf(dB) 13.1 15.1 19.3 24.0 26.0 28.2
2.5
34.0
3.6
4.1
34.8 34.8
M
L
SNR
2.8
30 26 21 29
36.4
WARNING: The reported attenuation will be obtained only if the SM1/SM1x(SR) is in good condition
and worn as directed (Refer to AS/NZS 1269.3 for guidance).
CRITERION LEVEL
The SM1, SM1x and SM1xSR have level dependant facilities and the criterion levels defined in
EN352-4 are displayed below.
SM1, SM1x and SM1xSR with standard headband H=113dBA M=108dBA L=93dBA.
SM1, SM1x and SM1xSR with helmet mount H=113dBA M=109dBA L=95dBA.
EXTERNAL AUDIO INPUT
The electrical input level for which the mean plus one standard deviation A-weighted diffused-field
related sound pressure level is equal to 82dB is an RMS voltage U=18.9mV
MAINTENANCE AND CLEANING
Ear-muffs, and in particular cushions, may deteriorate with use and should be examined at frequent
intervals for cracking and leakage, for example.
The ear-muff replaceable cushions should be replaced if any visible sign of damage is detected.
Inspect regularly and replace if any visible sign of damage is evident. Refer to ACCESSORIES
AND SPARE PARTS for details of the replacement hygiene kit.
The ear-muff cushions can be cleaned with a damp cloth using warm soapy water. The ear-muffs
must not be immersed in water as this may destroy the electronic circuits. This product may be
adversely affected by certain chemical substances. Further information should be sought from
Sensear Pty Ltd.
Fitting of hygiene covers to the cushions may affect the acoustic performance of the ear-muffs.
Please note that the battery is not user replaceable. If it becomes damaged or faulty, return to a
Sensear authorised distributor for repair.
The SM1, SM1x and SM1x SR are fitted with level-dependent attenuation. The wearer should check
the correct operation before use. If distortion or failure is detected, the wearer should refer to the
manufacturer’s advice for maintenance and replacement of the battery.
15
ACCESSORIES AND SPARE PARTS
The following accessories and spare parts may be ordered separately:
•
•
•
•
•
•
•
•
•
•
•
•
•
•
•
•
•
•
SPPA0000 –
SRCK0006 –
SRCK0007 –
SRCK0008 –
SRCK0009 –
SRCK0010 –
SRCK0011 –
SRCK0012 –
SRCK0013 –
SRCK0014 –
SCAJ00002 –
SMBM0001 –
SMHK0000 –
SMWS0001 –
SMHA0001 –
SMHA0002 –
SMHA0003 –
SMHA0004 –
Power pack adaptor, multizone.
Radio connection kit, Motorola Aoba/Plus.
Radio connection kit, Motorola Waris.
Radio connection kit, Motorola MTS/XTS.
Radio connection kit, Motorola CP150/CP200.
Radio connection kit, ICOM F50/F60.
Radio connection kit, Kenwood TK3140/3180.
Radio connection kit, ICOM 2 pin.
Radio connection kit, Kenwood 2 pin TK260/360.
Radio connection kit, Motorola Mototurbo XPR6300/6500.
3.5mm spiral audio cable suitable for external MP3.
SM1 Ultra Boom Microphone Upgrade.
SM1 Ear-muff Hygiene Kit.
SM1 Wind Noise Foam Kit.
SM1 Helmet Adaptor – MSA-Vguard.
SM1 Helmet Adaptor – Protector Allsafe.
SM1 Helmet Adaptor – Protector Tuffmaster.
SM1 Helmet Adaptor – Unisafe Unilite.
Further information may be obtained from your Sensear stockist, via the Sensear web site, or by
emailing or writing to the addresses on Page 11 of this User Manual.
DECLARATION OF CONFORMITY
We, the undersigned:
Company
Sensear Pty Ltd
Address
197-199 Great Eastern Highway Belmont WA 6104
CountryAustralia
Telephone Number +61 8 9277 7332
Fax number
+61 8 9277 7338
Websitewww.sensear.com
[email protected]
Declare that:
Models SM1, SM1x and SM1x SR, in accordance with the following directives:
• 69/686/EEC
• 2004/108/EC
•
•
99/5/EC
98/37/ED
•
2006/95/ED
Have been designed and manufactured to the following specifications:
• ETSI EN 352-1, EN 352-3, EN 352-4, EN 352-6 • ETSI EN 300 220
16
•
•
ETSI EN 301 489, EN 301 357
EN 60950
TROUBLE-SHOOTING
If the Sensear SM1, SM1x or SM1x(SR) is not functioning correctly, first refer to this Section for
simple trouble-shooting. This can save time and effort, however if symptoms persist, consult your
nearest Sensear Service Centre.
The SM1/SM1x(SR) does not power up.
Ensure that the battery is sufficiently charged. Charge the battery according to the instructions
given in the Section, “CHARGING”.
Bluetooth is not working.
Ensure that the Bluetooth is enabled in the System Set-up.
Two-way radio interface is not working.
Ensure that the two-way radio interface is enabled in the System Set-up.
External audio pass-through is not working.
Ensure that the external audio pass-through has not been permanently disabled and that it is
enabled in the System Set-up.
Volume of the two-way radio is too loud or too quiet.
Adjust the volume on your two-way radio.
The volume of the two-way radio cannot be adjusted using the volume controls on the SM1/SM1x.
Volume of the external audio device is too loud or too quiet.
Adjust the volume on your external audio device.
The volume of your external audio device cannot be adjusted using the volume controls on the
SM1/SM1x.
Unable to enter “Pairing Mode” (i.e., unable to make the Bluetooth module on the SM1x(SR)
discoverable).
The SM1x(SR) can only enter the “Pairing Mode” if the two-way radio interface is not in use. Ensure
the two-way radio is unplugged before attempting to enter the “Pairing Mode”. Alternatively, leave
the radio plugged into the system, however ensure that the radio is turned off.
The SM1x(SR) does not connect, either automatically or manually, to the cell phone it was
last paired with.
Ensure that the cell phone is ready to accept Bluetooth connections. This means that Bluetooth is
enabled on the cell phone and the phone is not connected to other Bluetooth devices.
Please note that on some phones, the user may also need to “authorise” the SM1x(SR) to connect
to the phone.
The SM1x(SR) does not connect, either automatically or manually, to a previously paired
cell phone after another cell phone has paired with the SM1x(SR).
The SM1x(SR) stores pairing information for only one cell phone at a time. If another cell phone
has paired with the system since last paired with it, the user will need to pair with the system again..
17
The SM1x(SR) connects, either automatically or manually, to another cell phone.
The SM1x(SR) contains pairing information for the other cell phone. Press and hold the “MultiFunction” button for five seconds to enter “Pairing Mode”.
This will clear the current pairing memory, which will ensure that the SM1x(SR) does not connect
to another cell phone.
The SM1x(SR) does not re-connect to the cell phone when powered on immediately after it
was powered off while connected to the cell phone.
If the SM1x(SR) is powered off while connected to the cell phone, it can take up to 20 seconds for
the phone to become ready to accept a new Bluetooth connection.
If the SM1x(SR) is powered back up during these 20 seconds, the automatic connection at the
power-up will fail. To prevent this, ensure that 20 seconds lapse between powering off and back up.
If the automatic connection fails, the user can still connect manually to the cell phone once the
phone becomes ready to accept a new Bluetooth connection.
Bluetooth connection is lost after an incoming call is accepted using the cell phone’s
“Answer” button.
When an incoming call is accepted using the cell phone’s “Answer” button, a small proportion of cell
phones automatically close the connection to their Bluetooth headset, (in this case, the SM1x(SR))
and re-route the audio to the phone’s speakers. They do this on the assumption that by answering
the call using the phone, the user wishes to use the phone’s microphone and speaker and not those
on the Bluetooth headset. To prevent this from happening, always use the “Multi-Function” button
on the SM1x(SR) to accept incoming calls.
Short Range FM does not work.
Ensure firstly that “Communications Options” in the System Setup has been set to “Short Range
FM Enabled”. Secondly Short Range FM has to be turned ON by simultaneously pressing “Volume
Up” and “Volume Down”.
Short Range FM is turned ON but will not transmit or receive.
If two SM1xSR units are to communicate, they must be tuned to the same frequency. See section
on Short Range FM Communications Frequency.
If all SM1xSR units are tuned to the same frequency but still do not communicate, try changing
the frequency on all SM1xSR units to ensure that there is no FM Broadcast Radio station on the
operating frequency.
VOX Does not work properly.
VOX is designed to operate in environments with up to 105dBA of noise. The trigger level of the
VOX has been set at the factory to ensure that it does not trigger in these noise levels. In order for
your voice to trigger the VOX –
1.
Move the boom close to your mouth and find a position where it picks up the greatest
amount of your voice.
2.
Speak Firmly.
There is a short processing delay after you start to speak before VOX enables the transmitter.
Continuous speech is required to ensure that the transmitter remains enabled.
18