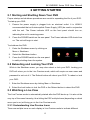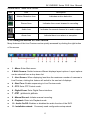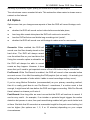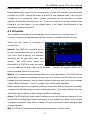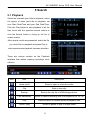
1
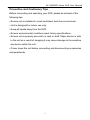
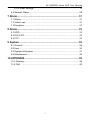
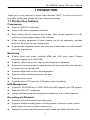
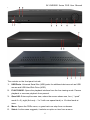
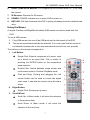
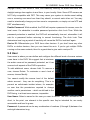
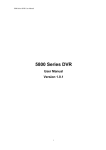
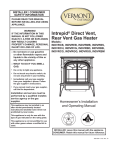
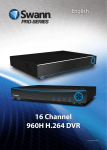
SV-HVR2800 Series DVR User Manual Version 1.0.3 English SV-HVR2800 Series DVR User Manual Preventive and Cautionary Tips Before connecting and operating your DVR, please be advised of the following tips: • Ensure unit is installed in a well-ventilated, dust-free environment. • Unit is designed for indoor use only. • Keep all liquids away from the DVR. • Ensure environmental conditions meet factory specifications. • Ensure unit is properly secured to a rack or shelf. Major shocks or jolts to the unit as a result of dropping it may cause damage to the sensitive electronics within the unit. • Power down the unit before connecting and disconnecting accessories and peripherals. 1 SV-HVR2800 Series DVR User Manual Table of contents 1 PRODUCTION ......................................................................... 4 1.1 Product Key Features ............................................................................ 4 1.2 Operating Your DVR .............................................................................. 5 1.3 Rear Panel Diagram .............................................................................. 9 2 GETTING STARTED ............................................................. 12 2.1 Starting and Shutting Down Your DVR ................................................ 12 2.2 Rebooting and Locking Your DVR ....................................................... 12 2.3 Watching a Live View .......................................................................... 12 2.3.1 Understanding Live Preview Icons .................................................. 12 2.3.2 Using the Mouse in Live Preview .................................................... 13 2.3.3 Using Digital Zoom ............................................................................ 14 2.4 Default Password Information ............................................................. 14 3 Display Settings ................................................................... 15 3.1 Camera settings .................................................................................. 15 3.2 Output Settings .................................................................................... 16 4 Recording Settings .............................................................. 18 4.1 Encode ................................................................................................ 18 4.2 Option .................................................................................................. 20 4.3 Schedule .............................................................................................. 21 5 Search ................................................................................... 23 5.1 Playback .............................................................................................. 23 5.2 Backup ................................................................................................. 24 5.3 Event ................................................................................................... 25 5.4 Log ....................................................................................................... 25 6 Network Settings .................................................................. 26 6.1 General ................................................................................................ 26 6.2 Advanced ............................................................................................. 27 6.2.1 DDNS................................................................................................... 28 6.2.2 NTP ...................................................................................................... 28 6.2.3 IP Filter ................................................................................................ 28 2 SV-HVR2800 Series DVR User Manual 6.2.4 Email Settings .................................................................................... 28 6.3 Network Status .................................................................................... 29 7 Alarm ..................................................................................... 31 7.1 Motion .................................................................................................. 31 7.2 Video Loss ........................................................................................... 31 7.3 Exception ............................................................................................. 31 8 Alarm ..................................................................................... 33 8.1 HDD ..................................................................................................... 33 8.2 S.M.A.R.T ............................................................................................ 33 8.3 PTZ ...................................................................................................... 33 9 System .................................................................................. 35 9.1 General ................................................................................................ 35 9.2 User ..................................................................................................... 36 9.3 System Information.............................................................................. 37 9.4 Maintenance ........................................................................................ 38 10 APPENDIX ........................................................................... 39 10.1 Glossary ............................................................................................ 39 10.2 FAQ ................................................................................................... 40 3 SV-HVR2800 Series DVR User Manual 1 PRODUCTION Thank you for your purchase of Digital Video Recorder (DVR). To get the most out of your DVR, please read through this User’s Manual thoroughly. 1.1 Product Key Features Compression Support PAL/NTSC video input. Adopt H.264 video compression standard. Each analog channel supports dual stream. Main stream supports up to D1 resolution and sub stream supports CIF resolution. Video encoding parameters of each channel can be set separately, including resolution, frame rate, bit rate, image quality. Supports both composite stream and video only stream. Audio and video streams are strictly simultaneous. Monitoring Support three local output including HDMI and VGA video output. Display resolution supports up to 1920*1080. Supports 1/4/9/16 screen live view, channel sequence is adjustable. Support live view group switch, manual switch and automatic cycle, the interval of automatic cycle can be adjusted. Supports digital zoom on live view and playback. Supports motion detection and video loss alert. Supports privacy mask. Supports various PTZ protocols, PTZ preset, patrol and pattern. HDD Management Supports 1 SATA HDD and 1 eSTAT HDD,each HDD supports up to 2TB capacity. Supports S.M.A.R.T. technology. Use pre-allocating hard disk management technology, and no disk fragments. Recording and Playback Supports cycle and non-cycle recording mode. Supports multiple recording types, including manual, continuous, alarm, motion, motion alarm and motion & alarm recording, etc. Supports Pre-record and Post-record time for alarm and motion detection, and 4 SV-HVR2800 Series DVR User Manual pre-record time for schedule and manual recording. Supports video data search and playback by channel number, recording type, time, event, etc. Supports pause, rewind, play fast, play slow, skip forward, and skip backward when playback, locating in progress bar by dragging the mouse. Backup Supports USB device backup. Support Network backup. Support eSATA backup. Alarm and Exception Supports various alarm input such as hard disk full, network break, IP conflicted and hard disk error. Supports various alarm response such as camera recording, on screen warning, audible warning, send email, etc. Network Supports 10/100 adaptive network interface. Supports TCP/IP protocols, PPPoE, DHCP, DNS, DDNS, NTP, etc. Supports remote search, playback and download video files. Supports remote configuration. Supports remote manual recording Supports remote manual alarm output control. Supports image capturing. Supports remote PTZ control. Others Supports front panel, mouse, IR control operation. Supports multi-level user management, each user can have individual DVR access rights. Powerful DVR log, including operation, alarm, information and exception log. Supports remote manual alarm output control. 1.2 Operating Your DVR There are numerous ways to navigate and operate your DVR. You may use the Front Panel Controls, the included IR (Infra-Red) Remote, a Mouse and the Soft Keyboard. Using the Front Panel Controls 5 SV-HVR2800 Series DVR User Manual The controls on the front panel include: 1. USB Ports: Universal Serial Bus (USB) ports for additional devices such as USB mouse and USB Hard Disk Drive (HDD). 2. PLAY/PAUSE: Opens the playback interface from the live viewing mode. Pauses playback or resumes playback from paused. 3. Quad /All: Enters split-screen view, where the screen shows one, four (“quad” mode 2 x 2) ,eight (8ch only – 3 x 3 with one space blank) or 16 video feeds at once. 4. Menu: Opens the DVRs menu, or goes back one step from a submenu. 5. Select: As the name suggests, it selects an option or item from a menu. 6 SV-HVR2800 Series DVR User Manual 6. DIRECTION/ENTER Buttons: For navigating around menus when you’e not using the mouse. 7. IR Receiver: Receiver for IR remote. 8. POWER: POWER indicator turn on when DVR is power on. 9. HDD LED: Will flash whenever the DVR is writing to/reading from the installed hard drive. Using the Mouse A regular 3-button (Left/Right/Scroll-wheel) USB mouse can also be used with this DVR. To use a USB mouse: 1. Plug USB mouse into one of the USB ports on the front panel of the DVR. 2. The mouse should automatically be detected. If in a rare case that the mouse is not detected, please refer to the recommended device list from your provider. The buttons on the mouse corresponds to: 1. Left Button: Single-Click: Select a component of a menu, such as a button or an input field. This is similar to pressing the ENTER button on the remote/front panel controls. Double-Click: Switch between single screen and multi-screen mode in Preview/ Playback mode. Click and Drag: Clicking and dragging the Left mouse button can be used to control the digital zoom area. It can also be used to setup the alarm areas. 2. Right Button: 3. Single-Click: Shows pop-up menu. Scroll-Wheel: Scroll Up: In Menu mode, it will move the selection to the previous item. Scroll Down: In Menu mode, it will move the selection to the next item. 7 SV-HVR2800 Series DVR User Manual Using remote control To use the remote control: 1. STANDBY: Press to turn standby mode ON/OFF. 2. Playback controls: : Increase rewind speed 2X, 4X, 8X; : Press to start playback; : Press to increase fast-forward speed 2X, 4X, 8X; : Press to slow-down playback by 1/2, 1/4, 1/8; : Press to pause, then press again to play single frame. 3. MENU: Opens the main menu. 4. Navigation/OK: : Move cursor in menus up; : Move cursor in menus right; : Move cursor in menus left; : Move cursor in menus down; OK: In menus, press to confirm selections; 5. Mode: Press to switch between quad and split-screen displays. 6. Number/Channel buttons: While in menus, press buttons 0~9 to enter values; during live viewing, press to view channels in full-screen. 7. ALARM: Clear alarm output. 8. SWITCH: Switch video output. 9. RECORD: Press to start manual recording. 10. STOP: Press to stop manual recording. 11. +/ - : In menus, press to adjust values. 12. PTZ: Press to open the PTZ control window. 13. EXIT: Close menu windows. 14. MUTE: Turn on / off audio output. 15. LOGIN / LOCK: If password has been enabled in the setup menu, press to open the user password login screen. 8 SV-HVR2800 Series DVR User Manual 1.3 Rear Panel Diagram 9 SV-HVR2800 Series DVR User Manual 10 SV-HVR2800 Series DVR User Manual No. Item Description 10 POWER SWITCH Power switch 11 DC POWER IN 12V DC power input 12 PTZ RS485 connector 13 VGA OUTPUT DB9 connector for VGA output. Display local video output and menu. 14 HDMI OUTPUT HDMI connector for high definition video output. Display local video output and menu. 15 AUDIO OUT RCA connectors for analog audio output. 16 LAN interface Connector for LAN (Local Area Network). 17 USB interface Connector for USB device. 18 eSATA Connects external SATA HDD, CD/DVD-RM or disk array 19、20、22 VIDEO IN BNC connectors for analog video input. 21 AUDIO IN RCA connector for analog audio input. 23 ALARM IN Connector for 4/8 channels alarm input ALARM OUT Connector for 2 channel alarm output MIC IN DC JACKES connector for microphone input, used for two-way 24 audio. (Option) LINE OUT DC JACKES connector for speaker output, used for two-way audio. (Option) 25 SDI VIDEO IN BNC connector for SDI video input 26 LOOP OUT 16 channel loop out 27 Video OUT BNC Video output(Option) 28 AC POWER IN AC100V-240V 11 SV-HVR2800 Series DVR User Manual 2 GETTING STARTED 2.1 Starting and Shutting Down Your DVR Proper startup and shutdown procedures are crucial to expanding the life of your DVR. To startup your DVR: 1. Ensure the power supply is plugged into an electrical outlet. It is HIGHLY recommended that an Uninterruptible Power Supply (UPS) be used in conjunction with the unit. The Power indicator LED on the front panel should turn on, indicating the unit is receiving power. 2. Press the POWER switch on the rear panel. The Power indicator LED should turn on. The unit will begin to start. To shutdown the DVR: 1. Enter the Shutdown menu by clicking on Menu > Shutdown. 2. Select the Shutdown button. 3. Press the POWER switch on the rear panel to safely shutting down the system. 2.2 Rebooting and Locking Your DVR While in the Shutdown menu, you may also reboot or lock your DVR. Locking your DVR will return you to the Live Preview mode, which will require an user name and password to exit out of it. The Reboot button will reboot your DVR. To reboot or lock your DVR: 1. Enter the Shutdown menu by clicking Menu > Shutdown. 2. Select the Lock button to lock the DVR or the Reboot button to reboot the DVR. 2.3 Watching a Live View The Live Preview mode is automatically started after the DVR boots up. It is also at the very top of the menu hierarchy, thus hitting the ESC multiple times (depending on which menu you’re on) will bring you to the Live Preview mode. 2.3.1 Understanding Live Preview Icons There are multiple icons on each display in Live Preview mode to indicate different 12 SV-HVR2800 Series DVR User Manual camera status. These icons include: Icon Item Description Motion Detection Icon Indicates motion detection. Record Icon Indicates the current channel is recording. Audio Icon Indicates the current channel is in audio output. Alarm Icon Indicate there is an alarm or exception. 2.3.2 Using the Mouse in Live Preview Many features of the Live Preview can be quickly accessed by clicking the right-button of the mouse. 1 - Menu: Enter Main menu. 2 Multi-Camera: Switch between different displays layout options. Layout options can be selected from a drop down list. 3 - Next Screen: When displaying less than the maximum number of cameras in Live Preview, clicking this feature will switch to the next set of displays. 4 - Start Tour: Enable sequencing in Live Preview mode. 5 - PTZ: Enter PTZ Control mode. 6 - Digital Zoom: Enter Digital Zoom interface. 7 - PIP : picture in picture. 8 - Manual Record: Initiates manual recording. 9 - Playback: Enter into Playback mode. 10 - Audio On/Off: Enables or disables the audio function of the DVR. 11- Installation wizard:Commonly used configuration setup wizard. 13 SV-HVR2800 Series DVR User Manual Note: The dwell time of the preview configuration should be set before using Start Tour. 2.3.3 Using Digital Zoom To use digital Zoom in Live Preview mode: 1. Right-click using the mouse in Live Preview mode. 2. Select Digital Zoom from Mouse menu. 3. Left-click and drag the red box to the desired area for zoom. The zoomed image will be magnified to full screen. : To enlarge the picture 2 times for each click. 6 times at most; : To shrink the enlarged picture till normal one; : To enlarge the selected area to full screen; : To turn the picture into normal size; : Exit. 2.4 Default Password Information To ensure your privacy, this DVR supports password protection. The default, all-access username is “admin”. If the DVR asks you to log in before you’ve set a password, enter admin as your username and leave the password blank. This will give you access to all areas of the DVR. The password function is disabled by default. However, if you’re asked for a password, the default is “12345”. To ensure your ongoing privacy, we strongly recommend setting a password as soon as possible. Choose something that you’ll remember, but that others would be unlikely to guess. If you do manage to lock yourself out of the DVR, you’ll need to contact us. 14 SV-HVR2800 Series DVR User Manual 3 Display Settings 3.1 Camera settings Camera menu is where you can make adjustments to how the DVR displays the feed coming from your cameras. You can adjust aspects of each channel/camera, such as: the camera’s name, which information will be displayed on-screen, and where this information will be displayed, whether information such as the date will be recorded directly onto your videos Any areas of the video you want “masked” - that is, left blank. Camera No.: Choose the camera / channel you want to edit here. The Camera No is the same thing as the number written on the rear panel next to the BNC socket used to connect the camera. Camera Name: Select a name for the camera you’ve selected. By default, all channels are named as the Camera No. field, but this can be set to anything you’d like up to 16 characters. Display Camera Name: When checked, the name you’ve selected for the camera/channel will be displayed on-screen as an overlay. Record Date: When checked, the date (as displayed) will be recorded directly into your videos. This can be useful, as it creates an inseparable record of exactly when the footage was captured. OSD Display Position: Gives you access to a screen where you can easily set the exact positions of any overlaid text, such as the camera name and the date and time. Simply select any item you want to move (such as the Channel Name and/or the Date and Time) and click and drag it to the position you’d like it to be. To exit the OSD Display Position screen, right click. A context menu will appear with two options: Save and Exit. To exit without saving, simply choose Exit. If you want to save your changes, choose 15 SV-HVR2800 Series DVR User Manual Save first. Image Settings: Gives you access to image adjustment tools, allowing you to adjust the way the DVR interprets and displays video images. The Image Settings you choose will affect your recorded footage. Rather than applying the changes after the video has been processed, the Image Settings affect how the DVR decodes the video it is receiving from the cameras. The upside of this is that you can use the Image Settings to dramatically improve the quality of the images being recorded by the DVR. This can be particularly useful for improving the accuracy of your Motion Detection settings. Mask: When checked, allows you to create, place and shape a “privacy mask” which obscures the view of part of the image on the associated channel. 3.2 Output Settings Output menu is where you can control how the DVR is going to deliver an image to your television, screen or monitor. You’ll be able to adjust such items as: screen resolution and position on your monitor the audio output, the appearance of the menus, the auto-sequence dwell time, and the sensitivity of the USB mouse. Resolution: Resolution should be set as high as possible, but equal to or lower than the maximum resolution your screen/monitor can display. Things change a little depending on what kind of monitor you’re using, and how it’s connected. The DVR has several formats available, in two different aspect ratios: Square (4:3) - 1024 x 768 or 1280 x 1024 Widescreen (16:9) - 1280 x 720 (720p) or 1920 x 1080 (1080p) Square Monitor via VGA: Use one of the 4:3 formats to correctly align the DVR’s output on your screen. Using a widescreen format will “stretch” the image vertically. Widescreen Monitor via VGA: If possible, use the widescreen (16:9) format. If your monitor can’t display that resolution, you might need to enable letter-boxing on your monitor and use a 4: 3 format. PC Monitor via HMDI: Choose a format appropriate for your monitor. If it’s a widescreen, 16 SV-HVR2800 Series DVR User Manual use a widescreen format. Set to the highest option that is equal to or less than the screen’s maximum resolution. Widescreen Plasma/LCD HDTV via HDMI: The resolution should be set to the maximum your television can process not display. Typically, this will be 1080p, as even screens which don’t have that many pixels can still display the image, just with less detail. Check your television’s documentation to learn this value. If your television can’t display 1080p, then use 720p instead. Transparency: You can set the DVR’s menus to be partially transparent (see-though) in case you need to keep an eye on things while adjusting settings (or it makes you feel like you’re living in the future because it’s so tech - we don’t judge). The best way to set this is to simply experiment over time and see what works well for you. Mouse Sensitivity: How sensitive the mouse will be. On lowest, large and dramatic movements are required to move the mouse but a few inches onscreen. At the other end of the spectrum, a tiny bump or knock can send the cursor from one side of the screen to the other. Try somewhere around the lower ending for starters, and then increasing it little by little if it’s moving too slowly. Dwell Time: How long channels will be displayed when using auto-sequence mode. Audio: Whether the DVR will output an audio signal. When checked, the DVR will output audio to a compatible device (via the HDMI or the RCA Audio Output). When unchecked, the DVR will not output an audio signal at all. Border Adjustment: Changes the size and position of the DVR’s images on the screen. Altering the border size can be useful if you’ve got parts of the DVR’s image extending beyond the part of the screen you can see. The border adjustment is much more likely to be required for older, CRT computer monitors connected via the VGA output. HDMI should (in theory) automatically adjust the DVR’s image to perfectly fit your screen. 17 SV-HVR2800 Series DVR User Manual 4 Recording Settings 4.1 Encode Encode menu allows to alter and customize how the DVR records footage and “encodes” the files. “Encode” is a term which refers to the compression algorithm (a fancy, computer term for “make the file smaller while retaining visual quality”) used by the DVR. You can choose and alter: the resolution (per channel), the frame rate (how many images per second the DVR records), the data-rate of each video stream. The higher the data rate, the “better” your images will look, but the more space they’ll require on your HDD. Camera No.: The camera feed you want to alter the settings for. These will be numbered sequentially, and correspond to the BNC video inputs labeled on the rear of the DVR. Note that the channel name here is independent of the Camera Name selected on the Display: Camera menu screen. Encoding Parameters (advanced user option): Whether you’re editing the parameters for the mainstream or the sub stream. Main-Stream: The main-stream is the video feed that the DVR will record and display. This is the higher-quality stream. Sub-Stream: The sub-stream is the video stream that the DVR will send to remote devices via a network or the Internet. It is the lower-quality stream as a reduction in video size makes it easier to send over a network. Record Audio: Choose whether the channel you’ve selected will record audio or not. If you don’t have any audio devices connected, it’s a good idea to disable audio, as it will save some space on your HDD. Resolution: There are three options: 18 SV-HVR2800 Series DVR User Manual 960H: About the same resolution as a DVD (960 x 480 for NTSC, or 960 x 576 for PAL). D1: About the same resolution as a DVD (704 x 480 for NTSC, or 704 x 576 for PAL). This is the default resolution for all channels, and we suggest leaving this setting well alone. HD1: Literally, half of D1 (352 x 480 NTSC / 352 x 576 PAL) and about the quality of a typical YouTube video. This won’t save HDD space - the bitrate is the important setting for determining how much space your recordings require on the HDD. CIF: 1/4 of D1 (352 x 240 NTSC / 352 x 288 PAL), and about the same resolution as a low-quality webcam. We can’t think of a good reason to use CIF as your resolution setting, unless you’ve some really cunning plan we didn’t think of. It won’t save any HDD space - for that, you’ll need to change the bitrate. Frame Rate: The number of frames per second (fps) that the DVR will record. The default (and maximum) is referred to as “real-time” and is 30fps (NTSC) or 25fps (PAL). Reducing the number of frames per second will either save hard drive space or improve the data-rate per frame (depending how you set the bit-rate - see the next point). Remember that your FPS count is the same as saying “take X photograph per second” (where X is your FPS setting). If maintaining image clarity while reducing HDD consumption is your priority, it makes sense to lower the frame rate. As with all settings on this screen, some experimentation is encouraged to find the settings which will work best for you! Max. BitRate(Kbps): The actual amount of data that the DVR will use to record video. The main-stream uses a variable bitrate to record video – the more movement occurs in the video, the higher the bitrate will have to be. When there’s little movement in view, the DVR will automatically reduce the bitrate to conserve HDD space. If the amount of movement in a recording would require a higher bitrate to accurately record than you’ve selected as the maximum, the DVR will attempt to preserve as much of the quality as possible by applying compression to the image. This compression will take the form of irregular, fuzzy blocks over segments or all of the image. If you encounter this, it indicates that you might need to increase the overall bitrate. If you’ve set a high bitrate but a low frame rate, the DVR will still use all the data it can, 19 SV-HVR2800 Series DVR User Manual resulting in potentially higher quality per frame than at higher frame rates. The sub-stream uses a constant bit-rate. This makes the video easier to stream over a network or the Internet. 4.2 Option Option menu lets you change some aspects of how the DVR will record footage, such as: whether the DVR will record a short video before events take place, how long after events take place the DVR will continue to record for, how the DVR will store and divide long recordings into “packs”, whether the DVR will record over old footage to make room for new events. Overwrite: When enabled, the DVR will record over the files already stored on the hard drive. The DVR will always record over the oldest files on your hard drive first. Using the overwrite option is advisable, as the DVR will always be able to record events as they happen. However, it does mean that you’ll need to get important events off the HDD before they’re overwritten. Pre-Record: While Pre-Record is enabled, the DVR will record a few seconds before an event occurs. It’s a little like making the DVR psychic (but not really - it’s actually just caching a few seconds of video which it adds to event recordings as they occur). If you’re using Motion Detection (recommended) as your primary recording method, then it’s a really good idea to use Pre-Record - sometimes, if a motion event is fast enough, it might have left view before the DVR can trigger a recording. With Pre-Record, there’s almost no chance you’ll miss it. Post-Record: How long after an event occurs that the DVR will continue to record. It can be very useful - for example, if an intruder or potential target triggers the motion detection but pauses in view, then post record being enabled will get a much better look at them. We think that 30 seconds is a reasonable length for the post-record setting, but can be higher (the options are 1, 2, 5 or 10 minutes) depending on your unique circumstances. 20 SV-HVR2800 Series DVR User Manual Pack Duration: Pack Duration is a measurement of how long the DVR will record for before splitting the output file into discrete units. “Packs” are something like the scene numbers on a DVD - though the video is broken up into separate units, it will still play through as one continuous movie (unless interrupted by the schedule or motion detection turning the recording on or off ). If you don’t want to worry about setting Pack Durations, you can leave it on the default value; it will make little difference to the day-to-day running of the DVR. 4.3 Schedule The schedule presented on-screen applies to one channel only. Use the Copy To functions to quickly assign identical schedule layouts to multiple channels at once. There are four types of recording to choose from: Normal: The DVR will constantly record for any period where Normal is selected. You won’t miss anything, but constant recording will fill your hard drive very quickly. (The DVR does record the equivalent of a DVD film every two hours on every channel, so that’s rather a lot of data!) Typically, we suggest Motion as a better recording mode for most users. Motion: The recommended recording setting for most applications. The DVR will only record when it detects something moving in front of a camera, and will then only record footage from the camera(s) that do detect motion unless you alter your Action settings “Alarm: Motion Detection - Action” on page 36 to include other channels. Before setting any of your schedule to Motion, ensure that Motion Detection is properly configured for the channel(s) you want to associate with it. See “Alarm: Motion” for more information about setting up and configuring Motion Detection. Alarm: The DVR will only record when it detects event from the sensor input port if user choose this recording type. Before setting any of your schedule to Alarm, ensure Alarm is properly configured. See “Alarm: Sensor” for more information about setting up and configuring alarm. M/A: The DVR will record when it detect motion detection or alarm event. 21 SV-HVR2800 Series DVR User Manual None: As the name suggests, the DVR will not record anything. This isn’t really a mode, but it’s listed here for completeness. 22 SV-HVR2800 Series DVR User Manual 5 Search 5.1 Playback Select the channels you’d like to playback, select the type(s) of video you’d like to playback, set your Start Date/Time and your End Date/Time. Click the Play button to start playback of all the files found with the specified search criteria or click the Search button to bring up the list of search results. After search results are presented, select the file you would like to playback and press Play to enter synchronous playback cameras selection. There are various controls on the Playback interface that makes viewing recordings more efficient. Icon Item Description Audio on/off Select to open or close the audio; Clip Start or stop clip; Backup Backup the clip file to USB storage device. Fast backwards Select to rewind recording files at the speed of x2, x4, x8 Play Select to return to normal speed to playback files Pause / play Select to pause or play in single frame 23 SV-HVR2800 Series DVR User Manual Fast Forwards Slow Forwards Select to playback the recording files forward at the speed of x2, x4, x8 Select to playback the recording files forward at the speed of x1/2, 1/4, 1/8 Hide: Select to hide the playback control panel Exit Select to exit playback Playback progress To drag the playback progress to a desired time Recording Type indicate the recording types during the period 5.2 Backup To backup footage: Connect a USB flash drive or a USB HDD to the USB port or connect an eSATA HDD to the eSATA port on the rear of the DVR. Choose the camera(s) you want to backup footage from, select the type(s) of video you want to backup, set your Start Time and End Time, and then select Backup. After search results are presented, select the file you would like to backup. Then select Next. Refresh: Looks for devices to which footage can be backed up. This will include USB flash drives or hard drives connected to the USB port, or external hard drives connected via the rear eSATA port. AVI Format File: When checked, the DVR will transcode the footage into a file format that can be played back in a computer. While the backup process is executed, the DVR will display a pair of progress meters. The top one indicates the 24 SV-HVR2800 Series DVR User Manual progress of the current video event; the lower one shows the overall progress. To end the backup process before it’s complete, choose Cancel. Some or all of the incidents you selected won’t have been copied. While backing up, particularly when transcoding to AVI, the DVR might take a few moments to register that you’ve selected Cancel. Note that, while the backup is in progress the DVR will be inoperable. It will continue recording and monitoring, but won’t respond to the mouse being moved or buttons being pressed (at least, not quickly - cut it some slack, it’s working really, really hard). Backing up footage can be a slow process - doubly so when transcoding to AVI. If you’re backing up more than a few minutes footage at a time, you’ve got time to make a cup of coffee, maybe call a friend or catch up on some TV. Seriously, it can take a while - talk to any video editor about transcoding and they’ll tell you it takes a long time. 5.3 Event The Event Search menu will show you recordings that were triggered by the DVR detecting motion. Typically, the majority of recordings based upon “Events” are likely to be recordings triggered by the DVR’s motion detection feature. The search function operates in the same way as the main playback search: the only difference is you’ll select an Event Type rather than a Video Type. 5.4 Log The Log Search screen operates in the same way as the other search screens, but is able to access the entire DVR’s event log, not just recorded footage. If you’re looking for an event which has no recorded footage associated with it (such as a lost video signal, hard drive error, Internet communication problem or similar) this is where you’ll find it. 25 SV-HVR2800 Series DVR User Manual 6 Network Settings 6.1 General Network Access: Here you can choose between the three different types of networks that the DVR can be connected to. The three types of networks are: DHCP: DHCP (Dynamic Host Configuration Protocol) is a system where one device on your network (usually a router) will automatically assign IP addresses to devices connected to the network. STATIC: Static networks require all devices to have their IP addresses manually defined, as there is no device dedicated to automatically assigning addresses. PPPoE: An advanced protocol that allows the DVR to be more directly connected via a DSL modem. This is an option for advanced users only. IP Address: Just as houses and businesses need to have an address which identifies their location on the road network, so too do computers and other devices need addresses (called IP ADDRESSES) to identify their position on the electronic network. The DVR uses IPv4 addressing, which consists of four groups of numbers between 0 and 255, separated by periods. For example, a typical IP address might be “192.168.1.24” or something similar. The most important thing when setting the IP address is that nothing else on your network shares that IP address. Subnet Mask: If the IP address is like a street address, then a sub network is like your neighborhood. This will be formatted in a similar way to the IP address. Default Gateway: This is the address of the “way to the Internet” - to continue the road analogy, this is like your local access point to the highway. This is an IP address in the same format as the others, and is typically very similar to the IP address of the DVR. Auto DNS / Static DNS: Choose how you’d like to define your DNS servers. We recommend leaving it on Auto unless you’ve got a specific reason not to. Auto DNS: The DVR will automatically choose a DNS server. This is the recommended setting. 26 SV-HVR2800 Series DVR User Manual Static DNS: If you need to manually define a DNS server, then choose Static DNS. This is recommended for advanced users only. Preferred DNS Server: Typically, the DNS Server address will automatically be detected by the DVR. In some cases, you’ll need to enter a value - the address of your router (the same as the Gateway) should work. Alternate DNS Server: A backup DNS server. This is here as a redundancy - your DVR will probably work without one. MAC Address:The Media Access Control address. This is a unique code which nothing else should share. You can’t change this one - it’s hard set when the DVR ships out. 6.2 Advanced DDNS: The place to configure the DVR to automatically update a dynamic DNS service. If you want to remotely access the DVR via the Internet, you’ll probably need to configure a DDNS account. See “Network: Advanced: DDNS” for details on setting up and configuring the DDNS. NTP: Network Time Protocol. If you’ve got the DVR connected to the Internet, you can have it automatically sync time with an online server. Email Settings: Where you can configure the DVR to work with an email account of your choice. This must be correctly configured for the DVR’s auto-email feature to work. IP Filter: An advanced feature which allows you to exercise precise control over what devices/IP address(es) are allowed to communicate with the DVR and which are not. Recommended for advanced users only. Server Port: This is the port that the DVR will use to send information through. You’ll need to know this port value when logging in from a mobile device or the MyDVR software. HTTP Port: This is the port through which you will be able log in to the DVR. You’ll need to know this port value when you access your DVR from IE browser. The default value is “85”. UPNP enable: UPnP is a technology which makes configuring your network easier and faster. To use the UPnP setting on the DVR, you’ll need a router which supports the feature, with UPnP enabled. Note that many routers which do support UPnP do not 27 SV-HVR2800 Series DVR User Manual come with the feature enabled by default. You may need to ask your Internet service provider to turn it on. When UPnP is enabled on both your DVR and router, the Ports that the DVR requires to be open for access to and from the Internet will automatically be opened and closed as necessary by your router, saving you the trouble of manually forwarding these ports. If UPnP is not enabled, or your router does not support the feature, you’ll need to forward the ports the DVR uses from the router to the DVR - since this is a technically challenging process, we strongly recommend using UPnP if possible. 6.2.1 DDNS How do I deal with a dynamic IP address? One option is to contact your ISP and request a static IP address. They’ll usually charge a small fee for doing this. It’s worth noting that not all ISPs offer static IP addresses. If your ISP does not offer static IP addresses then you can use a dynamic referencing service. 6.2.2 NTP A Network Time Protocol (NTP) Server may also be setup on your DVR to keep the date and time current and accurate. 6.2.3 IP Filter The IP Filter can be used to modify which IP addresses have permission to talk to the DVR and which do not. This is an advanced feature, and is recommended for advanced users only. If you’re not sure what you’re doing - is more likely to break things than making anything better. 6.2.4 Email Settings If you want the DVR to occasionally drop you a line, share news, tell you about its day and more importantly - tell you what’s going on around your home or business as it happens, then you can configure it to automatically send email alerts as events happen. For the Auto-Mail function to work correctly, the DVR will need to be correctly configured with 28 SV-HVR2800 Series DVR User Manual the details of the email servers and addresses you want to use. Enable SSL or TSL: Whether the email server you’re using requires a secure link. This is on be default, and should be left on if you’re using any of the preset email servers. SMTP Server: There are three preset options to choose from, Gmail (smtp.gmail.com), Windows Live Mail (smtp.live.com) and Yahoo Mail (smtp.mail.yahoo.com). You’ll need to setup an account with one of these email providers. SMTP Port: The SMTP port used by the email provider of your choice. This field will automatically self-populate if you use one of the presets. Sender Address: The address you’re sending the email from. This will be the username you’ve set up for the email server you’re using, followed by “@” and then the email server. For example: “[email protected]” or similar. Sender Password: The password for the outgoing email account. Recipient Address: The email address you want the DVR to send emails to. This can be any email address you like, however, bear in mind that the DVR might send a large number of automatic emails under certain conditions. Attach Picture: While this is selected, the DVR will attach a small image to each email alert (where applicable). For motion-based email alerts, this will be an image of whatever triggered the motion detection. Interval: The length of time that must elapse after the DVR sends an email alert before it will send another. Short Interval settings are likely to lead to huge numbers of alerts being sent by the DVR - perhaps even several emails for one event (if that one event lasts longer than the interval setting). On the other hand, a long interval setting might mean you’ll miss a specific update that you needed. There’s no right answer, and you’ll probably have to fine-tune this setting to get the results you’re after - it’ll be different for everyone’s unique circumstances. 6.3 Network Status The Network Status screen shows you a quick 29 SV-HVR2800 Series DVR User Manual summary of your network settings. You can’t alter things here - see the General and Advanced tabs for places to actually alter things. 30 SV-HVR2800 Series DVR User Manual 7 Alarm 7.1 Motion Set up properly, using motion detected recording will increase the number of days your DVR is able to record. It will only record relevant events rather than recording everything, making searching for an event easier. Enable: Whether or not motion detection is enabled on a specific channel. Each channel can be configured independently of one another. Motion Detection: Click the applicable Set button to setup the motion detection area for that channel. Action: Here you can define what will happen when the camera you’ve selected detects motion. 7.2 Video Loss Video Loss is regarded as a potential alarm event, and is considered to occur any time that the DVR doesn’t receive an active video signal on any of its inputs. The default behavior of the DVR, when a channel has no incoming video signal, is simply to display “Video Loss” in white text on a black background over the associated channel. If you’re not using all the inputs on your DVR, then some channels will be in “permanent” Video Loss state. Just be sure that you don’t enable a video loss action for these channels. Channel: Which channel/camera you’d like to set the Video Loss behavior for. Enable: Whether the selected channel has video loss monitoring active or not. Action: The action you’d like the DVR to take when this event occurs. It’s set in the same way as the Action for any other event. 7.3 Exception An Exception is any deviation from the DVR’s normal behavior - phrased another way, it’s like saying the DVR’s been working fine except for these events 31 SV-HVR2800 Series DVR User Manual Exception Type: What event type you’d like the DVR to react to. By configuring the Action for these events, you can create any combination of audio alerts (see below) or auto-emails to be sent for different event types. HDD Full: As the name suggests, this event occurs when the DVR runs out of space on the hard drive to save new footage. This event is redundant if you’ve got overwrite enabled, as the DVR will automatically delete old footage to ensure it can continue to record. HDD Error: Occurs when the DVR has trouble accessing one or more of its hard drives, or when it cannot detect one at all. Net Disconnected: Will occur if the DVR has problems connecting to the Internet. This may indicate a problem with the DVR’s configuration, a fault with your network or a problem with your Internet Service Provider (ISP). IP Conflict: This event will occur if the DVR detects another device on the same network with a conflicting IP address. It’s a little like two houses with the same number being on the same street - one house might get the other’s mail, or get woken up at all hours of the night being asked if someone named “Big Bob” lives there. Basically, it indicates that two devices are trying to use the same IP address. This shouldn’t occur if you’re using DHCP addressing, unless one or more devices is set to use a STATIC IP (the static addressing method overrides the automatic assignment process). Audio Warning: The DVR will use its internal buzzer to emit an alarm tone. It sounds like an old computer indicating an error, or a large truck backing up. Send Email: The DVR will send an auto-email alert when the event type you’ve selected occurs. 32 SV-HVR2800 Series DVR User Manual 8 Alarm 8.1 HDD Here you’ll find a comprehensive list of hard drives connected to the DVR. Typically, there will be one entry here, and it will probably be the hard drive that came with the DVR. This is not a problem, and you’ll probably get years of usage out of the included hard drive. Note that external drives connected by either eSATA or USB will NOT be displayed here. 8.2 S.M.A.R.T S.M.A.R.T. (Self-Monitoring, Analysis and Reporting Technology) is your hard drive’s way of telling the DVR how it’s going. Status: The current condition of the hard drive. It should say “Good”. If it says anything else, this indicates there’s a problem with your hard drive. If there’s no problem, there’s little else to do here, unless reading the output of the dozens of self-tests the hard drive performs on itself is of interest to you. If you have been confronted with a HDD Error, or the Status entry doesn’t read “Good” then you can use the S.M.A.R.T .information to attempt to diagnose the problem. The information presented in the S.M.A.R.T. report is practically identical to what you’d see on a desktop PC while using Administrator Tools, or a similar service. 8.3 PTZ This is where you can configure the DVR to be able to operate PTZ devices. PTZ stands for Pan, Tilt & Zoom. The DVR is compatible with many - but not all - PTZ devices available. Camera No: The camera you’d like to associate a PTZ device with. 33 SV-HVR2800 Series DVR User Manual Baudrate: Check the PTZ device’s documentation to learnthis value. Data Bit, Stop Bit & Parity: Options that subtly change the way the DVR talks to the device. These are important to get right - check your PTZ device’s documentation to learn the correct settings. PTZ Protocol: A protocol is like a language that the DVR uses to talk to the PTZ device. Ensure that this setting matches the requirement of your device. Address (0 - 255): The command address of the PTZ device you want to associate with this channel. 34 SV-HVR2800 Series DVR User Manual 9 System 9.1 General General menu contains many of the settings you’ll need to configure to get the most out of your DVR system. Most importantly: The time and date can be set here. You can select the language you want for the menus/GUI. The configuration for automatic adjustment to daylight savings time is here. You can easily enable or disable password protection - but will have to create a valid username/password Language: The language that the DVR’s menus, alerts and other communications will use. This usually defaults to English. Be careful not to change this setting unintentionally - it might be tricky to find the setting to change it back when the DVR is speaking another language! Video Standard: Here you can choose between PAL and NTSC. PAL is used in Western Europe and Australia, NTSC is used in the US, Canada and Japan. If the DVR’s picture is black and white, flickering or similar, then this is probably caused by the video system being set incorrectly. Don’t change this setting unless advised to do so by Technical Support. You may not be able to see the DVR’s output on your screen anymore! Time Zone: Particularly important if you’ve enabled NTP – set this to the time zone where you happen to be. For example, people in eastern Australia (Canberra, Sydney and Melbourne) choose GMT+10:00, whilst the Eastern Time zone in the USA and Canada is GMT-05:00. (GMT stands for Greenwich Mean Time - it’s the baseline that keeps all the different time zones in sync.) Menu Date Format: The format of the date (eg.DD/MM/YYYY or MM/DD/YYYY and so on). System Time: This can be edited manually, or set to update automatically by using NTP (see “Network: Advanced: NTP”). DST Setting: As the standards for daylight savings differ from country to country, and often state to state, you might need to manually tell the DVR exactly when it commences and ends in your locality. First, turn DST on. We suggest setting the 35 SV-HVR2800 Series DVR User Manual Daylight Saving Time Mode to Date, and manually entering the dates and times that daylight savings time applies to and from, in your locality. Note: Some NTP servers are NOT fully compatible with DST. This may cause your system to double-count adding one or removing one more hour than they should, or cancel each other out. You may need to intentionally change your time zone to compensate, or simply not use NTP and DST simultaneously. Enable Password: While enabled, the DVR will require a password to access, even for local users. It’s advisable to enable password protection Auto Lock Time: While the password protection is enabled, the DVR will automatically time-out, whereafter it will ask for a password before returning to normal functioning. The Auto Lock Time determines how long a period of inactivity will cause the DVR to lock itself again. Device ID: Differentiates your DVR from other devices. If you don’t have any other DVR’s or similar devices, then you can leave this as-is. If you’ve got multiple DVRs running on the same network, then it’s a great idea to give each a unique ID. 9.2 User User menu is where you can define and configure the different levels of access various users have to the DVR. We suggest that at minimum the admin account be password protected, as it has access to all aspects of the DVR’s operation. To add additional users, choose Add. To remove a user, choose Delete. To customize a user’s level of access, choose Modify. You cannot modify the access level of the default admin account - they can do everything. This is to prevent an unfortunate incident where, for example, no user has the permissions required to change another user’s permissions – which could lead to the DVR being, in at least some senses, inoperable. User Name: Select a name for the user you want to define. The best usernames are short, to the point, are relevant to the specific user they’re intended for, are easily memorable and hard to guess. Password: A password can be any combination of numbers (0 though 9) between four and eight characters long. 36 SV-HVR2800 Series DVR User Manual Confirm Password: Must exactly match the password for the definition of a new user to be successful. Level: There are two default levels of access to the DVR - Guests and Operators. Guest: By default, a Guest user has access to the live images on the DVR and can search through recorded events. They cannot change any settings or configure the DVR in any way. Operator: The default permissions of an Operator allow them to access and configure all aspects of the DVR. You can easily customize the level of access each individual user has. Simply choose the Permission button on either the Add User or Modify to set the specific access for the user you want. The Permission menu has two tabs - Configuration and Operation. Configuration: The configuration page select which menu(s) the user can access. There is no hierarchy and any combination of menus can be selected (although some combinations would make little sense in practice). Operation: You can select which channels the user has access to, and what they can do with them. For example, you could set a user to have permission to view all channels in live viewing mode, but only playback channels 2 and 4. Choose the Set button next to each type of access to choose specific channels that the user can access. Also, this page contains permissions for HDD Management and Shutdown. These are surprisingly powerful levels of access: between them, a user can remove all footage from a DVR’s hard drive and turn the DVR off. Be careful assigning these permissions! 9.3 System Information If you’re looking at the System Information screen, you’ve probably been directed to do so by Technical Support. If we haven’t told you to come here, you might be wondering what all the information means. On a day-to-day level, the answer is “very little”. However, if you’re still curious: Device Name: The name that the DVR considers to be its own, and what it will use to register an IP address with your DHCP host. The remaining information is for use by Technical Support, in the event that you require assistance. The various model and build numbers help us track down any known issues, or catalogue new issues as they come to light. It 37 SV-HVR2800 Series DVR User Manual also helps us figure out if you’re running the most recent firmware on the DVR, and whether you’d benefit from an upgrade. 9.4 Maintenance To maintain the operational integrity of the DVR, it is suggested that it be rebooted periodically. In much the same way that a computer can become unstable if left on for an extremely long time, the DVR can become unstable. It is strongly suggested that the DVR be rebooted at least once per week. However, as this can be a hassle (particularly if the DVR is stashed away somewhere inconvenient) you can set the DVR up to reboot itself. Enable auto reboot: Will automatically shut the DVR down and restart it at a certain time of the day or week. Auto reboot at: Choose when you’d like the DVR to reboot. Typically, this will be a time when it’s unlikely there’ll be any activity for the DVR to record. Firmware Upgrade (Upgrade): Instructs the DVR to update its firmware. You’ll only need to use this option if instructed to do so by Technical Support. Default Settings (Restore): Loads the factory default settings. This must be done after a firmware upgrade to ensure proper operation of the DVR. You can retain your settings, recording schedule and so on by using the Import/Export Configuration function. Configuration (Export): Creates a file containing all the settings you’ve customized, including your recording preferences, schedule, user-list and so on. To export your settings: Insert a USB flash drive into the USB port on the front of the DVR. Ensure it has enough free space (a few MB is sufficient – the file is less than 50KB) and that it is not write-protected. Choose Configuration: Import/Export. You’ll see a file browser, showing the contents of the storage device. Click Export to save your settings. Exporting your settings will overwrite any previous settings you’ve saved to that flash drive. If you want to do sequential configuration exports, you’ll need multiple USB drives or, rename the file using a PC (advanced users only). Configuration (Import): Operates in the same way as the Export function, but is used to load a previously saved configuration file. Locate the file you want on your flash drive - it will be called config.tgz. Loading the file will cause the DVR to automatically reboot. 38 SV-HVR2800 Series DVR User Manual 10 APPENDIX 10.1 Glossary 1. Dual Stream: Dual stream is a technology used to record high resolution video locally while transmitting a lower resolution stream over the network. The two streams are generated by the DVR, with the main stream having a maximum resolution of 4CIF and the sub-stream having a maximum resolution of CIF. 2. DVR: Acronym for Digital Video Recorder. A DVR is device that is able to accept video signals from analog cameras, compress the signal and store it on its hard drives. 3. HDD: Acronym for Hard Disk Drive. A storage medium which stores digitally encoded data on platters with magnetic surfaces. 4. DHCP: Dynamic Host Configuration Protocol (DHCP) is a network application protocol used by devices (DHCP clients) to obtain configuration information for operation in an Internet Protocol network. 5. HTTP: Acronym for Hypertext Transfer Protocol. A protocol to transfer hypertext request and information between servers and browsers over a network 6. DHCP: PPPoE, Point-to-Point Protocol over Ethernet, is a network protocol for encapsulating Point-to-Point Protocol (PPP) frames inside Ethernet frames. It is used mainly with ADSL services where individual users connect to the ADSL transceiver (modem) over Ethernet and in plain Metro Ethernet networks. 7. DDNS: Dynamic DNS is a method, protocol, or network service that provides the capability for a networked device, such as a router or computer system using the Internet Protocol Suite, to notify a domain name server to change, in real time (ad-hoc) the active DNS configuration of its configured hostnames, addresses or other information stored in DNS. 8. NTP: Acronym for Network Time Protocol. A protocol designed to synchronize the clocks of computers over a network. 9. NTSC: Acronym for National Television System Committee. NTSC is an analog television standard used in such countries as the United States and Japan. Each frame of an NTSC signal contains 525 scan lines at 60Hz. 10. PAL: Acronym for Phase Alternating Line. PAL is also another video standard used in broadcast televisions systems in large parts of the world. PAL signal 39 SV-HVR2800 Series DVR User Manual contains 625 scan lines at 50Hz. 11. PTZ: Acronym for Pan, Tilt, Zoom. PTZ cameras are motor driven systems that allow the camera to pan left and right, tilt up and down and zoom in and out. 12. USB: Acronym for Universal Serial Bus. USB is a plug-and-play serial bus standard to interface devices to a host computer. 10.2 FAQ • Why does the DVR seem unresponsive when operating with the IR remote control? If your DVR seem unresponsive when using the IR remote and you have read through the section Using the IR Remote Control, please check: 1. Check that the batteries are installed correctly in the remote, making sure that the polarities of the batteries are not reversed. 2. Make sure the batteries are fresh and are not out of power. 3. Make sure the remote has not been tampered with. 4. Check around and make sure there are no fluorescent lamps in use. • Why does the PTZ seem unresponsive? If the PTZ seem unresponsive, please check: 1. Check that the RS-485 cable is properly connected. 2. Check that the dome decoder type is correct. 3. Check that the dome decoder speed configuration is correct. 4. Check that the dome decoder address bit configuration is correct. 5. Check to make sure that the main board RS-485 interface is not broken. • Why is there no video recorded after setting the motion detection? If there are no recorded video after setting the motion detection, please check: 1. Check that the recording schedule is setup correctly by following the steps listed in Scheduling a Recording. 2. Check that the motion detection area is configured correctly (See Setting Up Motion Detection). 3. Make sure that channels are being triggered for motion detection (See Setting Up Motion Detection). • Why doesn’t the DVR detect my USB export device for exporting recorded files? There’s a chance that the DVR and your USB device is not compatible. Please refer to our company’s website to view a list of compatible devices. 40