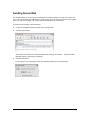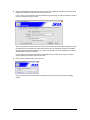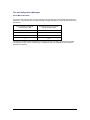
1
Secure Mail User Guide for Microsoft Outlook Express
TM
Product Release:
Release Date:
4.5.0
May 23, 2006
Copyright © 2003-2006 Echoworx Corporation
4101 Yonge Street, Suite 708, Toronto, Ontario M2P 1N6 Canada
All rights reserved.
This product or document is distributed under licenses restricting its use, copying, distribution, and
decompilation. This document is provided for informational purposes only and Echoworx makes no
warranties, either express or implied, in this document. Information in this document, including URL and other internet
website references, is subject to change without notice. The entire risk of the use or the results of the use of this
document remains with the user.
Unless otherwise noted, the example companies, organizations, products, domain names, email addresses, logos,
people, places and events depicted herein are fictitious, and no association with any real company, organization, product,
domain name, email address, logo, person, place or event is intended or should be inferred. Complying with all applicable
copyright laws is the responsibility of the user. Without limiting the rights under copyright, no part of this document may be
reproduced, stored in or introduced into a retrieval system, or transmitted in any form or by any means (electronic,
mechanical, photocopying, recording, or otherwise), or for any purpose, without the express written permission of
Echoworx Corporation.
Echoworx may have patents, patent applications, trademarks, copyrights, or other intellectual property rights covering
subject matter in this document. Except as expressly provided in any written license agreement from Echoworx, the
furnishing of this document does not give you any license to these patents, trademarks, copyrights, or other intellectual
property.
About This Guide
This guide describes how to install and use Secure Mail with supported Microsoft Outlook versions including:
MS® Outlook Express® 6.x or above
There are four main sections to the guide:
I) About Secure Mail
This includes product information including the system requirements to install and use Secure Mail.
II) Getting Started
Step by step instructions on how to download, install and activate the product.
III) Using Secure Mail
Here you will find instructions on sending and receiving secure messages, accessing tools included with
the plugin, and managing your settings.
Table of Contents
I) About Secure Mail ................................................................................................................................. 1
What Defines a Secure Message? ................................................................................................... 2
Secure Mail Components ................................................................................................................. 2
Who Needs Secure Mail? ................................................................................................................. 4
System Requirements ...................................................................................................................... 5
II) Getting Started....................................................................................................................................... 6
Before You Begin.............................................................................................................................. 7
Downloading and Installing the Software.......................................................................................... 8
Activating Your Software .................................................................................................................11
Validating Your Installation ..............................................................................................................15
III) Using Secure Mail .................................................................................................................................16
Sending Secure Mail........................................................................................................................17
About the Secure Mail Reminder Prompt ........................................................................................20
Receiving Secure Mail .....................................................................................................................21
Secure Mail Tools and Settings .......................................................................................................24
Interoperating with Other Secure Mail Systems...............................................................................30
Uninstalling Secure Mail ..................................................................................................................31
I) About Secure Mail
The Threat is Real
Sweetwater Hospital Association understands the security threats that you face when sending email. Email
travels from the sender to the receiver as a virtual postcard, and as email is stored and forwarded through
the Internet, there is a real risk that someone other than the sender or the receiver can intercept and either
read it or tamper with it.
The content of email is now regularly finding its way into the news or into the hands of people who should
not have it. The fact that large volumes of email can be collected, scanned, filtered, read and altered makes
email an easier target for illegal interception than regular physical mail. Also, unlike regular mail, you would
never know that your email has been intercepted and read or altered.
Secure Mail gives you confidence
Secure Mail gives you the confidence that only you and your intended recipients are able to read your email,
and that you know that the sender is not pretending to be someone else. It’s a value added service that
gives you the ability to send email with the confidence that the email is securely encrypted and that only the
person that you addressed the email to can unlock it. Recipients benefit because the identity of the sender is
also guaranteed. With Secure Mail, everyone with an email address can send and receive encrypted digitally
signed emails, without knowing the details of how it’s done.
This section of the guide covers the following topics:
What Defines a Secure Message
Secure Mail Components
Summary of Features and Benefits
Who Needs Secure Mail
System Requirements
Secure Mail User Guide for Microsoft Outlook Express
1 of 31
What Defines a Secure Message?
A secure message is one that is encrypted, digitally signed, and unalterable.
Encrypted
Your email message and any attachments are garbled and locked up, such that only your intended
recipient can unlock and read them.
Signed
When you enter your Secure Mail Password, your message is digitally signed to assure the recipient
that only you could have sent it.
Unalterable
The contents of your message cannot be altered, so the recipient can be sure that the message they
receive from you is genuine.
These qualities assure the sender that only their intended recipient can open and view the message, and the
recipient that the message actually came from the purported sender and has not been altered enroute.
Subscribers to the Secure Mail service never need to worry about the privacy and security of their email
messages.
Secure Mail Components
Subscribers of the Secure Mail service use the following components to send and receive secure messages:
Secure Mail ID
Your Secure Mail ID (also known as a digital ID or certificate) is the electronic equivalent of your
driver’s license or passport. Your ID is associated with your email address and is used to provide
proof of your identity when you send Secure Mail.
Secure Mail Plugin
The Secure Mail Plugin enables you to send and receive Secure Mail messages using your
existing email software. The plugin adds a number of new features to your email software.
Secure Mail Password
When you activate the plugin, you will be asked to create a Secure Mail Password. This password
should be known only to you, and is used to send and open secure messages.
Secure Mail User Guide for Microsoft Outlook Express
2 of 31
Summary of Features and Benefits
Anyone can sign up: you can use your existing email address ([email protected])
Confirm sender’s ID: digital signatures guarantee the identity of the sender
Messages are encrypted: military grade security is used to seal your email
Send to anyone: you can send Secure Mail to anyone, whether or not they are also a subscriber
Click to send: before sending, just click on the new SECURE button and the email will be encrypted
before it is sent from your computer
Click to open: click on a secure mail in your email box and enter your password to open it
Managing identities: you don’t have to worry about exchanging identities with anyone, just address
the email and we do the rest
Truly Secure: trusted standards - public key infrastructure (PKI), digital certificates (X.509), Secure
/ Multipurpose Internet Mail Extensions (S/MIME)
Secure Mail User Guide for Microsoft Outlook Express
3 of 31
Who Needs Secure Mail?
Consumers care about privacy
Privacy and personal security are two reasons why consumers think twice about sending email. Have you
ever decided to pick up the telephone to talk to someone instead of sending them an email because you
were concerned that your message could be intercepted? Do you suspect that an email is not actually from
the person listed in the “from:” line? Identity thieves and curious people have a growing array of widely
available spy-ware and email interception products at their finger tips. Isn’t it time to start putting your email
into an envelope with a guaranteed return address?
Businesses need trusted communications
Businesses are concerned about ensuring trust in communications, risk to their brand, confidentiality and
laws requiring that email be digitally signed and encrypted. Email has become one of the most important and
frequently used ways of communicating highly sensitive information. Why is it that businesses continue to
risk significant losses by sending email in the clear without digital signatures? The cost of hardware,
software, management and training required to build a proprietary encrypted email infrastructure was
prohibitively expensive. Today, any business email user can subscribe for a low monthly fee to send
unlimited Secure Mail.
Secure Mail is a valuable tool for businesses in complying with the law. Privacy legislation imposes a
general obligation on businesses and government to protect the privacy and security of personal and private
information. Some privacy legislation expressly requires that specific measures be taken to protect against
unauthorized disclosure of electronically stored or communicated information. Other industry-specific
legislation protects the confidentiality and integrity of information relating to specific markets.
Heath Insurance Portability and Accountability Act (HIPAA) is an example of legislation that
protects personal information sent amongst health care professionals.
Sarbanes-Oxley Act (SOX) governs integrity of financial operations of publicly traded companies.
Gramm-Leach-Bliley Act (GLBA) requires that all financial institutions protect customer
information.
California Security Breach Notification Act (CB 1386) requires disclosure when private personal
information of a California resident has been compromised.
These are a few important examples of US Federal and State industry-specific legislation that directly or
indirectly requires that information contained in email be protected against uncontrolled disclosure, and that
requires companies to adopt sufficient measures to ensure integrity and authenticity of private information
transmitted electronically.
Secure Mail User Guide for Microsoft Outlook Express
4 of 31
System Requirements
The minimum system requirements to install and use Secure Mail include:
Operating System
Microsoft™ Windows® XP (Recommended)
Microsoft™ Windows® 2000
Microsoft™ Windows® 98
For Windows XP and 2000, you are required to have administrative privileges.
Email Clients
Microsoft™ Outlook® 2003 (Recommended)
Microsoft™ Outlook® 2002
Microsoft™ Outlook® 2000 *
Microsoft™ Outlook Express® 6.0 or above
* For Outlook 2000, you require Microsoft Service Release 1 (SR1) or above.
For all other clients we recommend the latest service pack.
Web Browser
Microsoft™ Internet Explorer® 6.0 or above
Internet Connection
Minimum 56 KBPS dial-up modem
LAN-based using standard TCP/IP
DSL, ADSL, Cable Modem
If you are using a firewall/proxy the client plugin must be able to communicate with the Secure
Mail application back-end.
Computer Hardware
5-10 MB of hard drive space
Pentium 233 MHz (Recommended: Pentium 500MHz or greater)
128 MB RAM (Recommended: 256 MB or greater)
Secure Mail User Guide for Microsoft Outlook Express
5 of 31
II) Getting Started
After completing the account signup process you will be able to issue Secure Mail licenses to virtually any
existing email address. Once an account is established you will also be able to add Secure Mail licenses
through the self-care portal. This chapter explains how to install and activate the Secure Mail plugin after an
email has been provisioned through the signup or self-care portal.
Instructions are included for first-time users as well as user who are re-installing or installing the plugin for
an activated license on another computer.
This section of the guide covers the following topics:
What You Need to Know Before You Begin
Instructions for Downloading and Installing Secure Mail
Instructions for Activating Your Software
How to Validate Your Software Has Been Installed Correctly
Secure Mail User Guide for Microsoft Outlook Express
6 of 31
Before You Begin
Before you begin you will need the following three things:
A supported version of Microsoft Outlook (see System Requirements.)
An existing email address which is properly configured for use in your Microsoft Outlook client (popular
webmail accounts such as Hotmail, Yahoo and Gmail can be configured for use in Microsoft Outlook).
A Getting Started email which contains the activation code and a link to download the software (see
sample below) - or - if you have already used the activation code and are re-installing the software you
will need your Secure Mail Password.
Secure Mail User Guide for Microsoft Outlook Express
7 of 31
Downloading and Installing the Software
1
The Getting Started email contains a link to the download page; this page is also available from the
support web site. To install the program, simply click the ‘Download’ button.
2
Depending on your operating system you may be prompted with one or more Security Warning
dialogues.
Window 98 and 2000 users may see this:
Secure Mail User Guide for Microsoft Outlook Express
Windows XP users may see this:
8 of 31
3
At this point, if you haven’t already closed your email application and any open messages, please do
so.
4
Click the ‘Next’ from the Welcome screen.
5
Select which email application you plan on using the plugin with and click ‘Next’. Please ensure your
email account is properly configured for each email application you select before you install the
software.
6
From the Ready to Install screen click the ‘Install’ button to start the installation.
Secure Mail User Guide for Microsoft Outlook Express
9 of 31
7
You will then see a Setup Status screen that indicates the progress of your installation.
8
Once the installation is complete you will receive a confirmation screen.
Secure Mail User Guide for Microsoft Outlook Express
10 of 31
Activating Your Software
Activation for New Users
If you have never previously activated your software please follow these steps.
1
Enter your email address and click ‘Next’. Please be sure to enter the email address exactly as it
appears on your Getting Started email.
2
If you have not previously activated this email address for use with Secure Mail, you will be prompted
for your activation code. Enter your activation code exactly as it appears on your Getting Started email
and click ‘Next’ to continue.
If you are prompted for your Secure Mail Password at this step instead of your activation code it means
you have previously activated your software; please skip to step 2 of Activation for Existing Users if this
is the case.
Secure Mail User Guide for Microsoft Outlook Express
11 of 31
3
Now you will need to create a Secure Mail Password; see our tips on creating an effective password
below. Click ‘Next’ once you have entered your password.
Tips on Creating an Effective Password
Your password is a critical piece of information when it comes to protecting your private information and
digital identity. Here are a few tips to help you choose a strong password.
Good Passwords
Bad Passwords
Good passwords should be at least eight characters
long.
A bad password is one that is easily guessed by
someone who knows you.
They should include at least one character from
each of the following three character groups:
Upper case alphabetic characters (A-Z),
Lower case alphabetic characters (a-z),
Numbers and symbols ( 0-9~`!@#$%^&*()_+={}[]|\:;"<>',.?/ )
Embed at least one number or symbol within the
password rather than adding it to the beginning
or end of an otherwise alphabetic string.
Examples of bad passwords include:
Your username
Your name or nickname
Names of anyone in your family
Your pet's name
Your birthday or family birthdays
Your phone number, social security number,
or address
Do NOT make your password a dictionary word or common name with numbers and symbols merely
substituting for similar looking alphabetic characters (e.g., "P@ssw0rd"). Most importantly, never share your
password with anyone and do NOT write it down.
Remember to change your password regularly. This practice limits the amount of time that someone can use
to guess your password and the amount of time that your password can be used if it is uncovered.
Strong Passwords Can Be Easy to Remember
A simple way to create a strong but easy-to-remember password is to take a phrase that means something
to you and relate each word of the phrase to a corresponding letter, number or symbol. For example, the
phrase "I am one happy student at Princeton University" could become the password Im1Hs@PU.
Secure Mail User Guide for Microsoft Outlook Express
12 of 31
4
You must now create your password recovery question(s) and answer(s). You will be prompted to
provide the answer to these questions in the event you forget your password and need to reset it. Enter
questions and answers that you will easily be able to answer, but hard for some to guess.
5
Review the information you have entered and ‘Finish’.
Secure Mail User Guide for Microsoft Outlook Express
13 of 31
6
Once the activation process is complete you will receive a confirmation screen.
At this point the Secure Mail plugin is installed and your Secure Mail ID has been created and loaded onto
your local PC. You are now to ready to start using the software.
Activation for Existing Users
If you have previously installed and activated Secure Mail but would like to re-install Secure Mail or install /
activate it on another computer, please follow these steps.
1
Enter your email address and click ‘Next’.
2
Enter your Secure Mail Password associated with this email address.
3
Once the activation process is complete you will receive a confirmation screen.
Secure Mail User Guide for Microsoft Outlook Express
14 of 31
Validating Your Installation
To validate the installation of the Secure Mail Plugin for Microsoft Outlook, you should see the following:
If you click the Windows ‘Start’ button … ‘Programs’ and you should see a ‘Secure Mail’ folder. A
new ‘Secure Mail’ folder should also appear under your main Program Files directory.
When you open Microsoft Outlook after you have installed the software you should see a new
‘Secure Mail’ option from the main text menu bar.
You will also see a new ‘Secure’ button on the Compose screen.
To validate that your Secure Mail ID is installed correctly, send a test secure message to yourself and open
it by completing the following steps:
1
Compose a message as you normally would and address it to yourself.
2
Click the ‘Secure’ button and the ‘Send’.
3
Enter your Secure Mail Password when prompted.
4
You should receive a secure message in your inbox (as denoted by the lock icon).
5
When you click to open the message you will be prompted for your Secure Mail Password.
6
Once you enter your password the message will be decrypted and you will be able to read it.
Secure Mail User Guide for Microsoft Outlook Express
15 of 31
III) Using Secure Mail
This section of the guide covers the following topics:
Sending a Secure Message
Receiving a Secure Message
Secure Mail Tools and Settings
Interoperating with Other Secure Mail Systems
Uninstalling Secure Mail
Secure Mail User Guide for Microsoft Outlook Express
16 of 31
Sending Secure Mail
Secure Mail enables you to send a secure message to any recipient whether or not they are a secure mail
user. Part of what makes Secure Mail easy to use is that you don’t need to know the answer to this question
before you send your message – the system will look this information up automatically.
To send a secure message, follow these steps:
1
Compose a message and attach any files as you normally would.
2
Click the ‘Secure’ button.
Alternatively use the main menu in Microsoft Outlook by selecting ‘Secure Mail’ … ‘New Secure Mail
Message’ and then composing your message.
3
Click the ‘Send’ button.
If you forget to secure a message you will be prompted by default with a reminder prompt.
Secure Mail User Guide for Microsoft Outlook Express
17 of 31
4
At this point the plugin will automatically check to see if your recipient(s) subscribe to the service. What
happens next depends on what the outcome of this check is.
If one or more of your recipients is detected as NOT being a subscriber you will be prompted to create a
security question and answer for them.
The security question is used to ensure the identity of the recipient and protect the message from being
intercepted by someone other than the intended recipient. Prior to reading the message, the recipient
will be prompted to answer the question you create. If the question can not be answered, the recipient
will not be able to open the message.
If your recipient is already subscribed to the Secure Mail service you will not be required to create a
security question and answer; skip to the next step.
5
Enter your Secure Mail Password and click ‘OK’.
Once you have entered your password the message will be encrypted (or scrambled) and digitally
signed.
Secure Mail User Guide for Microsoft Outlook Express
18 of 31
Tips on Sending Secure Messages
Secure Mail and File Sizes
As a general rule of thumb, when a secure message is encrypted the size of the message will increase by a
factor of 2.5. The final size of the encrypted message is largely dependant on the size and file format of any
attachments.
Size of original message with
attachment(s) in MB
Approximate size of encrypted &
signed message in MB
1
2.5
2
5
3
7
5
12.5
The maximum allowable email size depends on the policy set by your company or email service provider.
For large files you may want to consider using a compression utility such as WinZip and/or sending the
attachments in batches.
Secure Mail User Guide for Microsoft Outlook Express
19 of 31
About the Secure Mail Reminder Prompt
How Does the Prompt Help?
If you have ever forgotten to attach a file before sending an email, you have an idea of why the ‘Send as
Secure Mail?’ prompt can be helpful. Forgetting to secure a confidential email can be much more serious
than forgetting an attachment.
This is why the prompt is on by default; it provides a “safety net” to make sure that messages that should be
secured are. However, some users do not want to be prompted when sending every message, so it is
possible (and simple) to turn this feature off.
Disabling the ‘Send as Secure Mail?’ Prompt
To disable the prompt, you must simply select the ‘Please
don’t prompt me again’ check box when the prompt appears.
Once this is done, it will no longer appear when you send a
message.
Enabling the ‘Send as Secure Mail?’ Prompt
After disabling the prompt, you may decide in the future that you would like to re-enable it for some reason.
In order to enable the prompt, simple select the ‘Prompt for secure mail’ option on the Secure Mail menu.
Secure Mail User Guide for Microsoft Outlook Express
20 of 31
Receiving Secure Mail
There are two ways of receiving a secure mail:
Subscribers of the service receive secure messages directly to their email inbox and simply enter their
Secure Mail Password to open the message.
Non-subscribers are sent a notification message and directed to the Message Pickup Center to retrieve
their Secure Mail. They are prompted to answer a security question set by the message sender in order
to decrypt and open the message.
Receiving as a Subscriber
1
When looking at your Microsoft Outlook inbox, a lock icon next to the sender's display name indicates
the message is secure. Messages remain encrypted in your inbox so even if you leave your computer
unattended only you will be able to access them.
Depending on your version of Microsoft Outlook and how you have configured your Secure Mail settings
you will see one of the following lock icons:
2
Double-click on the message to open it as you normally would.
3
You are then prompted to enter your Secure Mail Password to view the message. Once you have
entered your password click ‘OK’.
Secure Mail User Guide for Microsoft Outlook Express
21 of 31
4
After you have successfully entered your password the message will be displayed. You will notice a
banner with a ‘Verify’ button at the top of the message. Click these buttons to verify the integrity of the
message and the sender.
If you receive message 1, click on the Red Ribbon or the Blue Lock to verify the identity of the sender
and that the message has not been altered after being sent. You can click ‘View Certificates’ to display
the certificate information.
Receiving as a Non-subscriber
Secure messages sent to non-subscribers are encrypted, digitally signed and sent to the Message Pickup
Center to be stored securely until the recipient retrieves it. To retrieve the message, simply follow the steps
below.
1
A Secure Mail notification will arrive in the recipient’s inbox. The message contains some basic
information about the message and a link to open it.
Secure Mail User Guide for Microsoft Outlook Express
22 of 31
Note: Users who do not have email software capable of displaying HTML formatted messages see a
plain text version of the notification.
2
Click the ‘Open message’ link. A new web browser window will open, directing you to the Message
Pickup Center. You will be required to answer the security question defined by the sender to unlock
and view the message.
Note: The number of attempts allowed to answer the security question is three. After three incorrect
answers, the message is locked for a period of three hours before you can try again.
3
By successfully answering the security question, the message will be decrypted and displayed.
Once the message is open, you can verify the integrity of the message and the sender, print, delete or save
it (and any attachments).
Secure Mail User Guide for Microsoft Outlook Express
23 of 31
Secure Mail Tools and Settings
The Secure Mail Tools and Settings console provides the following options:
ID Tools to manage your Secure Mail ID
Password Tools to manage your Secure Mail Password
Plugin Tools to manage your desktop and/or web mail Secure Mail software add-ins
General Preferences
Access to online support content
Accessing the Tools and Settings console
The Tool and Settings console is accessed from the ‘Secure Mail’ option on the Outlook main menu.
Once either of the two access options described above is selected, the Tools and Settings console main
page will appear.
Secure Mail User Guide for Microsoft Outlook Express
24 of 31
ID Tools
This tool allows you to import/recover your secure mail ID(s) and view and manage details about your IDs.
Viewing and Managing Your Secure Mail ID
On the ID Tools main page, click on ‘View/Manage a locally available ID’. Your Secure Mail email addresses
are displayed.
Secure Mail User Guide for Microsoft Outlook Express
25 of 31
Click on the row that contains the email address for which you would like to see the ID properties. Once you
have selected an email address the details of your security credentials, including who issued your ID and the
expiry date will appear.
Exporting your ID
You can export your Secure Mail ID to a PFX file for safekeeping.
1
On the ID Properties page, click ‘Export ID’.
2
Enter your Secure Mail Password, a filename and click ‘Export.’
3
On success, a confirmation message is received.
Secure Mail User Guide for Microsoft Outlook Express
26 of 31
Recovering Your ID
If your ID is compromised in some way, customer support may instruct you to use this tool to recover it.
1
From the ID Tools main page, click ‘Add a Secure Mail ID’. The Secure Mail Activation Wizard is
displayed.
2
Enter your Secure Mail email address and click ‘Next.’ The Secure Mail Account Information dialog box
is displayed.
3
In the box, enter your Secure Mail Password and click 'Next'.
4
A confirmation message will appear once the recovery is complete. Click 'Finish' to close the window.
5
Close Microsoft Outlook and any open messages and then restart it to complete the recovery.
Recovering your ID on startup
In the event your ID is removed or corrupted, this tool automatically prompts you for your email address and
the associated Secure Mail Password so it can recover your ID.
1
Enter your Secure Mail email address and click 'Next'. The Secure Mail Account Information dialog box
is displayed.
2
In the box, enter your Secure Mail Password and click 'Next'.
3
A confirmation message will appear once the recovery is complete. Click 'Finish' to close the window.
4
Close Microsoft Outlook and any open messages and then restart it to complete the recovery.
Secure Mail User Guide for Microsoft Outlook Express
27 of 31
Password Tools
The Password Tools area of the console allows you to:
Change your password
Reset your password in the event you forget it
Enable session only password prompting (only available for Windows XP SP2 users)
Changing Your Password
Once the console is open on the 'Password Tools' page, follow the steps outlined below.
1
Click the 'Change Your Password' button.
2
You will then be prompted to enter your current password and the new password you want to change
to. Confirm the new password and click Save Changes. See Tips on Creating an Effective Password.
3
Once you have changed your password a confirmation screen will appear once the change is applied.
Resetting a Forgotten Password
Once the console is open on the 'Password Tools' page, follow the steps outlined below.
1
Click the 'Forgot Your Password?' button.
2
You will be then prompted with the password recovery question(s) that you created during the initial
activation process.
3
Once you have correctly answered the question(s), you will be able to change your password.
Secure Mail User Guide for Microsoft Outlook Express
28 of 31
Plugin Tools
This area of the Tools and Settings console provides detailed technical information about your Secure Mail
Plugin.
General Preferences
The General Preferences options enable you to change settings for:
Secure Mail Reminder Prompt
Application Event Logging (useful for support purposes)
Permanently Decrypt Message after you have opened / decrypted them.
Secure Mail Format
Secure Mail User Guide for Microsoft Outlook Express
29 of 31
Interoperating with Other Secure Mail Systems
To communicate with a user of another compatible secure email system, you can bypass the security
question and answer creation step when sending a message by adding them as a trusted contact. This
process is also known as key exchange.
Adding a Trusted Contact
To send your public Secure Mail ID (or public encryption key) and a request that someone else send you
theirs, follow the steps below.
1
From the Microsoft Outlook main menu select ‘Secure Mail’ … ‘Add a Trusted Contact’.
2
The following window is displayed with a preformatted email message.
3
Enter the email address of the person that you would like to add as a trusted contact in the ‘To:’ line and
click ‘Send’.
4
Enter your Secure Mail Password and click ‘OK’. At this point the message will be digitally signed with
a copy of your Secure Mail ID (public encryption key) and sent.
5
If the recipient responds to your request, the mail is displayed in your Inbox with a red ribbon icon.
6
When the message is open, right-click on the sender’s display name / email address (in the ‘From’ line)
and select the ‘Add to Outlook Contacts’ to add their public encryption key to your local address book.
Secure Mail User Guide for Microsoft Outlook Express
30 of 31
Uninstalling Secure Mail
To uninstall Secure Mail click the Windows ‘Start’ button … ‘Programs’ … ‘Secure Mail’ …
‘Uninstall Secure Mail’.
Alternatively you can use ‘Control Panel’ … ‘Add / Remove Programs’ … ‘Secure Mail’.
Select the ‘Remove’ option on the screen (as displayed below).
Note: When you uninstall Secure Mail you are given the following option to convert your secure messages to
a Microsoft message format. If you do not do this, you will not be able to access these messages after the
software has been uninstalled.
Secure Mail User Guide for Microsoft Outlook Express
31 of 31