1
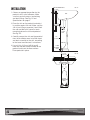
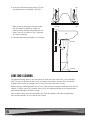
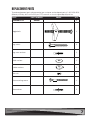
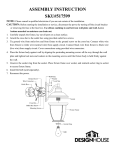
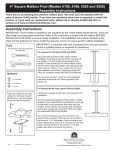
Deluxe Ceramic
Pedestal Sink
Installation Guide
and User Manual
Itm./Art. 734290
Model No. 4SHH001WHI
(QCSHH7001/7002)
ATTENTION
Before beginning installation, read ALL instructions first.
Save these instructions for future use.
CAREFULLY CHECK THE PRODUCT AND ITS COMPONENTS FOR DAMAGE PRIOR
TO INSTALLATION. IF THERE IS ANY DAMAGE OR IF YOU ARE MISSING PARTS,
PLEASE CALL CUSTOMER SERVICE TOLL FREE AT 1-800-459-4409 (Monday to
Friday, 8:30 am to 5:00 pm, EST).
DO NOT RETURN TO THE PLACE OF PURCHASE BEFORE CALLING THE Toll FREE
NUMBER. DO NOT DISPOSE OF PACKAGING UNTIL YOU ARE SATISFIED WITH YOUR
NEW PEDESTAL SINK.
WARNING: Always wear safety goggles and gloves during installation to prevent
personal injury.
CAUTION: Ceramic pedestal sinks are fragile and can break, chip or cause personal injury if
handled carelessly. Please handle your new sink with extra care during installation. Once the sink
is removed from the packaging, always ensure that it is placed on a soft surface such as a towel
or blanket before installation.
CAUTION: This pedestal sink is heavy. Get help lifting and moving it, if necessary.
CAUTION: Do not overtighten connections. Overtightening may break or chip the pedestal sink.
Before you Begin
Observe all local plumbing and building codes. Have a qualified tradesman do or approve your
plumbing installation.
These instructions are for installing the pedestal sink to wood frame construction. For other
installations, provide suitable bracing and fastening devices of sufficient size and strength.
Check that the walls and floor are square, plumb and level before beginning installation.
CONTENTS
TOOLS REQUIRED
Sink x 1
Pencil
Drill
Pedestal x 1
Stud finder
Assembly kit x 1
Carpenter’s level
1/8 in. (3.2 mm)
Drill bit for stud
Toggle bolts x 2
Wrench
Lag screws x 2
Hammer
Lag screw anchors x 2
Caulking
Metal washers x 2
Safety glasses
Rubber washers x 2
Measuring tape
Hex nuts x 2
Floor mounting screws x 2
Floor anchors x 2
2
3/8 in. (9.5 mm)
Drill bit for floor
mounting screws
5/8 in. (15.9 mm)
Drill bit for sheet rock
Specifications
4.02 in.
(102 mm)
8.66 in.
(220 mm)
5.9 in.
(150 mm)
20.47 in.
(520 mm)
27.56 in.
(700 mm)
7.28 in.
(185 mm)
2.98 in.
(76 mm)
2.76 in.
(70 mm)
9.65 in.
(245 mm)
11.8 in.
(300 mm)
5.51 in.
(140 mm)
33.07 in.
(840 mm)
3
INSTALLATION
SINK
SINKMOUNTING
MOUNTINGHOLES
HOLES
1.Choose an appropriate position for the
pedestal sink in your bathroom. Make
sure that you have access to plumbing
and drain fittings. See Fig. 1A and
Specifications on page 3.
SINK
SINK
2.Place the sink on the pedestal and adjust
its position against the wall. Make sure the
sink is level using a carpenter’s level. Mark
the wall and floor with a pencil at each
mounting hole on the sink and pedestal.
See Fig. 1B.
3.Carefully remove the sink and the pedestal
from the installation area. Install the faucet
and drain assembly to the sink, according
to the faucet manufacturer’s instructions.
4. Use a 3/8 in. (9.5 mm) drill bit to drill
holes into the floor where marked for the
pedestal and insert the floor anchors.
Place pedestal in place.
WATER
WATER
SUPPLY
SUPPLY
LINE
LINE
55in.
in.
(127
(127mm)
mm)
PEDESTAL
PEDESTAL
FLOOR
FLOOR
MOUNTING
MOUNTING
HOLES
HOLES
7.28
7.28in.
in.
(185
(185mm)
mm)
SINK
SINKMOUNTING
MOUNTINGHOLES
HOLES
FLOOR
FLOOR
MOUNTING
MOUNTING
HOLES
HOLES
4
FIG. 1A
FIG. 1B
DRILLING INTO A WALL STUD
FIG. 2A
WALL
5. Drill holes in the wall where marked, using
the appropriate method depending on
whether you are drilling into a wall stud
or into sheet rock.
SINK
a. Use a stud finder at the location of the
pencil marks to see if there are wall studs
before drilling holes into the wall.
WALL
b. If the wall studs are in the correct location:
Use a 1/8 in. (3.2 mm) drill bit to drill holes
into the studs.
C B
A1
SINK
MOUNTING
HOLES
If the wall studs are not in the correct
position: Use a 3/8 in. (9.5 mm) drill bit to
drill holes into the wall. Insert the lag screw
anchors into the holes.
WARNING: The weight of the sink must
be stably carried by the pedestal.
c.Place the sink against the wall, making
sure to line up the holes in the sink and
the holes in the wall.
d.Place the metal washer [B], then the
rubber washer [C], over the lag screws
[A1]. Insert the lag screws through the
holes in the sink, then into the holes in the
wall. Tighten into the wall wood studs until
the sink is snug against the wall. DO NOT
OVERTIGHTEN. See Fig. 2A.
DRILLING INTO SHEET ROCK
FIG. 2B
a.Use a 5/8 in. (15.9 mm) drill bit to drill
holes into the sheet rock as marked.
b.Place the sink against the wall, making
sure to line up the holes in the sink and
the holes in the wall.
c.Insert the toggle bolts [A2] through the
holes in the sink and into the holes in the
wall. Add the rubber washer [C] and the
metal washer [B] over the toggle bolts [A2].
See Fig. 2B.
A2
SINK
C B
D
SINK
MOUNTING
HOLES
d.Place the hex nuts [D] over the toggle
bolts [A2] and tighten alternately until the
sink is snug against the wall. DO NOT
OVERTIGHTEN. See Fig. 2B.
5
6.Insert the two floor mounting screws [E] into
the pedestal base and tighten. See Fig. 3.
7.Apply a layer of caulking in the area where
the sink meets the pedestal, where the
pedestal meets the floor and where the sink
meets the wall, as shown in Fig. 4. Remove
any excess caulking.
FIG. 3
E
FIG. 4
CAULKING
SINK
8.Complete plumbing connections, as required.
CAULKING
PEDESTAL
CAULKING
CARE AND CLEANING
For general cleaning, apply a mild, non-abrasive soap and warm water with a soft sponge or
cloth. Do not use abrasive cleaners such as cleaners that contain sand or silica, or abrasive
materials like brushes or scouring pads, as they will scratch the china surface.
Before using any cleaning product on this unit, carefully read the product label to ensure that the
cleaner is safe for use on this material. Always test your cleaning solution on an inconspicuous
area before applying to the entire surface.
Wipe surfaces clean and rinse completely with water immediately after cleaner application.
Do not allow cleaners to sit or soak on the surface.
6
REPLACEMENT PARTS
To order replacement parts, please contact our customer service department at 1-800-459-4409
(Monday to Friday, 8:30 am to 5:00 pm, EST) or email us at [email protected].
Part
Assembly Kit
Part number
SHH001
Image
Qty
1
Toggle bolts
2
Lag screws
2
Lag screw anchors
2
Metal washers
2
Rubber washers
2
Hex nuts
2
Floor mounting screws
2
Floor anchors
2
7
WARRANTY
This product is warranted to the original purchaser to be free of defects in material and
workmanship for twenty (20) years from the date of purchase. This non-transferable guarantee
applies only to the original purchaser and proof of purchase is required for all claims.
Exclusions
Any failure of the unit that is not traceable to a defect in material or workmanship is not
covered by this warranty. These non-warrantable items include, but are not limited to:
• Damage caused by failure to follow installation instructions
• Alterations made to the product after shipping
• Damage resulting from failure to reasonably clean, care for or maintain the product in
accordance with the care and cleaning instructions
• Commercial or institutional use or installation
Warranty claim procedure
If a claimable defect occurs, please fill out a claim form through our website at
www.qualitycraft.com or contact our customer service department at 1-800-459-4409
(Monday to Friday, 8:30 am to 5:00 pm, EST).
Before you make your claim call, please make sure you have:
1.The description of the product
2.Proof of sale
3.Details regarding the defect
4.Name and address of the owner and installer
Claims must be filled out in writing and returned within six (6) months of appearance of defect.
Failure to comply with this stipulation will make the warranty null and void. We reserve the
right to a thirty-day (30) delay following receipt of claim in which to inspect the product. We
assume no responsibility for labor costs or removing/replacing a previously installed product
or transportation or return of a product.
Imported by:
Laval, Quebec, Canada H7C 0A5
1-800-459-4409
www.qualitycraft.com
Made in China
8