1
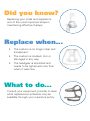
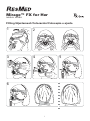
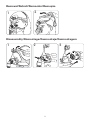
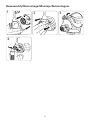
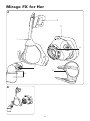
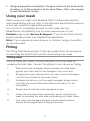
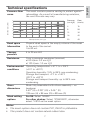
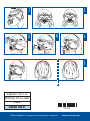
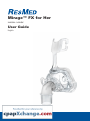
Mirage™ FX for Her
NASAL MASK
User Guide
English
Did you know?
Replacing your mask and supplies is
one of the most important steps in
maintaining effective therapy.
Replace when...
• The cushion is no longer clear and
transparent.
• The cushion is cracked, torn or
damaged in any way.
• The headgear is stretched and
needs to be tightened more than
when it was new.
What to do...
Consult your equipment provider to learn
what replacement schedule may be
available through your insurance policy.
Mirage™ FX for Her
nasal mask
Fitting/Ajustement/Colocación/Colocação e ajuste
1
2
3
4
5
6
Mirage FX
for Her
i
Mirage FX
for Her
Removal/Retrait/Remoción/Remoção
1
2
Disassembly/Démontage/Desmontaje/Desmontagem
1
3
2
ii
Reassembly/Remontage/Montaje/Remontagem
1
2
3
4
iii
Mirage FX for Her
A
2
3
1
4
7
5
6
B
iv
Mask components/Composants du masque/
Piezas de la mascarilla/Componentes da máscara
Item/
Article/
Artículo/
Item
Description/Description/Descripción/Descrição
Part number/
Code produit/
Número de pieza/
Número da peça
1
Mask frame/Entourage rigide/
Armazón de la mascarilla/Armação da máscara
—
2
Forehead support/Support frontal/
Apoyo para la frente/Suporte para a testa
—
3
Cushion/Bulle/Almohadilla/Almofada
62111
62136 (S)
4
Vent/Orifice de ventilation/Ventilación/
Respiradouro
—
5
Headgear/Harnais/Arnés/Arnês
62129
6
Elbow assembly/Ensemble coude/
Conjunto del codo/Conjunto do cotovelo
—
7
Elbow side tabs/Pattes d’attache latérales coude/
Lengüetas laterales del codo/
Abas laterais do cotovelo
—
A
Complete system/Système complet/
Sistema completo/Sistema completo
62128
62109 (S)
B
Frame system/Entourage complet/
Sistema de armazón/Sistema da armação
62112
62137 (S)
S: Small / Petit / Pequeño / Pequeno
v
Nasal MASK
Thank you for choosing the Mirage FX for Her. Please read the entire
manual before use.
Intended use
The Mirage FX for Her channels airflow non-invasively to a patient
from a continuous positive airway pressure (CPAP) or bilevel device.
The Mirage FX for Her is:
•• to be used by patients (> 66 lb/30 kg) for whom positive airway
pressure has been prescribed
•• intended for single-patient re-use in the home environment and
multipatient re-use in the hospital/institutional environment.
WARNING
•• The vent holes must be kept clear.
•• This mask should only be used with CPAP or bilevel devices
recommended by a physician or respiratory therapist.
•• The mask should not be used unless the device is turned on.
Once the mask is fitted, ensure the device is blowing air.
Explanation: CPAP and bilevel devices are intended to be
used with special masks (or connectors which have vent holes
to allow continuous flow of air out of the mask. When the
device is turned on and functioning properly, new air from
the device flushes the exhaled air out through the mask vent
holes. However, when the device is not operating, insufficient
fresh air will be provided through the mask, and the exhaled
air may be rebreathed. Rebreathing of exhaled air for longer
than several minutes can, in some circumstances, lead to
suffocation. This applies to most models of CPAP or bilevel
devices.
•• Follow all precautions when using supplemental oxygen.
•• Oxygen flow must be turned off when the CPAP or bilevel
device is not operating, so that unused oxygen does not
accumulate within the device enclosure and create a
risk of fire.
•• Remove all packaging before using the mask.
1
English
Mirage™ FX for Her
•• Oxygen supports combustion. Oxygen must not be used while
smoking or in the presence of an open flame. Only use oxygen
in well ventilated rooms.
Using your mask
When using your mask with ResMed CPAP or bilevel devices that
have mask setting options, refer to the Technical specifications section
in this user guide for mask setting options.
For a full list of compatible devices for this mask, see the
Mask/Device Compatibility List on www.resmed.com on the
Products page under Service & Support. If you do not have internet
access, please contact your ResMed representative.
Note: If you experience nasal dryness or irritation, using a humidifier
is recommended.
Fitting
The fitting illustrations section in this user guide show the sequence
for obtaining the best fit and comfort when using your mask.
Fitting steps
Prior to fitting your mask, remove the elbow from the mask by
pressing the side tabs. Connect the elbow to your device air tubing.
1.
With both lower headgear straps released, hold the mask
against your face and pull the headgear over your head.
2.
Bringing the lower straps below your ears, loop the headgear
into the lower hooks on the mask frame.
3.
Unfasten the Velcro®, pull the upper headgear straps evenly
until they are comfortable and reattach the Velcro. Do not
overtighten.
4.
Repeat step 3 with the lower headgear straps.
5.
Attach the combined elbow assembly and air tubing to the
mask by pressing the side-tabs and pushing into mask frame.
6.
Your mask and headgear should be positioned as shown.
Ensure the headgear label is facing outwards.
2
Refer to the removal illustrations section in this user guide. To remove
your mask, disconnect one of the lower headgear hooks and pull the
mask and headgear up over your head.
Disassembly
Refer to the disassembly illustrations in this user guide.
Disassembly steps
1.
Unhook the upper headgear straps from the mask frame, there
is no need to undo the Velcro.
2.
Remove the combined elbow assembly and air tubing from the
mask by pressing the side-tabs and pulling away from the mask
frame. Remove the elbow assembly from the air tubing.
3.
Gently separate the cushion from the mask frame.
Reassembly
Refer to the reassembly illustrations in this user guide.
Reassembly steps
1.
Ensure the cushion is oriented correctly by aligning the top
cushion tab with the recess in the top of the mask.
2.
Gently pull the cushion through the front of the mask frame
until the cushion locks securely into the mask frame. The tabs
on either side of the cushion should be sitting against the mask
frame. Ensure the cushion is not twisted or distorted.
3.
Attach the top headgear straps to the mask frame by looping
onto each of the upper headgear hooks.
4.
Replace the elbow assembly into the air tubing and attach
the combined elbow assembly and air tubing to the mask by
pressing the side-tabs and pushing into the mask.
3
English
Removing the mask
Cleaning your mask in the home
Your mask and headgear should only be gently handwashed.
Daily/After each use:
•• Disassemble the mask components according to the disassembly
instructions.
•• Thoroughly clean the separated mask components (excluding
headgear), by gently rubbing in warm (approximately 86°F/30°C)
water using mild soap.
•• To optimize the mask seal, facial oils should be removed from the
cushion after use.
•• Use a soft bristle brush to clean the vent.
•• Inspect each component and if required, repeat washing until
visually clean.
•• Rinse all components well with drinking quality water and allow to
air dry out of direct sunlight.
•• When all components are dry, reassemble according to the
reassembly instructions.
Weekly:
•• Handwash the headgear.
WARNING
Do not use aromatic-based solutions or scented oils (eg,
eucalyptus or essential oils), bleach, alcohol or products that
smell strongly (eg, citrus) to clean any of the mask components.
Residual vapours from these solutions can be inhaled if not
rinsed thoroughly. They may also damage the mask.
CAUTION
If any visible deterioration of a system component is apparent
(cracking, crazing, tears etc), or, if after cleaning, any component
remains unclean, the component should be discarded and
replaced.
4
This mask should be reprocessed when used between patients.
Cleaning, disinfection and sterilization instructions are available from
the ResMed website, www.resmed.com/masks/sterilization/americas.
If you do not have internet access, please contact your ResMed
representative.
Troubleshooting
Problem/possible cause
Solution
Mask is too noisy
Vent is blocked or partially blocked.
If the vent requires cleaning, use a
soft bristle brush.
Elbow incorrectly inserted.
Remove the elbow from the mask
and then reassemble according to
the instructions.
Mask leaks around the face
Mask not positioned correctly.
Gently pull the cushion away from
the face to reinflate. Reposition
your mask according to the
instructions.
Air leaking around the bridge of the nose
Mask is not tightened correctly.
Tighten top headgear straps. Do
not overtighten.
Air leaking around the sides of the nose
Mask is not tightened correctly.
Tighten both upper and lower
headgear straps. Do not
overtighten.
Turn off the CPAP or bilevel device
and remove mask. Refit the mask
according to the instructions.
Ensure you position the cushion
correctly on the face before pulling
headgear over the head.
Do not slide mask down the face
during fitting as this may lead to
folding or curling of the cushion.
5
English
Reprocessing the mask between patients
The mask does not fit properly
Mask is incorrectly assembled.
Disassemble the mask, then
reassemble according to the
instructions.
Cushion may be dirty.
Clean cushion according to the
instructions.
WARNING
•• The technical specifications of the mask are provided for your
clinician to check that they are compatible with the CPAP or
bilevel device. If used outside specification or if used with
incompatible devices; the seal and comfort of the mask may
not be effective; optimum therapy may not be achieved; and
leak, or variation in the rate of leak may affect the CPAP or
bilevel device function.
•• Discontinue using this mask if you have ANY adverse reaction
to the use of the mask, and consult your physician or sleep
therapist.
•• Using a mask may cause tooth, gum or jaw soreness or
aggravate an existing dental condition. If symptoms occur,
consult your physician or dentist.
•• As with all masks, some rebreathing may occur at low CPAP
pressures.
•• Refer to your CPAP or bilevel device manual for details on
settings and operational information.
•• At a fixed rate of supplemental oxygen flow, the inhaled oxygen
concentration varies, depending on the pressure settings, patient
breathing pattern, mask, point of application and leak rate. This
warning applies to most types of CPAP devices.
6
Pressure–flow
curve
The mask contains passive venting to protect against
rebreathing. As a result of manufacturing variations,
the vent flow rate may vary.
Vent flow rate (L/min)
60
50
40
30
20
Pressure
(cm H2O)
Flow
(L/min)
4
19
8
28
12
34
16
40
20
45
10
0
4
6
8
10
12
14
16
18
20
Mask pressure (cm H2O)
Dead space
information
Physical dead space is the empty volume of the mask
to the end of the swivel.
It is 93 mL.
Therapy
pressure
4 to 20 cm H2O
Resistance
Drop in pressure measured (nominal)
at 50 L/min: 0.2 cm H2O
at 100 L/min: 1.0 cm H2O
Environmental
conditions
Operating temperature: +41°F to +104°F
(+5°C to +40°C)
Operating humidity: 15% to 95% non-condensing.
Storage and transport: -4°F to +140°F
(-20°C to +60°C)
Storage and transport humidity: up to 95% noncondensing.
Gross
dimensions
Mask fully assembled with elbow assembly – no
headgear.
5.43“ (H) x 3.38“ (W) x 3.46 “ (D)
138 mm (H) x 86 mm (W) x 88 mm (D)
Mask setting
options
For S9: Select ‘NASAL’
For other devices: Select ‘STANDARD’, otherwise
select ‘VISTA’ as the mask option.
Notes:
•• The mask system does not contain PVC, DEHP or phthalates.
•• This product does not contain natural rubber latex.
7
English
Technical specifications
•• The manufacturer reserves the right to change these
specifications without notice.
Storage
Ensure that the mask is thoroughly clean and dry before storing it
for any length of time. Store the mask in a dry place out of direct
sunlight.
Disposal
This mask does not contain any hazardous substances and may be
disposed of with your normal household refuse.
Symbols
The following symbols may appear on your product or packaging.
Caution, consult accompanying documents;
REF
Catalogue number;
limitation;
LOT
Batch Code;
Temperature limitation;
Does not contain natural rubber latex;
Humidity
Manufacturer;
Indicates a Warning or Caution and alerts you to a possible
injury or explains special measures for the safe and effective use
of the device;
Keep away from rain;
handle with care;
This way up;
Fragile,
European Authorized Representative;
Prescription only (In the US, Federal law restricts these devices to
sale by or on the order of a physician.)
8
ResMed Ltd (hereafter ’ResMed’) warrants that your ResMed mask
system (including mask frame, cushion, headgear and tubing) shall
be free from defects in material and workmanship from the date of
purchase for the period of 90 days or in the case of disposable masks
the maximum use period.
This warranty is only available to the initial consumer. It is not
transferable.
If the product fails under conditions of normal use ResMed will
repair or replace, at its option, the defective product or any of its
components.
This limited warranty does not cover: a) any damage caused as
a result of improper use, abuse, modification or alteration of the
product; b) repairs carried out by any service organization that has not
been expressly authorized by ResMed to perform such repairs; and
c) any damage or contamination due to cigarette, pipe, cigar or other
smoke.
Warranty is void on product sold, or resold, outside the region of
original purchase.
Warranty claims on defective product must be made by the initial
consumer at the point of purchase.
This warranty replaces all other expressed or implied warranties,
including any implied warranty of merchantability or fitness for a
particular purpose. Some regions or states do not allow limitations on
how long an implied warranty lasts, so the above limitation may not
apply to you.
ResMed shall not be responsible for any incidental or consequential
damages claimed to have resulted from the sale, installation or use
of any ResMed product. Some regions or states do not allow the
exclusion or limitation of incidental or consequential damages, so
the above limitation may not apply to you. This warranty gives you
specific legal rights, and you may also have other rights which vary
from region to region. For further information on your warranty rights,
contact your local ResMed dealer or ResMed office.
9
English
Limited warranty
Manufacturer:
ResMed Ltd 1 Elizabeth Macarthur Drive Bella Vista NSW 2153 Australia.
Distributed by:
ResMed Corp 9001 Spectrum Center Boulevard San Dieago CA 92123 USA.
ResMed (UK) Ltd 96 Milton Park Abingdon Oxfordshire OX14 4RY UK.
See www.resmed.com for other ResMed locations worldwide.
Mirage FX for Her
Protected by patents: AU 785376, EP 1314445, EP 1582230, HK 1057714, JP 4354664, JP
4607913, US 6581594, US 6823865, US 7159587. Other patents pending.
Protected by design registrations: AU 336564, AU 336565, AU 336566, AU 336567,
AU 336568, CN 201030631361.9, EU 1781709, NZ 414291, NZ 414683, NZ 414684,
NZ 414685, NZ 414686. Others pending. Mirage is a trademark of ResMed Ltd and is
registered in U.S. Patent and Trademark Office.
© 2011 ResMed Ltd.
2
1
3
4
5
6
Mirage FX
for Her
Mirage FX
for Her
628024/1 2011-10
MIRAGE FX for HER
USER
AMER ENG
628024
Global leaders in sleep and respiratory medicine www.resmed.com