1
0123004
!"#$
56789
01232456
01232456,0178
%&'()*+,-./
Table of Contents
Note: Pages 3 - 4, 10 - 12 and 16 - 17 are omitted in this document
1
General………………………………………………………………………………….………………………………..5
2
Visual Check…………………………………………………………………………………..………………..……..6
3
Indicator Lights and audible Signal……….…………………………………………………….….……….7
4
Power supply adequacy…………………………………………………………………….………….…………9
5
Yearly Calibration Documentation: Please Fax Copy to Sirona 1-888-297-8631……...13,14,15
6
Adjusting / calibrating the system………………………………………………….…………….……....18
7
9.1
System adjustment menu…………………………………………………...18
9.2
Diaphragm Image/GALILEOS diaphragm adjustment….….…...20
9.3
Diaphragm image/GALILEOS GAX5 diaphragm adjustment.…23
9.4
Checking the beam field……………………………………………….....….26
9.5
Dosimetry……………………………………………………………………..…….27
9.6
Sensor calibration……………………………………………..…………………28
9.7
Iris calibration……………………………………………...…….…………...….29
9.8
Shading calibration……………………………………….……………..…..….30
9.9
Distortion calibration…………………………………………..………….…..31
9.10
Geometric calibration…………………………………….……………...……32
Checking the laser……………….……………………..…………………………………………..…….………33
012345678495
60986
514984548649291346 0
WC×A?AF=P
bX 8923855415
63
8634982c6378
6d00e6
06d26)($6^"63
8c6326861L5
849''
¦H§AFC̈G©©PªC«RAQG=Bª
2365286955969586 06986382832548616146
532754864195601234563818159134c654657865986334826
33
6832638254849
61495
59134616884915
'
2586I87825
6J8283254860954752768326715943916h:256
419c63786386I87825
6e89
59134c6219
86)"6[Iec60553:
9826¬c654759865465786598633482633
'
G@ªC®ªBPA
¯89488468°3328651495146596
85965633
:38869186i593:
59168°33286
3Y598c68863825914964929134654:
5
j'
±©AF=@>?²CD?E@FGB@>H?E
72149685288496547634923
6196164885269368482:
91³8632678:848291³869586419'6I3265
6338259149698363
8586
288826936958638259149649291346545
'
®«´ND±µC§>@OC¦®C¶H=FRE·
6J[63527652868199876419568
892341633348496841:
91L869368
89239591671552986i07j'64654684L12348496386
3L14963833
868
892395916552986528645L3175
86786936
8219134658766
395149c652389149689'
+,-./01
23695614633
1548641956958670628612884969586
06968651495148765445
683
34149675986386
1495
59134'
961695862833411
1963869586826936142869559695868613:
849616514951487641956958654859282;6283847876
<=>?@A?=?BACD?E@FGB@>H?E69361428633
15486419569586
I87825
6J82832548609547527'
25865485928265476958658
82K1495
826528628
18L876
82362833411
1961469538658645828643433
15486
4195695869547527628
968236958682;6851
28693655L869586
54859282;6283847876514984548638283287'
2586595
6514984548614389134654763486849682:
L1869686533
158766569251487682L1854'6M81:
958269586143891346432682L1861635296386958686138496452:
2549'
NABO?>B=PC>?E@FGB@>H?ECFAQG>FAR
3825914964929134
082L186545
D?E@FGSA?@EC=?RC=RTGE@SA?@C@HHPECFAQG>FAR
6852149678L1869686195
86832685288496
3469586514633984915
'
251614
78695863
8634982'
2516854U66L3
95986386"(((6V68948846563448913465476
9234769686331
8'
WX 719195
6
9189826I
Y86#&6ZZZ6326861L5
849'
25U
7[6L3
959\]^6('"6_6386285714963
6('()_638625498
7[6228`a]^6('%6_6386285714963
6('"_638625498'
¸l¹srtm
{yxzx|{~~
x{º{xx|y{}w{{|{|}{w~x
»¼~w{}~x{y|{v~yw{v{|}xy{x
xw
½lpmrmn
x|y~{¾}¿{À~Á~yÂ
»¼~w{|y{|{uÃÃ{vxºyx{x|
{~{wx|
{
|}x{|xw|{x~w{|{|}x{|xw|{|w
M
II
fX 7g98496896419565
1948496933
68326h:256856c69896
3Y654764887
86355493678
1L82876419569586419c6i:
klmnop
9382;63233829j'
ÄÅÆÇÈÉÊËÇÌÉÇÍÅÍÎqÏÐÑÉÌÎÇqÐÍÒÓÔÕÖ
klmnopqplkrlsrtm
uvwxyzx{|}x{y~~|{y|x|{
x{xw{~w{|x{{
|}x{uxy~|
{w|y|w{~~
y~~|{w{x||x{~w{
{~w{|}x{yxx~wx{v||{w{x
yxwwx
}x{y~{~|y{w|{
}|{{{|}x{~w~{
¡ ¡¢¡¡£¤¥¤
!"6"!6#"$67$%$&
7$%$&'"($'("'($'()
*
0123456789
77
7
UKVIEWGHKXYMZ[
!"##$%
$\
2>
#5
0 #12345622547
2-
8 92322:44524!64%42;44<=
>55?
8 @!A
8 @!"44
"4A!>3A!53
!2426!6-B!
CDEFGHHGFIJDKLMNJOFPQGOOGDFRKSGEENJOFT
,
&''&('))*)+
)*)+-'.)-.'-.)-./
012345678495
60986
%51498454&86'492(&91346)*'*+,0
mCN@cA]\BdZCFA_`BXC\@cC\WcAnoYCpA_@\o
!"#$"
s8
8586(9934
s5Q159134614Q1&5932 U4196,O6*+7
,O
,tt
u\c
vwxyz s8398
k23V3
^
789:;<=
G\Xbu\c
ir )
q
> ?@ABCDECFGHI
78J2869K865146L19&K6149369K86MNM6J31913469369(246(4196
,O36
PK86(41965QR(96198
S65(93591&5
T6L519653(96
.14(983
PK86MU4196,O6*+7M61469K86(JJ82621VK96&3248263S69K86WXYZC
A@BYZ[\]YCL1
69K84614Q1&59869K5969K86(419616,O3
> ^YXBA@_CB`YCaYbXC\@cCB`YC[W@]BAd@XCd@CB`YCWXYZCA@e
BYZ[\]Y3
f gK8469K86K81VK965QR(98496165Q869K86
3(Qh
J85i826K3(
Q6K(3
f 'S6283986161495
8QT698969K86283986i8654Q6Q1h
J
561465QQ191343
f PK8628
8586(99346(96439686Q8S8&91j8632623i843
08865
36,J825914V6'492(&91346(4Q826Mk28J5214V69K86+lJ3h
(28M6(&K5J9826M0L19&K14V69K8698634M3
-.6.-6/.0670102
701023.4034.340345
6
0123456789
47
623
634
426
! "!#$
%&'(&")*'*+,
³¶À¼»½¾°Á»º¶°Ã»¾¶µ
®¯°
ª¬
±ª²
®¯°
©ª«¬
½¼
¿·
½¾°
»
¼
¹
º»
±¹
°
¶
¸
·
¶
®´µ
W>;B9ÄÅ<@BAÆÄ?@
NHH&
§,¨*+
¦U4
¤
N(MN
Y<ZM (#!(
ÇÈÉÉÊWË
§,¨*+
NHH&
M\ !)
¥
N(MN
Y<ZM (#!(
ÇÈÉÉÊWË°ÁªÌÍ
7 89:;<9<;=>?@AB;C
D EFGH!(#GIJ'KL
I (MNO4
7 ;BBA><9<;=>?@AB;<Y<;9
9<;9AB;
D + #GPI(H Q'+E'
RS4
D ,#Q&FKK!K!P4!4#
T!HHI #! U
PI(J(!&PI(#&MUO4
,IU'(&4
D
U!#Q4
D G<VWXPI(IU!( UGY<ZM4
D &3[M\]X^!) (UY<ZM4
_`abcded`_f̀gfha
i _jkljmmenojeljwjumjesrnnqtertnxwelu{ewxonmerkeutve
mrsmjrjtnw{eljwjumjeienojejpkqmrljeyrmne
njlyxtunjexyyjvxunjw{|egojeluvxunxqtextvxzunqle
_`abcded`_f̀gfha
wxonmerk|
i _jkljmmenojejpkqmrljesrnnqteutveoqwvertnxwenoj
jpkqmrljenjlyxtunjmeurnqyunxzuww{|e
i gojejpkqmrljejtvme}ojtenojelqnunxqteutveluvxunxqte
_`abcded`_f̀gfha
urnqyunxzuww{em}xnzoeq~~|
_j
~
j
z
wxonextvxzunqlm
i gojeluvxunxqtextvxzunxqteyrmnewxonerkevrlxtenoje nxje
¡
jpkqmrljekjlxqv|e
goj
e
rm
j
l
e
x
m
e
tqn
i xyrwnutjqrmw{euteurvxswjesjjkeyrmnemqrtveunenoje uljeyuvj£ ekjlyxnnjvenqermjenojertxn¢ertnxweljkuxlme
rtxn|
3
-..-/.00102
01024.5045.450456
012345678495
60986
!51498454"86#492$"91346%&#&'(0
lFÄHÅENFqsOOBÆFKMEÇsK Æ
RS
\S
bÉÉFÊËÌ
bS
d
Èj
Èj
g23P/
%
Í
_R
h] %
i
: ;36<89821486=3>826$==
65<8?$5"@69A86BCDEFGHBIJ
KLEFMNHO6<$214P68Q=3$286$968685$28</
RS T86$286=3>82616<1"3448"98<65969A86"84925
6<1921$U
91346=548
V6
: W83X86Y23496"3X826ZY326<8951
6886082X1"86!54$5
[/6
\S 08
8"96,00]%^6
1486X3
95P86254P86346$
9189826/
^3448"9685$214P6
85<6936982145
6_R@6̀654<6a/
bS ^3448"96=3>82654<6>19"A6$4196(c6d/
e5196*614/6Y3268
YU5<f$984963Y69A86$419/
g286h86iFj6936289$246kU2569$86A85<6149369A86141915
6
=319134/
lS '95
1A68Q=3$286285<1486X1560#7'k#0mn/6
oS 08
8"96pCLpEqIFErOHqsNEFBEGEBF8/P/6tuh]vwt%
xyz{|}~
)*6*)6+*,67,-,.
7,-,./*0,/0*/0,/01
3456789
d
_R
&1486X3
95P8@6436
35<Î !5Q/6=8211
86
1486X3
95P86
<23=Î
Ð]
*+06Ï610+]
+]
10+6Ï61,0]
./Ñ]
1,06Ï61-0]
.]
1-06Ï61)-]
iE HNMFNEKMCDL/6
: ;$246$4196(¡¡/66
: W83X8689826
85<654<628Y196"3X82/
¢
£¤¥¦£§¨©ª
«¬®§°̄®§±²³̄´®µ¶§°̄¨¯§¨·§¨©®¸²¨¯®§¹³º®µ§²¹¹»¼§´²¯§½®§
¬·¯¨»»®©¾§¿®À®µ§³̄§Áµ®ªÂ·¯¨»»¨¯¬³·§Â·µ̄²±¯¬³·¾§
¦¦£Ã
2
03=A9
1=323354B56718469:54;9<=1:71;>31?35@9831
012345678495
60986
852
65
12591346698682186841488263269860628826936986514984548649291346
CDEFGDHIJKLLKMNHOIPIQROESIFKITNDKHRU
V3=354619=W<5X4;9<=1W<51;>31?35@98313=A9=335
Y86ZZ[\06]35@9831^4=_466\2`826a3%6 6!6!61614`1b845
86326b82321469865
1259134%6
636986
8528628c128`63269865
125913465286̀8218`698286146986d5b982ed5
1259146986419%f
g2982328h6986\b825914649291346i165868846bb
18`69389826i1969864196528628c128`%
n
)*+,-./
jklm
o=14pp9;9<=1;<1;>314==_4618>38q1:71;>31?7?;3X1<r=351<51<;>3514_;><59s3p1t35?<=?u14173456718469:54;9<=1
X_?;146?<1:31t35W<5X3p1:71;>31?35@98313=A9=335v
03
`61968648852693628b
586̀8891863b3484965
346i196b5296w896936i852h691696865288`6
b2813
6i19698693826326̀8495
6b25918695%
6
xyz{|z}~z~}x{z|}}|~{}
{}
713491459134636b5286b5296̀8
18218
g32685698h6986b5286b5296̀8
1821865286̀1349148`659826568295146b8213`636918%6Y869863i4826i1
6
8628b341
8632658928
8549651
28636986i1634914861463b82591346598269596918654`6546436
34826868218`6̀869361146b5286b529%
_?;<X351p4;4
_?;<X35
4?;1=4X3
95?;1=4X3
];533;
<?;18<p31189;7
><=3
0b586326b25918695b
6!6!""676"#"$
76"#"$%&!%& %&"%&
'(
01234567248932
86956
1613871618113636
16631136
6
1628
12716
37
86
83261
2465
169
&'()*+',)-./,01/23+'4/5-),
677177)-./23+'4/189:75+17
@',1/1
136
A5123
1
238782741662
8
62B2C46
1
6DEF6
11761
8
3236
31264DEF
121G61
8711H6G2
6 6
I1
11266
183148B761DEF
626246
11861
13
35876DEF
1626246
1367248932
86DEF6
1161387162246
3867248932
86DEF6
1161387162246
JKLMNOPQ7248932
86DEF
1161387162246
RNSTUVSNUOQ7248932
86DEFQ
1161387162246
11
38767248932
8QWXFQ
1161387162246
Y248932
866
773116DEFQ
1161387162246
6-7;1+/<517,):-7/;),0/417/=>/:+/-:/=?>
66Z6Y3317
624
[
%
14
6!6!""66"#"$
012345678495
60986852
65
12591346698682186841488263269860628826936986514984548649291346
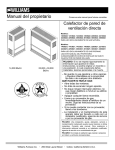
()*+,-./0.12/3-24-56742*570865/0).
9864:82148:63412695968;86568<8:6986419632698653862198215654:695968;865654:8:6
38269864196146
6491345
634:19134==
HF
IF
JF
KF
LF
MF
NF
OF
PF
HQF
HHF
HIF
HJF
HKF
B0
),/60*2
C35
./),
D-60572E)FA
(0
G/./
)6),
G0).2 E5,-A
C35
D-60572E)FA
(-57-6A
D01.5/+6-A
!"#$%&'
>-56 (5
*3-/-*2@)?
A
15
9 Adjusting / calibrating the system
9.1 System adjustment menu
9
Sirona Dental Systems GmbH
Maintenance Instructions GALILEOS
Adjusting / calibrating the system
1.
2.
3.
SERVICE
menu tab
Message
window
Preview
Image
Tools pictogram
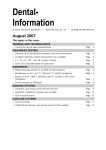
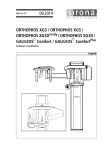
9.1 System adjustment menu
The SERVICE FUNCTIONS menu (1.) will guide you through
the calibration process. This service routine is started from
SIDEXIS XG:
UTILITIES Æ CONSTANCY TESTÆ 3D Æ (SELECT X-RAY
DEVICE) Æ SERVICE EXPOSURE Æ password query Æ
(SELECT X-RAY COMPONENT) Æ SERVICE FUNCTIONS menu
The queries SELECT X-RAY DEVICE and SELECT X-RAY
COMPONENT will only appear if several units are set up in
SIDEXIS XG.
i
NOTE
The SERVICE FUNCTIONS menu is password-protected. As
password, enter the first four digits of the current system
date (PC) in reverse order.
Example: On 05/30/2004, the service password is 5003
i
NOTE
When you open the SERVICE FUNCTIONS menu, the unit
switches from the user mode to the PC service mode
logged by the PC.
For GALILEOS:
This mode is displayed on the Easypad via the PC service
image (2.).
For GALILEOS GAX5:
This mode is displayed on the Multipad via the "SERVICE"
display (3.).
.
18
Status column
In PC service mode, the control options that are available
on the control panel are determined by SIDEXIS XG and the
currently selected service routine. General control of the
unit by means of the control panel (as in the user mode) is
not possible in this mode.
The SERVICE FUNCTIONS menu contains 9 sub-menus
that can be selected using the menu tabs.
The tools pictogram shows which (if any) test phantom
should be used for this particular adjustment step.
The message window displays text messages regarding
the adjustment process..
To the right of the menu you can see the status column.
This column contains information about the system's current calibration state.
9
green
and
checked
valid data record,
calibration is in progress.
green
calibration data record present, calibration has not been performed, calibration
might not be sufficient.
No calibration required!
Calibration required!
red
invalid data record or no record present
Calibration required!
To quit the SERVICE FUNCTIONS menu, click CANCEL.
61 16 813 D3437
D3437.103.01.04.02
Sirona Dental Systems GmbH
Maintenance Instructions GALILEOS
GALILEOS
9 Adjusting / calibrating the system
9.1 System adjustment menu
GALILEOS GAX5
Preview image
båÖäáëÜ
The DIAPHRAGM and SHADING submenus each contain a
preview image that symbolizes the exposure to be taken
during the calibration step.
Due to the varying geometry of the GALILEOS and the
GALILEOS GAX5 diaphragms, the preview images
displayed in these sub-menus differ slightly (see
illustrations above).
We use only the display of the GALILEOS in these
instructions, unless explicit reference is made to the
GALILEOS GAX5.
To quit the SERVICE FUNCTIONS menu, click CANCEL.
61 16 813 D3437
D3437.103.01.04.02
19
9 Adjusting / calibrating the system
9.2 Diaphragm exposure
Sirona Dental Systems GmbH
Maintenance Instructions GALILEOS
3.
R
1.
WAIT!
UNTIL UNIT IS IN STARTING POSITION
4.
2.
5.
C
A
Adjustment: not OK
B
Adjustment: OK
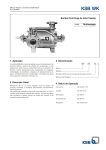
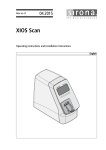
9.2 Diaphragm exposure
5.
9.2.1 GALILEOS diaphragm adjustment „Type 2“
•
Open the SERVICE FUNCTIONS menu.
1.
Select the DIAPHRAGM sub-menu.
2.
Make SIDEXIS XG ready for exposure:
Click IMAGE ACQUISITION
The exposure dialog box showing the exposure status
appears in SIDEXIS XG.
Service routine S030.5 is displayed on the Easypad
touchscreen.
3.
Press the R key to move the unit back to the starting
position.
4.
Press the release button. Hold down the release button
until image acquisition is completed and the acoustic
signal for end of exposure (double beep) sounds.
20
i
Evaluate the image.
– The brightness distribution along the border
surrounding the image on all sides must be uniform (A).
– The distance from the lower edge to the lowest
point in the image must be within the tolerance
range (inside the auxiliary lines) (B)
NOTE
If the distance between the bottom edge and the lowest
point in the image is out of tolerance (B) or the brightness
distribution along the surrounding border is not uniform (C),
the diaphragm must be adjusted mechanically (see Service
Manual).
6.
If the exposure is OK (A+B), confirm this by clicking the
check box underneath the message window.
The box will appear checked.
61 16 813 D3437
D3437.103.01.04.02
9 Adjusting / calibrating the system
9.2 Diaphragm exposure
Sirona Dental Systems GmbH
Maintenance Instructions GALILEOS
3.
R
1.
WAIT!
UNTIL UNIT IS IN STARTING POSITION
4.
2.
D
C
A
Adjustment: OK
Adjustment: not OK: diaphragm not centered
båÖäáëÜ
5.
Adjustment: not OK: diaphragm too small
B
9.2.2 GALILEOS GAX5 diaphragm
adjustment „Type 2“
•
Open the SERVICE FUNCTIONS menu.
1.
Select the DIAPHRAGM sub-menu.
2.
To make SIDEXIS XG ready for exposure:
Click IMAGE ACQUISITION
– The distance from the lower edge to the lowest
point in the image must be within the tolerance
range (B)
– The brightness distribution along the
surrounding border must be uniform (A).
A shadow in the image indicates horizontal or
vertical displacement of the diaphragm.
– No surrounding gray shadow should be visible
(D). A surrounding gray shadow in the image
indicates that the diaphragm is too small.
The exposure dialog box showing the exposure status
appears in SIDEXIS XG.
Service routine S030.5 is displayed on the Multipad.
3.
Press the R key to move the unit back to the starting
position.
4.
Press the release button. Hold down the release button
until image acquisition is completed and the acoustic
signal that indicates the end of the exposure (double
beep) can be heard.
5.
Evaluate the image.
– The brightness distribution along the border
surrounding the image on all sides must be
uniform (A).
61 16 813 D3437
D3437.103.01.04.02
i
NOTE
If the distance between the bottom edge and the lowest
point in the image is out of tolerance (B) or the brightness
distribution along the surrounding border is not uniform (C)
or a surrounding gray shadow is visible in the image (diaphragm opening too small) (D), the diaphragm must be adjusted mechanically (see Service Manual).
6.
If the exposure is OK (A+B), confirm this by clicking the
check box underneath the message window.
The box will appear checked.
21
9 Adjusting / calibrating the system
9.2 Diaphragm exposure
Sirona Dental Systems GmbH
Maintenance Instructions GALILEOS
2.
4.
R
1.
WAIT!
UNTIL UNIT IS IN STARTING POSITION
5.
3.
6.
A
C
Adjustment: not OK
B
Adjustment: OK
9.2.3 GALILEOS diaphragm adjustment „Type 3“
•
1.
2.
3.
4.
Open the SERVICE FUNCTIONS menu.
Select the DIAPHRAGM sub-menu.
The DIAPHRAGM OPEN button in the IMAGE ACQUISITION group is selectable.
"Open diaphragm" diaphragm setting
Set the rotary knob on the tube assembly to the "open
diaphragm" position.
Bring SIDEXIS XG into exposure readiness for the
exposure in the "open diaphragm" diaphragm position:
Click the DIAPHRAGM OPEN button.
The exposure dialog box showing the exposure status
appears in SIDEXIS XG.
Service routine S030.5 is displayed on the Easypad
touchscreen.
Press the R key to move the unit back to the starting
position.
5.
6.
i
NOTE
If the distance between the bottom edge and the lowest
point in the image is out of tolerance (B) or the brightness
distribution along the surrounding border is not uniform (C),
the diaphragm must be adjusted mechanically (see Service
Manual).
7.
22
Press the release button. Hold down the release button
until image acquisition is completed and the acoustic
signal that indicates the end of the exposure (double
beep) can be heard.
Evaluate the image.
– The brightness distribution along the border
surrounding the image on all sides must be
uniform (A).
– The distance from the lower edge to the lowest
point in the image must be within the tolerance
range (inside the auxiliary lines) (B).
If the exposure is OK (A+B), confirm this by clicking the
check box underneath the message window.
The box will appear checked.
61 16 813 D3437
D3437.103.01.04.02
9 Adjusting / calibrating the system
9.2 Diaphragm exposure
Sirona Dental Systems GmbH
Maintenance Instructions GALILEOS
2.
1.
4.
R
WAIT!
UNTIL UNIT IS IN STARTING POSITION
5.
3.
D
C
A
Adjustment: OK
Adjustment: not OK: diaphragm not centered
båÖäáëÜ
6.
Adjustment: not OK: diaphragm too small
B
9.2.4 GALILEOS GAX5 diaphragm
adjustment „Type 3“
•
1.
2.
3.
4.
5.
Open the SERVICE FUNCTIONS menu.
Select the DIAPHRAGM sub-menu.
The DIAPHRAGM OPEN button in the IMAGE ACQUISITION group is selectable.
"Open diaphragm" diaphragm setting
Set the rotary knob on the tube assembly to the "open
diaphragm" position.
Bring SIDEXIS XG into exposure readiness for the
exposure in the "open diaphragm" diaphragm position:
Click the DIAPHRAGM OPEN button.
The exposure dialog box showing the exposure status
appears in SIDEXIS XG.
Service routine S030.5 is displayed on the Easypad
touchscreen.
Press the R key to move the unit back to the starting
position.
Press the release button. Hold down the release button
until image acquisition is completed and the acoustic
signal that indicates the end of the exposure (double
beep) can be heard.
61 16 813 D3437
D3437.103.01.04.02
6.
i
Evaluate the image.
– The brightness distribution along the border
surrounding the image on all sides must be
uniform (A).
– The distance from the lower edge to the lowest
point in the image must be within the tolerance
range (B)
– The brightness distribution along the
surrounding border must be uniform (A).
A shadow in the image indicates horizontal or
vertical displacement of the diaphragm.
– No surrounding gray shadow should be visible
(D). A surrounding gray shadow in the image
indicates that the diaphragm is too small.
NOTE
If the distance between the bottom edge and the lowest
point in the image is out of tolerance (B) or the brightness
distribution along the surrounding border is not uniform (C)
or a surrounding gray shadow is visible in the image (diaphragm opening too small) (D), the diaphragm must be adjusted mechanically (see Service Manual).
7.
If the exposure is OK (A+B), confirm this by clicking the
check box underneath the message window.
The box will appear checked.
23
9 Adjusting / calibrating the system
9.2 Diaphragm exposure
Sirona Dental Systems GmbH
Maintenance Instructions GALILEOS
8.
10.
R
WAIT!
UNTIL UNIT IS IN STARTING POSITION
11.
9.
12.
A
B
B
Adjustment: not OK
A
Adjustment: OK
9.2.5 Diaphragm adjustment „Type 3 Upper jaw"
1.
Set the rotary knob on the tube assembly to the
"maxillary exposure" position.
2.
Bring SIDEXIS XG into exposure readiness for the
exposure in the "upper jaw" diaphragm position:
Click the UPPER JAW button.
The exposure dialog box showing the exposure status
appears in SIDEXIS XG.
Service routine S030.5 is displayed on the Easypad
touchscreen.
3.
Press the R key to move the unit back to the starting
position.
4.
Press the release button. Hold down the release button
until image acquisition is completed and the acoustic
signal that indicates the end of the exposure (double
beep) can be heard.
24
5.
i
Evaluate the image.
– The distance from the upper edge of the lower
lead diaphragm must be within the tolerance
range, i.e. inside the auxiliary lines (A).
NOTE
If the edge is outside of the tolerance range (B), the
diaphragm must be adjusted mechanically (see Service
Manual).
6.
If the exposure is OK (A), confirm this by clicking the
check box located to the right of the UPPER JAW
button.
61 16 813 D3437
D3437.103.01.04.02
9 Adjusting / calibrating the system
9.2 Diaphragm exposure
Sirona Dental Systems GmbH
Maintenance Instructions GALILEOS
14.
16.
R
WAIT!
UNTIL UNIT IS IN STARTING POSITION
17.
15.
A
C
B
båÖäáëÜ
18.
B
Adjustment: not OK
A
Adjustment: OK
9.2.6 Diaphragm adjustment „Type 3 Lower jaw"
1.
Set the rotary knob on the tube assembly to the
"mandibular exposure" position.
2.
Bring SIDEXIS XG into exposure readiness for the
exposure in the "lower jaw" diaphragm position:
Click the LOWER JAW button.
The exposure dialog box showing the exposure status
appears in SIDEXIS XG.
Service routine S030.5 is displayed on the Easypad
touchscreen.
3.
Press the R key to move the unit back to the starting
position.
4.
Press the release button. Hold down the release button
until image acquisition is completed and the acoustic
signal that indicates the end of the exposure (double
beep) can be heard.
61 16 813 D3437
D3437.103.01.04.02
5.
i
Evaluate the image.
– The distance from the lower edge of the upper
lead diaphragm must be within the tolerance
range, i.e. inside the auxiliary lines (A).
NOTE
If the edge is outside of the tolerance range (B), the diaphragm must be adjusted mechanically (see Service Manual).
6.
If the exposure is OK (A), confirm this by clicking the
check box located to the right of the LOWER JAW
button
The box will appear checked.
25
9 Adjusting / calibrating the system
9.3 Checking the radiation field
1.
Sirona Dental Systems GmbH
Maintenance Instructions GALILEOS
2.
2.
3.
A
4.
B
R
WAIT!
UNTIL UNIT IS IN STARTING POSITION
5.
9.3 Checking the radiation field
i
NOTE
Illumination must be checked once the diaphragm has been
adjusted.
1.
Clip distortion phantom A onto the X-ray detector cover.
2.
Go to the RADIATION FIELD sub-menu.
3.
Make SIDEXIS XG ready for exposure:
Click IMAGE ACQUISITION
The exposure dialog box showing the exposure status
appears in SIDEXIS XG.
Service routine S002.6 is displayed on the control panel.
4.
5.
26
Press the R key to move the unit back to the starting
position.
Press the release button. Hold down the release button
while checking the distortion phantom.
Lighting strips B on the distortion phantom must not
light up!
i
NOTE
If the strips on the phantoms light up at all it means overexposure of the system, and you cannot continue adjustment.
In this case, repeat the diaphragm adjustment procedure
and then check the radiation field again. If the lighting strips
still light up during the re-check of the radiation field, contact
the SIRONA Customer Service Center (KSC) to solve the
problem.
To confirm that the lighting strips on the distortion phantom
do not light up, click the check box underneath the message
window.
•
The box will appear checked.
•
Continue the calibration procedure with dosimetry.
i
NOTE
Leave the distortion phantom on the unit for the next calibration step.
61 16 813 D3437
D3437.103.01.04.02
9 Adjusting / calibrating the system
9.4 Dosimetry
Sirona Dental Systems GmbH
Maintenance Instructions GALILEOS
2.
1.
4.
båÖäáëÜ
3.
R
WAIT!
UNTIL UNIT IS IN STARTING POSITION
5.
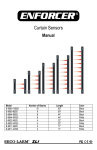
9.4 Dosimetry
i
6.
5.
NOTE
A dose measurement device (e.g. Mult-O-Meter type 510L)
is required for dosimetry.
The distortion phantom should be clipped onto the X-ray detector cover during the dose measurement process for protection against scratching.
1.
Go to the DOSE sub-menu.
2.
Attach the Mult-O-Meter sensor approximately in the
middle of the distortion phantom mounted on the X-ray
detector.
3.
Make SIDEXIS XG ready for exposure:
Click IMAGE ACQUISITION
The exposure dialog box showing the exposure status
appears in SIDEXIS XG.
Service routine S002.6 is displayed on the control
panel.
4.
i
Press the release button. Hold down the release button
until image acquisition is completed and the acoustic
signal for end of exposure (double beep) sounds. Then
read the dose on the Mult-O-Meter.
The value must be between 1.2 and 2.3 mGray.
NOTE
If the value is outside the permissible range
(1.2 to 2.3 mGray), check the tube (see Service Manual).
6.
•
•
•
To confirm that the dose is within the permissible
range between 1.2 and 2.3 mGray, click the check box
underneath the message window.
The box will appear checked.
Remove the sensor from the distortion phantom again
and remove the phantom from the X-ray detector.
Dosimetry is now completed.
Continue the calibration procedure with sensor calibration.
Press the R key to move the unit back to the starting
position.
61 16 813 D3437
D3437.103.01.04.02
27
9 Adjusting / calibrating the system
9.5 Sensor calibration
Sirona Dental Systems GmbH
Maintenance Instructions GALILEOS
3.
R
1.
WAIT!
UNTIL UNIT IS IN STARTING POSITION
4.
2 - 3 minutes!
2.
5.
6.
9.5 Sensor calibration
1.
Go to the SENSOR sub-menu.
2.
Make SIDEXIS XG ready for exposure:
Click IMAGE ACQUISITION
The exposure dialog box showing the exposure status
appears in SIDEXIS XG.
Service routine S010.14 is displayed on the control
panel.
3.
i
If you have repeated the procedure three times and still
have not attained a positive result, please contact the
SIRONA Customer Service Center.
Press the R key to move the unit back to the starting
position.
6.
4.
Press the release button. Hold down the release button
until image acquisition is completed and the acoustic
signal for end of exposure (double beep) sounds − this
takes approx. 2 − 3 minutes.
7.
•
5.
The acquired images are transferred from the unit to
the Reconstruction and Control Unit (RCU).
This may take 2 − 3 minutes.
The evaluation of the sensor calibration is then displayed in the message window.
28
NOTE
If the information in the message window indicates that calibration is not ok and/or not possible, keep repeating the
procedure starting with Step 2 until calibration is ok and/or
possible.
If calibration is ok and/or possible (see above), click
SAVE VALUES to save the calibration.
Sensor calibration is now completed.
Continue the calibration procedure with iris calibration.
61 16 813 D3437
D3437.103.01.04.02
9 Adjusting / calibrating the system
9.6 Iris calibration
Sirona Dental Systems GmbH
Maintenance Instructions GALILEOS
3.
R
1.
WAIT!
UNTIL UNIT IS IN STARTING POSITION
4.
2 - 3 minutes!
2.
båÖäáëÜ
5.
6.
9.6 Iris calibration
1.
Go to the IRIS sub-menu.
2.
Make SIDEXIS XG ready for exposure:
Click IMAGE ACQUISITION
The exposure dialog box showing the exposure status
appears in SIDEXIS XG.
Service routine S010.10 is displayed on the control
panel.
3.
Press the R key to move the unit back to the starting
position.
4.
Press the release button. Hold down the release button
until image acquisition is completed and the acoustic
signal for end of exposure (double beep) sounds this
takes approx. 2 − 3 minutes.
5.
The acquired images are transferred from the unit to
the Reconstruction and Control Unit (RCU).
This may take 2 − 3 minutes.
The evaluation of the iris calibration is then displayed in
the message window.
61 16 813 D3437
D3437.103.01.04.02
i
NOTE
If the information in the message window indicates that calibration was not successful, keep repeating the procedure
starting with step 2 until calibration is ok.
If you have repeated the procedure three times and still
have not attained a positive result, please contact the
SIRONA Customer Service Center.
6.
•
•
If calibration was successful, click SAVE VALUES to save
the calibration.
Iris calibration is now completed.
Continue the calibration procedure with shading calibration.
29
9 Adjusting / calibrating the system
9.7 Shading calibration
Sirona Dental Systems GmbH
Maintenance Instructions GALILEOS
3.
R
1.
WAIT!
UNTIL UNIT IS IN STARTING POSITION
4.
2.
5.
6.
9.7 Shading calibration
1.
Go to the SHADING sub-menu.
2.
To make SIDEXIS XG ready for exposure:
Click IMAGE ACQUISITION
The exposure dialog box showing the exposure status
appears in SIDEXIS XG.
Service routine S010.11 or S010.15 (extended shading
calibration) is displayed on the control panel.
i
NOTE
If the message window indicates that the calibration was not
successful, repeat the procedure starting with step 2 until
the calibration is OK.
If you have repeated the procedure three times and still
have not attained a positive result, please contact the
SIRONA Customer Service Center.
3.
Press the R key to move the unit back to the starting
position.
4.
Press the release button. Hold down the release button
until image acquisition is completed and the acoustic
signal that indicates the end of the exposure (double
beep) can be heard.
No foreign bodies may be visible on the shading exposure. If
this is the case, check the beam path for foreign bodies and
remove them if applicable. Repeat the calibration.
5.
The Shading exposure and the evaluation of the Shading calibration are displayed in the message window.
6.
CAUTION
•
•
30
If calibration was successful, click SAVE VALUES to save
the calibration.
Shading calibration is now completed.
Continue the calibration procedure with distortion calibration.
61 16 813 D3437
D3437.103.01.04.02
9 Adjusting / calibrating the system
9.8 Distortion calibration
Sirona Dental Systems GmbH
Maintenance Instructions GALILEOS
3.
1.
2.
4.
5.
båÖäáëÜ
A
R
WAIT!
UNTIL UNIT IS IN STARTING POSITION
6.
9.8 Distortion calibration
1.
Go to the DISTORTION sub-menu.
2.
Read off the serial number of distortion phantom A
from the ID label of the phantom and enter it in the text
box located in the DISTORTION submenu:
3.
Clip distortion phantom A onto the X-ray detector cover.
4.
Make SIDEXIS XG ready for exposure:
Click IMAGE ACQUISITION
The exposure dialog box showing the exposure status
appears in Sidexis.
Service routine S010.12 is displayed on the control
panel.
5.
Press the R key to move the unit back to the starting
position.
6.
Press the release button. Hold down the release button
until image acquisition is completed and the acoustic
signal for end of exposure (double beep) sounds.
7.
The acquired images are transferred from the unit to
the Reconstruction Control Unit (RCU).
This may take 2 − 3 minutes.
The evaluation of the iris calibration is then displayed in
the message window.
61 16 813 D3437
D3437.103.01.04.02
i
NOTE
If the information in the message window indicates that calibration was not successful, check the calibration phantom
to make sure that it is not damaged.
If the phantom checks out OK (all balls are present and correctly positioned), repeat the procedure starting with point 3
as often as required until the calibration is OK.
If you have repeated the procedure three times and still
have not attained a positive result, please contact the SIRONA Customer Service Center.
8.
If calibration was successful, click SAVE VALUES to save
the calibration.
•
•
•
Remove the distortion phantom.
Distortion calibration is now completed.
Continue the calibration procedure with the geometric
calibration.
31
9 Adjusting / calibrating the system
9.9 Geometric calibration
Sirona Dental Systems GmbH
Maintenance Instructions GALILEOS
3.
A
1.
2.
4.
5.
R
WAIT!
UNTIL UNIT IS IN STARTING POSITION
6.
9.9 Geometric calibration
1.
Go to the GEOMETRY sub-menu.
2.
Read off the serial number of geometric phantom A
from the ID label of the phantom and enter it in the text
box located in the GEOMETRY submenu.
3.
Insert geometric phantom A in the bite block holder of
the unit.
i
NOTE
Make sure that the phantom is firmly seated and straight in
the bite block holder.
4.
Make SIDEXIS XG ready for exposure:
Click IMAGE ACQUISITION
The exposure dialog box showing the exposure status
appears in Sidexis.
Service routine S010.13 is displayed on the control
panel.
5.
Press the R key to move the unit back to the starting
position.
6.
Press the release button. Hold down the release button
until image acquisition is completed and the acoustic
signal for end of exposure (double beep) sounds.
32
7.
i
The acquired images are transferred from the unit to
the Reconstruction and Control Unit (RCU).
This may take 2 − 3 minutes.
The evaluation of the calibration is then displayed in the
message window.
NOTE
If the information in the message window indicates that calibration was not successful, check the calibration phantom
to make sure that it is not damaged.
If the phantom checks out OK (all balls present are and correctly positioned), repeat the procedure starting with point 3
as often as required until the calibration is OK.
If you have repeated the procedure three times and still
have not attained a positive result, please check the mechanical geometry of the unit (see Service Manual). Adjust
the unit if necessary and then repeat the calibration.
If this still does not lead to a positive result, please contact
the SIRONA Customer Service Center.
8.
•
•
If calibration was successful, click SAVE VALUES to save
the calibration.
Remove the geometric phantom.
Calibration of the GALILEOS is now completed.
61 16 813 D3437
D3437.103.01.04.02
10 Checking the laser
9.9 Geometric calibration
Sirona Dental Systems GmbH
Maintenance Instructions GALILEOS
d.
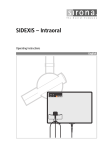
10 Checking the laser
1.
2.
båÖäáëÜ
A
B
1.
Place the bite block A in the bite block holder for the
unit (see User Manual).
2.
Check the laser:
•
Switch on the light localizer with key B on the
Easypad. The Lasers generate a red line.
Label
WARNING
Class 2 radiation is emitted during installation.
Always keep eyes a minimum distance of 100mm away
from the laser. Do not stare into the beam.
SAG laser (vertical line)
The laser beam must be visible in the center of the bite
block as a vertical line.
i
NOTE
To adjust the lasers, see Service Manual
No controls are available to adjust the laser power.
61 16 813 D3437
D3437.103.01.04.02
33