1
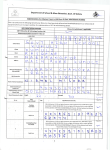
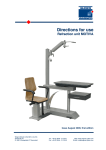
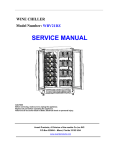
ERU-5000 COMBINED TABLE
OPERATION MANUAL
I .Introduction:
1. Product introduction:
Combined Table ERU-5000 is a combinatorial system which could be used together with
Auto Refractometer, Phoropter, Keratometer, Slit Lamp, and Chart Projector. It makes the
whole system work more conveniently and accurately. Sliding table accommodates two
instruments and provides with 90 degrees' rotation; Hand-operated phoropter arm can
swing up and down, left and right; Reclining Chair can smoothly lift up and down,
forward and backward with low noise. It can be used with kinds of ophthalmic
instruments, and it's the ideal choice for hospitals, clinics and optical shops.
II .Safety:
1. Safety symbols and illustration
2. The use of environment and Notes
l) Read and understand all instructions.
2) Operation should accord to the fuselage warnings and instructions.
3) Please do not place or use the equipment near water, do not use or place the
equipment in wet areas.
4) Keep the instrument on smooth ground. Otherwise, the falling of the unit can
cause serious damage or injuries.
5) For safety, the machine has ground plug. If you have no such outlet, please install.
Do not use the adapter; otherwise, it will cause abolition of the security features.
6) When equipment is installed, please check the installation correctly, and then
access the total power, cut off the power for a long time of stop using.
7) When cleaning the equipment, please unplug the power cord of the machine. Use
a wet cloth to clean, access to power supply when fully dry. (Do not clean the inside
part)
8) When there is failure or abnormal phenomenon during the use of this instrument,
please cut off the power immediately and contact us, do not maintain personally.
9) According to the principle of this product, work methods and features, no need to
do disinfection and radiation protection.
1
Contents
I .Product Introduction .............................................................. 3
1.Main Engine......................................................
3
2.Detailed explanation of Operation panel ..................... 3
II .Instruction
............................................................... 4
1.Installation ......................................................... 4
2.Adjustment ......................................................... 8
3. Testing and Operating ............................................. 8
ill. Maintenance ............................................................................. 9
1. Daily maintenance ................................................ 9
2. Replacing accessories..........................................
9
3. Cleaning ............................................................ 9
4. Notes of moving machine ....................................... 9
5. Service............................................................
9
IV. Malfunction and Exclusion................................. 9
1. The specifications of fuses: .................................... 9
2. The method of changing fuses.................................
9
V. Specifications ............................................................ 10
2
I .Product Introduction
1.Main Engine
Panel of chart projector
Chair
2. Detailed explanation of Operation panel
3
II .Instruction
1. Installation (Make sure the installation space: 5m*2m*2.4m)
Steps: 1) Removable with scissors carton packaging tapes, remove the carton and
side panels
2) Take off the packing material, take out the chair, and remove the fixed
screws which are used to fix the main unit with a spanner.
3) Take out the main unit from the wooden pallet. (See Figure 1)
Remove screws
Figure.I
4) Installation of chair: Correspond the holes on the chair and the chair
stand, fix them with screws. (See Figure.2)
4
Fix the backrest with
socket head screws
Figure.2
5) Take off the packing material , take out the table, arm, arm stand and the
accessones.
6) Installation of arm support: first assemble the panel of chart projector
on the arm support, connect the connectors under the arm support(arrange
the wires orderly), install the arm support on hole of the main unit, open
the side panels and fix the arm support tightly with screws, at last cover the
side panels.(See figure.3)
7) Assemble the phoropter arm on the arm support and fix it with screws.
(Attention: 1. The limit situation of arm rotation ; 2. Make sure the cover of
arm and fixed parts be tightly locked) (See figure.4)
5
Step four :install light
Step three :install arm
Step two: install stand column
step one : install table
Figure.3
Figure.4
6
8) Installation of the table: connect the wires under table support and the wires from Axis
of rotation following rotation, connect the table support and the Axis of rotation with
screws, install the wires cover and table support in the grooves which under the table
support. (See Figure 5)
Arm cover
Fixed screws of table
board
Connectors
Figure.5
7
2.Adjustment
(I) Check ifthe main engine is placed stable
(2) Turn the power switch, power indicator light lights
(3)Table rotation smoothly and flexiblely and sliding (total range is 90 degrees)
(4)Arm swings and rotates smoothly, and quietly, and can be locked.(Total range is 90
degrees)
(S)Turn on the light and it can work normally
(6)Check ifthe chair is steady , turn on the power switch of chair, it can up and down
smoothly and quietly(Total range is : 1Scm) (When chair up, press the limit switch, the
chair will stop)
(?)Check ifthe power socket for Slit Lamp, Keratometer and Auto Refractometer is ok.
3. Testing and Operating
I) Rotate the table 90 degrees counterclockwise; let the patient sit on the chair.
2) Rotate the table 90 degrees clockwise in front of patient; to check if you can use
Auto Refractometer correctly.
3) Turn on the Chart Projector to test the power (Please refer to the operation manual of
Chart Projector)
4) Swing arm manually, put the phoropter in front of patient's eyes, placed inspectors,
adjust the chair to suitable height, after using it, and reset it.
5) Rotate the table 90 degrees counterclockwise, press the down button of chair, lift
down to suitable position, to make it suitable for patient to leave.
6) Switch off the power, unplug the power cord if don 't use for a long time.
8
ill. Maintenance
1. Daily maintenance
If you don't use equipment frequently, tum off the power switch. Check Power line
regularly, if it's damage or aging.
2. Replacing accessories
There is no need to replace consumables frequently, when abnormal situation
occurs, such as fuse bums, replace the appropriate fuse type
3. Cleaning
When cleaning the equipment, please unplug the power cord of the machine. Use a
wet cloth to clean, access to power supply when fully dry. (Do not clean the inside
part) Do not clean the power outlet with wet cloth.
4. Notes of moving machine
Please pull out the power plug when moving the unit, ensure that all power is cut off.
Other equipments shall be removed to ensure that no parts will fall down . Protect
wires been not broken when moving.
5. Service
If anything abnormal during use, first cut off the machine power, then telephone
sales company or service points for consultation
IV. Malfunction and Exclusion
1. The specifications of fuses:
a) Power Supply:AC220V/110V Input fuses: F3A (5 X20) mm 2pcs
b) PowerSupplyofChair:
F6A (5X20) mm lpc
F2A ( 5 X 20) mm 1pc
c) External Socket AC220V:
2.The method of changing fuses:
a) Switch off power supply, Unplug the power cord;
b) Take off the fuses by removing the fuse cap with a screwdriver;
c) Put the same size fuse, revolve the fuse hat clockwisely, replace
the fuse.
9
V. Specification:
ERU-5000 Products Features:
A. Class: class I
B. Type: BC. Equipment belongs to common type
D. Equipment doesn't belong to type AP or APG
E. Equipment operation: continuous operation
F. Non-permanent equipment (mobile device)
Unit size: 1190*1055*1850mm
Table Size: 890*405mm
Table rotation range : 90 °
Table movable range : 335mm
Swing arm oscillation angle: +35 °
Chair rotation range: 60 °
Chair up and down range: 540-690mm
Chair loading ability: 200-250kg
Chair backrest obliquity: 160 °
Lamp: LED (24V, 3W)
Electric Voltage: AC220V/11 OV 50/60HZ
Weight: 200kg
10