1
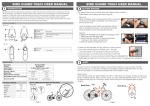
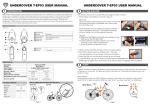
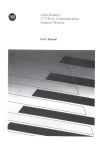
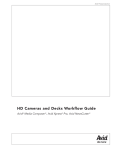
GPS Navigator Manual Welcome to use this GPS navigator The company (iSun) keep the final explanation right on this user’s manual. This manual is subject to changes without prior notice.`````` Please copy your important data as our company takes no responsibility for the loss of data. This manual has been reviewed.But we can not ensure the preciseness without any mistakes or error. Please contact our service center when a mistake gets discovered. Please read carefully the operations and instructions on user’s manual and use the accessories only provided by the original factory to avoid unexpected damages. If you don’t use it according to the correct process or connect the incompatible accessories, the guarantee will be automatically invalid and this can even cause hurt to you and others. Our company would not take the responsibility for this. It is possible that the electronic navigation data is not consistent with the real traffic instructions because of the traffic construction development. Please do comply with the real condition and obey the traffic rules. It will probably cause a serious accident if you check or use the navigator when you are driving, and our company will not take the responsibility for any loss. The updating and upgrading information on firmware will be put on our website. It’s depend on you weather or not to update or upgrade. The pictures on the manual is just for reference, subject to the real machine Welcome to use 1.1 THE PACKING .................................................................................................................................1 1.2 USER’S MANUAL............................................................................................................................... 2.1 PRODUCT APPEARANCE ..................................................................................................................2 2.2 POWER SUPPLY AND CHARGE ............................................................................................................3 2.2.1 POWER SUPPLY ...........................................................................................................................3 2.2.2 CHARGING BY ADAPTOR ................................................................................................................3 2.2.3 CHARGING BY CAR LIGHT ADAPTOR .................................................................................................4 2.3 BASIC USE .....................................................................................................................................4 2.3.1 TURN ON/OFF THE BATTERY ..........................................................................................................4 2.3.2 POWER ON/OFF ..........................................................................................................................5 2.3.3 RESET THE SYSTEM.......................................................................................................................5 2.3.4 CAR-USE BAR SHOE TO FIX NAVIGATOR ............................................................................................6 2.3.5 CAR-USE ANTENNA ...................................................................................................................6 2.3.6 TOUCH STICK ..............................................................................................................................7 2.3.7 SD/MMC CARD .........................................................................................................................7 2.4 CONNECT WITH COMPUTER ............................................................................................................8 2.5 TABLE LIST AND PRIMARY FUNCTION .................................................................................................8 2.6 TEND AND PROTECT YOUR GPS NAVIGATION .......................................................................................9 3.1 NAVIGATING FUNCTION AND FEATURE ..............................................................................................11 3.2 THE IMPORTANT KNOWLEDGE.........................................................................................................11 4.1 FUNCTIONS AND FEATURES.............................................................................................................13 4.2 INTERFACE OPERATION ..................................................................................................................13 5.1 FUNCTIONS AND FEATURES.............................................................................................................15 5.2 INTERFACE OPERATION ..................................................................................................................15 6.1 FUNCTIONS AND FEATURES.............................................................................................................18 6.2 INTERFACE OPERATION ..................................................................................................................18 7.1 FUNCTIONS AND FEATURES.............................................................................................................21 7.2 INTERFACE OPERATION ..................................................................................................................21 8.1 VOLUME ADJUST ..........................................................................................................................24 8.2 POWER SET .................................................................................................................................24 8.3 BACK LIGHT SET ..........................................................................................................................25 8.4 TIME AND DATE SET ......................................................................................................................26 8.5 LANGUAGE CHOOSING................................................................................................................... 27 8.6 SYSTEM INFORMATION ..................................................................................................................28 8.7 BLUETOOTH FUNCTION ..................................................................................................................28 1.1 Packing The following accessories are contained in the GPS box, please check it: 1 . GPS receiver. 2 . Adaptor. 3 . Car light adaptor 4 .MINI USB line 5 .Car-use antenna 6 . Earphone. 7 . User’s manual. 8 . Windscreen mount. 1.2 The use of the manual In order to take the best function of your machine, and acquire more operate details, please read the User’s manual carefully. On the using process, you will see the following supplementary information. 【note】: Explanation on topic; 【relative information】: Expand information on relative topic 【important】: warning indication on relative topic. Please pay more attention on this information and comply with the operation, otherwise, you will hurt your self and others. This User’s manual is only applicable for GPS navigation product. In this Chapter we will introduce the outer equipment and their basic operation to let you familiar with all the basic operations as soon as possible. 2.1 Features 1 Touch-screen Display main menu 2 Charging indication light. Indicates weather the outside power is linked; it is red when charging and turn blue after well charged. 3 Communicate with computer through MINI MINI USB port USB/connect adaptor 4 Reset key Reset the system 5 Stereo earphone jack Connect stereo earphone 6 SD/MMC card slot The machine is attached with the SD/MMC card, which contains the map firmware, map data, and user’s file. Please don’t take the card out when the machine been using 【note】If you pull out the card for during use please press the resetting key on the left side to activate the system. 7 Power key Power on/ off 8 Menu Return to the table list Bluetooth indication light Power off: when Bluetooth closed, Twinkle: when Bluetooth opened but disconnect with mobile phone, Power on: when connect with mobile phone Outside speaker Play sound (such as voice indication, music etc) 9 10 11 Unfold the GPS receiver to the level position to GPS receiver receive satellite signal. 12 Touch stick It is used to click and write on the screen. Draw it out when using, Draw it back after used. 2.2 Power supply and charge Give full overnight charge before use. 2.2.1 Power supply Types of supply power for this GPS device: Battery and Eternal power. The GPS navigator uses the Li-battery to supply power when it is not connected with adaptor. The symbol [ ] on the up right of receiver and the symbol [ ] on the screen. GPS navigator uses the External power supply when it is connected with the adaptor. 【note】This machine has a built-in, unchangeable Lithium battery. Under normal conditions (if the back light is not so bright), a fully charged battery can be used for up to 10 hours. This may vary with the type of use. Some functions (audio playing, video playing, bright back light) will consume a large quantity of battery power, which can reduce the usage. 【Important】This machine has a built-in, unchangeable Lithium battery. In order to avoid fire and burning, please do not dispose of this GPS unit in the fire. 2.2.2 Charging by adaptor At the first use, you should use the adapter to charge the navigator. 1. Connect the DC of adaptor to the electric port on the right part of the machine; 2. The other end is connected with electric socket to supply power and also charging at the same tine. 【note】The indication light is red when charging. Please do not pull out the adaptor until the light turn blue as it is well charged. 2.2.3 Charging by car light adaptor 1. Please connect one end of the car adaptor to the electric port on the right part of the machine. 2. The other end is connected with the car adaptor to supply power and also charging at the same time. 【Important】To avoid a power surge and damage to your receiver it is necessary that you plug the device into the car only after the engine is running. 2.3 Basic use 2.3.1 Switch on/off The battery switch [ ] on the right part of the receiver is used to control the system power supply Upward switch [ Downward switch [ ] indicates that supply power is by battery or adaptor. ] indicates to cut off the power and the system cannot be started. 【Note】When the switch is off, it can still charge the machine as it is just cuts off the system power supply. 2.3.2 Power on/off The power key [ ] can control the power on/off. Power off indicates the system is saving power; the system can keep the last operation position when you power on again. 1. Power on: Please check:The battery is well charged, or the machine is connected with adaptor and the switch is upward [ ]. Press the “power” key * ] on the top of machine to power on. 【Important】When you carry the machine from one place to another, you need to wait until the machine is adapted to the environment to avoid short circuit caused by the humidity fluctuation. 2. Power off Please press the Power key [ ] on top of the receiver to power off. The system will enter the sleep mode and the system can keep the last operation position when you power on again. 【Note】If you want to save the power, you can press the switch downward to cut off the electricity. 2.3.3 Resetting system If the system cannot work, you can reset the system in the following two ways. 1. Click the reset key on the right part of the machine to reset the system by using touch stick. 2. Press the switch downward to cut off the power supply. Then press it upwards again to reset the system. 【Information】 :It may not respond in the following conditions. 1. The shift between pictures is delayed. 2. The touch stick function does not work normally. 3. The power key does not work. 【Important】The unsaved data will be lost as you reset the system when the system has no response. Please copy the data other time. 2.3.4 Windscreen mounting When using the GPS receiver in your car, you should fix this machine down to the panel of the windscreen by using the suction bracket. 【Important】When using the bracket, please take care of the position. Please don’t fix the navigator to a position that will block or distract the driver line of sight with the road. 2.3.5 Car antenna The car-use antenna can improve the ability to receive the signal. Connect one end to the car antenna hole [ ] on the right part of the navigator; another end is absorbed with the roof. 【Note】The navigation function is affected with the GPS receiving ability, position accuracy and position speed. If you need the function when you are driving, we suggest you use the car antenna. 2.3.6 Touch stick The touch stick is the communication tool between you and your navigator. Please keep it carefully. 一、single click : Single click the screen with the touch stick point。 二、double click: Double click the screen with the touch stick point. 三、drawing: Click one point and hold, and then draw the touch stick on the screen. 【Important】A broken touch stick, ball pen or any acute and harsh object will scratch and destroy the LCD. 2.3.7 SD/MMC card The attached SD/MMC card contains the map software, map data and media file. Please insert the card correctly when in use. 【Important】Please do not take out the SD/MMC card when the system is navigating or playing. 【Important】 1. Don’t bend, stress or curve the SD/MMC card. 2. Avoid high temperature or high humidity when in use and store the card, don’t put the card direct to sunlight. 3. To avoid damage, please pay attention to the heading when inserting the SD/MMC card. 2.4 Connect with computer The machine can be connected with the computer through the MINI USB on its left part. You can copy files between navigator and computer or copy the data from GPS navigator to computer so as to recover the data in GPS when you are in need of them. 1. Please confirm the GPS navigator is power on; 2. Connect the MINI end [ ] of USB cable with the USB port on the left part of GPS machine and the normal end [ ] with the Host port on computer. 3. After connection, the computer can recognize and find the new hardware unit automatically. GPS navigator will stop operating the current procedure and shift to the online interface. 4. Please pull out the MINI USB cable as you finished your operation, the GPS navigator will return to the pre-operation interface. 【Important】Data security: Please copy the data to the outer storage device every time before you update your system data. Our company takes no responsibility for any loss of data. 【Note】The GPS navigator will stop any other operation when it is connected with computer. 【Important】In the process of communication, the following operations will break off the connection with computer, the unfinished data will be lost. 1. Pull out the MINI USB cable; 2. Power off 3. Reset the system by using resetting key or electric switch 4. Click the close button on the top right corner. 2.5 Table list and primary function. 1. Table list: 2. Function introduction: Navigation Afford the navigation reference Video player Video playing format: wmv, asf and avi. Support schedule adjustment, pause, full screen playing. Photo skimming Photo format: JPG, GIF, BMP, PNG. Support picture revolve, picture zoom, and power point. E-book Text format: txt. Support page option Audio player Audio playing format: WM9, MP3, WAV. Support random playing, sequence playing, repeat playing Setting Volume, power, backs light, date and time, language, system information. 2.6 Protect your GPS navigator. The GPS navigator is a reliable navigator if it’s protected correctly. Screen protection: Please use the touch stick to operate when pressing the screen. For cleaning the screen, you should use a soft cloth sprinkled with a few drops of glass cleaner. Do not spray the cleaner directly onto the screen. 【Important】Please do remember to power off the GPS navigator before cleaning the screen. Avoid dropping: Dropping or striking will damage the screen. 【Important】Accidental damage is not covered under the warranty. Avoid using the navigator at the following condition: rapidly changed temperature, high temperature (over 60 deg), low temperature (below 0 deg), high pressure, much dust, static, humidity, and also corrosive liquid. Avoid radiation: the radiation from other electric device may influence the screen display. It will be recovered by exclude the radiation. 【Important】We suggest you to take the gift bag to get the X- ray detection when you need air transport. This can help you avoid magnetic detection and bar magnet detection, which will damage the system data. In this chapter we will introduce some important notices on how to use the GPS navigator 3.1 Navigation functions and features According to your choice of navigation system, the GPS navigator can make a position by GPS satellite signal receiver and display it on the navigation map. The system can calculate the best route after setting the destination; this can help users to arrive at the destination safely and rapidly. The specific navigation functions are depended on your choice of navigating software. Please refer to the Navigation Software Instruction 3.2 The important knowledge 1. Map information It is possible that the electronic navigation data is not consistent with the real traffic instructions because of road construction and development. Please only comply with the road layout, conditions and the actual traffic rules. New layouts will be available at a later date from the website. See map instructions for details. . 2. Navigation The navigator offers the route for reference only; determine the route by yourself; the driver may be more familiar with the route than GPS navigator. 3. On receiving signal. Many factors such as high, dense buildings (in tunnels, between the high buildings, underground parking) various weather conditions, and closure of the satellites will affect the ability to receive signals and navigate accurately. Beware of these conditions. This chapter will introduce how to use the built in audio player on the GPS. 4.1 Functions and features The audio player supports WMA9, MP3 and WAV music format, you can set the playing sequence at random Before using the audio player, please copy your audio files to another folder. 4.2 Interface operation 1. Singly click the button in main menu to open the audio player as the following picture 4-1: Picture 4-1 audio playing interfaces Close Single click to close the audio player. Play Single click to play or stop Pause Single click to pause Stop Single click to stop Play list Support sequence playing, random playing, and repeat playing Last song Play the previous item Next song Play the next item Volume adjust Use the touch stick to adjust the volume by sliding the volume-displaying bar, go left to turn down, go right to turn up. Progress choice Use the touch stick to adjust the progress by slide the progress-displaying bar; go left to back up, go right to advance. File Single click to shift to the audio file interface and choose you favorite music. Song title, format Show the song title and the playing format. Time Show the elapsed time Playing list Show the playing order 2. Music file interface: Picture 4-2 music file interface Close Single click to close the playing file. Last page Show the last page Next page Show the next page Go back Return to the previous file File name The name of the playing file Song title, format The title and the audio format of the playing song. This chapter will introduce how to use the function of picture skimming. 5.1 Functions 1. Support JPG, GIF, BMP and PNG format 2. Support picture revolving, picture zooming, and power point. Before using the skimming function, please copy your pictures to the storage card. 5.2 Interface and operation 1. Click to open the picture browser showed by picture 5-1. Picture 5-1 picture browser interfaces Close Click to close the picture browser Magnify Magnify the picture on proportion. Decrease Decrease the picture on proportion Revolve Click to revolve the picture for 90 degree. Power point Play all the pictures circularly on full screen from the current picture The last item Play the previous picture in the same file. The next item Play the next picture in the same file. File Click to shift to the file interface, and choose your favorite picture. File name, format Show the current picture and its picture format. 2. Picture file interface: Picture 5-1 picture file interface Close Click to close the file Last page Show the last page Next page Show the next page Go back Return to the previous file File name Show the current file name Picture title Show the picture name and the picture format. and format This chapter will introduce how to use the function of E- book. 6.1 Functions 1. Support TXT format 2. Support page turning, page skip, file choosing. Before using the function of E-book, Please copy your documents to the storage card. 6.2 Interface and operation 1. Click to enter the text view interface, as picture 6-1 showed; Picture 6-1 text view interface Close Click to close the text viewer. Last page Turn to last page. Next page Turn to next page Page skip Click to enter the page-choosing interface as picture 6-2 showed. You can choose any page to read. File Click to enter the file interface and choose the book as picture 6-3 showed. The text title Show the document name and format. and format Page number/ Show the current page number / show the total page total page 2. Page choosing interface. Picture 6-2 page choosing interface Close Click to exit page choosing interface Numeric Consist of 9 figures from 0 to 9, can compose any number from 0 keyboard to 99999999. Numeric Show the input number. display area Back space Click to delete the last number Reset Clear all numbers Skip Skip to the t page of current number showed and browse the current page. 3. Text file interface: Picture 6-3 Text file interface Close Click to close the current file Last page Show the last page Next page Show the next page Go back Go back to the previous file File name The document name of the current file. Text name and format The text name and format. This chapter will introduce how to use the function of video playing. 7.1 Functions 1. Support wmv, asf, avi format. 2. Support full screenplay, progress choosing, and file choosing. Before using the function of video playing, please copy your video file to the storage card. 7.2 Interface and operation 1. Click to enter the video-playing interface as picture 7-1 showed. Picture 71 Video playing interfaces Close Click to close the video player. Play Indicate the movie is posed or stopped, click again to play continuously Pose Click to pose the movie Stop Click to stop playing the movie. Fast playing Click to playing the movie fast Volume Use the touch stick to adjust the volume by sliding the adjusting volume-displaying bar, go left to turn down, go right to turn up. Progress Use the touch stick to adjust the progress by slide the choice progress-displaying bar, go left to back up, go right to advance. File Click to enter the video file interface, and choose your favorite movie. Title and Show the movie title and the format. format Time The elapsed time/ the total time 2. Video file interface: Picture 7-2 Video file interfaces Close Click the current file Last page Show the last page Next page Show the next page Go back Go back to the previous file. File name The current file name Film title and format Click Film title and format to enter “system set” menu, then you can set the relevant functions. There are “voice”, “power”, and “backlight set “,” date and time “,” language, system info for choice Voice Adjust the speaker volume; Turn on / off “click screen volume” Power Check the present battery condition Backlight Adjust the screen backlight; Backlight turn off time interval under self power supply Backlight turn off time interval under external power supply Time and date Time set; Date set; Time zone set Language The default language set; Background style set System info Return the original implied value; GPS Reset Calibrate the touch screen 8.1 volume adjust “Volume adjusts” include: 1. Speaker volume adjust; 2. “Click screen volume” set Turn off Exit “volume adjust” interface; Volume - The system has 10 levels volume (from calm to loudest), single click can decrease a level Volume + The system has 10 levels volume (from calm to loudest), single click can increase a level “Click screen Once chose, it turn on, or it close volume” Present Red blanks shows the present volume level, a blank is mean a level volume 8.2 power set “Power set” is to check the power left and whether charging is on Turn on Exit “power set” interface; Power edition Red blank shows the power left; The red blank will be filled from left to right when charging 8.3 backlight Backlight set include: 1. Adjust backlight brightness; 2. Turn off backlight time interval set at self power supply condition; 3. Turn off backlight time interval set at external power supply condition. Turn off Exit “backlight set” interface; Brightness- Just click it, the brightness will decrease gradually to the lowest level; Brightness+ Just click it, the brightness will decrease gradually to the highest level Turn left Single click can turn the interval to left for one time to display the previous blank, repeatedly display Turn right Single click can turn the interval to right for one time to display the previous blank, repeatedly display Brightness Red blank shows the present brightness Time interval The backlight will turn off and enter the power saving mode after stopping to operate the machine. There are 6 items for choice: “never”, “3 min”, “2 min”, “1 min”, “30 s”, “10 s” and “repeat”. 8.4 Date and time Date and time include: 1. System time set; 2. System date set; 3. System time zone set. 1. Single click to enter “date” interface (as the following), then click or to set year, month and date. 2. Single click or to set hour and minute. 8.5 language Language set include: 1. Default language choose; 2. Background choose to enter “time” interface (as the following), you can single click Single click language column or to do language choose, there are simple Chinese TRA Chinese and English for choice. Single click background column or to do background choose, there are blue and yellow for choice 8.6 system info System info included: 1. Return the original set; 2. GPS Reset; 3. Calibrate the touch screen After single clicked single click , it will come out the “factory default setting” interface (as the following), to return the factory default setting, and click to shut the interface After single clicked , it will come out “GPS reposition” interface (as the following), click to reposition; click After single clicking to shut “GPS reposition” interface , it will come out “calibrate touch screen) interface (as the following). Use the touch stick and click the central cross cursor, it will move from in the sequence of center, left up, left down, right up and right down till the calibration is succeeded, then the system will exit to the main menu automatically We will keep the right of any technology change, and won’t specially announce the change in the future Size 4.3 inch (dimension: 124*81*19mm) Weight 190g Memory card size To be advise Battery Built-in Lithium battery, DC 5V/1.5A Speaker 1W 8ohm or 2W 4ohm Headphone 20 mW/32ohm Audio frequency WMA9, MP3 and WAV Video frequency AVI、MPEG、MPG Photo JPG、GIF、BMP and PNG E-book TXT Working -10 °C ~ 60 °C temperature Keep and -20 °C ~ 60 °C transporting temperature Relevant working 20% ~ 80%(40°C) temperature Keep and transporting humidity 20% ~ 80%(40°C) Air pressure 86KPa ~ 106KPa Language Simple Chinese / English Background Blue / yellow Operating system Windows 98 / Me / 2000 / XP / Server2003、Mac OS 9.0 or more advanced version, Linux2.4.x or more advanced version IF your GPS navigator is not working normally, please check the following. If you cannot resolve the problems, please contact our service center. Problem Reason Solution Can not turn on the Lack of power To be charged by adaptor or car light navigator adaptor Switch off Can not display clearly Upward the switch The back light is not Consult 8.3, adjust the backlight bright enough The back light has Use the touch stick to click the LCD; the been turned off screen will turn bright again. Touch screen function is Touch screen function abnormal is not emendated well Without sound The volume is at the lowest condition Consult 8.6, Emendate it again Turn up the volume The earphone can not Connect the earphone be connected well Can not communicate with The USB cable is not computer connected well Consult 2.4,connect USB cable No signal The signal intensity is weak, it need more than 3 minutes to receive the signal Consult 2.3.5、3.2 The map data is lost 1. The map data is included in the disc 2. Contact your agent or distributor When use the navigating function again, you need to input the password. 8.7 Bluetooth setting & user instruction (optional) Operating insturction: 1.Click on the main menu, and enter into the interface of Bluetooth setting, picture as below: Close Close the current folder Phone keyboard Dialing calls Record all dialed, received, missed call of the GPS; at most Phone records 20 records for each item Last call Note the last call you dialed To match the Bluetooth between Bluetooth mobile phone Pair and GPS Bluetooth setting Set Bluetooth, incoming ring, close Bluetooth Pair records Records pair device management and show all the paired devices Status Bar Show the present pair situation Remarks: 1. Bluetooth indication light is off when the Bluetooth is closed, it twinkles when Bluetooth is on but disconnects with mobile phone and powers again on again when connection is made with a mobile phone 2. Before dialing calls, please press the call button if the device wasn’t connected, the device will automatically enter into a pairing interface. 2.Click in Bluetooth interface,it will show the Bluetooth setting as below picture: 图 4.7.2 Close Click to close the current folder Bluetooth NVA(be reference) name Pin code The setting pin code is showed Phone Click and set pin code Keyboard Incoming calls Indicating the incoming calls Select incoming Click and select incoming call calls Keep Bluetooth function when Bluetooth interface Default is Selected. is closed 3. Click on Bluetooth setting, set pin code. Close Click to close the current folder Numeric Display the pin code. display area Number Consist of 9 figures from 0 to 9, can compose any number keyboard from 0 to 99999999. Reset Clear numbers Enter Click to confirm the pin code 【Notice】 After the pin code is re-installed, to pair new phones will no longer input the default "8888", you will need to enter a new pin code. 4 Click on Bluetooth setting to choose calls ring Close Click to close the current folder File name The document name of the current file Document Click document name to choose ring of calling name,format 5. Click pair key Last page Turn to last page Next page Turn to next page File Click to enter the file interface and choose on the Bluetooth interface, enter the pair interface. Close Click to close the current folder The countdown started from the 60s Pair time Pair Instruction 6.Click Put the Bluetooth phone near to the GPS and then select "tools" "Bluetooth" - "matching device" menu, click "Options" and select "new matching device “. After a few minutes the phone will find new device "XXXX", that is your GPS. Click the "Options", you will be prompted to input Bluetooth devices XXXX pass code, input "8888" then confirm. The phone will show that matching is completed. The third time that you click the “option” key, select “connect”, after the connecting completed, the menu will appear a loudspeaker signs next to mobile terminal name .our GPS will end the pair interface automatically. The main functions of Bluetooth interface of the status bar will be prompted to "connect telephone calls". The status bar of the phone icon will become red, And then the blue light twinkles. 【Notice】This instruction is up to the Nokia 3280 mobile phone, another models please refers to manual to be paired on Bluetooth interface, enter numeric key board interface Close Click to close the current folder Click to close the Show the input number. current folder Numeric Consist of 9 figures from 0 to 9, can compose 20 piece of key number, Back Click to delete the last number space Calling Click to calling Calling Click to open calling records records 7.Click on phone keyboard, input the number Minimize Click to minimize the interface Volume+ Increase volume (available on calling) Volume- Decrease volume (available on calling) Numeric Display the calling number display area Quiet Be quiet when click it, and restore when clicked again (available on calling) Hang up Click to cancel the calling 8. Minimize Click to minimize the interface Volume+ Increase volume (available on calling) Volume- Decrease volume (available on calling) Numeric display area Display the calling number Re-dial Click it the number will be re-dialed Close Click it the calling will be closed 9. If connected, it’ll display “Connected” Minimize Click to minimize the interface Volume+ Increase volume (available on calling) Volume- Decrease volume (available on calling) Numeric display area Display the calling number Mute Click to mute, and click again to restore (available on calling) Switch the Click it to switch the call mode (phone or GPS) call mode Ignore Click it to hang up the call Small keyboard Click it will display a small keyboard 【 Note】 this small keyboard can be used to dial the extension numbers, click it again it will be disappear 10.Incoming call - Display Minimize Click to minimize the interface Volume+ Increase volume (available on calling) Volume- Decrease volume (available on calling) Numeric display area Display the coming phone number Mute Click to mute and click again to restore (available on calling) Answer Click it to answer Ignore Click it to hang up 11.It’ll display “Connected” when you Click the “Answer” key, this navigation device can be used as a phone can talk through microphone and display the time,. Minimize Click to minimize the interface Volume+ Increase volume (available on calling) Volume- Decrease volume (available on calling) Numeric display area Display the connecting number and time Small keyboard Click it will display a small keyboard 【Note】 this small keyboard can be used to dial the extension numbers, click it again it will be disappear Quiet Click to mute and click again to restore. Switch call to mobile Hang up a) ;Click Click it to switch the call to mobile, after the call ended, or click the each “Speakerphone” “Bluetooth” of the mobile, the Bluetooth will be restore connected automatic 【Note】Different mobile has different response. For example, after press down this key of Nokia, it will switch the the call to device, and cut down the Bluetooth for the moment. The the interface will close at that time. Finish the call and operate .On the device will renew connection automatically. Interface will open and timing again. However, after Press down this key of Motorola, Bluetooth connection will not be cut down when it switches the call to device. Call interface will keep on. Call will switch back after user press this key again. Click it to ending the call of the Bluetooth “Function” Close Click to close the current folder Dialed records Click it to display dialed records Received calls records Click it to display received calls Missed calls records Click it to display missed calls Numeric display area Display number records Last Page View dial records on the last page Next Page View dial records on the next page Delete one piece of records Click it to delete one piece of records Delete All Click it to delete all the records Dial the selected number of the records Click it to dial the selected number of the records 【Notice】All the records contain Dialed, Received ,and Missed ,at most 20 records of each item from the GPS, including numbers, time of calling, and lasting time , etc.. 13. ;Click on the Bluetooth interface and enter the pair devices records 图 4.7.13 Close Click to close the current folder Bluetooth devices Area Display the name of matched Bluetooth device Last Page Choose the previous device Next Page Choose the next device Connect Click it to send the connecting request to the selected Bluetooth device. Disconnection Click it to disconnect the current connecting device. Delete ALL Click it delete all the paired device records 【Notice】If the GPS needs to connect with another Bluetooth devices while it connecting with a mobile already, it should cut the current connection first, then search the Bluetooth device and click the to connect. If failed, please turn back to the main interface , and click the “pair” key to research and connect the device.