1
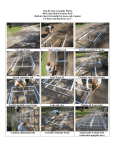
Bicycle maintenance made ridiculously easy From zero to hero all the things an absolute beginner needs to know to look after their own bike Checklists Every ride Monthly Repairs Automate Clean How to automate Lubricate your bike Fix a flat maintenance and Check for chain wear make your life easier Adjusting V brakes Adjust rear derailleur Adjust front derailleur Fixing stiff link in chain Version 1.1 By http://www.londoncyclist.co.uk/ Every Ride 20 seconds A basic toolkit that will get you a long way... Check tyres If you can push down on them with your thumb then they need pumping up Pump A mini pump is always very useful to have with you and will not take up much space. Puncture repair kit Check brakes Give the brake levers a squeeze and check the brakes are working. Also glance down at the brake pads to check they are aligned with the rim. No bike owner should be without. Punctures happen to everyone. The kit you buy should include tyre levers to make your life ten times easier. Allen key Essential for most bike tweaking. 4, 5 and 6mm being the most common. Wrench Check quick releases and bolts For all the bolts on your bike. Be sure any quick releases and bolts are firmly secured Lubricant I highly recommend Finish Line which is perfect for most parts of the bike in a wet climate. Don’t use WD-40! Monthly 30 minutes Clean bike Give the bike a complete clean Gears Check the full range of gears and see if the chain shifts easily when you change gear Lubricate bike Inspect accessories Complete a full bicycle lubrication after having cleaned it Check for loose accessories, any batteries that need replacing etc Saddle Check it is held secure and aligned straight Tyre Check for worn or cracked tyres. Frame Inspect the frame for any cracks or major dents. Also check cables for any fraying Pedals and arms Try to wobble them and check they are held firmly Wheels Handlebars Give them a spin and check they don’t wobble side to side majorly. Also check the rims are not damaged or heavily worn Lift the bike and twist the handlebars. If they turn smoothly and without any resistance all is well. Also check for looseness. Brakes Chain Check for worn brake pads. See if the brakes are squealing when you use them. When the brake levers are pulled halfway the brakes should be fully engaged Check for heavy chain wear including rust Use a wet brush to scrub the chain. Work your way into each chain link Cleaning your bike This is the simple way to keep a bike clean without any special tools. Doing this task at least once a month will really help keep your bike running smoothly. You will need: Brush, old toothbrush, small flat file, bucket with warm water and rags. Also if the bike is particularly dirty then a degreaser is very useful. Use a brush to scrub the rear derailleur. Again use a screwdriver to get any stubborn dirt out. Run the chain through a damp cloth. If the chain has still not come clean then spray on some degreaser. Allow it to set. Then brush the chain to remove any dirt and finally run it through the cloth again. You should not leave any degreaser on the chain as it can damage it. The chainrings can be cleaned in a similar fashion. Use your brush with warm water and then a toothbrush to get to the hard to reach places. Again use a cloth in a flossing motion to get any dirt trapped in-between the different parts. Use a wet brush to clean the rear sprockets and derailleur. Again use degreaser if particularly mucky. To clean the frame use a damp cloth. Avoid using cleaning liquid as it contains salt which can rust the frame. Use a narrow screwdriver to get in-between each sprocket as there is likely to be a lot of trapped dirt in there. A toothbrush can also be effective here. The wheel rims should be cleaned with a clean dry cloth. The brake pads themselves should also be cleaned with a dry cloth. Use a damp cloth in a flossing motion to get in-between each sprocket and remove any dirt. It is important also to get to the grooves in the brake pads by using a small flat file or blade. Lubricating your bike After cleaning your bike the second most important task you can do is keeping it lubricated. This prevents rust and keeps things running smoothly. You should only lubricate your bike when it is clean. You will need: Lubricant – don’t use WD40. Make sure you get some proper bicycle lubricant such as this one. Spin the chain and apply one drop per pin of lube as it spins between each chain link. Spread the lube by shifting between all the different gears Use your fingers to work in some lube in the points shown Brake and shift cables also need lubricating. Remove the cable from its housing and work in a tiny bit of lube with your fingers The rear derailleur also needs lubrication to keep working well Don’t apply too much lube on the jockey wheel as it gets a lot of it from the chain Use your fingers to work in some lube in the points shown Give the lube 5 minutes to dry and then use a dry cloth to wipe away any excess. Any lubricant that is needed will have sunk in and the rest will just gather dirt Release the brakes so that you can remove the wheel. Fix a flat Check the outside of the tyre for any debris. If there are then remove them. Part 1 Flat tyres happen to everyone. Keep your puncture repair kit with you or a spare inner tube. Once you have repaired your first puncture you will never look back! You will need: Puncture repair kit – one with tyre levers is preferable or buy these separately. Bicycle pump Wrench – to release the wheels. You may have a quick release. If the puncture is on the front wheel then use the quick release or a wrench to remove the wheel. Turn in an anticlockwise direction to loosen. If it is the rear wheel then use the quick release or a wrench but this time pull the derailleur backwards and push the jockey wheel forwards. This will give you clearance so you can lift the wheel out and forwards. Release any air left inside the tyre by pushing down on the valve head. If you don’t have tyre levers then work your way around the wheel with your thumbs pushing the tyre off the rim. With tyre levers start on the opposite side of where the valve is. Tuck in one of the levers under the tyre and hook the tyre lever under the spokes. Do the same with another tyre lever. Repeat this process with a third tyre lever. Remove the middle one and tuck it under the tyre after the third lever. Repeat this process until the tyre is possible to remove by hand. Fix a flat Part 2 If there is a nut holding the inner tube in position near the valve then undo it. Pull out the inner tube. Then thoroughly inspect the tyre inside and out for anything that may have caused the puncture. The fun part is finding the puncture. Pump up the inner tube and listen for a hissing sound. Failing that use your lips near the inner tube to feel for any air escaping. You can also try submerging the inner tube in water to watch for escaping bubbles. Having found the puncture don’t lose it! Use the abrasive paper that came with your puncture repair kit to scrape the area. Apply a layer of the glue that comes with the puncture repair kit. You should apply more than what will be needed by the patch and allow it to dry. Remove the metal part of the patch and don’t touch the sticky part. Apply the patch to the area of the puncture. Press the patch down firmly to remove any air. Fix a flat Part 3 Pump a small amount of air into the inner tube to give it some shape. Then push the valve through the hole. Push the inner tube back inside the tyre. Go to the opposite side of the valve and fold the tyre back over the rim. Work your way around the tyre. This can be a little tough. When you get stuck remove any air from the inner tube. Only if you are really struggling then use the tyre levers to assist. Check the inner tube is underneath the tyre around the whole wheel as if it is caught it will get punctured. Push the valve up into the tyre so that it almost disappears to be sure it is not caught. If there is a nut on the valve screw it back on. Pump up the tyre until it is not possible to push down with your thumb. Refit the front wheel by placing it back into slots. Tighten back on the bolts or quick release. The quick release lever should feel tough to push back into the secure position. It should leave an imprint on your palm. If replacing the rear wheel then push the jockey wheel forward and pull the derailleur backwards. Place the wheel so that the sprockets are within the chain loop. Tighten the bolt or quick release. Finally re-fit the brakes and check the wheel spins freely without touching the brake pads. Also test out your brakes to make sure all is working. Check for chain wear A heavily worn out chain will cause major damage to the drivetrain which is expensive to replace. Therefore it is worth checking for chain wear and replacing the chain before problems occur. You will need: 12 inch ruler To make this job easier you can also purchase a chain wear tool which only costs around £5 and I highly recommend. The easiest way to measure for chain wear is to measure the length of 12 links. These should measure 12 inches. Place the 0 mark at the centre of one the pins. Then count 12 complete links. If the pin is less than 1/16th of an inch (1.6mm) past the mark then the chain is fine. If it is between 1/16th of an inch and 1/8th (3.2mm) of an inch then it needs replacing. Any more than 1/8th on an inch and you may need to replace the chain and rear cogs. Complete chain link is shown to the left. Loosen the bolt holding the brake pad in place then remove it and the washers. Adjust V brakes Part 1 Brakes need adjusting when they are squealing, they have worn out, the stopping power is reduced or they are touching against the rim as the wheel spins round. This repair is fiddly to do but everyone needs to do it at some stage. Note: some brakes use cartridge pads so only the rubber section needs replacing instead of the entire unit. You will need: New brake pads – similar to your current ones Allen key Check the brake pad surface. As you can see the top one is completely worn out. In the worn out one the grooves have completely disappeared. You should check the new brake pads to see if they come with any specific installation instructions. This is important as it can vary. You can also use your existing brake pads as guidance to how the new pads should be installed. The curved washers tend to sit touching the brake arms. Fit the brake pad into position and add the remaining washers to the other side. Then loosely tighten the nut with your Allen key. This will allow you to manoeuvre them into the correct position at a later stage. Set the position of the brake pad so that it does not touch the tyre and it does not hangoff the side of the rim when the brakes are applied. Also the pad should meet the rim at 90 degrees. You may also need to do something called “toeingin”. Where the front of the pad which faces in the direction the bike travels should be slightly closer to the rim than the back. Not all v-brakes require toeing in; you only need to do so if they squeal when applied. To toe in the brakes simply push the front of the pad further in than the back before tightening the nut. Adjust V brakes Part 2 Finally tighten the nut firmly. Tightening the nut can be tricky as when you are tightening it the pad will attempt to move. Try holding it in place with your other hand. Test it is tight enough by trying to twist the pads by hand. If you can twist them then you need to tighten it further. If the wheel is touching the rim as it spins round due to the new pads then you need to adjust the brake cable tension. Usually the rim should sit 2-3mm away from the pad. If only a small adjustment is needed then this can be done by twisting the barrel adjuster. You should adjust the cable tension so that when the brake levers are applied halfway the brakes are fully engaged. If more adjustment is needed than the barrel adjuster can provide then loosen the cable clamp bolt. Then either release cable or pull more cable in. Finally retighten the bolt and test the wheels spin without touching the pad. It may take a while before the brake pads reach their full braking potential. At first cycle slowly to work them in. You should also test the brakes a few times after replacement to be sure they are tightly fastened and working correctly. It is also worth wiping down the rim surface to be sure they have a good braking surface. Always aim to have a clean brake pad and rim surface as otherwise both will wear prematurely. Adjust rear derailleur Part 1 Some of the signs that things are not quite right with the rear derailleur are: 1. Excessive noise when gear shifting 2. Not been able to shift into certain gears 3. Gears shifting on their own 4. Slow gear shifting You will need: Allen key Screwdriver Gear shifting problems can often be caused by kinked or damaged cable and housing. Use your hand to feel the entire length of the cables for any problems. If there are then these will need replacing. It is also a good idea to lubricate the gear cables. Do this near the housing openings in particular. The high and low limit screws stop the chain from falling off the edge of the cassette. To check for problems shift through the entire range of gears on the front and back. If you find it hard to shift into the more extreme gear configurations i.e. the highest and lowest then it is likely the end stop screws are incorrectly configured. Alternatively you may also notice that the chain looks like it is about to fall off the edge of the sprocket. If you notice problems then adjustment is needed. First identify which one is the high and which one is the low screw. These should be marked with a small H and L. The high limit screw controls the smallest sprocket. The low limit screw controls the largest sprocket. If you tighten these then movement is restricted. If you loosen them then you provide more freedom. The target here is to find the tightest screw setting that will allow access to all the gears. Before making adjustments we need to release the cable from its cable stop to prevent misdiagnosing the problem. To see how to do this proceed to the next step. Adjust rear derailleur Part 2 Shift into the largest rear sprocket by pedalling. Then stop pedalling and shift back a couple of gears towards the smaller sprockets. This will give plenty of cable slack so you can pull the gear cable out of its cable stop. Now we are all set we can adjust the screw labelled H. Shift into the large front chainring and the smallest rear cog. If you are having problems with the chain coming off the smallest rear cog and dropping to the side then you need to tighten (clockwise) the H screw. If you can’t shift into the smallest rear cog then you need to loosen it (counter-clockwise) to allow more movement. Remember to make adjustments in small quarter turn increments and then re-test by putting the gear cable back into its original position, spin the pedals and change the gears. The L screw adjusts the largest cog preventing the chain from falling off the side of it which could cause serious damage. Shift into the largest chainring at the front and smallest rear cog. If it is leaning too far off the top of the largest cog then you need to restrict its movement. Do this by tightening the L screw. If you are having the opposite problem whereby you are not able to shift into the largest cog then you need to loosen the screw slightly. Test and continue to adjust in small increments. Adjust rear derailleur Part 3 Once you are done with adjustments and have tested you can access all the gears without the chain falling off the edge then work in a tiny bit of lube into the screws. Wipe away any excess with a rag and be sure you have replaced the gear cable back into its original position in the cable stop. You can make adjustments to the cable tension through the barrel adjuster. This affects how well all the gears perform. Switch into the large chainring at the front. Then at the rear switch to the smallest sprocket. Be sure there is no more clicks you can possibly do on the gear shifter. Then shift back a gear. If it moves smoothly from one cog to the next then that is a good thing and you don’t need to make these adjustments. If it doesn’t or shifts very slowly then the cable tension needs increasing. Turn it a quarter turn counter-clockwise to do so from the barrel adjuster. Alternatively you may face the opposite problem where the chain tries to over-shift (i.e. the chain tries to skip a sprocket) If you notice this as you change gear then you need to decrease the cable tension. Give the barrel adjuster a small clockwise turn and test again. Adjust rear derailleur Part 4 If major adjustment is needed then you may need to loosen the cable fixing bolt to adjust the amount of cable available. If the problem is that the chain is struggling to shift into the next gear then you will need to reduce the amount of slack in the cable. Pull more cable through and then retest to see if gear shifting has improved. Alternatively you need to provide more cable slack if you notice overshifting. Test out the rest of the gears and make adjustments when problems arise following the steps above to increase or decrease cable tension. Remember to make small changes. One important thing to note is that the gear shifting is likely to respond slightly differently when you are out riding a bike. Do some test runs and diagnose any problems to correct later when you get back home. If you are still having major problems then you may need to consult an expert. This can be due to incompatible components. The final adjustment that can be made is to the b-screw. This positions the derailleur angle in comparison to the rear dropout. Adjust rear derailleur Part 5 To adjust shift into largest rear sprocket and smallest chainring. Then look at the bike from behind to see the distance between the guide pulley and the largest sprocket. This screw will need adjusting if there is too large a gap between the pulley and sprocket or if the two are rubbing against each other. Ideally the two should be just clear of each other. In the unlikely event this does need adjusting turn the b-screw clockwise, increasing the tension and thus moving the pulley away from the sprocket. Otherwise if there is a large gap between the two then loosen the b-screw until they come very close. The first thing to check is the height and angle of the front derailleur. Adjust front derailleur Part 1 If you are experiencing poor shifting or the chain is falling off either side of the chainrings as you pedal then you may need to adjust your front derailleur. Before completing this repair you should first adjust your rear derailleur. You will need: Allen key Screwdriver Start by shifting the front derailleur so that the edge of the cage is positioned above the largest chainring. This will allow you to see the correct height adjustment. The height and angle is sometimes pre-set on a front derailleur depending on the type you have. You can use a penny to check to see if there is about 1 to 2 mm of clearance between the outer cage and the highest point of the biggest chainring. If there is not enough clearance or more likely there is too much then you need to adjust this. Another thing to check before making adjustment is the angle. The best way to view this is from above. Picture an imaginary line coming from the middle of the derailleur cage. This should be lined up with the chain rings. To adjust the derailleur height and angle simply loosen slightly the bolt holding the clamp in place using your Allen key. Then wiggle it around to get the correct adjustment. Then retighten. The next adjustment that can be made is to the limit screws. These keep the chain in position so that it does not fall off either side of the chainrings. You should only adjust them if you are having problems with shifting into the highest and lowest chainrings or the chain is falling off. The screws should be marked with L and H. L is for the smallest chainring and H is for the largest. Adjust front derailleur Part 2 First let’s work on the lower limit screw marked L. Shift your bike between each chainring. If it drops off the lower chainring and onto the frame then you need to tighten the L screw. Turn it clockwise a ¼ turn. Then try again. Alternatively it is having trouble shifting onto the smallest chainring then you need to loosen it by ¼ of a turn. Then try it again. Now do the same for the high gear limit screw. Shift the bike between each chainring. If you notice the chain dropping off the top of the large chainring then tighten the high limit screw by ¼ of a turn. Alternatively if the chain is having trouble shifting onto the largest chainring then you need to loosen it by ¼ of a turn. Test your adjustments by running through the full range of gear changes on the front and back. Note that even on a properly adjusted bike the chain will slightly rub against the derailleur in the highest and lowest gear configurations. This is not something to worry about. Cable tension is also worth checking. Shift into the largest sprocket in the rear and smallest chainring at the front. Adjust front derailleur Part 3 Then loosen the cable clamp bolt and tighten the cable so there is no additional slack. Then retighten the bolt. The right cable tension will mean you are able to shift gears with any delays or problems. To check this, shift between all the chainrings and check that it is able to change smoothly. The barrel adjuster can also be used to make minor adjustments to the cable tension. A counterclockwise turn will tighten the cable. You should also check the cable for any problems such as broken strands or fraying as this too can cause problems with shifting. The final test to do is to run through the full range of gears and see if they respond well. If they don’t go back and make adjustments where necessary. You will know a stiff link has occurred because as you are cycling the pedals will slip forward regularly. Fixing stiff link Another cause of shifting problems is having a stiff link in the chain. This is very easy to correct. You may need: Chain tool Finding a stiff link is easy. Turn your bike upside down. Change into the lowest sprocket on the rear and the largest chain ring on the front. A stiff link can be identified by seeing which one struggles to pass through the derailleur. Spin the chain round a couple more times to be sure of the offending link. This problem can sometimes be solved by flexing the stiff link backwards and forwards using your thumbs around the troublesome link. Also work the stiff link in the motion shown above. If this doesn’t fix the problem then you will need to use the chain tool. Proceed to the next step. Position the chain in the slot of the chain tool that is nearest the handle. If one side of the chain pin is protruding more than you should place that side nearest the handle. Line up the chain pin precisely with the chain tool handle. This is important so that the chain pin is pushed out smoothly. Then turn the chain tool handle until it reaches the chain pin. When it does give it only a 1/3 of a turn. Remove the tool and move the chain around to see if it is still stiff. Try to compare this to the other links. If it is still not moving around freely repeat the process but on the other side of the chain. Automating your bike maintenance and making your life easier Bicycle maintenance can often be seen as one of those chores you never get round to. I frequently used to say to myself: “Ah I’ll give it a clean next week”. Usually next week never came round and I ended up with a worn out bike I didn’t want any more. Checklist Luckily bikes don’t need much time, only 30 minutes out of 43,829 that are available in a month. In return you’ll save money, components will last longer and best of all you will get a smoother, noise free ride. Little and often I have a couple of techniques for making sure I don’t skimp on my monthly maintenance that have worked wonders. I wanted to share these with you as hopefully it will save you some time and make your life easier. The second trick is to have a checklist like the one I have provided you with in this eBook. Then I can simply work through it without forgetting anything. I find this speeds things along. My final trick is to keep myself motivated by reminding myself that the little bit of effort I’m putting in now will save me many hours of hassle later on. I hope this helps and saves you some money in bike repairs, Andreas londoncylist.co.uk Put it in the calendar! The first thing I did was make sure there is a certain day every month that I set aside some time to perform my maintenance routine. Then I never have to think about it. A little beep goes off on my phone and I know what needs to be done. I recommend doing the same with your phone, computer or paper based calendar. By http://www.londoncyclist.co.uk/ Where to from here? Reading If you’re looking to expand your knowledge of bicycle maintenance then there are three books I can highly recommend. The first is The Ultimate Guide to Bicycle Maintenance. Which I reviewed on London Cyclist. It is very easy to follow and great for beginners. The second is The Bike Book which is popular book available from Amazon.co.uk iPhone If you are on the iPhone then I’ve released an application called Bike Doctor. It takes you through step-by-step as above through 20 repairs. Each one comes with a color picture. It is perfect because you can carry it with you at all times and use it whenever there is a problem. To find out more about Bike Doctor head to the blog post on London Cyclist about it or download the App now. Finally Park Tools Big Blue Book of Bicycle Repair is known and trusted by many bike mechanics. It is available from Amazon.com This Guide is by LondonCyclist.co.uk Websites Online is a great place to expand your knowledge of bikes. You really only need two websites when you are starting. The first is Bicycle Tutor which has an enormous collection of well narrated videos that take you through each repair. I can’t recommend this resource enough. The web address is: www.bicycletutor.com The second is the Park Tool website. It has very in-depth instructions and clear illustrations to talk you through common repairs. When I was learning I constantly had this website open in the background. The web address is: www.parktool.com Head to the site to get more great articles about your bike and cycling. Also check out the newsletter for more free guides such as this one.