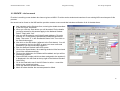
1
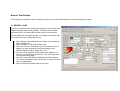
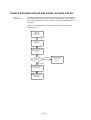
National Student Index
Integration Testing
For Take2 Users
Test Script for the XML Interface
April 2006
Version 1.5
National Student Index – Take2
Integration Testing
Name of Document
National Student Index Integration testing - Test Scripts for On-line Interfaces for
Take2 users.
Document Contact
For information and copies of any documents relating to the NSI please contact:
NSI Unit
Ministry of Education
Level 3, St Paul's Square, Wellington
Phone: 04-463 8173
Email [email protected]
Fax: 04-463-8726
Meta Office Help Desk
51a Waipapa Road
Hataitai
Wellington 6003
New Zealand
Phone 04 939-1267
Fax
04 386-3519
Email [email protected]
Related Documentation
Document Title
Version
Status
Last
Revision
Post-Compulsory Unique Identifier
Code 2001
-
Issued
14 August
2001
NSI Business Process
Web
Published
9 May 2001
National Student Index - A Manual for
Tertiary Education providers and
Student Management System
Developers
1.1
Final
8 February
2001
Take2 User Manual
8.1
Current
January 2006
2
National Student Index – Take2
Integration Testing
Table of Contents
INTRODUCTION
4
ORIGIN OF THIS MANUAL
PURPOSE OF INTEGRATION TESTING
INTENDED AUDIENCE
OVERVIEW OF GOING LIVE WITH THE NSI
OVERVIEW OF INTEGRATION TESTS
PROCEDURE FOR INTEGRATION TESTING
SYSTEM REQUIREMENTS
TIPS FOR TESTERS
SETTING UP A TEST DATABASE
4
4
4
4
5
5
5
7
7
SEARCH TEST SCRIPTS
9
1.1 SEARCH - NSN
1.2 SEARCH – NAME, DATE OF BIRTH & GENDER
1.3 SEARCH – NAME ONLY
9
12
13
CREATE RECORD TEST SCRIPTS
14
2.1 CREATE – PARTIAL RECORD
2.2 CREATE – PARTIAL RECORD WITH ALTERNATIVE NAME
2.3 CREATE – ACTIVE RECORD
2.3 CREATE – ACTIVE RECORD
2.4 CREATE – ACTIVE RECORD – POTENTIAL MATCH
14
16
19
19
22
UPDATE RECORD TEST SCRIPTS
25
3.1 UPDATE - NAME
3.2 UPDATE – VERIFICATION INFORMATION
3.3 UPDATE – UNSUCCESSFUL UPDATE ATTEMPT
25
28
31
MERGE RECORD TEST SCRIPTS
33
4.1 MERGE – NO MANUAL INTERVENTION REQUIRED
4.2 MERGE – MANUAL INTERVENTION REQUIRED
33
35
CHALLENGE CHANGE TEST SCRIPTS
37
5.1 CHALLENGE CHANGE
37
A NOTE ON SEARCHING THE NSI
42
3
National Student Index – Take2
Integration Testing
DOING A PROVIDER UPLOAD AND GOING LIVE WITH THE NSI
43
Introduction
Origin of This Manual
This manual was prepared by Meta Office (suppliers of Take2) by taking the Ministry
of Education’s own manual and revising it to incorporate information specific to
Take2 users. Where a section of the manual is specific to Take2 you will see a
vertical bar in the left margin – just like this paragraph.
Purpose of Integration Testing
The purpose of the integration testing described in this document is to formally test
that the interface between a provider’s implementation of Take2 and the National
Student Index (NSI) functions correctly. It is expected that before this testing takes
place the provider will have completed their own testing to ensure that the interface
works in the way that is required by their own organisation. The integration testing is
intended to provide both the provider and the Ministry of Education with the
confidence that the NSI interface allows data to be successfully transferred without
causing either system to malfunction before the provider commences their use of the
live NSI system.
Change from COM to XML Interface
When the NSI was introduced Meta Office implemented the “COM” interface for
Take2 at the suggestion of the Ministry. Because of changes in government policy
the COM interface is being phased out in 2006. Therefore from version 8 of Take2,
released in early 2006, the COM interface is replaced with the XML interface. From a
user’s perspective there is no difference at all in how Take2 functions. The screen
designs are the same and the same things happen when you click on the various
buttons. The Ministry of Education has, however, mandated that Take2 users moving
from the COM interface to the XML interface must carry out integration testing.
Intended Audience
This document is intended for technical personnel carrying out NSI testing at provider
sites.
If you are a small provider, intending to use the Web interface (rather than the XML
interface) you may not wish to carry out this integration testing, because you intend
to rely on obtaining National Student Index numbers for existing students via the
Web. You should contact the NSI Unit to obtain access to the NSI Web site.
Overview of Going Live with the NSI
When you are ready to go live with the NSI you go through a testing process (what is
described in this manual), and then you go through a “provider load” process which
results in an NSN (National Student Index number) being assigned to all your
existing students. Finally you “go live” by changing some settings in Take2, which
4
National Student Index – Take2
Integration Testing
then allows you to use the XML interface – a way of looking up data from the NSI
database via the Internet.
Integration
Testing
Provider Load
Go Live with
XML interface
Use
XML interface
Overview of Integration Tests
The integration tests cover all of the areas of NSI functionality that you are able to
access via a standard NSI interface. The tests are divided into each of the following
main areas:
•
•
•
•
•
searching for an existing NSI record;
creating a new record;
updating an existing record;
merging two or more NSI records; and
challenging a change that another user has made to one of your student’s NSI
records.
There are test scripts that relate to each of these main areas. These scripts are
essentially checklists that detail precisely what is being tested and in what sequence.
Procedure for Integration Testing
The following steps are the procedure for carrying out NSI Integration testing.
1. Obtain a log-in (user name and password) to the NSI test site from the NSI Unit if
you do not already have one. If you have an existing log-in contact the NSI Unit
to make sure that it is valid for the XML interface.
2. Arrange test date with the NSI Unit.
3. Confirm test scripts that will be executed.
4. Prepare test database.
5. Run tests on agreed date.
6. Complete test script templates.
7. Fax or e-mail completed templates to the NSI Unit.
8. Review test results in conjunction with the NSI Unit.
9. Rectify any problems.
10. Resubmit as necessary.
11. NSI Unit agrees that testing is completed.
System Requirements
In order to successfully complete the integration testing and then use the NSI your
system must meet the following requirements:
1. Your Take2 Main Module must be version 8.1.1 or higher. You can determine
your version of the Main Module by opening Take2 and looking at the version
5
National Student Index – Take2
Integration Testing
number in the title bar of the Take2 window. If you need to upgrade you can
obtain the relevant download from the Take2 web site (www.take2.co.nz) or
contact the Take2 help desk on 04 939-1267.
2. After integration testing and prior to going live you must use the Take2 Provider
Load Utility. This applies only if you have not previously been using the COM
interface. You must use version 1.4 or higher. You can determine your version of
the Utility by opening it and looking at the version number in the title bar of the
Utility window. If you need to upgrade you can obtain the relevant download from
http://www.meta-server.com/Downloads/SupportFiles/NSIProviderLoad.exe
(password is “sweetthing”) or contact the Take2 help desk on 04 939-1267. A
description of the “going live” process is provided in the Take2 user manual and
the relevant section is reproduced at the end of this test script.
6
National Student Index – Take2
Integration Testing
Tips for Testers
Integration testing will be most successful if you ensure that:
•
•
•
•
•
•
•
You enter the exact data in the test script. If all of the data cannot be entered, or
alternate data is entered, you should provide an explanation on the template.
You execute the tests in order because the test scripts have been designed to be
carried out sequentially, for example the record you create in 2.1 is subsequently
updated in 3.1.
The test environment is equivalent in all respects to the live/production
environment that you will be using. If this is not possible you should discuss with
the NSI Unit the differences between your testing and live environments.
Only people testing the NSI interface have access to your test environment while
you are performing the testing.
You conduct the testing on the date agreed with the NSI Unit.
You keep a full record of any errors or issues that arise – e.g. take a screen shot
of any errors.
To copy the window or screen contents:
To make a copy of the active window, press ALT+PRINT SCREEN.
To copy the entire screen as it appears on your monitor, press PRINT
SCREEN.
Note: To paste the image into a document (e.g. a Word document), click the
Edit menu in the document window, and then click Paste.
If any questions arise during the integration testing please contact the NSI Unit or the
Take2 Help Desk as soon as possible.
Setting Up a Test Database
We suggest that you do your testing by using a copy of your live Take2 database. It
is also a good idea to use a separate Take2 front-end to reduce the chance of mixing
up the test database with the live database.
a) Create a new folder on your PC called “NSITest”.
b) Copy the live Take2 data files (Take2Data.mdb and Take2Archive.mdb) into
this folder.
c) Copy the Take2 front-end files (Take2.mde and Take2Admin.mde) into this
folder.
d) Create a shortcut to each of the two front-end files, naming them “Test
Take2” and “Test Take2 Admin”.
e) Open each front-end file and you will be prompted to locate the Take2 data
files. Select the data files in the NSITest folder.
f)
Notice that when you return to the Main Menu after linking, the word “Test”
will appear rather than the logo file.
g) Open the Administration Module and go to System Management Site
Details->NSI. Make sure that the XML Interface field is ticked and that “Live”
is entered in the NSI Implemented field.
7
National Student Index – Take2
Integration Testing
h) Enter the correct URLs:
i. Web: URL: http://nsicompl.nsi.govt.nz
ii. XML URL: https://nsicompl.nsi.govt.nz/interface/nsi_xml.asp
i)
Now go to the Optional Functionality tab. Remove the tick from the
Mandatory Field Checking box.
Now you are ready to run through the test script.
8
Search Test Scripts
These tests are intended to ensure that the provider can use their NSI interface to locate existing NSI records.
1.1 SEARCH - NSN
Provider is enrolling a new student who has given the provider their
National Student Index number (NSN). Provider enrols student
and searches for an existing NSI record as part of this process.
Record details are returned from NSI. If all details are correct then
the provider uses the existing NSI record.
a) Add a student on the Students form. Make up the details of
name, gender, etc.
b) Enter “3596060” in the NSI Number field.
c) When you click the Save button you will be asked “Do the
details you have entered for this student apply to the
National Student Index?” Reply with “Yes”.
d) Now you will be asked to verify identify and residency. In
fact this is not necessary for this test. You can simply click
on the Save button again.
e) Now click on the NSI button (adjacent to the Print button).
You will be prompted to log-in to the NSI, so enter your user
name and password.
f) Now the National Student Index form opens.
National Student Index – Take2
Integration Testing
Test Script Templates
g) Click on the Search button and a student will be found. The Data
tab will be displayed. If one student is displayed in the NSI
section write “One student returned” in the first “Actual Output”
box of the Ministry’s test script, below. (That one student may
have alternative names such as “Alt Surname” etc. That’s ok –
the student still counts as one student. )
h) Write down the name and date of birth of the returned student
whose details are displayed on the Data tab in the second
“Actual Output” box of the Ministry’s test script, below. Note,
Take2 display the code of the organisation that created NSI
records, and code “9999” is NZQA.
i) Close the National Student Index form.
j) Mark off below whether the test was passed or failed (ie the test
was passed if you found one student and it was the correct
student).
10
National Student Index – Take2
Integration Testing
Test Script Templates
Please complete the ‘Actual Output’ column and record any comments in the Notes section below.
NSI Action
Input
Expected Output
1. Log into NSI
2. Perform Search for student
•
Student NSN: 3596060
•
Search executes successfully.
3. Search returns one exact match
result.
•
None
•
One NSI record is returned that relates to
the NSN entered by the provider.
Record was created by NZQA and
should have date of birth 1/1/80.
Actual Output
Notes:
Pass/Fail
11
National Student Index – Take2
Integration Testing
Test Script Templates
1.2 SEARCH – Name, Date of Birth & Gender
Provider is enrolling a new student who has not given the provider an NSN. Provider enrols student and searches for an existing NSI record as
part of this process.
Record details are returned from NSI. If an NSN exists and all details are correct then the provider uses the existing NSI record.
Follow the Take2 steps described above for section 1.1, except that at step a) you must type in precisely the details given below in the first
“Input” box, miss out step b), and at step g) you may find several students returned. Record the output (the NSN that was returned) and mark
off the pass/fail.
Please complete the ‘Actual Output’ column and record any comments in the Notes section below.
NSI Action
Input
Expected Output
1. Log into NSI
2. Perform Search for student
•
•
Search executes successfully.
•
•
Student Name: Fraser
Richards
DoB: 1 Aug 1979
Gender: Male
•
None
•
•
•
NSI record 260362 is returned.
Other NSI records may also be returned.
The returned data will be in the format
described in the Search Function section
of GINS.
3. Search returns results from the NSI.
Actual Output
Notes:
Pass/Fail
12
National Student Index – Take2
Integration Testing
Test Script Templates
1.3 SEARCH – Name Only
Provider is enrolling a new student who has not given the provider their NSN. Provider enrols student and searches for an existing
NSI record as part of this process.
Record details are returned from NSI. If an NSN exists and all details are correct then the provider uses the existing NSI record.
Follow the Take2 steps described above for section 1.1, except that at step a) you must type in precisely the details given below in
the first “Input” box, miss out step b), and at step g) you may find several students returned. Record the output and mark off the
pass/fail. If several students are found, you will need to double click on each individual student (at the left hand arrow) to see all
their details.
Please complete the ‘Actual Output’ column and record any comments in the Notes section below.
NSI Action
Input
Expected Output
1. Log into NSI
2. Perform Search for student
•
Student Name: Ian Carter
•
Search executes successfully.
3. Search returns results from the NSI.
•
None
•
•
•
NSI record 98108230 is returned.
Other NSI records may also be returned.
The returned data will include at least
student name and date of birth. NSI
record status may also be shown,
although if you found more than one NSI
match for Ian Carter the NSI status may
not be shown
Actual Output
Notes:
Pass/Fail
13
National Student Index – Take2
Integration Testing
Test Script Templates
Create Record Test Scripts
These tests are intended to ensure that the provider can use their NSI interface to create new NSI records. In completing these test you will be
creating four new NSI records which are referred to in the following scripts as records A, B, C and D. As you will use these records again in
later tests it is important that you keep a note of the NSNs that you create for each of these new records.
2.1 CREATE – Partial record
Provider is enrolling a new student who has not given an NSN. Provider creates a new record.
a) Add a student on the Students form, entering the details described in the first “input” box below.
b) When you click the Save button you will be asked “Do the details you have entered for this student apply to the National Student
Index?” Reply with “Yes”.
c) Now you will be asked to verify identify and residency. Do not do so
because this is a “partial” record. You simply click on the Save button
again.
d) Now click on the NSI button (adjacent to the Print button). You will be
prompted to log-in to the NSI, so enter your user name and password if
you are not already logged in.
e) Now the National Student Index form opens.
f) Click on the Search button. No matching student will be found and you
will be notified accordingly.
g) Click on the Add button, the student will be added, and you will be
accordingly notified.
h) Record the NSI number which has been assigned to the student (it is
displayed in the NSI field at the top right of the National Student Index
form).
i) Close the National Student Index form.
j) Mark off below whether the test was passed or failed.
14
National Student Index – Take2
Integration Testing
Test Script Templates
Please complete the ‘Actual Output’ column and record any comments in the Notes section below.
NSI Action
Input
Expected Output
Actual Output
1. Log into NSI
2. Create student record using
create/insert function.
•
•
•
Enter student details into create
function.
•
New NSI record saved in the NSI
database
NSN and record status returned.
Record the new NSN. (Note – this is
the NSN for record A).
Details to enter:
• Student Surname: Street name
where your provider is located.
• Student Forename1: Your own first
name.
• Gender: Male
• Date of Birth: Today’s date – 3
years.
• Residential Status: Citizen
Eg.
•
•
•
•
•
Student Surname: Pipitea
Student Forename1: Karen
Gender: Male
Date of Birth: 30 Jan 1999
Residential Status: Citizen
Note that this record is partial, so do
not enter verifications for residential
status or name/DoB.
Notes:
Pass/Fail
15
National Student Index – Take2
Integration Testing
Test Script Templates
2.2 CREATE – Partial record with alternative name
Provider is enrolling a new student who has not given an NSN. Provider enrols student and creates a new record that includes the student’s
alternative name (i.e. alias or former name).
a) Add a student on the Students form, entering the details
described in the “input” box below. Enter the student’s
preferred (alt) name “Rob Bob MacPherson” into the Family
Name and First Names fields. Note, by entering this name
here you are automatically setting it as the student’s preferred
name. Enter the student’s gender.
b) Now enter the student’s other name and their remaining
details on the right hand side (NSI side). To do this, you’ll
need to make sure the NSI Details button is depressed.
c) Once you’ve entered all the details described below, click on
the Save button. You will be asked “Do the details you have
entered for this student apply to the National Student Index?”
Reply with “Yes”.
d) Now you will be asked to verify identify and residency. Do not
do so because this is a “partial” record. You simply click on
the Save button again.
e) Now click on the NSI button (adjacent to the Print button).
You will be prompted to log-in to the NSI, so enter your user
name and password if you are not already logged in.
f) Now the National Student Index form opens.
g) Click on the Search button. It is likely that no matching
student will be found and you will be notified accordingly. If
potential matches are found, ignore them and go to the Process tab.
h) Click on the Add button, the student will be added, and you will be accordingly notified.
i) Record the NSI number which has been assigned to the student (it is displayed in the NSI field at the top right of the National Student
Index form).
16
National Student Index – Take2
Integration Testing
Test Script Templates
j) Close the National Student Index form.
k) Mark off below whether the test was passed or failed.
Please complete the ‘Actual Output’ column and record any comments in the Notes section below.
NSI Action
Input
Expected Output
Actual Output
1. Log into NSI
2. Create student record using
create/insert function.
•
•
•
Enter student details into create
function.
•
New NSI record saved in the NSI
database
NSN and record status returned.
Record the new NSN. (Note – this is
the NSN for record B).
Details to enter:
•
•
•
•
Alt Surname: MacPherson
Alt Forename 1: Rob
Alt Forename 2: Bob
Alt Forename 3:
•
NSI Surname: Name of the
suburb/town where your provider
is located.
NSI Forename1: Your own first
name.
NSI Forename 2: Name of the
region where your provider is
located
Gender: Male
Date of Birth: Today’s date – 3
years.
Residential Status: Citizen
•
•
•
•
•
17
National Student Index – Take2
Integration Testing
Test Script Templates
Eg.
• Family Name: MacPherson
• First Name: Rob Bob
•
•
•
•
•
•
Student Surname:
ThorndanWellington
NSI Surname: Karen
NSI Forename 2: Wellington
Gender: Male
Date of Birth: 30 Jan 1999
Residential Status: C
Note that this record is partial, so do
not enter verifications for residential
status or name/DoB.
Notes:
Pass/Fail
18
National Student Index – Take2
Integration Testing
Test Script Templates
2.3 CREATE – Active record
Provider is enrolling a new student who has not given an NSN. Provider enrols student and searches for an existing NSI record as part of this
process.
No record can be found on the NSI and the provider creates a new record that includes verification of all of the data items.
a) Add a student on the Students form, entering the details described
in the first “input” box below.
b) When you click the Save button you will be asked “Do the details
you have entered for this student apply to the National Student
Index?” Reply with “Yes”.
c) Now you will be asked to verify identify and residency. Do so by
entering “B “ in the Identity Verified and Residential Verification
fields. Also enter “P” in the Residential Status field. Then click on
the Save button again.
d) Now click on the NSI button (adjacent to the Print button). You will
be prompted to log-in to the NSI, so enter your user name and
password if you are not already logged in.
e) Now the National Student Index form opens.
f) Click on the Search button. No matching student will be found and
you will be notified accordingly.
g) Click on the Add button, the student will be added, and you will be
accordingly notified.
h) Record the NSI number which has been assigned to the student (it
is displayed in the NSI field at the top right of the National Student
Index form).
i) Go to the Data tab to see if the NSI Status is active – record the
status in the output box below.
j) Close the National Student Index form.
k) Mark off below whether the test was passed or failed.
19
National Student Index – Take2
Integration Testing
Test Script Templates
Please complete the ‘Actual Output’ column and record any comments in the Notes section below.
NSI Action
Input
Expected Output
Actual Output
1. Log into NSI
2. Create student using
create/insert function.
•
•
•
Enter student details into create function.
Details to enter:
• Family Name: Name of your provider.
• First Names: Your own first name, then
your own surname, then “Marie”
• Gender: Female
• Date of Birth: Today’s date – 20 days.
• Residential Status: Permanent res.
• Name/DoB ver.:Passport
• Res Stat ver.: Passport
Eg.
•
•
•
•
•
•
•
•
New NSI record saved in the NSI
database. Record correctly shows the
student’s details.
NSN and “active” record status returned.
Record the new NSN (note this is the
NSN for record C).
Family Name: Ministryofeducation
First Names: Karen Wilton Marie
Gender: Female
Date of Birth: 10 Jan 2002
Residential Status: P
Name/DoB ver.:B
Res Stat ver.: B
Note that this is an Active record, so both the
verification fields must be filled.
Notes:
20
National Student Index – Take2
Integration Testing
Test Script Templates
Pass/Fail
21
National Student Index – Take2
Integration Testing
Test Script Templates
2.4 CREATE – Active record – potential match
Provider is enrolling a new student who has not given an NSN. Provider fully enrols the student and searches for an existing NSI record as part
of this process.
The search identifies a potential match but after viewing this record the provider determines that in fact the existing NSI record relates to a
different student and so creates a new record that includes verification of all of the data items.
a) Add a student on the Students form, entering the details described in the first “input” box below.
b) When you click the Save button you will be asked “Do the details you have entered for this student apply to the National Student
Index?” Reply with “Yes”.
c) Now you will be asked to verify identify and residency. Do so by entering “B “ in the Identity Verified and Residential Verification fields.
Also enter “P” in the Residential Status field. Then click on the Save button again. A warning may appear asking you whether you want
to see a list of duplicates. Click “No”. You will then be asked whether you want to save this entry anyway. Choose “Yes”.
d) Now click on the NSI button (adjacent to the Print button). You will be prompted to log-in to the NSI, so enter your user name and
password if you are not already logged in.
e) Now the National Student Index form opens.
f) Click on the Search button. A matching student maybe be found and you will be notified accordingly, but after viewing the details on the
Data tab, you decide that this is not the correct student.
g) On the Process tab click on the Add button. You may be asked whether you want to view matches before adding. Choose “No”. The
student will be added, and you will be accordingly notified.
h) Record the NSI number which has been assigned to the student (it is displayed in the NSI field at the top right of the National Student
Index form).
i) Close the National Student Index form.
j) Mark off below whether the test was passed or failed.
Please complete the ‘Actual Output’ column and record any comments in the Notes section below.
22
National Student Index – Take2
Integration Testing
NSI Action
Input
Expected Output
1. Log into NSI
2. Attempt to create student record
using create/insert function.
•
•
Enter student details into create
function.
Test Script Templates
Actual Output
Search executes successfully.
Details to enter:
• Student Surname: Name of your
provider.
• Student Forename1: Your own first
name.
• Student Forename2: Your own
surname.
• Student Forename3: Marie
• Gender: Female
• Date of Birth: Today’s date – 10
days.
• Residential Status: Permanent res.
• Name/DoB ver.:Birth certificate.
• Res Stat ver.: Birth certificate
Eg.
• Student Surname:
Ministryofeducation
• Student Forename1: Karen
• Student Forename2: Wilton
• Student Forename3: Marie
• Gender: Female
• Date of Birth: 20 Jan 2002
• Residential Status: Permanent res.
• Name/DoB ver.: Passport
• Res Stat ver.: Passport.
23
National Student Index – Take2
Integration Testing
Test Script Templates
Note that this is an Active record, so
both the verification fields must be
filled.
3. Search results in matching
records and override code
being returned.
4. Create student using
create/insert function but
1
ensure that the override code
is added to the input data.
•
•
Can add Alt Names
None
•
•
Input data from step 2 above.
Override code produced from first
create attempt.
•
Override code & details from potential
matching record(s) returned.
•
Record the override code OR if your
system deals with the override code
behind the scenes then record the
details of the potentially matching NSI
record that has been returned.*
•
New NSI record saved in the NSI
database.
NSN and record status returned.
•
Record the new NSN (note this is the
NSN for record D):
•
Notes:
Pass/Fail
1
Your interface may deal with the override code behind the scenes and instead your system may advise you that a closely matching record has been found and ask you to
confirm that you really do want to create new record.
24
National Student Index – Take2
Integration Testing
Test Script Templates
Update Record Test Scripts
These tests are intended to ensure that the provider can use their NSI interface to update existing NSI records. The records that are updated
in the following tests will have been created as part of executing the “Create Record Test Scripts”.
3.1 UPDATE - Name
Provider is enrolling a new student who has not given an NSN. Provider
enrols student and searches for an existing NSI record as part of this
process.
An existing NSI record is found for the student however the details on the
NSI record are now out of date and need to be updated to reflect a change
in the student’s name.
a) Open the Students form and select the student created in section 2.1
above.
b) Click on the NSI button and log-in to the NSI.
c) Now the National Student Index form opens. In the Use option group
untick the NSI No and Residential Status fields.
d) Click on the Search button. One or more matches will be found.
e) Move to the Data tab of the National Student Index form. See the last
page of this document for more information on viewing and selecting
matches.
f) On the Students form change the student’s name – you must change
the name that appears in the NSI Details section of the students
form.
g) In the NSI section tick the Accept field and the Update NSI field.
h) Now return to the Process tab of the National Student Index form and
click on the Update button.
25
National Student Index – Take2
i)
j)
k)
l)
Integration Testing
Test Script Templates
You will receive a message telling you that the NSI has been successfully updated.
Close the National Student Index form and return to the Students form.
Click on the NSI Details button and check that the student’s NSI name has been updated.
Mark off below whether the test was passed or failed.
Please complete the ‘Actual Output’ column and record any comments in the Notes section below.
NSI Action
Input
Expected Output
1. Log into NSI.
2. Perform Search for student.
•
Student Name – from record
2
A
DoB, Gender, Residential
Status-optional from record A.
•
Search executes successfully.
Search returns results, including record
A.
Update executes successfully.
•
3. Search returns results.
•
None
•
4. Update the name details on
record A using the update
function.
•
Update name.
•
Actual Output
Details to enter:
Surname: Johnstone
Forename 1:Henry
Forename 2: Your own first name.
Eg:
Surname: Johnstone
Forename 1:Henry
Forename 2: Karen
2
Note that record A is the record that you created as part of test script 2.1.
26
National Student Index – Take2
Integration Testing
Test Script Templates
Notes:
Pass/Fail
27
National Student Index – Take2
Integration Testing
Test Script Templates
3.2 UPDATE – Verification information
Provider is enrolling a new student who has not given an NSN. Provider enrols student and searches for an existing NSI record as part of this
process.
An existing NSI record is found for the student however the details on the NSI record are not verified. The provider confirms the students’
personal information and verifies the data on the NSI record accordingly.
a)
b)
c)
d)
e)
f)
g)
h)
i)
j)
k)
l)
m)
n)
Open the Students form and select the student created in section 2.2 above.
Click on the NSI button and log-in to the NSI.
Now the National Student Index form opens. In the Use option group untick the NSI No and Residential Status fields.
Click on the Search button. One or more matches will be found.
Move to the Data tab of the National Student Index form. See the last page of this document for more information on viewing and
selecting matches.
Select the matching student and tick the Update box. Move back to the Process tab and click Update.
Now close the NSI section so that you return to the Students form. Change the Identity Verified field to “O” and the Residential
Verification field to “B”.
Go back to the NSI section, search again (using NSN this time)
You should match only one student. On the data tab tick the Accept field and the Update NSI field for the student.
Now return to the Process tab of the National Student Index form and click on the Update button.
You will receive a message telling you that the NSI has been successfully updated.
Close the National Student Index form and return to the Students form.
Click on the NSI Details button and check that the student’s NSI name, Identity Verification and Residency Status fields have been
updated.
Mark off below whether the test was passed or failed.
Please complete the ‘Actual Output’ column and record any comments in the Notes section below.
28
National Student Index – Take2
Integration Testing
NSI Action
Input
Expected Output
1. Log into NSI
2. Perform Search for student.
•
Student Name – from record
3
B
DoB, Gender, Residential
Status-optional from record B
•
Search executes successfully.
•
3. Search returns results.
•
None
•
Search returns results, including record
B.
4. Update the verification details on
record B using the update
function.
•
Update record data:
•
•
Update executes successfully.
Record status changes to “active”.
Test Script Templates
Actual Output
Details to enter:
Surname: Johnstone
Forename 1:Henry
Forename 2: Your own first name.
Forename3: Alistair
Name/DoB Verification: Other
Res. Status ver: Birth certificate
Eg:
Surname: Johnstone
Forename 1:Henry
Forename 2: Karen
Forename 3: Alistair
Identity Verified: O
Res. Verification: B
3
Record B is the NSI record that you created as part of test script 2.2.
29
National Student Index – Take2
Integration Testing
Test Script Templates
Notes:
Pass/Fail
30
National Student Index – Take2
Integration Testing
Test Script Templates
3.3 UPDATE – Unsuccessful update attempt
Provider is enrolling a new student who has not given an NSN. Provider enrols student and searches for an existing NSI record as part of this
process.
An existing NSI record is found for the student however the details on the NSI record are now out of date and need to be updated to reflect a
change in the student’s name. The provider attempts to update the record but does not enter verification information for the new data. As the
NSI record has an “active” status an error is returned.
a) Add a student on the Students form with the name “Henry Johnstone” and the same date of birth and gender as used in section 2.2
above.
b) Enter “AUS” in the Citizenship field.
c) Click on the Save button and when prompted to verify identity and residency type leave the Identity Verified field and the Residential
Verification field as “U”.
d) Click the Save button again and click on the NSI button and log-in to the NSI.
e) Now the National Student Index form opens.
f) Untick the Residential Status box in the list of search criteria.
g) Click on the Search button. One or more matches will be found, including one for the record you entered in section 2.2. If you have not
already noted the NSN for this student, do so now,
h) Return to the students form and enter the NSI number into Henry Johnstones record..
i) Return to the NSI form, and perform another search. This time ensure that NSI number is ticked before searching.
j) On the data tab, only one student should be displayed. Tick both the Selected and Update NSI fields for this student.
o) Now return to the Process tab of the National Student Index form and click on the Update button.
p) You will receive a message telling you that you cannot replace a verified flag with an unverified flag.
k) Mark off below whether the test was passed or failed.
31
National Student Index – Take2
Integration Testing
Test Script Templates
Please complete the ‘Actual Output’ column and record any comments in the Notes section below.
NSI Action
Input
Expected Output
1. Log into NSI
2. Perform Search for student.
•
Student Name – Henry
Johnstone
DoB, Gender, Residential Status4
optional from record B
•
Search executes successfully.
Search returns results, including record
B.
Unsuccessful update – error message
returned:
Error 274: Can’t replace verified data
with unverified data.
•
3. Search returns results.
•
None
•
4. Perform update on record B.
•
Perform update.
•
Data to enter:
Res Stat: Australian
Res Stat Verification: Unverified
•
Actual Output
•
Record actual error message shown on
your system.
Notes:
Pass/Fail
4
Record B is the record that was created as part of test script 2.2 and that was also used in script 3.2.
32
National Student Index – Take2
Integration Testing
Test Script Templates
Merge Record Test Scripts
These tests are intended to ensure that the provider can use their NSI interface to lodge a request for a group of NSI records to be merged.
The records that are used in the following tests will have been created or located as part of executing the “Create Record Test Scripts”.
4.1 MERGE – No manual intervention required
Provider is enrolling a new student who has not given an NSN. Provider enrols student and searches for an existing NSI record as part of this
process.
An existing NSI record is found for the student however an additional NSI record that also appears to relate to the student is found. The
provider lodges a request with the NSI Unit for the multiple records to be merged.
a) Find the student on the Students form who was added in
section 2.3 above.
b) Click on the NSI button and log-in to the NSI.
c) Now the National Student Index form opens.
d) Untick NSI number and DOB on the search criteria.
e) Click on the Search button. Several matches will be found,
including the record created in section 2.3 and the record
found at step 3 in section 2.4 which was not accepted.
These records can be identified by their NSNs.
f) The matches are displayed on the Data tab of the National
Student Index form. Tick the Select field for the two records
in question.
g) Now return to the Process tab of the National Student Index
form and click on the Merge button.
h) You will receive a message telling you that you that the
merge succeeded.
i) Mark off below whether the test was passed or failed.
33
National Student Index – Take2
Integration Testing
Test Script Templates
You will need your results from test script 2.4 in order to complete this test successfully. Record D is created as part of executing 2.4 and the
override code and details referred to in step 3 below should also have been recorded as part of executing 2.4.
Please complete the ‘Actual Output’ column and record any comments in the Notes section below.
NSI Action
Input
Expected Output
1. Log into NSI.
2. Perform Search for student.
•
Student Name (Name On Record
D)
DoB, Gender, Residential Status
(Optional from Record D)
•
Search executes successfully.
•
3. Search returns results.
•
None
•
Search returns results, including record
D & the record with an NSN that relates
to the override code or details returned in
step 3 of script 2.4.
4. Perform merge request for
the two records.
•
The NSNs of the records D and the
record that relates to the override
code in 2.4.
•
Merge request executes successfully.
Actual Output
Notes:
Pass/Fail
34
National Student Index – Take2
Integration Testing
Test Script Templates
4.2 MERGE – Manual intervention required
Provider is enrolling a new student who has not given an NSN. Provider enrols student and searches for an existing NSI record as part of this
process.
An existing NSI record is found for the student however an additional NSI record that also appears to relate to the student is found. The
provider lodges a request with the NSI Unit for the multiple records to be merged.
Take2 handles this process in exactly the same way as section 4.1, above. Simply repeat the steps described there. Don’t forget to untick the
NSI Number and DoB boxes in the NSI list of search critera.
Please complete the ‘Actual Output’ column and record any comments in the Notes section below.
NSI Action
Input
Expected Output
1. Log into NSI.
2. Perform Search for student.
•
•
Search executes successfully.
•
•
Search returns results, including record A
& record B.
Merge request executes successfully.
3. Search returns results.
•
Student Name: Henry Johnstone
(i.e. Updated Name On Record A)
DoB, Gender, Residential Status
5
(Optional from Record A)
None
4. Perform merge request for
the two records.
•
The NSNs of the records A and B.
•
Actual Output
Notes:
5
Note that record A is the record that you created as part of test script 2.1.
35
National Student Index – Take2
Integration Testing
Test Script Templates
Pass/Fail
36
National Student Index – Take2
Integration Testing
Test Script Templates
Challenge Change Test Scripts
This test is intended to ensure that the provider can access their change notification files and successfully submit a challenge change request.
5.1 CHALLENGE CHANGE
Provider is processing their change notification file and reviews the outcome of the merge request that they lodged. The provider disagrees
with this outcome and so challenges the change.
This section does not involve the use of Take2.
The website you need to go to is at http://nsicompl.nsi.govt.nz/
Choose “Batch” from the menu (top right of screen), then choose “Download”.
If any files are showing, select one and click on the download button. Choose “save to my computer”. It is up to you what location you save it to.
If no files are showing, proceed to the “Challenge” step below. A file may appear in the next 15 min or so, so you may want to go back and
check. If not, just record that no files were displayed in the Output box.
Now select “Challenge” from the menu (top right of screen).
Enter challenge change details. The NSN you need to enter is the one you recorded in record A.
Record the output and pass/fail.
Please complete the ‘Actual Output’ column and record any comments in the Notes section below.
NSI Action
Input
Expected Output
1. Log into NSI Web
application.
•
User name & password.
•
Log-on executes successfully.
2. Open file download screen.
•
Select option from batch menu.
•
•
File download screen opens.
Result file (i.e. file name beginning with
REC) displayed in file list.
3. Download file.
•
Select file and select Download
•
File download successfully.
Actual Output
Note: You may have an option in your
37
National Student Index – Take2
Integration Testing
Student Management System to process
the change notification file. If this is the
case this process should be run at this
point in your integration testing.
button
4. Open challenge change
screen.
•
Select challenge option from menu.
•
Challenge change screen opens.
5. Enter challenge change
details.
•
NSN you recorded in record A
(mandatory field)
Description of change (mandatory
field)
User’s email address
•
•
Challenge successfully lodged.
NSI Unit receives notification of
challenge.
•
•
Test Script Templates
Note: Include in your reason for challenging
the change that it is part of your integration
testing.
Notes:
Pass/Fail
38
National Student Index – Take2
Integration Testing
Test Script Templates
6 – GOING LIVE
If you previously used the COM interface you can go live once the Ministry has confirmed successful testing. All you need to do is to update the URLs on the
NSI tab of the Site Details form in the Take2 Administration Module. You enter the live URLs, which are shown on the form. Be sure to do this in your live
Take2, not the one you have been using for the integration testing.
39
National Student Index – Take2
Integration Testing
Test Script Templates
If you have not previously used the COM interface but have been using the web interface to acquire NSNs for your students, you can follow the same
procedure.
If you have not used the COM interface or web interface at all, you need to do a provider load and so should follow the instructions provided below in the
section entitled “Doing a Provider Upload and Going Live with the NSI”.
40
National Student Index – Take2
Integration Testing
Test Script Templates
If you previously used the COM interface you can go live once the Ministry has confirmed successful testing of the new XML interface. All you need to
do is to update the URLs on the NSI tab of the Site Details form in the Take2 Administration Module. You enter the live URLs, which are shown on
the form.
41
A NOTE ON SEARCHING THE NSI
In some of the tests your search of the NSI may return more than one possible
match. If that happens the Data tab of the NSI form will display a datasheet like this:
You can hunt through the returned records in the datasheet to find the match you
want to accept and then place a tick in the Select field to indicate that this is the
record you want to use for any subsequent action.
If that action includes updating the NSI, also place a tick in the NSI Update field.
By double clicking on a record in the datasheet you display the full details for that
record. Click on the DataSheet button to return to the datasheet view.
Page 42
DOING A PROVIDER UPLOAD AND GOING LIVE WITH THE NSI
Ministry
requirements
The National Student Index (NSI) became mandatory in 2003. Take2 has
been NSI enabled from version 4, released in 2002. The COM interface
was in effect through to version 7. From version 8 the XML interface has
been used.
Going live with the NSI means following the steps described in the
diagram below.
Create NSI
input file for
Provider Load
Process
NSI output file
Set "NSI Implemented"
switch to "Live" in
Take2
Select NSI
interface
Web interface
Com Interface
Tick "XML Interface"
switch in Take2
Manage NSI functions
through Take2's
XML interface
Page 43
Manage NSI functions
through NSI
Web site
Provider load
process
When you go live with the NSI the Ministry needs you to send to them a
file (the “input” file) containing details of all your students. The Ministry
then loads the students on the NSI, matching the students where possible
with existing NSI records. The Ministry sends you back a file (the
“output” file).
The output file contains records containing NSI information and NSI
numbers that you can review before deciding what action to take for each
student. Normally you would choose to update the Take2 database with
the data from the Ministry’s output file.
Special utility
The process of handling “input” and “output” files is something that
should happen only once so, rather than clog up the standard version of
Take2, a special utility is supplied for the provider. The utility comprises
two files: “NSIProviderLoad.mde” (current version is 1.5) and
“NSIImportData.mdb”.
Contact the Help Desk to obtain a copy of these files, both of which
should be copied into a folder on your local hard drive.
To use the Provider Load Utility, double click on the file called
NSIProviderLoad.mde. A form will open, as shown below.
Create the NSI
input file
Before creating an input file it is strongly recommended that you use the
process available in Take2 to identify and merge duplicate records (see
section 14.8 of the Take2 User Manual). Doing so will improve the
quality of data that you send to the Ministry and therefore the quality of
data you will get back.
To create the NSI input file click Create Input File on the Main Menu of
the special utility. The NSI Input form opens.
Before you create the input file you should ensure that, where
appropriate, you verify each student’s identity and residency status (see
below for more information on this topic).
When you have done this click Create Input File and a process will be
run to create a file to send to the Ministry and, when the process is
complete, you will be prompted to identify the name and location for this
file. The file name must comply with the Ministry’s naming convention
but all you need to do is enter a sequential number: “1” for your first
44
input file, “2” for your second, etc. So your first file would be called
“UPI00001.txt”.
Hopefully, of course, you will only ever need to use “1”.
Once the file has been created Take2 will print out an audit summary to
show how many records are included in the file and the date and time it
was created.
Note the input file will not contain details of archived students or nonactive students. It will not contain details of students who have not been
enrolled in Take2, nor will it contain a record for a student who does not
have a first name and a family name.
45
Verifying
student’s identity
and residential
status
One of the major benefits of the NSI is that it records whether a student’s
identity (name and DoB) and residential status have been verified. This
means that if a student comes to your organisation and you search for and
find the student on the NSI and the student’s details have been verified,
then you do not need to independently verify that student’s details.
When you go live with the NSI and do the provider load you are sending
details of students to the NSI and, amongst those details, you can send
verification of identity and residential status.
The NSI Input form gives you a chance to record the verification
retrospectively.
On the form you can select a source of funding code and a list of students
will be displayed who, at some point, have been enrolled with that source
of funding. Now you can either manually go through and tick the two
fields Identity and Residency for individual students or click Set All
Values for Displayed Students. Doing this will place a tick in the two
fields for all displayed students.
Given that it is a Ministry of Education requirement that you have
verified the details of students who are funded through student
component funding (code “01”), it would be reasonable for you to use the
button for such students.
Process NSI
output file
To process the NSI output file – the file returned from the Ministry – first
click Read Output File on the Main Menu of the special utility. A process
is then run which imports the output file and prints out some summary
information showing the number of records, number of matches, etc.
Then View and Process NSI Data, which opens the NSI Output form. The
form has three tabs:
Alternative
names
The Unique tab displays records where you submitted a record and
no match could be found in the NSI, so a new NSI record was
created. Note an existing RoL is not used for matching purposes
during the provider load process.
The Possibles tab displays records where you submitted a record and
one or more possible matches were found in the NSI.
The Errors tab displays records that show where the data that you
supplied in the input file was defective (e.g. there was an invalid
character such as a bracket in a surname).
With the introduction of version 4 of Take2 it became possible to store
two names for a student; the standard first name/ family name
combination which you see of the Students form plus, where they differ,
a NSI forename/ surname combination.
However, when you create the NSI input file Take2 uses the standard
name combination because until you go live you will not necessarily
have NSI names for your students – unless you have entered them all
manually.
The NSI database stores the NSI name combination but it can also store
what are called “alternative” name combinations for the same student. An
alternative name can be marked in the NSI as being a student’s “preferred
name”. The standard name you send in the input file may match on the
NSI name combination but, if not, it might match on an alternative name
combination held in the NSI.
46
Error records
Accordingly, when you receive the output file it is possible that there are
two returned records with the same NSI number. Watch out for this when
accepting or rejecting records.
You can view or print error records by clicking the appropriate buttons.
You cannot process error records; rather you have to go to the Students
form and correct the error before processing each student’s NSI
individually using the standard NSI method – see section 6.3.3
47
Unique records
On the Unique tab you will see a datasheet at the top, listing individual
students. The records are sorted by the name of the students, but you can
change the sort order using the options provided, namely: Internal ID,
Previous Name and RoL ID.
You can select a specific student by clicking their record and, having
done so, you will see that the bottom part of the form displays the full
details for the single record returned for the student.
You can accept or reject the returned record for an individual student by
entering either an “A” or “R” in the Process field in the top part of the
screen. However you will probably find it quicker to use the Accept All
button to accept every student and then you only need to enter “R” for
any records that you do not want to accept.
When you have completed assigning “accept” or “reject” values for all
students you click Process in order for the data in Take2 to be updated.
See below for information on precisely what happens when you accept
NSI records.
Possible records
On the Possible tab you will also see a datasheet at the top, listing
individual students.
Select a student by clicking the record and the bottom part of the form,
which is also a datasheet, will display all of the matches found for the
selected student. Notice that there is a Ranking field to show how good a
match the record is. Records are displayed in descending ranking order.
You can view the detail of any specific record in the bottom part of the
form by double clicking the record selector. Return to the datasheet by
clicking Datasheet.
There is a Process field in the top datasheet and a Select field in the
bottom datasheet. If you do not want to accept any possible match, enter
“R” (or leave it blank) on the top datasheet. If you do want to accept a
record, place tick in the Select field of the relevant record of the bottom
datasheet and an “A” will be automatically inserted in the top datasheet.
Repeat this process for each student and then click Process in order for
48
the data in Take2 to be updated.
Multiple records
The bottom datasheet on the Possible tab will often show multiple
records. It is even possible (though, one hopes, highly unlikely) for two
or more records to have rankings of 100. The question is then, which
record do you accept?
Check to see if the Hook On Paid field displays “Y”. If it does in one
record but not in the other, grab the “Y” record. It will save you $20.
If you believe two records relate to the same person you should make a
note of the NSN values and, later, send a merge request to the NSI – see
section 14.7
Accepting NSI
records
Telling Take2
you have gone
live
When you click Process Take2 does two tasks:
It updates fields in the Take2 database with data from the NSI
(Appendix C4 lists the specific fields).
It changes the Process value to “D” for “done”. The purpose of this
is so that you can work through the output file over a period of time,
processing a set of records at the end of each session. “Done” records
will not be displayed the next time you open the NSI Output form.
Once you have completed the provider load process you need to tell
Take2 that you have gone live with the NSI. You do this using the Go
Live button on the Main Menu of the Provider Load Utility.
Click on the button to open the Go Live form. Change the value in the
NSI Implemented field to “Live”. Note – there are three possible values
for this field: “No”, which is the default; “Upload” which is set by the
system when you have created an NSI input file, and “Live”. You enter
“Live” only when you have processed the NSI output file.
The reason why Take2 needs to know if you have gone live with the NSI
is because it affects the way Take2 exchanges hook-on data with NZQA.
If you are going to use the XML interface, tick the Use XMLInterface
field, and enter the correct XML live site Web address in the NSI XML
Site field. You can obtain this address from the Ministry of Education.
Select an NSI
interface
The Ministry offers a number of interfaces to the NSI but only two are
implemented in the Access edition Take2: the Web interface and the
XML interface. The Web interface is available to all users. Essentially it
is just a hyperlink on the Students form.
The XML interface is only available if you select it from the Site Details
form. Doing this will enable certain features in Take2.
You can learn more about the interface types from the Ministry’s
documentation.
Using the XML
interface
Sections 6.3.3 and 14.7 of this manual explain how the XML interface is
implemented in Take2. There are two main areas:
From the Students form you can search the NSI.
From the System Management menu you can perform a number of
housekeeping tasks associated with the NSI.
49