1
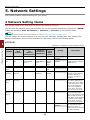
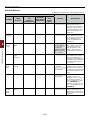
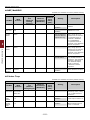
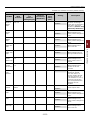
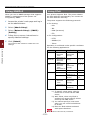
Windows Utilities 4 Create a form you want to register on 3 Click icon and select [Color matching file (.ICC, .ICM)] from [Files of type] the printer. When using the Windows PCL printer driver, go to step 9. 4 Select a profile you want to register and 5 Select [Print] from the [File] menu. then click [Open]. 5 Select the type of the profile you want to register from [Profile Type]. 7 Select the [Job Options] tab, and click 6 Click [Component] of the registered on [Overlay]. profile, and [Storage Manager] dialog is displayed. 8 Select [Create Form]. 7 Select a number you want to register for the profile. 9 Start a print job. 10 Enter the file name you would like to save as. 8 Enter comments in [Comment] field, if 11 Return to [Printer Port] from the 9 Click on [OK]. 10 Select the printer from the device list. Registering a Form on the Printer Using the Storage Manager Plugin 11 Click 1 Click icon. 2 Click icon, and select the created [Ports] tab. necessary. icon and send the registered profile to the printer. 12 Check that the completion message is displayed and click [OK]. Registering Forms (Form Overlay) You can create and register overlays such as logos or forms for printing. This explains how to register forms. form. 3 Click on the form file. 4 Enter the [ID], and click [OK]. Note ●● Do not change [Target Volume] and [Path]. Memo Reference ●● When using the Windows PS printer driver, enter [Component]. ●● For how to print overlays, please refer to “Overlay Printing” P.35. Memo ●● When using a Windows PS printer driver, administrator privileges are required. 5 Select the device in the device selection area at the bottom of the Storage Manager Plug-in window. ●● The Windows XPS printer driver cannot be used. Create a Form 1 Click on [Start] and then select [Devices and Printers]. 2 Right click on the Your Printer icon, 6 Select [Send Project Files to Printer] from the [Projects] menu. 7 Click icon. 8 Click on [OK]. and select the type of driver you need from [Properties]. 3 Select the [Ports] tab, check [FILE:] from [Print Port], and click on [OK]. - 85 - 4 4. Using Utility Software The registered numbers are displayed in yellow back ground. 6 Click on [Preferences].