1
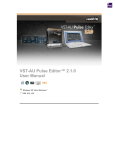
VST Pulse Editor 1.5.1 Manual
VST Pulse Editor™ 1.5.1 Manual
Windows 98, ME, 2000, XP, Vista
OS 9, OSX 10.4, OSX 10.5
Universal Binary
Table of Contents
» Introduction
» Installation
» Setup
» User Interface
» Working with the VST Pulse Editor
» Working with Presets
» Working with Sysex Presets
» MIDI Continuous Controller Chart
» Modulation Routing Chart
» MIDI Implementation
Introduction
The reKon audio™ VST Pulse Editor™
The VST Pulse Editor™ is a real-time MIDI synth editor that allows you full control of
every parameter of the sound on the Waldorf Pulse™ and Pulse Plus™ synthesizers. Now
you can utilize your Pulse to its full potential and build lasting and meaningful patches that
will bring new life to your Pulse, and more importantly, your music. All this and more in a
matter of minutes via a slick and friendly user-interface that actually adds features to your
Pulse, such as the ability to name your patches in a way that makes them understandable.
You also maintain all your patches on the PC itself without the hassle of manual dumps. All
parameters are fully automatable and you can even use your favorite VST host, giving you
the ability to visually program the Pulse to your music via the host sequencer. This ability to
model your synth patches in real-time, inside your main music production environment is
part of what makes the reKon™ VST Pulse Editor unique when compared to other hardware
synth editors.
1
VST Pulse Editor 1.5.1 Manual
The Waldorf Pulse™ synthesizer
The Waldorf Pulse™ is a rack mountable, monophonic analog synthesizer built in Germany.
It sports three oscillators, two with pulse width, two LFOs, two assignable envelopes, a filter
and amp section and an advanced arpeggiator. There is also a matrix of four modulation
routings that are assignable by source and destination. This in part, is what gives the Pulse a
unique sound characteristic. Later came the Waldorf Pulse Plus™, the same great synth, but
fitted with the added capability of utilizing MIDI CV control and the ability to route external
signals through the Pulse’s filter and amp sections.
Installation
reKon audio software is now installed with a simple installer file. The installer will allow you to
specify the location of your VST folder and sometimes, additional components to install.
Windows XP, Vista
Use the included. EXE installer file. The installer will allow you to specify the location of the VST
Plugin folder to install the VST Pulse Editor into and provide an adequate means to uninstall the
software.
Mac OSX
Use the included .DMG installer file. The installer will allow you to specify the location of the VST
Plugin folder to install the VST Pulse Editor into and provide an adequate means to uninstall the
software. *Note- All our plugins are UB (Universal Binary) compatible.
License and Use Agreement
By downloading, installing or using this product you are agreeing to the Terms and Conditions
as defined on our web site at www.rekonaudio.com. We highly recommend all users
read this agrrement to become familiar with these Terms and Conditions before downloading
or using any reKon audio™ software.
Setup
Assumptions
It is assumed that the user is familiar with the basic functionalities of the hardware synthesizer,
it's operators manual and the basic concept of MIDI itself. Without this knowledge, utilizing the
editor may be a bit more challenging to set up and use properly. By familiarizing yourself with
the operators manual and the MIDI standards, and following the instructions in this manual, you
should be able to get up and running in a short amount of time.
STEP 1: Setting Up the Pulse
Make sure you have your midi ports and channels set up and matching properly and that all
cables are working and connected properly.
STEP 2: Setting Up the Plugin for Your VST Host (DAW)
The setup procedure will vary from host. Each host may support VST's differently and more
importantly, each host may support MIDI data from a VSTi differently, or not at all. Please refer
to the 'Supported Hosts' list on the rekon audio web site at www.rekonaudio.com. Also, please
refer to the setup instructions provided with your VST host application for setting up a VST
instrument (VSTi).
Setup Example for Cubase SX 1-3 or Cubase 4.1.3
To setup the reKon™ VST Pulse Editor for Cubase SX 1-3 or Cubase 4.1.3 **:
2
VST Pulse Editor 1.5.1 Manual
1. Be sure to check your VST Instrument plugins folder to make sure the editor was installed.
2. Open Cubase SX or Cubase 4.1.3+.
3. Create a new project.
4. Open your 'VST Instruments' panel and then select the 'reKon™ VST Pulse Editor' VST in
a VST slot.
5. Create a 'MIDI' track. Select this MIDI track. (this will be the MIDI track the VST Pulse Editor
is on).
6. On the I/O properties panel for this MIDI track, assign the MIDI input to the 'VST Pulse
Editor'. Assign the MIDI output to go to the MIDI port (and channel) that your Waldorf Pulse
is on.
7. Create another 'MIDI track'. Select this track.
8. On the I/O properties panel for this MIDI track, assign the MIDI input to your MIDI
keyboard. Assign the MIDI output to go to the MIDI port (and channel) that your Waldorf
Pulse is on. (this will be the MIDI track to play and record your note/pitch/mod changes to
the Waldorf Pulse).
9. Activate the little yellow 'speaker' icons for both MIDI tracks (this allows them to be played
even if the track is not selected).
10. Start tweaking and playing the Waldorf Pulse via the VST Pulse Editor and your MIDI
keyboard. Cool!
NOTICE- *Setup for other hosts is similar. Please see the Host Support page on the reKon
audio web site for more information. **Note that MIDI messages were dropped from VSTi in
Cubase SX 3.1.1+ and Cubase 4 versions 4.0 - 4.1.2 (a SB bug). Please refer to the Steinberg
website for more details on MIDI support and versions in these hosts.
STEP 3: Setting Up MIDI IN tracks
For MIDI Input into the editor:
1. Follow Steps 1 -4 above. * Be sure to disable any outgoing MIDI tracks from the editor to
prevent a feedback loop!)
2. Create a 'MIDI' track. Select this MIDI track. (this will be the MIDI track the VST Pulse Editor
is on).
3. On the I/O properties panel for this MIDI track, assign the MIDI input to the MIDI port (and
channel) that your Waldorf Pulse is on. assign the MIDI Output to the 'VST Pulse Editor'.
4. Turn some knobs on the Pulse. The editor should respond by visually showing the movement
of this control in the editor.
How to load a Pulse patch into the editor:
Once you have completed the MIDI input steps above AND you have the latest Pulse OS
2.0.1, you can now receive a 'Single Controller Dump' from the Pulse to 'recreate' the patch in
the editor. Here's how:
1. Select the patch on the Pulse that you wish to save into the editor.
2. Press the 'Shift+Dump' button.
3. The editor will update all parameters to the values of the dumped patch.
4. Rename the patch in the editor to the name of the hardware patch. Save the patch as an
.fxp file.
The Graphical User Interface
Using The Graphical User Interface
The graphical user interface of the VST Pulse Editor™ is designed for maximum ease of use,
giving you easy access to all of the Waldorf Pulse™ controls right on one screen. You are also
3
VST Pulse Editor 1.5.1 Manual
able to rename, modify and browse the patches right inside the editor itself. All control elements
are handled via either a Knob, Combo box, Button or Text Edit Box.
The User Interface
The following screen shot will help familiarize the controls of the VST Pulse Editor™ v. 1.5.1:
Working With the VST Pulse Editor
About Sound
The VST Pulse Editor™ is a VSTi (synth) plug-in that deals only with MIDI data. As a result it
makes no sound of its own. The sound comes from the actual hardware synth itself... Which
is what you want (pure hardware generated sound, but with VST control). The VST Pulse
Editor™ is not a VST MIDI Effect plug-in, it is a VSTi instrument without audio processing
functions.
Using the Controls
Most controls on the VST Pulse Editor™ are self explanatory as to their use. There are two
types of knobs, those that have their ‘zero’ or lowest value set to the far left, and the other
has the ‘zero’ position set in the absolute middle. The display readouts will vary based on
the related ranges and values for that particular control.
Resolution of the Controls
To obtain a finer resolution control of the knobs in the VST Pulse Editor™, hold down the
shift key while adjusting the knob. This will allow you to ‘fine-adjust’ the values of the knob.
Resetting the Default Value of a Control
To reset a control to its default value, hold down the ‘CONTROL’ key while clicking on the
control.
Receiving MIDI Continuous Controller Data
The VST Pulse Editor™ can receive and interpret MIDI Continuous Controller (cc) messages. All
controls respond to their correlated MIDI CC number as listed in the MIDI Continuous Controller
Chart of this manual. Automation of all parameters can be achieved via these MIDI Messages or
via your sequencer host.
The MIDI LED Indicators
When the VST Pulse Editor™ receives or transmits MIDI data, the corresponding MIDI LED will
4
VST Pulse Editor 1.5.1 Manual
blink to notify you. The VST Pulse Editor™ responds to MIDI Note On/Off, Pitchbend,
Modulation, Continuous Controller MIDI messages.
The MIDI Channel Selector
This selects the MIDI channel that the VST Pulse Editor™ receives and transmits MIDI data on.
This value is independent of the preset and will not be stored with the preset. This allows you to
browse presets on individual MIDI channels.
The MIDI SEND and RECEIVE Buttons
These buttons determine whether or not to send/receive MIDI Program changes. When
activivated, Program change messages will be sent/received between the editor and the
hardware synth.
The MIDI In Button
This button determines whether or not to receive MIDI into the editor. When activivated, MIDI
messages will be received between the editor and the hardware synth. Use this as an alternative
to the hosts 'midi in' activation button. Ideal for when turning on/off midi in quickly, for example
controller dumps. MIDI in should be disabled to prevent feedback loops, when using the MIDI
Out simultaneously.
The About Screen
To view the About screen, click on the reKon audio™ logo button.
Working With Presets
The Presets Section
The preset section allows you to control and manage your presets or ‘patches’ as they are
referred to in the synthesizer world. The display readout shows the current preset name and
number. The arrow buttons will allow you to move up and down through the presets. The
‘loader bar’ indicates MIDI data being sent to your synth to set the patch dynamically.
Changing the Current Preset
Use the arrow buttons to change the currently selected preset.
Renaming the Current Patch
To rename your preset, simply click on the name in the display readout and type the new
name of your patch, then hit the ‘Enter’ key. Patch names are limited to 24 characters.
Using the Copy/Paste Buttons
You can easily copy and paste presets to and from the currently selected preset. First select
the preset you wish to copy by navigating to it with the preset select arrow buttons. Now,
click the ‘Copy’ button (you will notice the button change color). Next, navigate to the preset
number you wish to paste to. Now click the ‘Paste’ button (the ‘Copy’ button will change
back to it’s default state). Voila! You can also continue to paste the same preset data into
other preset locations without having to re-click the ‘Copy’ button. This tool is invaluable for
creating variations of your favorite presets and allows you to quickly build your preset
library up.
Default Preset Banks
The default preset bank in the VST Pulse Editor is the standard factory default bank A from
Waldorf Music. If you modify the default bank and wish to restore the default bank, you can
easily load the bank from the 'fxb' folder. Also included is a default blank bank that has all
presets values set to zero. This results in a preset that makes no sound on the synthesizer. This
is sometimes a good bank to start your projects with which you can copy patches into without
worry of overwriting other patches.
5
VST Pulse Editor 1.5.1 Manual
Working With Sysex Presets
Sysex Patches and Banks
The VST Pulse Editor can also load and save standard sysex (system exclusive) patch and
bank files. This makes importing, exporting and sharing your existing patch libraries very easy.
Use the Sysex menu to select either a patch or bank load or save method. Once you have
loaded a sysex patch or bank, the editor will update with the loaded settings and the patch name
will be set to 'Sysex Patch'. You should give the patch(es) a unique name and then save them
as an .fxb/.fxp file.
Sysex and Patch-Bank Names.
Note that the native Waldorf Pulse sysex program format does not include parameters for a
patch name. This is normal, as the synth itself has no way to display this information. As such,
no name will be stored or loaded when you are working with sysex files. The VST native .fxb/.fxp
format can store the patch names, and therefore these will be preseved while loading and
saving presets in the .fxb/.fxp format.
A valid Waldorf Pulse Sysex patch file is 77 bytes and is formatted according to the sysex
specification found in the Waldorf Pulse User Manual. The editor will only accept .syx files that
are formatted specifically for the Waldorf Pulse.
You can load or save a bank to/from preset slots 1-40 or 41-80. The VST Pulse Editor
recognizes a valid Waldorf Pulse Sysex bank file as a 3092 byte file and is formatted according
to the sysex specification found in the Waldorf Pulse User Manual. A Waldorf Pulse bank
consists of 40 patches (P.1-P.40 on the Pulse.), each at 77 bytes in size, with a 12 byte header.
The editor will only accept .syx files that are formatted specifically for the Waldorf Pulse. If you
are having problems loading a patch or bank from a file you are certain was created by your
Waldorf Pulse, First check the file size. If it is not at a byte size specified above, then you need
to examine the sysex data and remove any extra sysex messages from the beginning of the file.
Sometimes, utilty programs may add or append additional sysex messages that were used to
call the synths bank dump, and this data may be saved in your file.
An Example of the start of a sysex bank file:
F0 3E 0B 00 08 26 40 13 00 00 79 F7 F0 3E 0B 00 01 00 10 31 02 40 70 4E 00 28 00 01 10
40 02 29 28 42 7F 73 00 16 06 66 7F 00 00 63 03 00 29 00 32 40 03 6F 01 00 01 02 0B 7F 03
01 7F 03 06 7F 02 00 40 0A 02 03 0E 16 00 4A 40 40 1F 7F 04 49 7F 40 40 00 00 40 00 37
F7 F0 3E 0B 00 01 01 40 41 01 16 40 40 00 53 01 01 40 40 00 7F 7F 47 56 00 04 00 08 5F
13 25 1F 65 03 00 2D 54 00 21 03 53 0A 00 02 02 03 7F 07 04 32 06 0F 5D 05 06 50 0C 02
01 10 2D 06 38 50 1C 28 66 0C 6B 5C 49 4D 0B 04 48 00 08 F7 ...
The underlined portion is the 12byte header that defines a program bulk dump. Following this we
see patch 1 defined between the first 'F0' and 'F7' tags in bold. Followed by patch 2, and so on,
until we have filled 40 patches. (12byte header + (77 byte patch * 40 patches)) = 3092 bytes.
Sysex Utilities to work with your synth offline.
Sysex (Sytem Exclusive) data from a VSTi to the host is not widely supported by most DAW
manufactures. Also, Sysex data is typically not real-time data, so incorporating sysex data
transmission into a VSTi is not exactly an elegant or feasible solution. Instead, we can import
and export this data from the VST Pulse Editor and then use these files when we are offline from
our DAW, to transfer the data to and from the hardware with other utilities such as MIDI-OX for
PC, or SysEx Librarian for Mac, or any other common MIDI System Exclusive data utility.
MIDI Continuous Controller (CC) Messages
6
VST Pulse Editor 1.5.1 Manual
The following MIDI Continuous Controller messages are transmitted (Tx) and Received (Rx) by
the editor to set the patch. *NOTICE- Not all parameters are available to all Pulse Models.
CC
Parameter
Range
45
OSC 1 Level
0-127
32
OSC 1 Semi
-48 to +48
33
OSC 1 Tune
-32 to +31
34
OSC 1 Shape
Pulse, Saw, Triangle
35
OSC 1 Pulse Width
0-50
46
OSC 2 Level
0-127
36
OSC 2 Semi
-48 to +48
37
OSC 2 Tune
-64 to +63
38
OSC 2 Shape
Pulse, Saw, Triangle, CrossMod
39
OSC 2 Pulse Width
0-50
40
OSC 2 Keytracking
0-1 (on/off)
41
OSC 2 Sync
0-1 (on/off)
47
OSC 3 Level
0-127
42
OSC 3 Semi
-48 to +48
43
OSC 3 Tune
-32 to +31
44
OSC 3 Shape
Pulse, Saw, Triangle
57
MAIN Level
0-127
10
MAIN Panning
-64 to +63
48
MAIN Noise
0-127
58
MAIN Velocity
-64 to +63
61
PITCH Amount
-64 to +63
63
PITCH Scale
0-24
60
PITCH Source
0-15 (See MOD Source Chart)
5
PORTA Time
0-127
62
PORTA Mode
0-1 (on/off)
64
Hold
0-1 (on-off)
24
LFO 1 Speed
0-127
25
LFO 1 Shape
0-6
26
LFO 2 Speed
0-127
27
LFO 2 Delay
0-127
50
FILTER Cutoff
0-127
56
FILTER Resonance
0-127
51
FILTER Keytracking
-64 to +63
53
FILTER Velocity
-64 to +63
52
FILTER ENV 1 Amount
-64 to +63
55
FILTER MOD Amount
-64 to +63
54
FILTER Source
0-15 (See MOD Source Chart)
7
VST Pulse Editor 1.5.1 Manual
14
ENV 1 Attack
0-127
15
ENV 1 Decay
0-127
16
ENV 1 Sustain
0-127
17
ENV 1 Release
0-127
28
ENV 1 Keytracking
-64 to +63
29
ENV 1 Trigger
0-3 (Single T1, Single T2, Retrig 1, Retrig 2)
18
ENV 2 Attack
0-127
19
ENV 2 Decay
0-127
20
ENV 2 Sustain
0-127
21
ENV 2 Release
0-127
30
ENV 2 Keytracking
-64 to +63
31
ENV 2 Trigger
0-3 (Single T1, Single T2, Retrig 1, Retrig 2)
102
ARP On
0-2 (Off, On, Hold)
104
ARP Clock
0-31
106
ARP Mode
0-7 (Up, Down, Alt, Rand, Ass Up, Ass Down, Ass
Alt)
105
ARP BPM
Midi, 48-300 (bpm)
103
ARP Range
1-10
108
MOD 1 Source
0-15 (See MOD Source Chart)
110
MOD 1 Destination
0-15 (See MOD Destination Chart)
109
MOD 1 Amount
0-127
111
MOD 2 Source
0-15 (See MOD Source Chart)
113
MOD 2 Destination
0-15 (See MOD Destination Chart)
112
MOD 2 Amount
0-127
114
MOD 3 Source
0-15 (See MOD Source Chart)
116
MOD 3 Destination
0-15 (See MOD Destination Chart)
115
MOD 3 Amount
0-127
117
MOD 4 Source
0-15 (See MOD Source Chart)
119
MOD 4 Destination
0-15 (See MOD Destination Chart)
118
MOD 4 Amount
0-127
22
PLUS CV2 Source
0-15 (See MOD Source Chart)
23
PLUS External Amount
0-127
49
PLUS External Level
0-127
Modulation Routing Chart
The following options are available for the Pulse Modulation Matrix...
Value
Source
Destination
0
Off
Pitch
1
LFO 1
OSC 1 Pitch
8
VST Pulse Editor 1.5.1 Manual
2
LFO 1 Mod Width
OSC 2 Pitch
3
LFO Aftertouch
OSC 3 Pitch
4
LFO 2
PulseWidth 1
5
LFO 2 ENV 1 Amount
PulseWidth 2
6
ENV 1
OSC 1 Level
7
ENV 2
OSC 2 Level
8
Velocity
OSC 3 Level
9
Keytracking
Noise Level
10
Pitch Follow
Cutoff
11
Pitch Bend
Resonance
12
Mod Wheel
Volume
13
AfterTouch
Panning
14
Breath
LFO 1 Speed
15
Control X
Modulation 1 Amount
MIDI Implementation Chart
The following MIDI data is transmitted (Tx) and Received (Rx) from the editor...
Message
Channel
Mode
Note On/Off
Velocity
Aftertouch
Poly Pressure
Pitchbend
Modulation
Continuous Controller
Program Change
System Common
System Realtime
System Exclusive
Tx
x
x
o
x
x
x
x
Rx
o
x
o
o
o
o
o
o
o
x
x
x
x
Notes
1-16
Omni mode
note numbers 0-127
0-127
0-127
0-127
0-127
0-127
0-127
0-127
x = no
o = yes
©2008 reKon audio. www.rekonaudio.com
9