1
J i Me
Join
M User
U
G
Guide
id
& Tutorial
T-Series Handsets
Join Me User Guide_T Series_v3.0
1
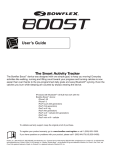
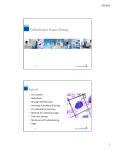
Compatibility
T-series
T
Pd dt Supported
S t dt d
All iProducts
P Products
St Supported
T
T-series
i Products
P d t Supported
S
t d
ALL Products
P d t Supported
S
t d
S
Supported
t d
Note: 64-bit Windows drivers are supplied with JoinMe for T-series handsets.
Note:
For basic instructions on Windows operations and using computers, please
refer to your Windows user’s manual, someone familiar with computers or
consult an IT Technician.
Join Me User Guide_T Series_v3.0
2
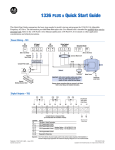
Launch Join Me
Double-Click on the Join Me icon on y
your desktop
p to
launch the software
If no icon is present:
Please install Join Me from the supplied CD or visit the
ZTE website to download www.zte.com.au
www zte com au
Note:
For basic instructions on Windows operations and using computers &
peripherals, please see your respective user’s manual.
Join Me User Guide_T Series_v3.0
3
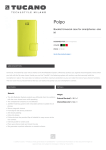
Select Phone Type
From the drop down box Select the model of your handset.
Press ‘Connect’ to continue
If an error is received:
Please visit the FAQ section of the ZTE website (www.zte.com.au), for more information.
Join Me User Guide_T Series_v3.0
4
Downloading
Note:
These windows display the progress of the data
downloading from your handset to your computer.
Join Me User Guide_T Series_v3.0
5
‘Connected
Connected to PC
PC”
‘Connected
Connected to PC
PC’ will now be displayed on your
phone.
This message will is displayed the entire time your
phone is connected to you PC.
Note:
N
t
Pressing ‘OK’ on your phone will disconnect the connection you
have established between your phone & your PC.
Join Me User Guide_T Series_v3.0
6
Join Me – What can it do?
The Join Me software can be used to perform the following:
Copy files from your PC to your handset
Copy files from your handset to your PC
Manage
g yyour ‘Contacts’ ((Locally,
y on yyour Phone & on yyour SIM))
Create new ‘Contacts’
Synchronise - Import ‘Contacts’
Create & Send text messages (SMS)
Manage your ‘Messages’ (Locally, on your Phone & on your SIM)
Manage
M
your ‘C
‘Calender’
l d ’ (L
(Locally,
ll on your Ph
Phone & on your SIM)
Create new ‘Calender’ entries
Synchronise – Import/Export ‘Calendar’
Calendar
Connect to the Internet
Backup/Recover
p
p
phone & PC data
Join Me User Guide_T Series_v3.0
7
Connected
Note: You onlyy have the option
p
to
‘Disconnect’ as Join Me is already
connected.
With Join Me successfully connected the
status information will indicate your device
is connected
Join Me User Guide_T Series_v3.0
8
Disconnected
Note: You only have the option to
‘Connect’ as Join Me is disconnected.
As shown here the status information
indicates your device is disconnected
Join Me User Guide_T Series_v3.0
9
Phonebook Tab
The 3 directories of the PhoneBook tab, indicate
where contacts are stored:
• Local
– stored on your PC
• Phone – stored in the handset memory
• (U)SIM – stored on the SIM card
Within the Local & Phone directories, contacts can
be sorted in to the following groups:
Family,
y, Friends,, Work,, VIP & Unclassified
Capacity Information
Join Me User Guide_T Series_v3.0
10
Phonebook: Local/Phone Fields
Selecting a Contact will
populate the ’Detail information’
window
i d
((as shown)
h
)
This applies for both Local & Phone directories.
Join Me User Guide_T Series_v3.0
11
Phonebook: (U)SIM Fields
Selecting a Contact will
populate the ’Detail information’
window (as shown)
Contacts on the (U)SIM can only support the
fields displayed. If copying/moving a contact to
the (U)SIM all other content will be discarded.
Join Me User Guide_T Series_v3.0
12
Message Tab
The 3 directories of the Message tab, display
messages stored in folders:
• Local – stored on your PC
• Phone – stored in the handset memory
• (U)SIM – stored on the SIM card
Capacity Information
Join Me User Guide_T Series_v3.0
13
Calendar Tab
The 2 directories of the Calendar tab, display
messages stored in folders:
• Computer – stored on your PC
• Phone – stored in the handset memory
Capacity Information
Join Me User Guide_T Series_v3.0
14
Internet Tab
The ‘Connect’ button creates an
internet connection
Status
Window
This area displays internet
session information.
Join Me User Guide_T Series_v3.0
15
Media Tab
PC E
Explorer:
l
N i t & Vi
Navigate
View ffolders
ld
on your PC in this area.
Phone Explorer: Navigate & View
folders on your phone in this area. This
is the same directory structure as seen
on the handset in ‘File Manager’.
g
Join Me User Guide_T Series_v3.0
16
Media Tab
NAVIGATE & Browse files and folders
on your PC in this area.
NAVIGATE & Browse files and folders
your phone in this area.
Join Me User Guide_T Series_v3.0
17
The ‘Phone Explorer’
In the example shown we see an expanded view of all
the ‘Phone Explorer’ folders. This is the same
directory structure as seen on the handset in ‘File
Manager’.
With the ‘My Pictures’ folder highlighted (as shown)
we see 2 image files.
Join Me User Guide_T Series_v3.0
18
Previewing files
To preview an file (image & audio ONLY), left-click to
highlight the file you wish to preview, right-click & select
Preview Photo/Media {or double-click
double click the selected file to
auto-load}
The file will then proceed to load then display the file. As
shown on the next slide.
Join Me User Guide_T Series_v3.0
19
Previewing files
Join Me User Guide_T Series_v3.0
20
Copy file - phone to clipboard
In the 'Phone
Phone Explorer‘
Explorer NAVIGATE to the source folder where
the file is you want to copy to your PC. From the files listed
highlight the file you want to copy. Using the Edit pull down
menu select Copy. This stores the selected file on to the
clipboard.
Note: The following 'copy'
copy functions are supported
supported, click & drag
drag,
Ctrl+C, right-mouse click menu.
Join Me User Guide_T Series_v3.0
21
Paste file - phone to PC
In the 'PC Explorer‘ NAVIGATE to the destination folder where
you want to store the file on your PC (for this example the ‘My
Pictures’ folder was selected).
Using the Edit pull down menu select Paste. The file will then
proceed to be copied. As shown on the next slide.
Note: The following ‘paste' functions are supported, click & drag,
Ctrl+V,, right-mouse
g
click menu.
Join Me User Guide_T Series_v3.0
22
Copy file from PC to phone
Join Me User Guide_T Series_v3.0
23
File now on PC
Join Me User Guide_T Series_v3.0
24
Copy files from PC to phone
Follow the same method as outlined on
the previous pages. Your PC will now
be the source & your phone the
destination.
Eg.
g mp3
p files to yyour handset.
Transferring
Note:
Other file types also can be sent to your mobile phone. However,
the mobile phone may just act as a mobile storage device as not all
file types are supported on the phone
phone.
Join Me User Guide_T Series_v3.0
25
Creating Contacts
CLICK the ‘New Contact’ button to create a contact.
The ‘New Contact’ window will now appear.
(see next page)
Join Me User Guide_T Series_v3.0
26
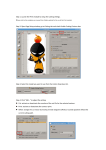
Creating a ‘New Contact’
1. From the options listed SELECT the location
where your contact will be saved:
• Local
L
l
– stored
t d on your PC
• Phone – stored in the handset memory
• (U)SIM – stored on the SIM card
• All
– local,
local phone & (U)SIM
2. ENTER all the information for the
contact you wish to create.
Fields marked with a * are
mandatory.
3. CLICK Save
Join Me User Guide_T Series_v3.0
Note: There is space to insert a picture,
however this is not supported.
27
Contact Management
In this example, note the following:
• Local
–
1 Contacts stored on the PC
• Phone – 19 Contacts stored in the handset memory
• ((U)SIM
)
–
1 Contact stored on the SIM card
Notes:
Join Me User Guide_T Series_v3.0
1.
It is possible to “click & drag” contacts from one location to another.
2.
The sub-folders give you the ability to further classify your contacts.
3.
The ‘Phone’ sub-folders are the same as the contact tabs on your phone.
4.
The Edit pull down menu gives the added option to copy, cut & paste.
5.
A right-click displays more menu options.
6.
Ctrl+C, Ctrl+X, Ctrl+V shortcuts are supported.
7.
Contact information supported by PC, phone & SIM card is different,
some
information loss may occur when contact information is copied
or moved from your PC to the phone and SIM.
28
Searching Contacts
Type here to search
eg. Clicking on the IJ button will display
all contacts starting with “I”
I or “J”
J
eg. Clicking the ALL button
will display all contacts
Join Me User Guide_T Series_v3.0
29
Phonebook Sync
1. CLICK the ‘Sync’ button to import contacts.
The ‘New Contact’ window will now appear.
(see next page)
2. SELECT the import
process you wish to
perform ((see next p
p
page)
g )
Join Me User Guide_T Series_v3.0
30
Import from CSV
There is information on how to import contacts
from a CSV file in to Join Me on the FAQ page of
the ZTE website. About half way down the page
under "FAQ 3 - Connectivity: Using Join Me and
Bl
Bluetooth
hd
devices"
i
" there
h
iis a ffaq titled
i l d "H
"How d
do I
import contacts into Join Me?".
Please follow the procedure you can download
for assistance.
Join Me User Guide_T Series_v3.0
31
Import Contacts from Outlook
1. SELECT the appropriate
pp p
synchronisation option, click OK &
follow the prompts
Note:
If you are having trouble with the importing of contacts from Outlook not all
functions are supported. ZTE suggest you follow the Import from CSV process
outline on the previous page.
Join Me User Guide_T Series_v3.0
32
Sending Text Messages (SMS)
CLICK the ‘New Message’ button to draft an SMS.
The ‘New message’
g window will now appear.
pp
(see next page)
Join Me User Guide_T Series_v3.0
33
Sending SMS
Enter the phone number here
CLICK the magnifying glass
to select a contact from
local, phone or (U)SIM.
T
Type
your message here
h
Note: You can send the same message to multiple recipients
Join Me User Guide_T Series_v3.0
34
Sending SMS
From the drop down list select the location where your
contacts are:
• Local – stored on your PC
• Phone – stored in the handset memory
• (U)SIM – stored on the SIM card
Join Me User Guide_T Series_v3.0
35
Sending SMS
2. CLICK the right arrow to
choose contact(s).
( )
1. TICK the
1
th b
box off the
th contact
t t you
wish to SMS. Remember you can
select more than one.
3. Click OK to continue.
Join Me User Guide_T Series_v3.0
36
Sending SMS
<Type your message here>
CLICK save as
draft to save & edit
& send later
Join Me User Guide_T Series_v3.0
CLICK send to
send the SMS
37
SMS – Message Length
Character
Counter
2. CLICK ‘OK’ to
acknowledge the SMS will be
sent as 2 messages.
1. CLICK send to
send the SMS
The maximum length of an SMS is 160 characters by default. If this
maximum is exceeded the SMS will be sent as 2 SMS.
Join Me User Guide_T Series_v3.0
38
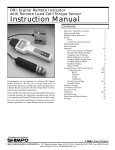
SMS – Unicode characters
The characters indicated by a red box in the image
here are Unicode Characters. This means that they are
not part of the standard SMS character set and they
require 2 SMS characters to transmit them
them. If you use
any of these characters in your message the message
length is limited to 70 characters. If you exceed 70
characters then the message will be sent using 2 SMS
messages.
Join Me User Guide_T Series_v3.0
39
Sending SMS
Note: The ‘Sending message’ window will be
displayed showing the status of your sent message.
SMS messages sent from Join Me are stored on your PC in the ‘Local’
folder of the ‘Message’ tab.
Join Me User Guide_T Series_v3.0
40
Message Management
In this example, note the following:
• Local
– 1 SMS stored on the PC
• Phone – 0 SMS stored in the handset memory
• (U)SIM – 2 SMS stored on the SIM card
Note:
Join Me User Guide_T Series_v3.0
1.
It is possible to “click & drag” messages from one location to another.
2.
User folders give you the ability to further classify your messages.
3.
The Edit pull down menu gives the added option to copy, cut & paste.
4.
A right-click displays more menu options.
5.
Ctrl+C, Ctrl+X, Ctrl+V shortcuts are supported.
41
Creating Calendar Entries
CLICK the ‘New Calendar’ button to create a new
calendar entry.
The ‘New Contact’ window will now appear.
(see next page)
Join Me User Guide_T Series_v3.0
42
Creating a ‘New Calendar’
1. From the options listed SELECT the location
where your calendar entry will be saved:
• Computer
C
t – stored
t d on your PC
• Phone – stored in the handset memory
•All – local & phone
2. SELECT the type of calendar entry:
• Meeting
• Memo
M
• Reminder
3. ENTER the information for the
calendar entry you wish to create. ie.
subject, location, start date, end
date, alarm & repeat.
4. CLICK Save & Close
Join Me User Guide_T Series_v3.0
Note: See your User Manual for more information on how to
set appointments in the calendar.
43
Calendar Management
In this example
example, note the following:
• Computer – 2 Meetings, 0 Memos, 0 Reminders
• Phone – 2 Meetings, 0 Memos, 0 Reminders
Notes:
Join Me User Guide_T Series_v3.0
1.
It is p
possible to “click & drag”
g contacts from one location to another.
2.
The sub-folders give you the ability to further classify your contacts.
3.
The ‘Phone’ sub-folders are the same as the contact tabs on your phone.
4.
The Edit pull down menu gives the added option to copy, cut & paste.
5.
A right-click displays more menu options.
6.
Ctrl+C, Ctrl+X, Ctrl+V shortcuts are supported.
7.
Contact information supported by PC, phone & SIM card is different, some
i f
information
ti lloss may occur when
h contact
t t information
i f
ti is
i copied
i d or moved
d
from your PC to the phone and SIM.
44
Calendar Sync
1. CLICK the ‘Sync’ button to Import & Export calendar entries.
2. SELECT the import or export
process you wish to perform
((see the next pages
p g for
explanation).
Join Me User Guide_T Series_v3.0
45
Import Calendar from TXT
This method is recommended for users with
advanced PC skills.
skills Hint: Create & save a
dummy calendar entry to understand the text file
format Intermediate PC users please following
format.
the ‘Import Calendar from CSV’ procedure as
outline on the next page
page.
Join Me User Guide_T Series_v3.0
46
Import Calendar from CSV
There is information on how to import calendar
entries from a CSV file in to Join Me on the FAQ
page off the
th ZTE website.
b it About
Ab t half
h lf way down
d
the page under "FAQ 3 - Connectivity: Using
Join Me and Bluetooth devices"
devices there is a faq
titled "How do I import calendar entries into Join
Me? .
Me?"
Please follow the procedure you can download
for assistance.
Join Me User Guide_T Series_v3.0
47
Import Calendar from Outlook
1. The import from Outlook process
will
ill llaunch
h automatically.
t
ti ll
2. If prompted that a calendar entry
cannot be imported CLICK OK to
continue.
continue
Note: The handset calendar does not
support all the MS Outlook Calendar
features
3. CLICK OK when importing has
finished. A message will indicate
how many records were imported
Note:
If y
you are having
g trouble with the importing
p
g of calendar entries from Outlook not all functions are
supported. ZTE suggest you follow the Import from CSV process outline on the previous page.
Join Me User Guide_T Series_v3.0
48
Export Calendar to Outlook
1. TICK the calendar entries
1
you want to export.
2. CLICK the ‘Sync’ button.
3. SELECT ‘Export Calendar to Outlook’
Note:
If y
you are having
g trouble with exporting
p
g calendar entries to Outlook,, p
please be advised that not
all functions are supported.
Join Me User Guide_T Series_v3.0
49
Export to Outlook
1. The export from Outlook process
will now start.
2. CLICK OK when exporting has
finished. A message will indicate
how many records were imported
Note:
If you are having trouble with the exporting of calendar entries to Outlook
not all functions are supported.
Join Me User Guide_T Series_v3.0
50
Backup your Data
Note: Using the ‘Recovery’ option
you can recover the data back to
your phone or PC when
necessary.
To backup data:
5 Backup options are available:
From the File pull down menu (as shown):
• Backup PC Data – creates a backup of all the data on your computer to your computer
• Backup Phone Data – creates a backup of all the data on your phone to your computer
• Backup Phonebook(Vcard) – creates a backup of your phonebook in Vcard format
• Backup Calendar(Vcard) – creates a backup of your calendar in Vcard format
• Backup NV Data - creates a backup of your phones non-volatile memory
Join Me User Guide_T Series_v3.0
51
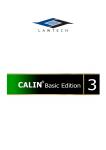
Backup PC / Phone Data
1. SELECT the content to backup
(phonebook, SMS & calendar) by placing
a tick in the appropriate box.
2. CLICK 'Browse' to select the folder you wish to
store the backup; or enter directly the import path
and filename (including the '.xml
xml' extension).
extension)
Note: The default install path will be used to when
no input path is defined. If the default path is used &
you uninstall Join Me all data will be lost.
3. CLICK 'OK' to finish the backup.
Join Me User Guide_T Series_v3.0
52
Backup Vcard Data
1. CLICK 'Browse' to select the
folder you wish to store the backup;
or enter directly the import path and
filename (including the '.xml'
extension).
t
i )
Note: The default install path will be
used to when no input path is
defined. If the default p
path is used &
you uninstall Join Me all data will be
lost.
2. C
CLICK
C 'OK'
O to finish
s the
t e backup.
bac up
Join Me User Guide_T Series_v3.0
53
Backup VCalendar Data
1 CLICK 'OK'
1.
OK if you wish to continue
continue.
2. CLICK 'Browse' to select the
folder you wish to store the backup;
or enter directly the import path and
fil
filename
(i
(including
l di th
the ''.xml'l'
extension).
Note: The default install path will be
used to when no input
p p
path is
defined. If the default path is used &
you uninstall Join Me all data will be
lost.
3. CLICK 'OK' to finish the backup.
Join Me User Guide_T Series_v3.0
54
Recover your Data
To recover all data (phonebook & SMS) from a single file:
4 Recovery options are available:
From the File pull down menu (as shown):
• Recover PC Data – restores all the PC data to your computer
• Recover Phone Data – restores all the data to your phone
• Import Phonebook(Vcard) – imports your Vcard contacts
p
non-volatile memoryy
• Restore NV Data – restores yyour phones
Join Me User Guide_T Series_v3.0
55
Recover PC / Phone Data
1. CLICK ‘Open file' to select the file you wish to
restore; or enter directly the import path.
Note: The default install path will be used to when
no input path is defined. If the default path is used &
you uninstall Join Me all data will be lost.
2. SELECT the
2
th content
t t to
t backup
b k
(including the phonebook, message &
calendar) by placing a tick in the
appropriate box.
3. CLICK ‘Recovery’ after you
have chosen the data to be
recovered.
Join Me User Guide_T Series_v3.0
56
Restore Warning
1. CLICK 'OK' to continue.
Warning: Restoring data clears all the data on your phone/PC. Before
recovering data please make sure no important data will be lost.
Note:
The destination of data to be restored whether for phone or PC is determined during the backup
operation, that's to say, if the selected backup file was initially obtained from the phone, then it
can be only recovered back to the phone, or vice versa.
Join Me User Guide_T Series_v3.0
57
Connect to the Internet
CLICK the ‘Connect’ button to
establish a connection to the
internet.
Join Me User Guide_T Series_v3.0
58
Connecting to the Internet
CLICK the ‘Cancel’ button to stop
establishing an internet connection
The status window indicated that
the phone is connecting ti the
internet.
Join Me User Guide_T Series_v3.0
59
Disconnect the Internet
CLICK the ‘Disconnect’
Disconnect button to
end your Internet session.
Join Me User Guide_T Series_v3.0
60
Internet Session Information
This area displays Internet
session information.
Join Me User Guide_T Series_v3.0
61
More Information
In Join Me there is a comprehensive
p
help
p file
(from the pull down menu under help, or press F1)
For product support enquiries please visit our website at www.zte.com.au.
Here you will find:
• comprehensive product information
(ZTE Next G handsets, Telstra Data Devices & Car-kits)
• an extensive FAQ knowledgebase
• ZTE discussion forums
• the latest JoinMe software to download
• the latest software updates to upgrade your handset
• all handset user guides to view online
Join Me User Guide_T Series_v3.0
62