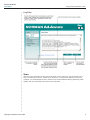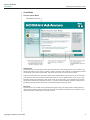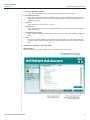
1
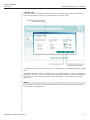
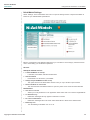
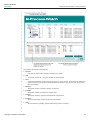
Norman Ad-Aware User Manual Norman Ad-Aware 2008 Norman Ad-Aware User Guide Limited Warranty All rights reserved. No parts of this work may be reproduced in any form or by any means - graphic, electronic, or mechanical, including photocopying, recording, taping, or information storage and retrieval systems - without the written permission of the publisher. Products that are referred to in this document may be either trademarks and/or registered trademarks of the respective owners. The publisher and the author make no claim to these trademarks. While every precaution has been taken in the preparation of this document, the publisher and the author assume no responsibility for errors or omissions, or for damages resulting from the use of information contained in this document or from the use of programs and source code that may accompany it. In no event shall the publisher and the author be liable for any loss of profit or any other commercial damage caused or alleged to have been caused directly or indirectly by this document. Copyright © 1995-2008 Norman ASA. Norman ASA, POBox 43, N-1324 Lysaker, Norway For more information, contact your local Norman subsidiary, contact details found at www.norman. com/Partner/Subsidiaries_and_distributors/11229 October 2008 Copyright © 1990-2007 Norman ASA ii Norman Ad-Aware User Guide Table of Contents Table of Contents Norman Ad-Aware Overview.....................................................................................................1 What Is Norman Ad-Aware?.....................................................................................................1 Norman Ad-Aware Features.....................................................................................................1 Norman Ad-Aware System Requirements..................................................................................2 Getting Started..........................................................................................................................3 Install Norman Ad-Aware.........................................................................................................3 The Norman Ad-Aware Interface...............................................................................................3 First Step Settings. .................................................................................................................5 Using Norman Ad-Aware...........................................................................................................6 Status....................................................................................................................................6 Scan......................................................................................................................................8 N-Ad-Watch. ........................................................................................................................22 Web-Update.........................................................................................................................29 Tools & Plug-ins....................................................................................................................31 Settings...............................................................................................................................37 Using Command Line Parameters..........................................................................................44 Uninstall Norman Ad-Aware....................................................................................................46 Resources...............................................................................................................................47 Norman Support Center.........................................................................................................47 Purchasing Additional Norman Products..................................................................................47 Copyright © 1990-2007 Norman ASA iii Norman Ad-Aware User Guide Norman Ad-Aware Overview > What Is Norman Ad-Aware? Norman Ad-Aware Overview What Is Norman Ad-Aware? Norman Ad-Aware is an industry leading anti-spyware solution. Norman Ad-Aware allows you to combat the growing threats and latest advancements of malicious spyware and malware. Norman Ad-Aware protects you from spyware that secretly takes control of your computer, resulting in aggressive advertising pop-ups, sluggish computer activity and even identity theft through stolen private information. We give you the tools to detect hazardous content on your computer, clearly identify their threat level, and then give you the ability to remove unwanted content, so that your private information remains right where it should - under your control. Norman Ad-Aware’s advanced Code Sequence Identification (CSI) technology roots out deeply hidden malware and then searches for similar codes in order to identify emerging variants. Norman Ad-Aware thoroughly scans your memory, registry, Hosts file, hard, removable and optical drives for known datamining, aggressive advertising, parasites, scumware, keyloggers, trojans, dialers, malware, browser hijackers, and tracking components. Norman Ad-Aware Features ●● Fully redesigned engine - provides optimal productivity with fast scans and improved spyware detection. ●● Advanced Code Sequence Identity technology - results in better detection of deeply imbedded and emerging malware ●● Enhanced Detection Database - protects Norman Ad-Aware users from the latest threats with incremental and automatic updates resulting in fast download times. ●● New graphical user interface (GUI) - easy to navigate for beginners while maintaining advanced options for experienced users and businesses. ●● TrackSweep - this new feature erases tracks left while surfing the Internet on Internet Explorer, Firefox and Opera, in one easy click of a button. ●● Multiple Browser Support - Internet Explorer, Firefox and Opera ●● System Restore Point - set a Windows system restore point after a scan to easily revert back to your clean system in order to recover from a spyware attack. ●● Customized scans - customizable scanning of RAM, registry, hard drives, external storage devices, and optical drives means you save time by scanning selected areas where known spyware programs are located. ●● N-Hosts File Editor - allows users to add, delete or make changes to the Hosts File to create Web navigational shortcuts and block specific sites ●● N-Ad-Watch real time monitor - protects your computer by proactively detecting malware and other parasites before they install on your PC. ●● N-Ad-Watch Connect - monitors outgoing network traffic, providing an additional channel for identifying active threats. ●● N-Process Watch module - view an in-depth snapshot of all running processes and quickly stop any known offending processes. ●● Advanced command line support - allows users to scan and remove spyware without launching the interface window. Copyright © 1990-2007 Norman ASA 1 Norman Ad-Aware User Guide Norman Ad-Aware Overview > Norman Ad-Aware System Requirements Norman Ad-Aware System Requirements Processor: Pentium III 600MHz or faster RAM: Operating system + minimum 50 MB (100 MB recommended) Hard Disk: 50 MB free space recommended Operating Systems: Windows Windows Windows Windows Web Browsers: Internet Explorer (version 5.5 or higher) Firefox (version 1.5 or higher) Opera (version 9 or higher) Copyright © 1990-2007 Norman ASA Vista (32 bit) XP (Home and Pro) Server 2003 2000 (Pro and Server) 2 Norman Ad-Aware User Guide Getting Started > Install Norman Ad-Aware Getting Started Install Norman Ad-Aware For specific questions related to your download or purchase of Norman Ad-Aware, please visit the Support Center at www.norman.com. If you are installing Norman Ad-Aware on Windows 2000 or XP operating systems, please make sure you have administrative rights. Norman Ad-Aware is a service and as such has escalated rights. You must have administrative rights in order to install Norman Ad-Aware. If you are unsure if you have the necessary permission, please contact your system administrator or refer to your computer’s user guide before installing. ●● Start Installation ◦◦ If you are installing Norman Ad-Aware from a CD, insert the CD into the CD-ROM drive. If you downloaded your copy of Norman Ad-Aware, locate and double-click on the downloaded file to start the installation. ●● Uninstall Previous Versions of Ad-Aware ◦◦ Norman Ad-Aware will not function correctly if old versions are not removed prior to installing a new version or an upgrade. When you proceed with the installation of Norman Ad-Aware, all prior Ad-Aware versions will automatically uninstall. ●● Welcome Screen ◦◦ Please read the License Agreement before you proceed. When you have completed reviewing the agreement and if you agree to the terms, select the button next to “I accept the license agreement” and press “Next” to continue with the installation of the software. ●● Destination Location ◦◦ Click “Next” to accept the default location or use “Browse” to specify where you want Norman Ad-Aware installed. ●● Start Installation ◦◦ Click “Next” to begin installing Norman Ad-Aware onto your computer. After the files finish copying, you will receive a confirmation message that the installation was successful. ●● Installation Successful ◦◦ Click “Finish” to complete the installation process. The Norman Ad-Aware Interface Quick Launch Menu Opens copyright and contributor information about Norman Ad-Aware. Opens the Norman Ad-Aware Product Manual. Copyright © 1990-2007 Norman ASA 3 Norman Ad-Aware User Guide Getting Started > First Step Settings Main Menu Click the main menu buttons on the interface to open the drop-down menu in each section. View the status of the components that make up Norman Ad-Aware, statistics from your scans, and log files from your scans. Perform spyware scans, manage your Quarantine and Ignore lists, and use the Scheduler to set up automatic scans and Web Updates. Launch the N-Ad-Watch real-time monitor. Use Web Update to keep Norman Ad-Aware’s threat database up-to-date with the latest Definitions File, and to receive software updates. Choose additional privacy and protection options like the stand alone tools N-Process Watch and N-Hosts File Editor and the convenient TrackSweep feature. Change Norman Ad-Aware’s settings to fit your individual needs. Copyright © 1990-2007 Norman ASA 4 Norman Ad-Aware User Guide Using Norman Ad-Aware > First Step Settings First Step Settings Before you scan your computer with Norman Ad-Aware for the first time, use Web Update to make sure that you are using the latest Definitions File and software version updates. To stay protected from the latest threats, it is important that you regularly update Norman Ad-Aware’s threat database, the Detection Database, with the latest Definitions File update. Regular scans are highly recommended. The Scheduler feature allows you to manage Norman Ad-Aware by setting up automatic scans and Web Updates to take place on scheduled dates and at specific times. We also recommend having Norman Ad-Aware set to automatically quarantine files prior to removal. You can set up Norman Ad-Aware to automatically perform Web Updates, scan, remove infections, and quarantine detected objects. In order to make these adjustments, follow the instructions below. ●● Automatic Web Update ◦◦ Use the Scheduler to schedule automatic Web Updates to occur at set times. To open the Scheduler, click the “Scan” menu button and then click “Scheduler” in the drop-down menu. Click “Add,” select “Web Update” from the list of tasks, and then specify the frequency, date and time for the Web Update to occur. (More information is available in the “Using Norman Ad-Aware” chapter, under “Scheduler”.) ◦◦ You can also adjust Norman Ad-Aware settings to automatically update the Detection Database prior to scanning your computer. Click the “Settings” button to open the Norman Ad-Aware settings menu. Select the “Auto Scans” tab. Under “System,” check the box next to “Update Definitions File before scanning.” If an updated file is available, it will automatically be downloaded to your computer before scanning. Click “Save” to save your changes. ●● Automatic Scans ◦◦ Use the Scheduler to schedule automatic scans to occur at set times. To open the Scheduler, click the “Scan” menu button and then click “Scheduler” in the drop-down menu. Click “Add,” select “Smart Scan” or “Full Scan” from the list of tasks, and then specify the frequency, date and time for the scan to occur. (More information is available under the “Using Norman Ad-Aware” chapter, under “Scheduler”.) ◦◦ You can also adjust the Norman Ad-Aware settings to automatically scan your computer when Norman Ad-Aware is launched. Select the “Auto Scans” tab. Under “Start-Up Scan,” select a scan mode. Click “Save” to save your changes. ●● Automatic Cleaning ◦◦ You can change the Norman Ad-Aware settings so that threats detected on your system after a scan with a certain TAI (Threat Analysis Index) level are automatically removed from your system. Select the “Auto Scans” tab. Under “System,” select a setting in the “Automatically remove infection with TAI higher than ‘X’.”’ Click “Save” to save your changes. ●● Automatic Quarantine ◦◦ You can change the Norman Ad-Aware settings so that detected threats are automatically quarantined prior to being removed from your system. Select the “Auto Scans” tab. Under “Safety,” check the box next to “Quarantine objects prior to removal.” Click “Save” to save your changes. Copyright © 1990-2007 Norman ASA 5 Norman Ad-Aware User Guide Using Norman Ad-Aware > Status Using Norman Ad-Aware Status Click the “Status” menu button to open the drop-down Status menu. Click “Main Status” in the dropdown menu to see the Norman Ad-Aware Main Status screen, Statistics, and Log Files. Main Status Screen Copyright © 1990-2007 Norman ASA 6 Norman Ad-Aware User Guide Using Norman Ad-Aware > Status Statistics General Statistics Detailed Statistics Copyright © 1990-2007 Norman ASA 7 Norman Ad-Aware User Guide Using Norman Ad-Aware > Scan Log Files Scan Click the “Scan” menu button to open the “Scan Mode” screen, where you can choose the type of scan you would like to perform- a Smart Scan, Full Scan, or Custom Scan. Before you scan your computer, you should always be sure to have the most recent Definitions File by performing a Web Update. See more information about each scan mode below. Copyright © 1990-2007 Norman ASA 8 Norman Ad-Aware User Guide Using Norman Ad-Aware > Scan Scan Mode Choose A Scan Mode Smart Scan The Smart Scan is a fast system check that scans only the most critical sections of your system. The Smart Scan will scan your memory, registry, cookies, favorites, and Hosts file. The directories scanned are Windows, Temp and Program Files. The Smart Scan does not scan archived content. This scan mode should only be used for daily system maintenance; use this scan if you are sure that your system is clean and you have performed a Full Scan or an in-depth Custom Scan on your main hard drive at least once during the past month. If this is your first scan, you suspect that your system has become infected with suspicious content, or you have used another anti-spyware product prior to installing and using Norman Ad-Aware, we recommend performing a Full Scan. Full Scan The Full Scan is an in-depth scan mode that thoroughly scans your entire system including all local drives. We recommend using the Full Scan when you use Norman Ad-Aware for the first time, and at regular intervals to ensure that your system is clean. Copyright © 1990-2007 Norman ASA 9 Norman Ad-Aware User Guide Using Norman Ad-Aware > Scan The Full Scan takes longer to scan your system than the Smart Scan, but is more likely to find infections that have been installed on drives other than your main hard disk or in your archives. In addition to the areas scanned during a Smart System Scan, all fixed drives and archive files are also scanned. Custom Scan The Custom Scan scans your system using your pre-configured settings. You can customize Norman Ad-Aware to scan specific sections or directories. Custom Scan Settings - Sections Custom Scan Settings After clicking “Configure,” choose from the following customized scan settings. See a description of each section you can choose to scan below. Sections to Scan ●● Active processes ◦◦ Scans all active processes currently running on your system. ●● Registry ◦◦ Scans known spyware areas of the registry for the current user. ●● Registry executables ◦◦ Scans within the registry for malicious executables. ●● Hosts file ◦◦ Scans your Hosts file. Edits to the Hosts file may occur due to home page hijackers. If you use a N-Hosts File Editor to block content, this option can cause some entries to be detected and presented for removal. To avoid any unwanted changes to your Hosts file, please review the content at the end of a scan and select the entries that you want to ignore in subsequent scans. ●● Tracking cookies ◦◦ Scans for tracking cookies in Internet Explorer, Mozilla Firefox, and Opera. Copyright © 1990-2007 Norman ASA 10 Norman Ad-Aware User Guide Using Norman Ad-Aware > Scan ●● Alternate Data Stream (ADS) ◦◦ Scans files and simultaneously investigates ADS streams for malicious objects. ●● Executable files only ◦◦ Scans only for executable files. This option should be used by advanced users because this will eliminate detection of related content that could cause the removed executables to be reinstalled at a later time. ●● Archives ◦◦ Scans within archives such as .zip, .cab, etc. ●● Spanned files ◦◦ Scans CAB files which are spanned. Spanned CABs occur where several CAB files make up a single CAB archive. ●● Possible browser hijacks ◦◦ Scans browser settings (like start page and search page), favorites, and desktop for malicious URLs. ●● LSPs ◦◦ Detects and unloads malicious LSP (Layered Service Providers). LSP are used by malicious software to detect network activity. The LSPs must be loaded for Norman Ad-Aware to detect them. Custom Scan Settings - Files & Folders Select Folders Click the “Select Folders” tab to select folders and directories you want to scan. Copyright © 1990-2007 Norman ASA 11 Norman Ad-Aware User Guide Using Norman Ad-Aware > Scan Performing Scan Performing Scan After you select a scan mode and click “Scan”, Norman Ad-Aware will begin to scan your system, and the “Performing Scan” screen will appear. Note! Virus Warnings While performing a scan with Norman Ad-Aware, a background anti-virus monitor (from another provider) may issue an alert, stating that a virus has been found in the temporary directory (%temp%) for the current user. This does not necessarily mean your computer has been infected with an active virus. Most anti-virus resident scanners will not scan compressed files and only monitor your memory for signs of an active viral process. During a scan, Norman Ad-Aware will temporarily decompress files to scan their contents without activating the content, but in doing so, the file is noticed by the anti-virus’ resident scanner. Also, some anti-virus applications include an option to quarantine infected files, and when Norman Ad-Aware decompresses these quarantined files, the anti-virus background scanner detects the virus moving outside the quarantine area. To avoid this, you can either remove the quarantined files through your anti-virus application, or have Norman Ad-Aware ignore the anti-virus program’s quarantine folders/files during a scan. Copyright © 1990-2007 Norman ASA 12 Norman Ad-Aware User Guide Using Norman Ad-Aware > Scan Scan Results After the scan is complete, you will be presented with a detailed listing of the items that were detected in the “Scan Results” screen. Please review each detected item in the results screen before removing it. We do not suggest or recommend that everything detected by Norman Ad-Aware should be removed. You have the final say in what to delete from your system. Norman Ad-Aware is designed to report possible suspicious content on your system, give you a straightforward method to understand the content detected, and then provide a simple way to remove threats. In the Scan Results screen, detected objects are separated into critical objects and privacy objects. The total number of critical objects and privacy objects detected during the scan are listed at the top of each tab. Critical Objects Critical objects are detected objects that may pose a threat and should be considered for removal. In order to give you information about each critical object detected, items are grouped under their family name, and are listed with their category, assigned Threat Analysis Index (TAI) level, and file path. The Threat Analysis Index (TAI) associated with each detected object enables you to easily understand what constitutes an annoying threat and what should be recognized as a high risk to your privacy and security. The TA point system is based on a 10-point scale, with 1 representing the lowest threat and 10 representing the highest. For each detected critical object, you can choose to: ●● Add to Ignore ◦◦ Add the object to the Ignore List; keep the item on your system and make sure it is not detected in future scans. ●● Quarantine ◦◦ Add the object to the Quarantine; isolate and back-up the object in quarantine, where it does not pose a threat to your system. ●● Remove ◦◦ Delete the object from your system. You can either select each object individually by checking the box beside it, or use the selection options in the context menu. Before deleting critical objects, you have the option to create a system restore point. A system restore point allows you to restore your computer to a previous working state, in the event of a problem. System restore creates backups, or restore points, of vital system configurations and files. You may choose to create a system restore point prior to deleting objects that you are unsure of removing, or after handling items detected by a scan, when you know that your system is clean. Copyright © 1990-2007 Norman ASA 13 Norman Ad-Aware User Guide Using Norman Ad-Aware > Scan Critical Objects Context Menu Right-click within the “Critical Objects” section of the “Scan Results” screen to open the context menu where you can choose from the following operations: ●● Select All Objects ◦◦ Select all of the detected critical objects. ●● Unselect All Objects ◦◦ Unselect all of the detected critical objects. ●● Add Selected to Ignore List ◦◦ Add all of the selected critical objects to the Ignore List. ●● Quarantine Selected ◦◦ Add all of the selected critical objects to the Quarantine. Copyright © 1990-2007 Norman ASA 14 Norman Ad-Aware User Guide Using Norman Ad-Aware > Scan Privacy Objects Privacy objects consist of tracking cookies and MRU (Most Recently Used) lists. These objects are not considered to be a critical threat to your security, but they may be removed if you desire. For each detected privacy object, you can choose to: ●● Add to Ignore ◦◦ Add the object to the Ignore List; keep the item on your system and make sure it is not detected in future scans. ●● Remove ◦◦ Delete the object from your system. You can either select each object individually by checking the box beside it, or use the selection options in the context menu. Privacy Objects Context Menu Right-click within the “Privacy Objects” section of the “Scan Results” screen to open the context menu where you can choose from the following operations: ●● Select All Objects ◦◦ Select all of the detected privacy objects. ●● Unselect All Objects ◦◦ Unselect all of the detected privacy objects. Copyright © 1990-2007 Norman ASA 15 Norman Ad-Aware User Guide Using Norman Ad-Aware > Scan Log File The log file contains information about the scan; it is a record of the action that occurred during the scan. You can adjust the amount and type of information contained in the log file in the Norman Ad-Aware settings. Copyright © 1990-2007 Norman ASA 16 Norman Ad-Aware User Guide Using Norman Ad-Aware > Scan Scan Summary The “Scan Summary” screen shows information about the scan that you performed and the number of objects that were detected, deleted, ignored by the scanner, and quarantined. Quarantine & Ignore List From the drop-down Scan menu, click “Quarantine & Ignore” to open the Quarantine manager and the Ignore List. Quarantine Quarantine is used to isolate and backup objects detected during an Norman Ad-Aware scan. You then have the option to restore them at a later time. Objects that are quarantined will be encrypted and compressed, and can only be read and restored using the Norman Ad-Aware Quarantine manager. Objects stored in Quarantine do not pose a threat to your computer. The Quarantine manager lists objects by: ●● Family ◦◦ Shows the family associated with the detected objects. ●● Category ◦◦ Shows the category that Norman has classified that threat to be in. ●● Description ◦◦ Shows a description of the object’s location. ●● TAI ◦◦ Shows the Threat Analysis Index (TAI) of the detected object. ●● Time ◦◦ Shows the date and time you quarantined the object. Copyright © 1990-2007 Norman ASA 17 Norman Ad-Aware User Guide Using Norman Ad-Aware > Scan Add Objects to Quarantine To add an object to Quarantine, you must first run an Norman Ad-Aware scan. From the Scan Results screen, select the object or objects you would like to Quarantine by checking the box beside it. Click the “Quarantine” button to quarantine the object or objects. You can then open the Quarantine manager to see a list of quarantined objects. Restore Quarantined Objects In the Quarantine manager, select the quarantined object or objects you would like to restore by checking the box beside it. When you click “Restore,” the object/objects will be removed from Quarantine. Automatic Quarantine You can set Norman Ad-Aware to automatically quarantine objects prior to removal. Click the “Settings” button and select the “Auto Scans” tab. Under “Safety,” check the button next to “Quarantine objects prior to removal.” Ignore List The Ignore List can be used when you want to keep a particular detected item installed on your system, and do not want Norman Ad-Aware to remove it. When you add items to the Ignore List, Norman Ad-Aware will not detect them when your system is scanned. The Ignore List lists types of objects together by category, and shows a description of each object’s location. Add Objects to Ignore List To add an object to the Ignore List, you must first run an Norman Ad-Aware scan. From the Scan Results screen, select the object or objects you would like to add to the Ignore List by checking the box beside it. Click the “Add to Ignore” button and the object/objects will be added to the Ignore List. Copyright © 1990-2007 Norman ASA 18 Norman Ad-Aware User Guide Using Norman Ad-Aware > Scan Remove Objects from Ignore List After accessing the Ignore List, select the object or objects you would like to remove from the Ignore List by checking the box beside it. Click “Delete” to remove the selected object/objects from the Ignore List. Copyright © 1990-2007 Norman ASA 19 Norman Ad-Aware User Guide Using Norman Ad-Aware > Scan Scheduler Scheduler Click “Scheduler” from the drop-down “Scan” menu to open the Norman Ad-Aware Scheduler. You can use the Scheduler to automatically perform Web Updates and automatically scan your computer on specific dates, at set times. Copyright © 1990-2007 Norman ASA 20 Norman Ad-Aware User Guide Using Norman Ad-Aware > N-Ad-Watch Schedule Task To schedule a task, click “Add” and follow the steps in the “Schedule Task” window to schedule the type of task to perform, its frequency, and the date/time you want it to start. A message will appear in the notification area of your taskbar when a scheduled Web Update is taking place. The Norman Ad-Aware icon in the notification area of your taskbar will begin to blink, and a message will appear to let you know when a scheduled scan has begun and finished. To stop a scheduled scan that is in progress, you can right-click on the Norman Ad-Aware icon in the system tray and select “Stop Scan.” Note! If your computer is not turned on at the date and time a task is scheduled to occur, the task will not occur until the next scheduled time. Copyright © 1990-2007 Norman ASA 21 Norman Ad-Aware User Guide Using Norman Ad-Aware > N-Ad-Watch N-Ad-Watch After clicking “N-Ad-Watch” on the Norman Ad-Aware main menu, launch the program by clicking “Start”. The N-Ad-Watch module will open, displaying the main menu screen. N-Ad-Watch is the real-time monitor featured in Norman Ad-Aware. The scanner in Norman Ad-Aware detects and cleans malware from your system, but N-Ad-Watch goes a step further. From the moment your machine is turned on, N-Ad-Watch is watching for malware that tries to integrate and install on your PC. If malware or parasites are detected, an N-Ad-Watch notification window will appear in the notification area of your taskbar, giving you the choice to allow or block that particular process or registry change or addition. N-Ad-Watch allows you to lock the start-up sections of your registry, block possible and actual browser hijack attempts, block suspicious processes, lock executable file associations, and block malicious cookies. Because N-Ad-Watch uses the same Definitions File as Norman Ad-Aware, it is important to get updates regularly from Norman’s Detection Database. N-Ad-Watch has been re-designed and now features four different protection tools: RegShield, Processes, Connect, and TrackSweep. Similar to the Norman Ad-Aware interface, N-Ad-Watch also has a “Settings” screen where you can make specific changes to the actions that N-Ad-Watch performs. Status N-Ad-Watch Status Status The N-Ad-Watch “Status” screen gives you an overview of the N-Ad-Watch real-time monitor, allows you to activate the tools it consists of, and shows statistics from events you have been alerted about. Copyright © 1990-2007 Norman ASA 22 Norman Ad-Aware User Guide Using Norman Ad-Aware > N-Ad-Watch Event Log Event Log N-Ad-Watch’s “Event Log” shows a list of all of the events detected by N-Ad-Watch, such as blocked processes, blocked registry changes or cleaning events (items cleaned by TrackSweep). N-Ad-Watch RegShield Select “RegShield” in the N-Ad-Watch main menu to open the RegShield screen. The registry is a database that stores settings and options for the operating system for Microsoft Windows 32-bit and 64-bit versions. The registry contains information and settings for the hardware, operating system software, users, and preferences of your computer. RegShield allows you to protect the areas in your registry that are common targets for malware by alerting you when a program attempts to make changes to sections in your registry. Protected Areas RegShield allows you to protect the following areas of your registry: ●● Internet Explorer Settings ◦◦ Internet Explorer stores settings in the registry that contain information on your default home page and default search page, as well as other user settings that control the browser’s behavior. These settings are common targets for browser hijackers. ●● Windows Start-up Settings ◦◦ Windows start-up settings affect which parts of Windows are loaded at start-up and what programs are started. ●● Windows security Restrictions and Policies ◦◦ These are settings for user access rights, and other security settings that are used to protect the system’s integrity by making it harder to change files and folders that are vital for Windows to run properly. Copyright © 1990-2007 Norman ASA 23 Norman Ad-Aware User Guide Using Norman Ad-Aware > N-Ad-Watch ●● Windows Scripts ◦◦ Windows Scripts are executed when logging-in to Windows. ●● Windows Session Manager ◦◦ Session Manager keeps track of your current system state, including the applications that are open and the documents each application has opened, so that the same state can be restored when you log-in or log-out. ●● Windows File Associations ◦◦ This data is needed to associate certain file types with certain programs (for example, to associate “.psd” with Photoshop, or “.html” with your browser of choice). Copyright © 1990-2007 Norman ASA 24 Norman Ad-Aware User Guide Using Norman Ad-Aware > N-Ad-Watch N-Ad-Watch Processes Select “Processes” in N-Ad-Watch’s main menu to open the N-Ad-Watch Processes screen. The Processes screen displays the processes that you have been alerted about by N-Ad-Watch because they are in detection in the Norman Detection Database. Each process is show with its corresponding TAI (Threat Analysis Index) rate so you can easily assess its threat level. You can choose to remove analyzed processes from the list of processes, block any processes that you had previously chosen to allow, and allow any processes that you had previously chosen to block. N-Ad-Watch Connect Select “Connect” in the N-Ad-Watch main menu to open the N-Ad-Watch Connect screen. N-Ad-Watch Connect allows you to monitor network traffic, so that you are able to examine network statistics for all running processes. The N-Ad-Watch Connect screen shows a list of all running processes, and allows you to see detailed network information on each process. If the process is in detection, its TAI (Threat Analysis Index) rate will be shown, so you can easily assess its threat level. Connect Context Menu Right-click on a process and choose “Traffic Details,” to open the Traffic Details window, which shows you detailed information on that particular process. Copyright © 1990-2007 Norman ASA 25 Norman Ad-Aware User Guide Using Norman Ad-Aware > N-Ad-Watch N-Ad-Watch TrackSweep Select “TrackSweep” in the N-Ad-Watch main menu to open the TrackSweep screen. TrackSweep is a privacy tool that allows you to remove the traces of your Internet browsing from your system. By checking the buttons next to the items of your choice, the tracks left behind when you surf the Internet can be cleaned from Internet Explorer, Firefox, and Opera web browsers whenever you close a web browser. You can choose to clean the following areas: ●● Cache ◦◦ Clears your browser cache, or Temporary Internet Files. ●● Cookies ◦◦ Clears browser cookies – data that a website saves on your computer’s hard drive and retrieves when you revisit the site. ●● History ◦◦ Clears your full history of visited websites. ●● Last typed URLs ◦◦ Clears the list of last accessed URL’s from your web browser’s address bar. ●● Browser tabs ◦◦ If you use tabbed browsing, your browser tabs will be cleared. TrackSweep Context Menu Right-click within TrackSweep’s selection screen to open the context menu where you can choose from the following operations: ●● Check all ◦◦ Marks all items to be cleaned from every browser. ●● Uncheck all ◦◦ De-selects all items from being cleaned. ●● Check all Explorer ◦◦ Marks all Internet Explorer items to be cleaned. ●● Uncheck all Explorer ◦◦ De-selects all Internet Explorer items from being cleaned. ●● Check all Firefox ◦◦ Marks all Firefox items to be cleaned. ●● Uncheck all Firefox ◦◦ De-selects all Firefox items from being cleaned. ●● Check all Opera ◦◦ Marks all Internet Explorer items to be cleaned. ●● Uncheck all Opera ◦◦ De-selects all Internet Explorer items from being cleaned. TrackSweep automatically deletes cookies that are in the Detection Database. If you do not want TrackSweep to clean all cookies that are in detection, you can adjust N-Ad-Watch’s settings so that cookies are not automatically deleted. Copyright © 1990-2007 Norman ASA 26 Norman Ad-Aware User Guide Copyright © 1990-2007 Norman ASA Using Norman Ad-Aware > N-Ad-Watch 27 Norman Ad-Aware User Guide Using Norman Ad-Aware > N-Ad-Watch N-Ad-Watch Settings Select “Settings” in the N-Ad-Watch main menu to open the settings screen to adjust N-Ad-Watch to better suit your individualized specifications. Below is a description of the different settings that you can select in each category. Check the button next to each setting you would like to implement. General Startup & window beviour ●● Load N-Ad-Watch on start-up ◦◦ If activated, N-Ad-Watch will start with Windows. ●● Start minimized ◦◦ N-Ad-Watch icon will show in your taskbar. ●● Always keep N-Ad-Watch window on top ◦◦ This option will force the N-Ad-Watch window to stay on top of all other open windows. ●● Restore window on new events ◦◦ This will cause the N-Ad-Watch window to open only when a new event has been detected. Notifications ●● Use rules in user list ◦◦ Allows you to set permissions on an application basis under User List on the the RegShield tab ●● On detection only ◦◦ Notification messages will only appear on detection of events. ●● Do not use notifications ◦◦ Notification messages will not be used. Select either allow or block as the default action. ●● Blink Tray Icon ◦◦ Turn the blinking N-Ad-Watch icon on or off. Copyright © 1990-2007 Norman ASA 28 Norman Ad-Aware User Guide Using Norman Ad-Aware > Web-Update Log By default, N-Ad-Watch logs all events in the Event Log. You may choose to change the event log options for Registry Events, Process Events, TrackSweep Events, and Cookies Events. Check the button next to the events that you want N-Ad-Watch to log. Web-Update Click “Web Update” on the main menu and select “Web Update” from the drop-down menu to open the Web Update screen. Web Update allows you to connect directly to the Norman Security Center to look for Definitions File and software updates for Norman Ad-Aware. To stay protected from the latest threats, it is important to run regular Web Updates, to have the most recent Definitions File update from the Norman Detection Database. You can also receive software version updates through Web Update as they become available. The Detection Database is Norman Ad-Aware’s extensive threat detection list, and allows Norman Ad-Aware to detect the latest threats on your system. When you update the Detection Database with the latest Definitions File, you download an incremental update from the database, guaranteeing you a quick, easy update. The file will automatically be stored in the correct location on your computer. Update Norman Ad-Aware While you can get the latest Definitions File by performing a manual update, Web Update is a simple way to update the Detection Database. When you perform a Web Update, you will receive verification that your Definitions File is up-to-date or you will be prompted to confirm that you want to download the latest file. The update manager will then launch if there is a new software version available, allowing you to choose to update the software. You can also use the Scheduler to set up automatic Web Updates to occur at specific dates and times, and change the Norman Ad-Aware settings so that an automatic Web Update is performed prior to scans. Copyright © 1990-2007 Norman ASA 29 Norman Ad-Aware User Guide Using Norman Ad-Aware > Web-Update Web-Update Settings Select “Settings” from the Web Update drop-down menu to change the Definitions File and Proxy settings. Automatic Web Update You can use the Scheduler to schedule automatic Web Updates to occur at set times. To open the Scheduler, click the “Scan” menu button and then click “Scheduler” in the drop-down menu. Click “Add,” select “Web Update” from the list of tasks, and then specify the frequency, date and time for the Web Update to occur. You can also adjust the Norman Ad-Aware settings to automatically update the Detection Database prior to scanning your computer. Click the “Settings” button to open Norman Ad-Aware’s settings menu. Select the “Auto Scans” tab. Under “System,” check the box next to “Update Definitions File before scanning.” If an updated file is available, it will automatically be downloaded to your computer before scanning. Click “Save” to save your changes. Manual Update In some circumstances, such as if your proxy settings are not configured properly, you may not be able to update the Detection Database by using Web Update. You can manually update the Detection Database with the latest Definitions File by following the steps below. ●● Close Norman Ad-Aware. ●● Download the latest Definitions File in a ZIP file from the Norman website. ●● Save the file to a temporary location. Copyright © 1990-2007 Norman ASA 30 Norman Ad-Aware User Guide Using Norman Ad-Aware > Tools & Plug-ins ●● When complete, unzip the contents of the file to the installation directory of Norman Ad-Aware, which is usually C:\Program Files\Norman\N-Ad-Aware\. ●● Open Norman Ad-Aware. You can confirm the latest Definitions File is installed by looking at “Update Status” on Norman Ad-Aware’s main status screen. Tools & Plug-ins Click the “Tools & Plug-ins” menu button to open the “Tools & Plug-ins” drop-down menu. Click “Tools” to open the N-Process Watch and N-Hosts File Editor menu screen. Click “Start” to launch N-Process Watch or N-Hosts File Editor. N-Process Watch and N-Hosts File Editor are both stand-alone tools, and their modules will be launched separately from the Norman Ad-Aware user interface. Tools N-Process Watch N-Process Watch is a powerful process viewer and manager. It is a stand-alone tool that allows you to browse and terminate running processes and their associated modules. N-Process Watch allows you to view detailed information on all processes that are running on your system to see if there are any known offending processes. By default, N-Process Watch lists all processes that are connected to visible windows on your desktop. You can then choose to quickly terminate any running process or unload a module, if necessary. Note! Be careful; some processes and modules are needed by Windows or other software in order to function. Using N-Process Watch When the N-Process Watch module is launched, it shows you a snapshot of all the running processes (top window), their associated modules (lower left window), and a list of threads running for current processes (lower right window). This snapshot is constantly refreshed, and your screen is automatically updated. The N-Process Watch displays three main lists of information. The upper list is the process window, displaying the processes that are currently running in your system. In order to see a more in-depth picture of where each process originated, the module shows a “graphic tree”; the parent process tops each “graphic tree,” and branches down to show the spawned sub-processes. The lower left list is the module window, showing a list of the modules the selected process has loaded into memory. The lower right list is the thread window, showing a module’s thread, or path of execution. Process Window The top window of the N-Process Watch module is the process window. The columns of specific information on each process are listed below. Processes are briefly color-coded as an action occurs, to give you quick, additional information. When a process is highlighted green, it indicates that the process has recently started. A process will be highlighted yellow when suspended, and will remain yellow until you choose to resume it. A process is highlighted red when it has been terminated. Copyright © 1990-2007 Norman ASA 31 Norman Ad-Aware User Guide Using Norman Ad-Aware > Tools & Plug-ins The process window lists information by: ●● Process ◦◦ Lists the file name of all processes running in your system. ●● PID ◦◦ Shows the process ID – a unique identifier for each process. ●● CPU ◦◦ Shows the percentage of CPU time being used by a given process. (The N-Process Watch can support more than one process; these are taken into account, and you are given an accurate CPU percentage.) ●● Memory ◦◦ Shows the amount of memory used by the process. ●● Threads ◦◦ Shows the number of threads the process uses. ●● Priority ◦◦ Shows the operating system’s assigned level of importance. ●● Created ◦◦ Shows a time stamp of when the process was created. ●● Path ◦◦ Shows where the operating system loaded the process into memory. Copyright © 1990-2007 Norman ASA 32 Norman Ad-Aware User Guide Using Norman Ad-Aware > Tools & Plug-ins Process Window Context Menu Right-clicking on a process in the top, main screen opens the process window context menu, showing the operations you can perform on any given process. You can choose from the following operations: ●● Terminate ◦◦ Terminates the selected process. ●● Terminate Tree ◦◦ Terminates the selected parent process and all of its sub-processes. ●● Restart ◦◦ Starts the process again from the beginning. ●● Suspend ◦◦ Freezes a selected process, so that it temporarily stops running. ●● Resume ◦◦ Resumes the execution of a process that has been suspended. ●● Set Priority ◦◦ Manually change the priority level that was assigned by the operating system. The priority level can be reassigned to: • Real Time -- Highest possible priority level; pre-empts all other processes, including operating system processes performing important tasks. • High -- Piority level of time-critical tasks that must be executed immediately. • Above Normal* -- Priority level above the normal level. • Normal -- Piority level with no special scheduling needs. • Below Normal* -- Priority level below the normal level. • Low -- Priority level set to run the process when the system is idle. ●● Open Folder ◦◦ Opens the folder that contains the file spawning the selected process. ●● Google ◦◦ Brings you directly to a Google search to access more information about the selected process. ●● Process Details ◦◦ Opens the “Process Details” window which shows a graph of the estimated CPU usage of the process and more detailed information on that particular process. (You can also access Process Details by double-clicking on a process.) ●● Columns ◦◦ Allows you to add or remove any of the columns of information displayed in the process window. Module Window The lower left window of the N-Process Watch module is the module window. Click a process in the process window to have its details shown in the windows below. The module window lists information by: ●● Module ◦◦ File name of the module. ●● Base Address ◦◦ Module’s point of origin - where it started executing. ●● Size ◦◦ Allocated memory size for the selected module. Copyright © 1990-2007 Norman ASA 33 Norman Ad-Aware User Guide Using Norman Ad-Aware > Tools & Plug-ins ●● Path ◦◦ Full path of the module - where the module is located. Module Window Context Menu Right-clicking on a module in the module window opens the module window context menu, showing the operations you can perform on any given module. You can choose from the following operations: ●● Unload ◦◦ Unloads the selected module from memory. ●● Open Folder ◦◦ Opens the folder that contains the file spawning the selected module. ●● Google ◦◦ Brings you directly to a Google search to access more information about the selected module. Thread Window The lower right window of the N-Process Watch module is the thread window. Click a process in the process window to have its details shown in the windows below. The thread window lists information by: ●● Thread ◦◦ ID number assigned by the operating system - the thread’s unique identifier. ●● Priority ◦◦ Priority level allocated by the operating system. N-Hosts File Editor The N-Hosts File Editor is a stand-alone tool that allows you to create navigation shortcuts, reverse browser hijack entries, block advertisement sites, assist with parental controls, and make other exceptions to normal Internet navigation. Your Hosts File is used to associate host names with IP addresses. For example, the host name for Yahoo! is www.yahoo.com, while its IP address is 204.71.200.67. Both addresses will bring you to Yahoo!’s site, but the “www” address will first have to be translated into the IP address by your Hosts File. Using N-Hosts File Editor The N-Hosts File Editor allows you to make changes to normal Internet navigation by redirecting a host name to a different IP address. Some spyware and malware attempt to change your Hosts File in order to redirect your browsing to another site. You can use the N-Hosts File Editor to reverse browser hijack attempts, block advertisements sites, and redirect your Internet navigation. Computers have a host address of their own, which is known as the “localhost” address. The localhost IP address is 127.0.0.1. If you type in a host name to the N-Hosts File Editor, and then redirect it to your localhost IP address, you have effectively blocked that host, since all attempts to access it will lead back to your localhost. Using this method, you can block sites that serve advertisements, sites that serve objectionable content, or any other site that you choose. The N-Hosts File Editor lists your current Hosts File information by: ●● Status ◦◦ Shows if the entry is active or inactive. Changes to your Hosts File will only occur when the status of an entry is marked “ACTIVE.” ●● Hostname ◦◦ Shows the URL that leads to the IP address of the entry. ●● IP ◦◦ Shows the IP address of the entry. Copyright © 1990-2007 Norman ASA 34 Norman Ad-Aware User Guide Using Norman Ad-Aware > Tools & Plug-ins ●● Comment ◦◦ Allows you to write in a brief comment of your own about that specific entry. N-Hosts File Editor Context Menu Right-click within the “Current Host File” screen to open the context menu where you can choose from the following operations: ●● Add new entry ◦◦ Add a new entry to your Hosts File. After you choose to add a new entry, a new entry will appear in “Current Hosts File” list. You can then double-click within the hostname, IP address or comments column in order to add that information. ●● Delete entry ◦◦ Delete a specific entry. Highlight an entry and then select “Delete entry” in order to delete that entry. ●● Flush ◦◦ Reset your Hosts File into a single localhost entry. If selected, all of your current entries will be deleted. Copyright © 1990-2007 Norman ASA 35 Norman Ad-Aware User Guide Using Norman Ad-Aware > Tools & Plug-ins TrackSweep Select “TrackSweep” from the Tools and Plug-ins drop-down menu to access TrackSweep. Norman Ad-Aware’s TrackSweep feature is a privacy tool that allows you to remove all traces of your Internet browsing from your system. By checking the buttons next to the items of your choice, and clicking “Clean”, the tracks left behind when you surf the Internet can be cleaned from Internet Explorer, Firefox, and Opera web browsers. All browsers that are not running will be cleaned. You can choose to clean the following areas: ●● Cache ◦◦ Clears your browser cache, or Temporary Internet Files. ●● Cookies ◦◦ Clears browser cookies – data that a website saves on your computer’s hard drive and retrieves when you revisit the site. ●● History ◦◦ Clears your full history of visited websites. ●● Last typed URLs ◦◦ Clears the list of last accessed URL’s from your web browser’s address bar. ●● Browser tabs ◦◦ If you use tabbed browsing, your browser tabs will be cleared. TrackSweep Context Menu Right-click within TrackSweep’s selection screen to open the context menu where you can choose from the following operations: ●● Check all ◦◦ Marks all items to be cleaned from every browser. ●● Uncheck all ◦◦ De-selects all items from being cleaned. ●● Check all Explorer ◦◦ Marks all Internet Explorer items to be cleaned. Copyright © 1990-2007 Norman ASA 36 Norman Ad-Aware User Guide Using Norman Ad-Aware > Settings ●● Uncheck all Explorer ◦◦ De-selects all Internet Explorer items from being cleaned. ●● Check all Firefox ◦◦ Marks all Firefox items to be cleaned. ●● Uncheck all Firefox ◦◦ De-selects all Firefox items from being cleaned. ●● Check all Opera ◦◦ Marks all Internet Explorer items to be cleaned. ●● Uncheck all Opera ◦◦ De-selects all Internet Explorer items from being cleaned. Settings Click “Settings” in the main menu to open the Settings screen where you can customize Norman Ad-Aware to fit your needs. Use the tabs to navigate between different categories of settings. Copyright © 1990-2007 Norman ASA 37 Norman Ad-Aware User Guide Using Norman Ad-Aware > Settings Browsers Browser Defaults ●● Default home page ◦◦ Norman Ad-Aware uses the specified Internet Explorer home page when recovering from a browser hijack. When you click “Read Setting,” your current Internet Explorer home page setting will be used. ●● Default search page ◦◦ Norman Ad-Aware uses the specified Internet Explorer search page when recovering from a browser hijack. When you click “Read Setting,” your current Internet Explorer search page will be used. Scanning Processes Detected During Scan ●● Unload malicious processes & modules ◦◦ This allows Norman Ad-Aware to close any currently running process or module that is recognized by the Detection Database. If this setting is disabled, the recognized process or module will continue to run during the remainder of the scan. Deactivation of this option does not imply that Norman Ad-Aware will not be able to remove the executable if selected for removal by the user, just that removal will happen more efficiently if the process has already been stopped. ●● Remove malicious LSPs ◦◦ LSPs, or layered service providers, are often exploited by spyware and adware. If selected, Norman Ad-Aware will remove LSPs in detection. Copyright © 1990-2007 Norman ASA 38 Norman Ad-Aware User Guide Using Norman Ad-Aware > Settings Scanning Options ●● Skip files larger than “X” kb ◦◦ Norman Ad-Aware will skip files that are larger than the specified value. This is most useful for those with large (clean) files such as music or digital imaging files. This will decrease scanning time. ●● Scan Alternate Data Streams (ADS) ◦◦ Norman Ad-Aware will scan files and investigate ADS streams for malicious objects. ●● Scan tracking cookies ◦◦ Norman Ad-Aware will scan for tracking cookies in Internet Explorer, Mozilla Firefox, and Opera. ●● Scan MRU objects ◦◦ Norman Ad-Aware will scan MRU (Most Recently Used) objects. ●● Deep archive scan ◦◦ Norman Ad-Aware will thoroughly scan archives to ensure authenticity. Cleaning Engine ●● Unload modules ◦◦ Norman Ad-Aware will unload running process modules that have matches in the Detection Database. ◦◦ Unload browsers while scanning: Any browsers that are open will be closed before a scan is performed. ●● Suppress failure warnings ◦◦ Messages with certain objects that cannot be removed will be suppressed. ●● Let Windows remove files at start-up ◦◦ If it is necessary to restart your computer to remove a file, Norman Ad-Aware will request that the files be removed during the next system restart. Norman Ad-Aware will instruct Windows to remove these files at start-up. Copyright © 1990-2007 Norman ASA 39 Norman Ad-Aware User Guide Using Norman Ad-Aware > Settings Performance Tuning ●● Run scan as a background process ◦◦ Forces Norman Ad-Aware to run in the background with a lower priority level. This allows other running programs to obtain more processor time. ●● Suppress progress bar during scan ◦◦ When a scan is performed, Antispyware will not show the progress bar on the “Performing Scan” screen. ●● Deactivate N-Ad-Watch ◦◦ N-Ad-Watch will be deactivated when Norman Ad-Aware scans your system. ●● Re-analyze scan result ◦◦ After a scan is completed, Norman Ad-Aware will re-analyze the findings before presenting them. ●● Ignore infections with TAI lower than “X” ◦◦ Items that receive a TAI (Threat Analysis Index) level less than 3 are considered to be low risk threats. You may choose to ignore low risk infections. Auto Scans System ●● Automatically remove infection with TAI higher than “X” ◦◦ Allows you to automatically remove infections above a specified TAI rating in a start-up scan. ●● Close Norman Ad-Aware after start-up scan ◦◦ Once the scan is complete and any detected objects have been handled, Norman Ad-Aware will automatically shut down. ●● Update Definitions File before scanning ◦◦ Automatically checks for updates to the Detection Database before scanning. If an updated file is available, it is automatically downloaded to your computer Start-Up Scan ●● No automated scan ◦◦ No automated scanning will be performed when you start Norman Ad-Aware. This is independent from command line parameters. ●● Smart Scan ◦◦ A Smart Scan will be performed when you start Norman Ad-Aware. ●● Full Scan ◦◦ A Full Scan will be performed when you start Norman Ad-Aware. Windows Start-Up Scan ●● No automated scan ◦◦ No automated scanning will be performed at Windows start-up. This is independent from command line parameters. ●● Smart Scan ◦◦ A Smart Scan will be performed at Windows start-up. ●● Full Scan ◦◦ A Full Scan will be performed at Windows start-up. Safety ●● Update Definitions on start-up ◦◦ When you start Norman Ad-Aware, the program will check for Definitions File updates. ●● Quarantine objects prior to removal ◦◦ Quarantines objects that have been marked for automatic clean. ●● Safe mode ◦◦ A dialog box requesting confirmation will be displayed when altering (removing, quarantining, etc.) objects. Copyright © 1990-2007 Norman ASA 40 Norman Ad-Aware User Guide Using Norman Ad-Aware > Settings ●● Delete restored items ◦◦ After the objects in Quarantine are restored, the quarantine file is deleted. If disabled, the quarantine file will remain on the system even after restoring its contents. User Interface Miscellaneous ●● Integrate into Windows Explorer ◦◦ This setting allows you to use the right-click menu to scan a file or folder with Norman Ad-Aware. ●● Dump exceptions to disk ◦◦ If an exception occurs that cannot be handled, Norman Ad-Aware will append to (or create) a special log file for later trouble-shooting and/or product support. ●● Write protect system files ◦◦ Norman Ad-Aware will write-protect certain system files after repairing them, such as the Hosts File. ●● Use grid lines in results list ◦◦ Display grid lines in the scan result lists. ●● Use Tool tips ◦◦ Display tool tips for the Norman Ad-Aware user interface. Sound ●● Play a sound if scan locates an infection ◦◦ Check the box to have Norman Ad-Aware play a sound at the end of a scan if any critical objects are detected. You can choose a wave-file to be played when content is detected. Any file with a .wav extension can be used. Copyright © 1990-2007 Norman ASA 41 Norman Ad-Aware User Guide Using Norman Ad-Aware > Settings Menu Animation ●● No animation ◦◦ The Norman Ad-Aware main menu will have no animation when selecting headings. ●● Slow animation ◦◦ The Norman Ad-Aware main menu will be set to slow animation when selecting headings. ●● Normal animation ◦◦ The Norman Ad-Aware main menu will be set to normal animation when selecting headings. Skin You can change the look of the program by changing skins. Select the skin that you would like to use from the drop-down menu. Click “Apply” to apply the skin you selected. Language File You can change the interface of the program to the language of your choice by selecting the language of your choice from the drop-down menu. Click “Save” to save your settings. Log Files Log Files ●● Create log file ◦◦ Check the box to have Norman Ad-Aware create log files from your scans. Use the browse feature to locate the folder you wish to store the log files in. Click on the folder and navigate to your chosen location. ●● Limit log files to “X” ◦◦ Allows you to set a limit to the amount of log files created. This may be useful so that log files do not take up added hard drive space. The default setting limits your log files to one. Copyright © 1990-2007 Norman ASA 42 Norman Ad-Aware User Guide Using Command Line Parameters > Settings Include in Log file ●● Basic settings ◦◦ Includes basic settings information in the log file. ●● Advanced settings ◦◦ Includes detailed settings information in the log file. ●● User and computer name ◦◦ Includes the computer’s name and the user name currently logged on in the log file. ●● Environment information ◦◦ Includes system related as well as Norman Ad-Aware specific environment information in the log file. ●● Running processes ◦◦ Includes a list of all running processes in the log file. ●● Running processes and modules ◦◦ Includes a list of all running processes and their associated modules in the log file. ●● Include info about ignored objects in log file ◦◦ Includes information about detected objects that you have added to the Ignore List in the log file. Copyright © 1990-2007 Norman ASA 43 Norman Ad-Aware User Guide Using Command Line Parameters > Settings Using Command Line Parameters Norman Ad-Aware can be operated without using the graphical user interface (GUI). It can be controlled by using command line parameters. UNC paths are supported. Example: >N-Ad-Aware.exe /Smart /Silent /Cookies Norman Ad-Aware will run in the background (without the GUI) and perform a Smart Scan with cookie scan turned on. Scanning Parameters /Full Performs a Full Scan. If set, this parameter will override all other scanning parameters, except the optional Full Scan /Smart Performs a Smart Scan. If set, this parameter will override all other scan parameters except the optional Smart Scan settings: /Cookie /ADS and /MRU, and /Full, which takes precedence over /Smart. /Processes Scans all active processes. /Reg Scans the registry. /RegPE Scans registry executables. /Hosts Scans the Hosts file. /exe Scans only executable files. /zip Scans archives /deepzip Deep-scans archives. /Spanned Scans spanned files. /ukpds Unloads all malicious programs. The /process option has to be set for this option to have effect. /PBH Scans for possible browser hijacks. /LSP Scans Layered Service Providers. Copyright © 1990-2007 Norman ASA 44 Norman Ad-Aware User Guide Using Command Line Parameters > Settings /Path [filepath] Sets a folder to be scanned. If you want to scan more than one folder, you will have to use this parameter for each folder. Usage: /Path C:\Windows\ /Path C:\Program Files\ /Cookies Scans Tracking Cookies. /ADS Scans Alternate Data Streams. /MRU Scans Most Recently Used (MRU) lists. Other Scanning Options /FileSize [0] Sets the maximum size of the files to be scanned in kilobytes. If it is not set, it will default to 0 (i.e. all files will be scanned). Usage: /FileSize 4000 /ScanTAI [1-10] Sets the lowest TAI to scan for. If not set, TAI 3 will be used. Usage: /ScanTAI 5 Cleaning /Clean Detected malware will be cleaned. /CleanTAI [1-10] Set the lowest TAI to clean. Usage: /CleanTAI 4 /NoQuarantine Infections will not be quarantined before removal. If this option is not set, all infections will be quarantined. Updates /Update Performs a Web Update to look for a new Definitions File. If there is a newer version it will be downloaded and installed. /Backup [filename] Creates a backup of the current Definitions File before updating. Usage: /Backup defs.bak Miscellaneous /Silent Runs Norman Ad-Aware without showing the graphical user interface and performs a scan that automatically quarantines any detected objects. /Stat [filename] Creates a file containing statistics, version numbers and settings for the scan. Usage: /Stat scanstats.txt Copyright © 1990-2007 Norman ASA 45 Norman Ad-Aware User Guide Uninstall Norman Ad-Aware > Settings Uninstall Norman Ad-Aware You can use one of the methods below to uninstall Norman Ad-Aware. Uninstaller ●● Go to the “N-Ad-Aware” folder in your Start menu. ●● Run “Uninstall N-Ad-Aware”. ●● Verify uninstalling by selecting “Yes.” ●● When the program exits, Norman Ad-Aware has been uninstalled. Control Panel Copyright © 1990-2007 Norman ASA ●● Go to the Control Panel. ●● Run “Add or Remove Programs”. ●● Select N-Ad-Aware in the list and click the “Change/Remove” button ●● Verify uninstalling by selecting “Yes.” ●● When the program exits, Norman Ad-Aware has been uninstalled. 46 Norman Ad-Aware User Guide Resources > Norman Support Center Resources Norman Support Center Under the Support menu at www.norman.com, you can access the FAQs and the Support Forum. FAQs The FAQs provide you with answers to some of the most frequently asked questions about Norman antisypware. Support Forums In the Norman Support Forums, at http://forum.norman.com, our users can share and discuss experiences with Norman antispyware. The forum will be monitored by Norman Support, but we will not answer all questions that are posted. For urgent requests, please contact Norman Support directly. Contact Norman Support For urgent support requests, please contact your local Norman Support department. To be eligble for free support, you will need to state your customer ID or other license details that verifies that you have a valid license. Please find contact info here: www.norman.com/Support/Contact_support Purchasing Additional Norman Products Please use the following links to our website for more information on Norman products. Home Users Please visit our Home/home office page at www.norman.com/Product/Home_Home_office For any questions, please contact our sales Department at www.norman.com/Home/Contact_ Norman Corporate Please visit our Corporate page where you can browse products in the Small Business or Enterprise category, at www.norman.com/Product/Corporate If you have joined our global network of Norman partners or if you are a registered reseller, you may use the resources available by logging in to the Partner Center at www.norman.com/Partner For sales questions, please contact sales at www.norman.com/Home/Contact_Norman Support Center Visit the Norman web, www.norman.com, for a convenient way to upgrade your software, communicate with Support Center staff through e-mail, and have access to important product resources. Copyright © 1990-2007 Norman ASA 47 Norman offices Denmark Norman Data Defense Systems AS Blangstedgårdsvej 1, DK-Odense SØ Tel: +45 63 11 05 08 Fax: +45 63 13 39 01 Email: [email protected] Web: www.norman.no/dk France Norman France 8 Rue de Berri, 75008 Paris Tel: +33 1 42 99 94 14 Fax: +33 1 42 99 95 01 Email: [email protected] Web: www.norman.fr Germany Norman Data Defense Systems GmbH Zentrale, Gladbecker Str. 3, 40472 Düsseldorf Tel: +49 0211 5 86 99 0 Fax: +49 0211 5 86 99 150 Email: [email protected] Web: www.norman.de Italy Norman Data Defense Systems Centro Direzionale Lombardo, Via Roma, 108 20060 Cassina de’Pecchi (MI) Tel: +39 02 951 58 952 Fax: +39 02 951 38 270 Email: [email protected] Web: www.normanit.com Netherlands Norman/SHARK BV Postbus 159, 2130 AD, Hoofddorp Tel: +31 23 789 02 22 Fax: +31 23 561 31 65 Email: [email protected] Web: www.norman.nl Spain Norman Data Defense Systems Camino Cerro de los Gamos 1, Edif.1 E - 28224 Pozuelo de Alarcón MADRID Tel: +34 91 790 11 31 Fax: +34 91 790 11 12 Email: [email protected] Web: www.normandata.es Sweden Norman Data Defense Systems AB Korsgatan 2, 602 33 Norrköping Tel: +46 11 230 330 Fax: +46 11 230 349 Email: [email protected] Web: www.norman.com/se Switzerland Norman Data Defense Systems AG Münchensteinerstrasse 43, CH- 4052 Basel Tel: +41 61 317 25 25 Fax: +41 61 317 25 26 Email: [email protected] Web: www.norman.ch United Kingdom Norman Data Defense Systems (UK) Ltd Exchange House, 494 Midsummer Boulevard Central Milton Keynes, MK9 2EA Tel: +44 08 707 448 044 / +44 01 908 255 990 Fax: +44 08 701 202 901 Email: [email protected] Web: www.normanuk.com United States Norman Data Defense Systems Inc. 9302 Lee Highway, Suite 950A, Fairfax, VA 22031 Tel: +1 703 267 6109 Fax: +1 703 934 6367 Email: [email protected] Web: www.norman.com Norway Norman ASA (Headquarter / hovedkontor og salg Norge) Visit: Strandveien 37, Lysaker PO Box 43, N-1324 Lysaker Tel: +47 67 10 97 00 Fax: +47 67 58 99 40 E-mail: [email protected] Web: www.norman.com/no Norman ASA is a world leading company within the field of data security, internet protection and analysis tools. Through its SandBox technology Norman offers a unique and proactive protection unlike any other competitor. While focusing on its proactive antivirus technology, the company has formed alliances which enable Norman to offer a complete range of data security services. Norman was established in 1984 and is headquartered in Norway with continental Europe, UK and US as its main markets. Copyright © 1990-2007 Norman ASA