1
Metagenomic Sample Analysis
Standard Operating Procedures for fossil fuel
environments
Contents
1
2
Sample Collection ................................................................................................................................. 4
1.1
Metadata....................................................................................................................................... 4
1.2
Sample Fractionation .................................................................................................................... 4
DNA Extraction ...................................................................................................................................... 5
2.1
3
DNA Sample Fractionation ............................................................................................................ 7
Community Analysis .............................................................................................................................. 8
3.1
PCR amplification .......................................................................................................................... 8
Procedure – PCR amplification and barcoding ..................................................................................... 9
Materials and Reagents ........................................................................................................................ 9
4
3.2
16S DNA Sequencing ................................................................................................................... 11
3.3
Data Analysis via Phoenix II......................................................................................................... 11
Total DNA Analysis .............................................................................................................................. 12
4.1
Total DNA Sequencing ................................................................................................................ 12
4.2
Binning and Assembly ................................................................................................................. 12
4.3
Annotation .................................................................................................................................. 12
4.4
Data Analysis ............................................................................................................................... 12
5
Data Storage........................................................................................................................................ 13
6
Appendix 1 .......................................................................................................................................... 14
Typical Metagenomics Work Flow
1 SAMPLE COLLECTION
The goal of effective sample collection is to minimize contamination while maintaining the character of
the indigenous microbial community and obtaining sufficient amounts of biomass. The sample and
resulting sequence data should be checked for contamination.
The sample procedure will be dependent on the nature of the natural environment.
I.
II.
III.
Water (Produced water, Tailings pond water, Pipeline water)
o Sample should be collected in sterile Nalgene bottles filled to the top to avoid air
exposure. When samples are processed immediately they can be stored in an anaerobic
chamber containing 90% N2 and 10% CO2. Samples to be kept for later metagenomic
analysis should be stored at -80 °C. Tailings ponds often yield around 100 ng per ml of
sample, while produced water yields are lower, at around 5 ng per ml.
o Excess water from tailings samples are removed with centrifugation at 14,000 rpm
o Produced water samples are filtered with a 0.2um filter
o Oil can be removed from samples by a short centrifugation a 14,000 rpm
Drilling Cores (Coal, Oil Sands, etc)
o Drilling cores should be rapidly frozen at the well site immediately following collection.
Cores should remain frozen when in transportation. Samples should be stored at -80°C.
Core can be subdivided using a sterile rock saw. Samples should be prepped for DNA
extraction by aseptically removing the outside surfaces of the cores (to eliminate drilling
contamination) leaving the interior of the core material for DNA analysis. The interior
frozen core material is then ground with a mortar and pestle prior to DNA extraction.
The yield of core material is often less than 1 ng of DNA per g of core material. Although
freezing is ideal for metagenomics (DNA) analysis it is not appropriate for all
downstream analysis, such as culturing. If other tests will be conducted on the core
material, some of the core material should be left unfrozen.
Biofilms (pipelines)
o Pipeline sections should be stored in the anaerobic hood (90% N2 and 10% CO2) until
the pipeline biofilm can be scraped off. The scrapings should be processed immediately
or stored at -80°C. Although the yield can vary widely, based on the composition of the
scrapings, it can be as high as 500 ng per g.
1.1 METADATA
Effective sample collection also requires extensive metadata collection. Items that should be recorded
include: Environmental conditions (temperature, depth, and location), Chemistry (pH, salinity, etc), and
sampling methodology to name a few. More information on metadata collection can be found at the
Genomics Standards Consortium’s “Minimum Information about a (Meta)Genome Sequence” (MIMS)
website: www.gensc.org.
1.2 SAMPLE FRACTIONATION
As long as sufficient material is obtained, samples should be subdivided and some material stored at -80
°C for later use or for different analyses.
2 DNA EXTRACTION
The optimal DNA extraction procedure will depend on the sample being processed. For the majority of
samples a bead-mill homogenization with SDS-Chloroform Treatment can be used for DNA extraction.
The protocol is listed below, other protocols commonly used are listed in appendix 1.
DNA extraction from tailings ponds using FastDNA spin kit for soil
Overview
The FastDNA® SPIN Kit for Soil quickly and efficiently isolates PCR-ready genomic DNA directly from soil
type samples in less than 30 minutes. Designed for use with the FastPrep® Instruments from MP
Biomedicals, microbial cells within soil type samples are easily lysed within 40 seconds. These benchtop
devices use a unique, optimized motion to homogenize samples by multidirectional, simultaneous
impaction with lysing matrix particles.
Part I describes the cell lysis step and the isolation of genomic DNA from soil type samples. Samples are
placed into 2.0 ml tubes containing Lysing Matrix E, a mixture of ceramic and silica particles designed to
efficiently lyse all soil organisms including historically difficult sources such as eubacterial spores and
endospores, and gram positive bacteria. Homogenization in the FastPrep® Instrument with Lysing
Matrix E takes place in the presence of MT Buffer and Sodium Phosphate Buffer, reagents carefully
developed to protect and solubilize nucleic acids and proteins upon cell lysis. These reagents work
together to allow extraction of genomic DNA with minimal RNA contamination. Following lysis, samples
are centrifuged to pellet soil, cell debris and lysing matrix. DNA is purified from the supernatant with a
silica-based GENECLEAN® procedure using SPIN filters. Part II describes the quality control step, where
the resulting DNA is assessed for its quantity, quality, and purity. This would determine whether the
DNA is appropriate for 454 pyrosequencing.
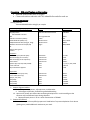
Kit Components and User Supplied Materials
FastDNA® SPIN Kit for Soil Components
Lysing Matrix E
Sodium Phosphate Buffer
MT Buffer
PPS Solution
Binding Matrix
SPIN Modules
Catch Tubes
Concentrated SEWS-M
DES
BBS Gel Loading Dye
User manual
MSDS
Certificate of Analysis
50x 2.0 ml tubes
60 ml
8 ml
25 ml
66 ml
50 each
50 each
2 ml
20ml
200 μl
1 each
1 each
1 each
User Supplied Materials
FastPrep® Instrument
Microcentrifuge that can freely spin 2.0 ml tubes
Microcentrifuge tubes (2.0 ml and 1.5 ml)
Clean 15 ml tubes for DNA binding
Rotator or low-speed vortex
Reference:
http://images.www.mpbio.com/docs/fastprep/FastDNASpinKitforsoil.pdf
Part I: DNA Extractio1. Add up to 500 mg of sample to a Lysing Matrix E tube.
If there is too much water in the sample, it is possible to remove the supernatant with centrifugation,
which may lead increased DNA yields.
2. Add 978 μl Sodium Phosphate Buffer to sample in Lysing Matrix E tube.
3. Add 122 μl MT Buffer.
4. Homogenize in the FastPrep® Instrument for 40 seconds at a speed setting of 6.0.
5. Centrifuge at 14,000 x g for 5-10 minutes to pellet debris.
NOTE: Extending centrifugation to 15 minutes can enhance elimination of excessive debris from large
samples, or from cells with complex cell walls.
6. Transfer supernatant to a clean 2.0 ml microcentrifuge tube. Add 250 μl PPS (Protein Precipitation
Solution) and mix by shaking the tube by hand 10 times.
7. Centrifuge at 14,000 x g for 5 minutes to pellet precipitate. Transfer supernatant to a clean 15 ml tube.
NOTE: While a 2.0 ml microcentrifuge tube may be used at this step, better mixing and DNA binding
will occur in a larger tube.
8. Resuspend Binding Matrix suspension and add 1.0 ml to supernatant in 15 ml tube.
9. Place on rotator or invert by hand for 2 minutes to allow binding of DNA. Place tube in a rack for 3
minutes to allow settling of silica matrix.
10. Remove and discard 500 μl of supernatant being careful to avoid settled Binding Matrix.
11. Resuspend Binding Matrix in the remaining amount of supernatant. Transfer approximately 600 μl of
the mixture to a SPIN™ Filter and centrifuge at 14,000 x g for 1 minute. Empty the catch tube and add
the remaining mixture to the SPIN™ Filter and centrifuge as before. Empty the catch tube again.
12. Add 500 μl prepared SEWS-M and gently resuspend the pellet using the force of the
liquid from the pipet tip.
NOTE: Ensure that ethanol has been added to the Concentrated SEWS-M.
13. Centrifuge at 14,000 x g for 1 minute. Empty the catch tube and replace.
14. Without any addition of liquid, centrifuge a second time at 14,000 x g for 2 minutes to “dry” the
matrix of residual wash solution. Discard the catch tube and replace with a new, clean catch tube.
15. Air dry the SPIN™ Filter for 5 minutes at room temperature.
16. Gently resuspend Binding Matrix (above the SPIN filter) in 50-100 μl of DES (DNase/Pyrogen-Free
Water).
NOTE: To avoid over-dilution of the purified DNA, use the smallest amount of DES required to
resuspend Binding Matrix pellet.
NOTE: Yields may be increased by incubation for 5 minutes at 55˚C in a heat block or water bath.
17. Centrifuge at 14,000 x g for 1 minute to bring eluted DNA into the clean catch tube. Discard the SPIN
filter. DNA is now ready for PCR and other downstream applications. Store at -20°C for extended
periods or 4°C until use.
Part II: Quality Control
1. Quantify the DNA concentration via Quant-iTTM fluorometer.
2. Ensure DNA can be amplified with PCR primers.
2.1 DNA SAMPLE FRACTIONATION
DNA should be subdivided so some DNA can be stored frozen at -80 °C for later use.
3 COMMUNITY ANALYSIS
3.1 PCR AMPLIFICATION
Either primers that universally amplify the 16S gene can be used or primers targeting specific organisms
or functional genes can be used. It is important to know the limitations (biases) of the primers you are
using.
Since the PCR primers with barcodes and sequencing (FLX) adapters are quite long (40 nt), PCR
amplification is performed in two stages. Fist the DNA is amplified with only the universal primers (no
adapters) and the sequencing adapters are added during a second round of PCR.
Universal PCR PRIMERS (See Roche technical bulletin TCB No. 005-2009 for list of bar codes (MIDs))
Original PCR primer no adaptor
1392R: acg ggc ggt gtg tRc
926wF: aaa ctY aaa Kga att gRc gg
Original PCR primer with adaptor
_______FLX Adapter__________ ____bar code____ ________Primer________
454T_RL 5’-CCATCTCATCCCTGCGTGTCTCCGAC TCAG ACGAGTGCGT acg ggc ggt gtg tRc
454T-FB 5’-CCTATCCCCTGTGTGCCTTGGCAGTC
aaa ctY aaa Kga att gRc gg
Updated PCR primer for Epsilon no adaptor
1392Re: acg ggc ggt gWg tRC
926wFe: aaa ctY aaa Kga atW gRc gg
Updated PCR primer for Epsilon with adaptor
_______FLX Adapter__________ ____bar code____ ________Primer________
454T_RL 5’-CCATCTCATCCCTGCGTGTCTCCGAC TCAG ACGAGTGCGT acg ggc ggt gWg tRC
454T-FB 5’-CCTATCCCCTGTGTGCCTTGGCAGTC
aaa ctY aaa Kga atW gRc gg
Procedure – PCR amplification and barcoding
•
•
Establish unidirectional flow of reagents.
Clean work surfaces and tools with 70% ethanol before and after each use
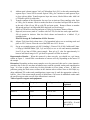
Materials and Reagents
Starting materials
-Extracted DNA diluted to 10ng/ul per sample
Materials/Reagents/Equipment
Vendor
Stock Number
Taq polymerase
10x PCR buffer included
BSA
Nuclease Free Water (500mL)
10mM dNTP Mix (200ul, 1ml)
100bp DNA ladder Plus (0.5ug/ul, 50ug)
Minelute Gel Extraction Kit (50,250)
Amersham Pharmacia Biotech
27-0799-62
New England Biolab
Ambion
MBI Fermentas
MBI Fermentas
Qiagen
B9001S
9930
R0191, R0192
SM0323
28604, 28606
Equipment
MJ Thermocycler (96-well alpha)
Microcentrifuge (for 1.5 tubes)
Microcentrifuge (for 8-strip tubes)
Vortex Genie
Pipettes (P2, P10, P20, P200, P1000)
0.2mL tube rack
8-tip multichannel pipettor
MJ Research
ISC Bioscience
ISC Bioscience
ISC Bioscience
Rainin
Fisher
Rainin
ALS 1296
C-1201
C-1202
S-7350-1
RL-2, 10, 20, 200, 1000
05-541-55
L8-200
Disposables
8-strip tubes and caps (0.2mL)
0.2 mL tubes (with cap)
Tips (P2, P10, P20)
Tips (P200)
Tips (P1000)
Tips (P1000)
ISC Bioscience
ISC Bioscience
Rainin
Rainin
Rainin
Rainin
T-3014-1
C-3328-1
RT-L10F
RT-L200F
RT-L1000F
RT-L1000F
TE
Seakem GTG agarose
Ethanol
1. Prepare oligonucleotides
1.1. Order 454 primer sequences, 16S sequences, and barcodes.
a. Scale oligos to 25nmole, purified using standard desalting
1.2. Upon arrival, briefly spin down tubes containing dried primers in a minicentrifuge as the
contents may have become loose during shipment
a. Resuspend each primer in TE to a stock concentration of 100uM
2 Prepare PCR cocktail.
2.1 For each sample to be amplified, prepare mix listed below. To prevent depletion of mix due to
pipeting error, add 3 additional reactions to your total.
a.
The following is a list of reagents added per reaction. PCR master mix should be
prepared as follows;
2.2
2.3
2.4
2.5
3
13.9 uL water
2.0 uL 10x PCR buffer
0.4 uL 10mM dNTPs
0.6 uL 10mg/ml BSA
1.0ul 1uM Forward primer
0.1 uL Taq
Vortex to mix, spin down
Dispense 18ul aliquots of the master mix into 0.2mL microtubes
Add the following in triplicate tubes/wells
1ul of the 1uM Reverse primer
1ul 10ng/ul DNA
Vortex to mix, spin down, cap.
Enter the following PCR program into Thermal cycler. See Thermal cycler manual for instructions on
entering new PCR programs.
95C, 3 min
25 cycles of: 95C 30s, 55C 45s, 72C 90s *
72C 10min
4C ∞
*second round of amplification with adapters only uses 10 cycles
4 Confirm successful amplification by running reactions out on a 1% agarose gel
4.1 Preparing Agarose Gel and run buffer
a. Make a 1.0% GTG SeaKem agarose TAE mini gel
b. Stir 200ml 1X TAE with 2.0g agarose and microwave until completely melted, stir on stirplate
until slightly warm then add 10ul EtBr.
c. Pour 1X TAE buffer to fill line of gel tank.
4.2 Running Agarose Gel
5
a. Submerge solidified gel in TAE run buffer in tank, and remove comb.
b. Add 5-6ul of 5X loading dye to each sample, vortex to mix.
c. Load Samples in large wells and add a 100bp ladder
d. Run gel at 120V until band size is easily visible ~30-40 minutes
e. Image gel using dark reader settings on Fluor-S multi imager.
Purify amplification (PCR) product by QIAquick PCR Purification (QIAGEN)/ other similar kit
a. Add 1:250 volume of pH indicator I to Buffer PB, depending on the amount to be used (e.g. 16 µl
pH indicator I to 4 ml Buffer PB). Yellow color of Buffer PBI indicates pH ≤ 7.5.
b. Next, add 5 volumes of Buffer PBI to 1 volume of the PCR sample and mix (e.g. add 500 µl of
Buffer PBI to 100 µl PCR sample).
c. If the color of the mixture is (pale) orange or violet, add 10 µl of 3 M sodium acetate, pH 5.0
(need to be prepared, not included in the kit) and mix. The color of the mixture will turn to
yellow.
d. Place a QIAquick spin column in a provided 2 ml collection tube.
e. To bind DNA, apply the sample to the QIAquick column and centrifuge for 30-60 s.
f. Discard flow-through. Place the QIAquick column back into the same tube.
g. To wash, add 750 µl Buffer PE to the QIAquick spin column and centrifuge for 30-60 s.
h. Discard flow-through and place the QIAquick column back in the same tube. Centrifuge the
column for an additional 1 min.
i. Place QIAquick column in a clean 1.5 ml microcentrifuge tube.
j. To elute DNA, add 30 µl - 50 µl Buffer EB (10 mM Tris-Cl, pH 8.5) or water (pH 7.0-8.5) to the
center of the QIAquick membrane and centrifuge the column for 1 min.
Addition of the elution buffer can vary depending on the amount of the PCR product obtained.
6. Quantify each purified sample
[For additional details, please refer QIAGEN/QIAquick Spin Handbook (March 2008).]
3.2 16S DNA SEQUENCING
In order to obtain read lengths long enough to identify taxa to the genus level, Roche’s 454 flex titanium
platform is used. Additionally the length of the primers used in the PCR amplification are optimized for
the 500 bp reads of the 454 flex.
3.3 DATA ANALYSIS VIA PHOENIX II
Once the 16S sequence data is available the data needs to go through quality control to eliminate the
poor or chimeric sequences. The quality controlled data is then aligned and clustered so diversity
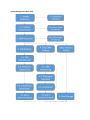
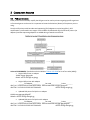
statistics and taxonomic identifications can be made. The following figure demonstrates a typical
analysis workflow.
There are several tools that can do this analysis. These include Phoenix 2
(http://hmp.ucalgary.ca/phoenix/) and QIIME (http://qiime.org/).
4 TOTAL DNA ANALYSIS
Total DNA analysis avoids the PCR amplification stage and is sent directly for sequencing.
4.1 TOTAL DNA SEQUENCING
Currently two sequencing platforms are used for total DNA sequencing
1) Roche 454 flx+
the ~800 bp reads provide more reliable annotation for unassembled metagenomes.
½ run of 454 sequencing typically provides 800,000 reads (640,000,000 bps)
2) Illumina HiSeq 2000
-
All though the reads from the HiSeq 2000 are much shorter ~150 to 200 bps, paired end
runs are possible and the sequencing depth is much higher with 1.5 billion reads per 2 lanes
(~40,000,000,000 bps)
-the greater coverage allows for the identification of rarer genes and species but it makes
assembly and annotation more difficult.
4.2 BINNING AND ASSEMBLY
Binning and assembling large metagenomics datasets is complex and requires a dedicated and
sophisticated computing systems. However metagenomic datasets can be and are often analyzed
without assembling the dataset. Besides being computationally complex, assembling the data can create
chimeric sequencing. Unassembled data (gene centric analysis) can be conducted using the IMG/MER
and MG-Rast platforms described in 4.3 & 4.4. The project’s binning and assembly SOP is below.
Project SOP coming soon
4.3 ANNOTATION
Project SOP coming soon.
Although Online tools like MG-Rast (http://metagenomics.anl.gov/) and IMG/MER
(https://img.jgi.doe.gov/mer/) will not assemble metagenomics data for end users, they will annotate
your datasets. Programs like MLTreeMap (http://www.mltreemap.org/) will use conserved genes
provide taxonomic assignment to the microbes in the metagenome sample.
4.4 DATA ANALYSIS
Both MG-Rast and IMG/MER provide a wide range of tools for metagenome data analysis and
comparison tools.
5 DATA STORAGE
Although raw data should be stored on site and remotely backed up, online databases like the NCBI’s
SRA will accept both 16S amplicon data and total DNA metagenomes datasets. Additionally, both MGrast and IMG/MER will store the quality controlled and annotate reads from metagenome samples.
6 APPENDIX 1
Alternative DNA extraction protocols:
DNA extraction using chloroform, isopropanol and bead beating
Materials:
Solutions (all sterile filtered):
o 50mM phosphate buffer pH 7.0
o lysis buffer: 10% SDS, 100mM NaCl, 500mM Tris pH 8.0
o 24:1 chloroform:isoamyl alcohol (make reasonably fresh)
o 7M ammonium acetate
o 100% isopropanol
o MilliQ-filtered water
Equipment:
o 1.5ml eppendorff tubes
o 2ml screw-cap tubes containing 0.5g ea.) of 0.5 and 10 micron diameter zirconium
beads
o pipettes and tips
o bead beater
o microcentrifuge
Method:
1) In a 2ml screw-cap tube containing 0.5g (ea.) of 0.5 and 10 micron diameter zirconium beads
add 300µl 50mM phosphate buffer pH 7.0
2) Add a healthy loop full of cells
3) Add 300µl lysis buffer and 300µl 24:1 chloroform:isoamyl alcohol
4) Shake on a bead beater for 40 seconds at 5000rpm
5) Centrifuge at 13,000rpm for 5 minutes
6) Remove the supernatant (~650µl) into a fresh 1.5ml eppendorff tube
7) Add 7M ammonium acetate to a final concentration of 2.5M (~360µl) and gently mix
8) Centrifuge at 13,000rpm for 5 minutes
9) Remove the supernatant (~580µl) into a fresh 1.5ml eppendorff tube
10) Add 1 volume of 100% isopropanol
11) Incubate at -20°C for at least 30 minutes
12) Centrifuge at 13,000rpm for 10 minutes
13) Remove supernatants and dry pellets
14) Resuspend in 40µl MilliQ water
Notes:
Procedure works well done in batches of 12 reactions (capacity of the bead-beater)
Total procedure up to incubation at -20°C takes approximately 45 minutes
Extracts can be incubates at -20°C at least overnight (indefinitely?)
DNA EXTRACTION for HIGH MOLECULAR WEIGHT DNA USING 0.22 µM
STERIVEX FILTERS
Jody J. Wright, Elena Zaikova, David A. Walsh and Steven J. Hallam
Department of Microbiology & Immunology
University of British Columbia
Corresponding author: Steven J. Hallam
Keywords: microbiology, seawater, DNA extraction
Short Abstract: We describe a method for extraction of high molecular weight genomic DNA
from planktonic biomass concentrated on 0.22 µm Sterivex filters.
Long Abstract: This method is used to extract high molecular weight genomic DNA from
planktonic biomass concentrated on 0.22 µM Sterivex filters that have been treated with
storage/lysis buffer and archived at -80°C. The protocol begins with two one-hour incubation
steps to liberate DNA from cells and remove RNA.
Part II involves a series of
Phenol:Chloroform and Chloroform extractions followed by centrifugation to remove proteins
and cell membrane components, collection of the aqueous DNA extract, and several buffer
exchange steps to wash and concentrate the extract. Part III describes a method to check for the
quality and presence of DNA in the extract and recommendations for both long and short-term
storage of the resulting samples. The total time required for this protocol depends on the number
of samples to be extracted. It is recommended to work with less than 15 samples at one time to
avoid confusion and cut down protocol time. For 10-15 samples and assuming the proper
centrifugation equipment is available, this protocol should take about 8 hours, with an additional
overnight step to run an agarose gel to visualize and quantify the DNA extracts. Make sure you
have the hybridization ovens set to temperature at the outset of the process.
Protocol
Part 1: Incubation
1)
Thaw filters on ice.
2)
Add 100 µl lysozyme (125 mg in 1000 µl TE) and 20µL RNase A (10 µg/ml) to each
filter. Reseal the top with Parafilm. Incubate in a rotating incubator at 37°C for 1 hour.
Add 100µl Proteinase K and 100 µl 20% SDS to each filter. Reseal using Parafilm.
Incubate at 55°C for 1 – 2 hours in a rotating incubator.
Remove lysate from sterivex filter using a 5cc syringe into a 15 ml falcon tube. Add 1 ml
lysis buffer to rinse the fillter out. Pool this with the lysate in the 15 ml tube.
3)
4)
5)
Part II: Extraction & Centrifugation
Add an equal volume (about 3ml) of Phenol:Chloroform:IAA (25:24:1), pH 8.0 to the
lysate tube. Vortex for 10 seconds. Spin at 2500 g for 5 minutes or until aqueous layer is
clear (use the J.S.-5.3 rotor, using the 50 ml falcon tubes in which the filter was stored as
an adapter). Transfer aqueous layer into a new 15 ml falcon tube.
6)
Add an equal volume (approx 3mL) of Chloroform:IAA (24:1) to the tube containing the
aqueous layer. Vortex for 10 seconds. Spin at 2500 g for 5 minutes or until aqueous layer
is clear with no debris. Transfer aqueous layer into a new, labeled falcon tube. Add 1ml
of TE buffer (pH 8.0) to this tube.
7)
Transfer contents of the falcon tube for step 6) to an Amicon Ultra centrifuge tube. Spin
at 3500 g for 10 minutes. Check to make sure there is less than 1ml liquid left in Amicon
at the end of this (if not, fill up with TE and spin again). Remove filtrate to another
falcon tube and save in fridge until DNA has been recovered on gel.
8)
Add 2 ml TE buffer to Amicon and spin at 3500 g for 6 minutes. Remove filtrate.
9)
Repeat 8) twice more (total of 3 washes with 2 ml TE). For the last wash, spin until 200 –
500 µl remain in Amicon. Note the final volume and transfer to a labeled 1.5 µl
eppendorf tube.
Part III: Storage & Confirmation of DNA Presence
10)
Aliquot 70µl from final volume into a 1.5µl eppendorf tube to use as working stock and
place in -20°C freezer. Place the rest of the DNA into -80°C freezer.
11)
Set up an overnight agarose gel (0.8%) loading 1-2 lanes of 10 µl 1kb+ ladder and 3 lanes
of 50ng/µl λHindIII ladder (2µl, 5µl, and 10µl) to use as size and intensity standards.
Load 5 µl per lane of DNA extract sample. Run gel at 15 volts for approximately 16
hours to and check image in UV gel dock for presence of DNA in extracts.
Representative Results: – When this protocol is done correctly, you should see a gel image
similar to Figure 1. Actual DNA concentration of extracts will vary depending on the source of
the sample.
Discussion: Depending on how many samples are to be processed, this can be a time-intensive
procedure due to the two one-hour incubation steps, and the repeated washes and centrifugation
steps. It is best to plan a whole day for this procedure to leave plenty of time. If there are
problems getting the final extract volume in the Amicon tube to reduce down to 200-500µl, try
doing additional TE washes and centrifugations (repeat step 9) until the appropriate volume is
leftover. Also, if the extract smells acutely of chloroform, it is best to do additional washes until
the smell lessens to make sure all of the chloroform is removed.
Table of specific reagents and equipment:
Name of the reagent
Company
Catalogue number
Lysozyme
Sigma
L6876-5G
RNase A
Fisher
BP2539-100
Proteinase K
Qiagen
19133
Lysis Buffer
Comments
(optional)
0.75 M sucrose, 40
mM EDTA, 50 mM
Tris (pH 8.3)
Parafilm
Fisher
13-374-10
20% SDS
5cc syringes
15ml Falcon tubes
Incubator (37°C &
55°C)
Beckman Centrifuge
Amicon Ultra centrifuge Fisher
tubes (15mL)
Phenol:Chloroform:IAA Sigma
(25:24:1)
Chloroform:IAA (24:1) Sigma
UFC801096
77617-500ML
25666-500ML
TE buffer, pH 8.0
1.5µl eppendorf tubes
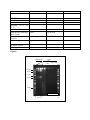
Figures:
λ DNA-HindIII
Depth
(m)
1000
10.0 kb
2000
500
2lo
g
2log
10
{
{
{
{
6.0 kb
3.0 kb
2.0 kb
0.5 kb
June 2007 P16
100 100250500
ng ng ng ng
100
ng
Figure 1. 0.8% agarose gel electrophoresis image of high molecular weight DNA collected from
four depths in the subarctic Pacific Ocean (in duplicate), stained with the intercalating agent
ethidium bromine (10 mg/ml). Gel was run at 15V for ~16hrs in 1X TAE gel running buffer.
Sample bands are of good quality showing little evidence of mechanical shearing (shows single
bands or smears as opposed to multiple bands) although the 10m extracts retain some RNA carry
over (see smear in the 0.5 to 2.o Kb rage).
16S rDNA Pyrotag Sequencing Protocol using KAPA2G Robust HotStart DNA Polymerase
(Carmen Li, University of Alberta)
Materials:
-
2.5 µM stocks of primers (made up with sterile-filtered nuclease-free water):
DMSO
KAPA2G Robust HotStart DNA polymerase (5 U/µl)
5X KAPA2G Buffer A (included with KAPA2G Taq Polymerase)
5X KAPA Enhancer 1 (included with KAPA2G Taq Polymerase)
25mM MgCl2 (included with KAPA2G Taq Polymerase)
dNTP mix, 10 mM each (included with KAPA2G Taq Polymerase)
Sterile nuclease-free water (Ambion)
A thermocycler
Method:
1) For each unique barcode (i.e., each different sample), add the following
components together in an eppendorf tube to form a master mix:
2.5 µM Forward primer
2.5 µM Reverse primer
5X KAPA2G buffer A
(with MgCl2)
5X KAPA Enhancer 1
DMSO
DNA polymerase
dNTP mix (10mM each)
MgCl2 (25mM)
Sterile nuclease-free water
Total
Per reaction:
2.5 µl
2.5 µl
5 µl
Per 4 reactions:
10 µl
10 µl
20 µl
5 µl
1.25 µl
0.1 µl
0.5 µl
2 µl
5.15 µl
24.5 µl
20 µl
5 µl
0.4 µl
2 µl
8 µl
46 µl
98 µl
2) Vortex each master mix. Dispense into 4 PCR tubes, one of these will be the notemplate negative control.
3) Add 0.5 µl of the same template to each of the 3 other PCR tubes.
4) Place all tubes in the thermocycler and run the following program:
1 cycle of 5 minutes denaturation at 95°C
10 cycles of 30seconds at 95°C, 30 seconds at 60°C, decreasing 0.5°C/cycle, and 30
seconds at 72°C
30 cycles of 30 seconds at 95°C, 30 seconds at 55°C and 30 seconds at 72°C.
1 cycle of 5 minutes at 72°C
5) Pool replicate template-containing PCR tubes. Run 4 µl each template-containing
and no-template control reaction on an agarose gel.
6) Provided bands are visible following agarose gel electrophoresis, purify the
template-containing PCR reaction using the Qiagen QIAquick spin kit.
• I use the following modifications to increase template yield: Heat buffer EB to
~65°C prior to elution; elute PCR products in 30 µl buffer EB; following
application of buffer EB to the column let it sit for 2 min before centrifugation.
7) Quantify purified PCR products using Nanodrop. Perform at least 2 readings for each
sample, mixing samples well before measuring.
• I take more than 2 readings if the first 2 differ by >2 ng/µl. If all replicates are
relatively close I average all readings. If replicates are radically different (e.g.,
possibly from a different sample altogether) I omit the erroneous replicate.
8) In 8-chain tubes or a 96-well plate, dilute the purified PCR products with PCRgrade water to the concentration of 30 ng/µl or that of the most dilute sample in the
sample set. I use 25 µl final volumes.
9) Run 2 µl of each diluted PCR product on an agarose gel.
10) Quantify diluted PCR products using Nanodrop.
11) After filling out the appropriate documentation, send the diluted PCR products for
pyrotag sequencing.
Genomic DNA Extraction from Tailing Ponds
Overview
This protocol is a slight variation from methodology developed by Sangwon et al. (2009) and tailored to
suit the need of obtaining high molecular weight DNA from low biomass environmental samples such as
tailing ponds. The resulting DNA from this modified protocol has been shown to have a distribution of
high molecular weight DNA essential for a construction of fosmid metagenomic library.
Part I describes the cell lysis step and the isolation of genomic DNA from the environmental matrix and
cell debris. The cell lysis is achieved mainly through chemical lysis. The genomic DNA is then isolated
through chloroform isoamyl alcohol and buffer exchanged using low molecular cut off filter. Mechanical
lysis and aggressive vorterxing are avoided in this procedure. This in combination with guanidine
isothiocyanate and hexadecyltrimethylammonium bromide (CTAB), helps preserve the integrity of the
high molecular weight genomic DNA. Part II describes the quality control step, where the resulting DNA
is assessed for its quantity, quality, and purity. This would determine whether the DNA is appropriate for
fosmid library construction.
Part I: DNA Extraction
Time required: 6 hours
Before you start the extraction, pre-chill 50 ml tubes containing 20 ml chloroform-isoamyl alcohol (24:1)
on ice. Set the oven to 65 °C to pre-heat. Check CTAB solution, if it is crystallized warm to 65°C to melt
the crystals. Complete the denaturing solution and extraction buffer by adding the last ingredients just
before you start the extraction (see the recipe).
1. Prepare the denaturing solution and extraction buffer.
Keep the denaturing solution on ice and the extraction buffer at 65°C (hybridization oven).
2. Aliquot 6 g of the tailing ponds material into 50 ml Falcon tube.
3. Add 3 ml of the denaturing solution (1 ml per 2 g of material).
4. Shake the extraction buffer before use. Add 15 ml of the extraction buffer. Shake briefly to mix. Store
the remainder of the extraction buffer at 65°C.
Shaking the extraction buffer ensures homogeneity of the solution. Shaking the sample provides a
minimum mechanical lysis and ensures most of the material is well permiated throughout the sample.
5. Incubate for 40 minutes at 65°C in a hybridization oven. During the incubation gently invert the tubes
every 10 min, or continuously rotate the tubes at the lowest speed.
The heat helps weaken the cell membranes and aids in the cell lysis. The slight agitation help ensures
the tailing material is well in contact with the extraction buffer.
6. Centrifuge at 1800 x g for 10 minutes using a swinging bucket rotor at 10 - 14°C.
JS 5.3 rotor from Beckman Coulter was used in this application.
7. Transfer the supernatant into a pre-chilled 50 ml Falcon tube containing 20 ml chloroform:IAA (24:1).
Avoid transferring the detergent precipitate and the tailings material. Keep on ice.
When transferring the supernatant, it is better to leave some behind to ensure clean DNA.
8. Repeat the extraction process with another 15 ml of extraction buffer. Incubate at 65°C as previously
described but only for 10 minutes. Centrifuge at 1800 x g for 10 minutes at 10 - 14°C.
Prior to the incubation, mix the pelleted tailings material with an autoclaved spatula for a better mixing.
9. Transfer the supernatant into the same tube as in step 7.
10. Cap the tube firmly and invert the tube to mix several times.
This is performed to increase the efficiency of the extraction by increasing the surface contact between
the aqueous layer and the organic layer.
11. Place the tube over a bed of ice and gently shake the tube containing the supernatant
chloroform:IAA mix using a rocking platform at low setting (1 - 2 out of 10) for 10 minutes.
The agitation would provide constant mixing of the two phases further increasing the efficiency of the
extraction. The low temperature would precipitate the detergent used and make it easier to be
extracted by the organic phase.
12. Centrifuge at 1800 x g for 20 minutes at 10 - 14°C.
The spin would partition the phase and concentrating the cell debris in the interphase.
13. Transfer the aqueous phase (top) to a new 50 ml Falcon tube.
The organic extraction can be repeated to ensure clean DNA. However, multiple round of organic
extraction would lower the final DNA yield.
When transferring the supernatant, it is better to leave some behind to ensure clean DNA. Make sure
that the newly transferred aqueous phase is chloroform free. Residual chloroform would interfere with
downstream steps.
14. Concentrate the aqueous phase using 10 kDa centrifugal filter unit (ie. Amicon filter).
In this application Amicon-15 with 10 kDa cut off was used. The spin time would vary across different
sample from 10 to 20 minutes with a full load. The flow-through can be saved until the concentrate has
been confirmed to contain DNA. The spin was done using the JS 5.3 swinging bucket rotor at 3000 xg for
15 minutes.
15. Buffer exchange the concentrate using 1x Tris EDTA buffer via diafiltration (top up the filter by
topping up the filter and diluting the concentrate 1000x).
Buffer exchange is done to dilute the high salinity extraction buffer with storage buffer.
16. Transfer the concentrate into a microcentrifuge tube and note the volume.
Part II: Quality Control
1.
Quantify the DNA concentration via Quant-iTTM fluorometer.
2.
Check for amplifiability through PCR reaction.
3.
Run pulse field gel electrophoresis to check for the fragment distribution.
For Fosmid DNA library construction, the median size of the DNA should be equal to or exceed 36 kb.
Supplementary Material
*Denaturing solution
4 M Guanidine isothiocyanate
10 mM Tris-HCl (pH 7.0)
1 mM EDTA
0.5% 2-mercaptoethanol
*Note:
The denaturing solution is water based. Autoclave the solution excluding 2-mercaptoethanol and keep it
at 4°C. The 2-mercaptoethanol is added just before use. If possible use fresh denaturing solution for the
extraction, and the solution should not be stored for more than a week.
**Extraction Buffer
100 mM Sodium phosphate buffer [pH 7.0]
100 mM Tris-HCl [pH 7.0]
100 mM EDTA [pH 8.0]
1.5 M NaCl
1% Hexadecyltrimethylammonium bromide (CTAB)
2% SDS
**Note:
The extraction buffer is water based. Autoclave and store the three solutions (salt buffer solution, CTAB,
and SDS stock) separately. These solutions can be kept at room temperature. Combine the three
components just before use. The precipitated detergent can be re-solubilized by heating them at 65°C.
Equipment or Reagent
Company
Catalogue Number
Comments
Centrifuge
Beckman
Coulter
369003
Any centrifuge with 16000 ´ g
capacity
Centrifuge rotor, JS5.3
Beckman
Coulter
368690
For 1800 – 3000 g
Hybridization oven
Fisher
Scientific
13-247-10
65 °C. It can be replaced with
water bath.
Rocking plate
VWR
Rocking
Platform Model 200
1.5 ml tube
Eppendorf
0030 125.150
1 per sample
50 ml disposable tube
Corning
430290
3 per sample
Graduated glass cylinder
It can be replaced with glass
pipette
Pipettes and filtered tips
20 ml, 200 ml, 1ml, 5 ml
Spatula
1 per sample, autoclaved
Chloroform-isoamyl alcohol (24:1)
Fluka
UN1888
20 ml per sample
Denaturing solution*
3 ml per sample
Guanidine isothiocyanate
Promega
V2791
Trizma® base
Sigma
T1503
Ethylenediaminetetraacetic acid disodium salt
dihydrate
Sigma
E5134
Mercaptoethanol
Sigma
M3148
Extraction buffer**
30 ml per sample
Sodium phosphate dibasic
Sigma
S3264
Sodium phosphate monobasic
Sigma
S3139
Sodium Chloride
Sigma
S3014
Hexadecyltrimethylammonium bromide
Sigma
H6269
Quant-iT™ PicoGreen ® dsDNA Reagent and Kit
Invitrogen
P758
Spectrophotometer
Thermo
Scientific
Nanodrop
CHEF Mapper® XA Pulse Field Electrophoresis
System
Bio-Rad
170-3670 to 170-3673
Reference:
Hurt, A. H., et al. Simultaneous Recovery of RNA and DNA from soils and sediments. AEM 67(10): 44954503 (2001).
Lee, S., Hallam, S. J., Extraction of High Molecular Weight Genomic DNA from Soils and Sediments.
http://www.jove.com/details.php?id=1569 doi: 10.3791/1569. J Vis Exp. 33 (2009))