1
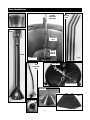
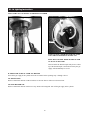
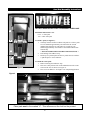
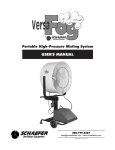
Zubri
Portable Heater
Propane Gas Heater - 40,000 BTU
USER'S MANUAL
WARNING
Important safety precautions are described in
these instructions! They must be read before
using the Zubri Z1-12 patio heater or handling
gas/propane cylinders.
Z1-12
800-779-3267
[email protected] • www.schaeferfan.com
©2008 Schaefer Ventilation Equipment
Parts Identification
Emitter
Folding
Wing Nut
(attached)
Spring
Clip
Emitter
Burner
Head
Threaded
Rod
Wing
Nut &
Washer
Body
U Bracket
Legs
Gas Valve
Gas
Regulator
Hose
Thermocoupler
Reflector
Skirt
Control Cone
Knob
2
Z1-12 Assembly Instructions
* IMPORTANT NOTE *
IF THE REGULATOR HOSE IS NOT
CONNECTED INSIDE THE CONTROL
CONE, a thin layer of teflon tape should
be applied to the threads on the gas
valve before attaching the hose to ensure
a safe, tight connection.
STEP 1 ATTACH LEGS TO
CONTROL CONE
STEP 2 ATTACH LEG
STABILIZER BRACE
Depress spring clip on leg and slide
leg into leg holder on control cone.
Be sure the spring clip locks into
hole in leg holder.
The three sections are held together by a
fastener in the center. Insert the peg at the
end of each section into the key hole in
the inside of each leg and snap into place.
Propane cylinder may be set on brace.
STEP 3 ATTACH REFLECTOR
STEP 4 HANG THE CYLINDER
Place center hole of reflector over folding wing nut. Flip the folding
wing nut and screw down onto the reflector until it is held firmly onto
the emitter but do not over-tighten. OVER-TIGHTENING THE
FOLDING WING NUT CAN DAMAGE THE REFLECTOR.
Lift the propane cylinder onto the hook so
it is suspended. Attach the regulator hose
to the cylinder. THE CYLINDER ADDS
IMPORTANT WEIGHT TO THE HEATER
AND HELPS TO KEEP IT STABLE.
STEP 5 ATTACH SKIRT
Wrap skirt around legs. Secure with
velcro at top. Zip up and move skirt so
that zipper runs down one of the legs.
TABLE TOP INSTALLATION
To install heater on a patio table, do not
attach legs. Remove the cylinder hook
and bracket, pass the long screw and
regulator hose through hole in table and
attach, then replace the bracket and hook
from underneath the table. Hang the
propane cylinder on the hook. NOT
DESIGNED FOR GLASS TOP TABLES.
3
Bracket
Z1-12 Lighting Instructions
STEP 1 TURN ON GAS SUPPLY AT PROPANE CYLINDER
Off
High
STEP 2 POSITION FLAME AS SHOWN
4
Ignite
STEP 3 PUSH IN CONTROL KNOB AND TURN
COUNTER-CLOCKWISETO IGNITE GAS
KEEP THE CONTROL KNOB PUSHED IN FOR
AT LEAST 15 SECONDS
This will allow the thermocouple safety device to heat
up. If the thermocouple is not heated correctly the gas
supply will automatically be cut off.
IF THE FLAME GOES OUT FOR ANY REASON
Turn off the gas supply at the cylinder and wait two mintes before repeating steps 1 through 3 above.
TO ADJUST HEAT
Push in control knob and turn counter-clockwise to increase heat or clockwise to decrease heat.
TO TURN HEATER OFF
Push in control knob and turn clockwise to stop. Flame will extinguish. Turn off the gas supply at the cylinder.
4
Case/Pad Assembly Instructions
Top
FOLLOW THESE INSTRUCTIONS TO ASSEMBLE A NEW CASE
1
Included in Zubri heater case:
Four - V foam pads
Two - center foam pads
2
To attach V pads (see Figure 1):
1. Carefully note the location to adhere each pad. Two of the V pads
are to be attached approximately one inch below the second
indented slots from the top. The other two V pads are to be
attached approximately one inch above the fourth indented slots
from the top.
* DO NOT INSERT PADS INTO THE INDENTED SLOTS. *
2. Peel backing from adhesive strip.
3. Pinch top of V pad and place all the way inside the case. Release
V pad and press to secure adhesive.
3
4
To attach the center pads:
1. Remove backing from adhesive strip.
2. Place one center pad into each of the indented slots in the center
section of the case as shown (see Figure 1).
3. Press to secure adhesive. See Figure 2 for completed application.
Bottom
Figure 1
Figure 2
X
X
X
X
X
X
DO NOT PLACE PADS WITHIN THESE INDENTED “X” SPACES.
Place pads next to the marked “X”. This will secure a firm hold on the product.
5
Safety Guide
PLEASE READ THESE INSTRUCTIONS BEFORE USING ANY ZUBRI PATIO HEATER
AND KEEP FOR FUTURE REFERENCE.
The following paragraph does not apply to any country where such provisions are inconsistent with local law. This publication is provided "as is"
without warranty of any kind, either express or implied, including, but not limited to, the implied warranties of merchantability or fitness for a
particular purpose. Some states do not allow disclaimer of express or implied warranties in certain transactions, therefore, this statement may not
apply to you.
This publication could include technical inaccuracies or typographical error. Changes are periodically made to the information herein; these changes
will be incorporated in later editions. Improvements or changes in the product may be made at any time.
References in this publication to products or services do not imply that the manufacturer intends to make these available in all countries in which it
operates. Evaluation and verification of operation in conjunction with other products or services, except those expressly designated by the
manufacturer, are the user's responsibility.
PATENT APPLICATION NUMBER PCT/IB00/00046 protects the unique design of the Zubri Pation Heater. Any infringement of the granted claims
contained therein will be prosecuted on grant. In terms of the claims submitted attention is drawn specifically but not exclusively to the peripherally
spaced legs and the manner in which the skirt spans the said legs.
August 200 Zubri Heating (Pty) Ltd. 30 Cole Street. Observatory, South Africa. All rights reserved.
IMPORTANT INFORMATION ABOUT USING SELF-CONTAINED LOW-PRESSURE GAS CYLINDERS
• This heater is designed for use with a 20 lb. (LP) liquified petroleum gas cylinder.
• Ensure the LP gas cylinder is constructed and marked in accordance with the specifications of the US Department of
Transportation; or in accordance with the specifications of the relevant regulatory authority. The gas cylinder must have a
shutoff valve terminating in a LP gas supply cylinder valve outlet.
• This heater is for outdoor use only, in well-ventilated spaces and is not for use buildings, garages or other enclosed areas.
• Follow the Assembly Instructions carefully.
WARNING
Whenever you attach a new cylinder or any time you suspect there may be a gas leak, turn off the gas supply at the
cylinder immediately. Mix a solution of dish soap and water. Turn on the gas supply and apply soapy liquid to the
suspected area with a small brush. Bubbles will form if a leak is present. Never test with flame. DO NOT use this
equipment if you suspect or have detected a gas leak.
• The heater is fitted with a quick-connect device, which will normally not allow gas to escape when the cylinder is turned
on. However, it is not designed as a stopper. Therefore, whenever the gas is not in use, you must turn off the gas supply
at the cylinder.
• Indoor storage of the heater is allowed only if the gas cylinder is disconnected and removed.
• Store gas cylinders outdoors, in well-ventilated areas and out of reach of children. Ensure the valve plug is replaced.
• The heater is supplied with a low pressure gas regulator complying with the US Standard for Pressure Regulating Valves
for LP Gas, ANSI/UL 144-1985, as part of the self-contained LP gas supply system. The outlet pressure of the regulator
does not exceed 11.0 inches water column (2.74 kPa) with the heater operating at maximum temperature. Be sure to
screw the regulator onto the cylinder valve and tighten firmly.
• If the original gas regulator and hose assembly must be replaced, use only identical replacement parts. If in doubt, contact
your Zubri dealer for assistance.
• DO NOT attempt to connect the Zubri to a fixed gas supply, as the components are not suitable. If you want to convert
it for use with a fixed gas supply, contact your local registered gas dealer or your Zubri dealer.
6
Safety Guide Cont'd
FOR YOUR SAFETY
If you smell gas, shut off gas supply to appliance and extinguish open flame.
Do not store or use gasoline or other flammable vapors or liquids near this or any other gas appliance.
For outdoor use only.
Improper installation, adjustment, service or maintenance can cause injury or property damage. Read the safety,
assembly, operating and maintenance instructions thoroughly before installing or servicing equipment.
• The installation must conform to local codes.
• Minimum inlet supply pressure 28mbar; maximum inlet supply pressure 37mbar.
• Minimum clearance above the heater is 16". Minimum side clearance is 7'.
• Inspect all parts before each use. If excessive abrasion, wear of damage is evident, contact your Zubri dealer.
• The emitter and reflector reach high surface temperatures during operation. Do not touch for 20 minutes after shut off.
• Carefully supervise children and animals in the area.
• Do not allow anyone to assemble or use the heater if ill, tired, or under the influence of alcohol or durgs.
• Position the heater on a level, stable surface capable of bearing its weight.
• Gas cylinders are heavy. Be prepared in case you require assistance.
• Never carry or pull the gas cylinder by the regulator hose.
• Never leave the heater turned ON while unattended. Always turn heat control knob and gas valve OFF when not in use.
• Never use or leave standing in wind, rain or exposed areas.
• Keep the area around the heater clear of trip hazards.
Maintenance
• Repairs should only be performed by qualified service persons.
• The heater should be inspected before use and serviced by a qualified person at least annually. More frequent servicing
may be necessary.
• It is imperative that the control cone, burner and circulating air passageways of the heater be kept clean and the
surrounding area free from combustible materials, gasoline and other flammable vapors and liquids.
• Keep ventilation openings free and clear of debris.
• Check the burner flame visually. It should be blue with slight orange tips. If excess orange flame is seen, have the heater
serviced.
7
Troubleshooting
The most common cause for the heater not working correctly is an inadequate or non-existent gas supply. Therefore, if the
heater will not light you should check the following:
• There is gas in the cylinder.
• The gas valve on the cylinder is fully open.
• The quick connectors are firmly fastened together.
• You are following the ignition instructions provided on the heater label or in this manual.
• The emitter is fastened securely to the burner head.
• The emitter is clean.
• The gas jet in the burner head is clean (dirt, bugs, cob webs etc. may partially plug opening).
• Mix a solution of dish soap and water. Turn on the gas supply and apply soapy liquid with a small brush to the joints that
could be leaking gas. Bubbles will form if a leak is present.
• Even if the soap test does not detect a leak, be sure teflon tape has been applied to the gas valve.
The heater is equipped with a tip switch. Bumping the heater accidentally can activate this safety feature. The heater must
sit on a level surface for the same reason.
If you have followed these instructions and your heater is still not working properly, contact your Zubri dealer or local gas
supplier immediately. DO NOT ATTEMPT TO REPAIR ANY OF THE GAS SUPPLY PARTS YOURSELF.
Cleaning
• Do not attempt to clean the heater while it is warm. Be sure the gas supply is turned off. General cleaning can be done
with a damp soapy cloth followed by polishing with a soft cloth. Do no use abrasive cleansers.
• Remove the reflector by loosening and flipping the folding wing nut up. Clean the reflector with a damp soapy cloth
followed by polishing with a soft cloth. Be careful when handling the reflector as it can bend or dent easily.
• Remove the emitter by loosening and removing the U bracket assembly. Use a wire brush on the inside and outside of
the emitter to remove deposits.
8
Storage
• Turn off gas supply at cylinder when not in use.
• Do not store the heater indoors unless the cylinder has been removed:
1) Unzip the skirt.
2) Turn off gas supply at cylinder.
3) Disconnect the regulator hose from the cylinder. Do not disconnect the hose from inside the control cone.
4) Remove cylinder from the hook.
5) Always replace the safety cap when putting the cylinder into storage to prevent dirt from entering the valve.
• To dismantle the heater for storage:
1) Reverse the Assembly Instructions on page 3.
2) Repack into the case and be sure the lid fits over it.
• If you do not have the case, make sure the heater is adequately protected in storage. Dust and other airborn debris can
block gas openings and cause the heater to malfunction.
Warranty
Schaefer Ventilation Equipment, LLC. warrants to the original purchaser that our products which prove to be
defective in material or workmanship within one year (unless otherwise specified) from date of purchase will be
repaired or replaced at the option of Schaefer Ventilation Equipment, LLC. F.O.B. Sauk Rapids, Minnesota.
What is Not Covered By The Warranty
The warranty does not cover:
(1)
(2)
(3)
(4)
(5)
Installations not made in accordance with installation instructions;
Where the operation of the product varies substantially from our operating instructions;
Malfunctions resulting from misuse, negligence, alteration, accident or lack of performance of required
maintenance;
Loss of time, inconvenience, loss of use of the product, or other consequential damages;
Removal of any manufacturer nameplate.
The above constitutes our sole warranty.
THERE IS NO WARRANTY OF MERCHANTABILITY AND THERE ARE NO WARRANTIES WHICH EXTEND
BEYOND THE DESCRIPTION OF THE FACE HEREOF.
All information, illustrations and specifications provided here are based on the latest product information
available at the time of printing. Product specifications subject to change.
9
800-779-3267
www.schaeferfan.com
©2008 Schaefer Ventilation Equipment 4-1-08