1
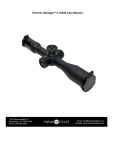
Heritage™ 5-25 X 56 User Guide
American Company… American Product
The Premier Heritage™ 5-25x56 carries a lifetime warranty. If you have any questions or would like
more information regarding your scope please contact us using the information below. For a more
comprehensive user manual, one can be downloaded from our website.
Caution:
Ensure all manufacturer instructions are followed when mounting this optic to a rifle in order to prevent damage
to the optic, rifle, and/or operator. Also do not look through the optic directly at the sun or laser light devices as
doing so could result in permanent eye injury.
175 Commonwealth Ct.
Winchester, VA 22602 USA
Phone: 540-868-2044
Email: [email protected]
Website: www.premierreticles.com
Specifications:
Length: 16.34”
Height: 3.21”
Width: 4.02”
Weight: 39 oz
Click Value: 0.1 mrad / .36” @ 100 yards
Elevation Knob: 28 mrad/ 96 MOA
Total Elevation Range: 30 mrad/ 103 MOA
Windage Knob: 12 mrad/ 41 MOA
Diopter Range: -3 to +2.5
Exit Pupil: 11.2mm-2.24mm
Eye Relief: 3.5”/ 90mm
Field of View: 7.6 m to 1.6 m
Gen II Mil Dot™ Reticle:
The Gen II Mildot™ reticle is installed in the first focal allowing range estimation and trajectory compensation to be performed at
any magnification level. The click values match the reticle meaning that ten clicks of the elevation or windage knob will equal one
mil at any distance. This can greatly reduce the time necessary to make corrections for zeroing or target engagement, as the
correction noted while looking through the scope is the correction that needs to be dialed in. Below are some subtensions of the
Gen II reticle. (Not To Scale)
0.4 mil
1.0 mil
0.2 mil
0.5 mil
0.8 mil
5.0 mil
Operation:
2.
Adjust Diopter:
1.
Loosen the ocular lock ring by turning it counter
clockwise.
2.
Look through the scope and adjust the ocular until the
reticle comes into focus.
3.
Look away and look back at the reticle to ensure the
image is still crisp and clear from edge to edge.
4.
Tighten the ocular lock ring by turning it clockwise
until snug. The diopter will only focus the reticle to
the eye.
Adjust Magnification:
1.
To increase magnification, rotate the power
adjustment ring counter clockwise.
2.
To decrease magnification, rotate the power
adjustment ring clockwise.
Illumination:
1.
Grasp the knob and pull away from the scope to
enable the illumination function.
2.
Rotate the knob clockwise and select one of the
eleven intensity settings. The illumination will shut off
between intensity settings however the barrel cannot
be pushed back in.
3.
To turn off the illumination rotate the knob counter
clockwise until the knob hits the stop and then push
the illumination knob back in.
Elevation/Windage Knob Operation:
The elevation and windage knobs are single turn with 0.1
mrad clicks and a noticeable “clunk” every full mil.
The elevation knob also has a zero stop approximately .5
mil below “0”.
Elevation:
1.
To increase elevation adjustment, rotate the elevation
knob counter clockwise.
2.
To decrease elevation adjustment, rotate the
elevation knob clockwise
Windage:
1.
For right windage, rotate the knob counter clockwise.
2.
For left windage, rotate the knob clockwise.
Zeroing out the knobs:
1.
Use a cartridge case or other object to lift the toggle
on top of the elevation and windage knobs.
2.
Flip the toggle 180* so the toggle is upside down.
3.
4.
Changing the battery:
1.
Use a coin or similar object to insert into the
slot on the battery cover.
2.
Rotate counter clockwise until the cover can be
removed to expose the battery.
3.
Remove the battery and replace with a fresh
CR2032 coin cell battery.
4.
Replace the battery cover and rotate clockwise
until snug.
Parallax Adjustment:
The scope can compensate for parallax from 50 meters to
infinity.
Adjust Parallax:
1.
To adjust the parallax for farther objects rotate the
knob clockwise until the target and reticle are in focus.
To adjust the parallax for closer objects rotate the
knob clockwise until the target and reticle are in focus.
Grasp the knob and reset it to zero. While turning the
knob it will still have audible clicks and clunks
however there will be no change in zero.
Once the knob is reset to zero, return the toggle to the
upright position. The toggle will be in the optimal
position when steady pressure is needed to fully close
it. If the toggle is not in the optimal position then the
toggle will not close or it will require excessive
pressure to close. If excessive pressure is necessary
to close the toggle, lift it and turn counter clockwise
1/16th of a turn, then retry. Too little pressure on the
toggle can result in the toggle becoming loose while
turning the knob, which can result in no correction
being made despite audible clicks and clunks.
Lens Cleaning:
1.
Use a soft brush to remove dirt and dust from
the lens.
2.
Use a lens pen or an optical quality solution to
clean the lens using a spiral motion starting at
the center and going out.
3.
Remove any left over residue or streaks from
the glass using a lens pen or piece of lens
paper.
Premier Heritage, Lever‐ Lock™, Gen 2 Mildot, and Gen 2 XR are all trademarks of Premier Reticles Ltd. Gen 2 Mildot is protected under US Patent # 6,729,062. MTC technology is used by permission and is the property of U.S. Optics, US Patent # 7,415,791, all rights reserved.