1
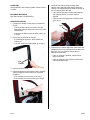
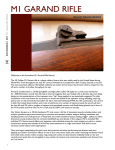
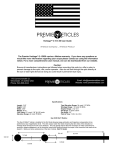
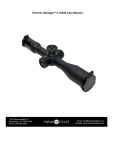
Service Bulletin
Applies To:
10-011
March 5, 2010
See VEHICLES AFFECTED
Service Manual Update: Power Window Goes Up and Reverses On Its Own,
Is Slow to Open and Close, or Squeals, Creaks, Clunks, or Clicks
NOTE: Do steps 4 thru 7 within 5 seconds of each
other. Do these steps a total of four times in a row.
These steps clear the control unit’s memory.
BACKGROUND
The information in this service bulletin addresses three
power window problems that are not currently covered
in the service manuals.
4. Turn the ignition switch to LOCK (0).
5. Push down and hold the power window switch.
VEHICLES AFFECTED
6. Turn the ignition switch to ON (II).
2003–10 Accord – ALL
7. Release the power window switch.
2006–10 Civic – ALL
NOTE: Make sure the auto-up feature doesn't work.
If it does, do steps 4 thru 7 again, paying close
attention to the 5-second time limit for up to three
more times for each series of steps.
2007–10 Civic Hybrid – ALL
2007–10 CR-V – ALL
2003–10 Element – ALL
8. Lower the window all the way down with the power
window switch.
2009–10 Fit – ALL
9. Pull up and hold the power window switch until the
window goes all the way up, then keep holding the
switch for 1 second.
2010 Insight – ALL
2005–10 Odyssey – ALL
2009–10 Pilot – ALL
NOTE: Make sure the auto-up/down feature works
correctly by lowering and raising the window with
the power window switch. If it doesn't work
correctly, repeat the manual reset several times,
paying close attention to the 5-second time limit. If it
still doesn't work, troubleshoot the power window
circuit. Then continue with Symptom 2.
2006–10 Ridgeline – ALL
SYMPTOM 1
When using the auto-up function, the driver’s or front
passenger’s window goes up and then reverses on its
own.
SYMPTOM 2
PROBABLE CAUSE
The power window control unit needs to be reset, or
the run channel is damaged/dirty.
NOTE: Do the power window control unit reset
procedure first. If the window still doesn’t work, go to
Symptom 2.
The windows are slow to open.
PROBABLE CAUSE
The run channel is damaged or dirty.
REQUIRED MATERIALS
Shin-Etsu Grease: P/N 08798-9013
REPAIR PROCEDURE
NOTE: You must do the manual reset from the power
window switch at the affected window. For example, if
you’re resetting the front passenger’s power window
control unit, do it from the front passenger’s power
window switch, not the driver’s power window master
switch.
1. Turn the ignition switch to ON (II).
2. Lower the window all the way down with the power
window switch.
3. Open the driver’s or front passenger’s door.
© 2010 American Honda Motor Co., Inc. – All Rights Reserved
ATB 43340 (1003)
1 of 3
CUSTOMER INFORMATION: The information in this bulletin is intended for use only by skilled technicians who have the proper tools, equipment,
and training to correctly and safely maintain your vehicle. These procedures should not be attempted by “do-it-yourselfers,” and you should not assume
this bulletin applies to your vehicle, or that your vehicle has the condition described. To determine whether this information applies, contact an
authorized Honda automobile dealer.
REPAIR PROCEDURE
NOTE: Aftermarket window tinting will also cause the
window to move slower and is not covered by the
manufacturer’s warranty. No repair attempts should be
made if the window has aftermarket tinting.
1. Compare the up and down speed of the affected
window to another like vehicle:
• If the speed is the same as the other vehicle, no
further troubleshooting is required.
• If the speed is not the same, remove the door
panel and the door glass, then check the window
regulator speed.
• If the speed is the same as it was with the glass
in place, replace the window regulator.
4. Inspect the run channel alignment, both inside and
outside the door. Pay close attention just below the
door skin; this is a common area for the run
channel to be pinched.
• If the run channel is pinched, replace it, then
adjust the run channels and the glass as needed.
• If the run channel is not pinched, go to step 5.
5. Clean the run channel using a soapy water
solution, then apply Shin-Etsu grease. You may
also need to clean the portion of the run channel
within the door.
Spray.
• If the speed is faster without the glass, go to step
2.
NOTE: When evaluating regulator performance
without the glass, never allow the regulator to travel
to the full up position because damage can occur to
the regulator.
2. Inspect the visible portion of the run channel for
damage.
• If the run channel is visibly damaged, replace it,
then recheck the window speed.
• If the run channel looks OK, go to step 3.
RUN
CHANNEL
3. Reinstall the glass into the door without bolting it to
the regulator, then manually slide it through its
range of travel and check for excessive resistance:
• If the resistance is excessive, go to step 4.
• If the resistance is not excessive, go to step 5.
2 of 3
10-011
SYMPTOM 3
During operation, the window squeaks, creaks, clunks,
or clicks.
REQUIRED MATERIALS
Shin-Etsu Grease: P/N 08798-9013
REPAIR PROCEDURE
1. Compare the window’s noise level to another like
vehicle:
5. Clean the run channel using a soapy water
solution, then apply Shin-Etsu grease inside the
channel. You may also need to clean the portion of
the run channel within the door.
• If the window operates normally after cleaning
and applying grease, no further action is
required.
• If the window noise symptoms are still present,
go to step 6.
Spray.
• If the noise is the same, no repair is needed.
Advise the customer that some noise is a normal
characteristic.
• If the noise is different from the other vehicle, go
to step 2.
2. Inspect the run channel for damage.
• If it is damaged, replace it, then recheck the
noise level.
• If the run channel is not damaged, go to step 3.
6. Inspect the run channel alignment, both inside and
outside the door. Pay close attention just below the
door skin; this is a common area for the run
channel to be pinched.
• If the run channel is pinched, replace it and
adjust as needed.
RUN
CHANNEL
• If the run channel is not pinched, continue with
normal troubleshooting.
3. Remove the door panel.
4. Unbolt the glass from the regulator, then manually
slide it through its travel to check for excessive
resistance.
• If the resistance is excessive, go to step 5.
• If the resistance is not excessive, go to step 6.
10-011
3 of 3