1
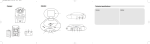
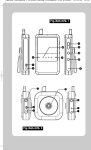
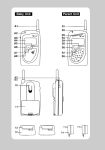
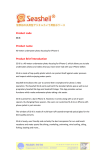
VisionNOVA omslag
04-07-06
Camera
15:11
A1
Side 1
Monitor
A3
A2
Technical specifications
A4
B1
A5
LOW POWER
MIC
AV-OUT
A6
B8
B9
B2
B3
A7
A9
A10
A11
ON
B4
CH
A8
4
3
SW
2 1
4 3 2 1
AV IN
CH SEL
OFF
(CHARGE)
ON
SV-1000mA
POWER
OFF
B11
ON IR
7,5–300mA
B7
B6
B5
B12
B13
B14
B10
Camera
Monitor
Frequency:
2.4 GHz
Channel:
4 selectable channels
Modulation:
FM
Antenna:
Built-in omni-directional antenna
Image sensor:
1/3” CMOS color image sensor
Output power (max.):
10 mW (CE)
Power consumption (max.): 1.8 Watts
Power supply (optional):
230VAC to 7.5VDC, 300mA
or 3 x AA Battery
Operational range:
Up to 100 meters
(open air situation)
Dimension:
75mm x 45mm x105mm
Weight:
135g
Frequency:
Channel:
Receiver sensitivity:
Antenna:
Power consumption (max.):
Power supply:
Dimension:
Weight:
2.4 GHz
4 selectable channels
-80dBm
Built-in omni-directional antenna
5 Watts
100~240VAC to 5VDC, 1A
or 3,6V 1400mAh LI-ION rechargeable battery
140mm x 115mm x 45mm
245g
Camera: Connections
Congratulations!
Power supply
The camera can be used with a power
adapter or three batteries (type AA alkaline).
On battery power the camera will normally
work up to 11 hours.
We thank you for choosing VisionNOVA Video Babycall, and we know
you'll be pleased with your choice. Please read this manual carefully
and keep it for future reference.
POWER
OFF
ON IR
7,5–300mA
POWER
OFF
ON IR
M
Monitor: Legend
M
B7 LED indicator for low battery
power
B8 Jack for audio/video output
B9 Volume controller
B10 Brightness controller
B11 Channel selector
B12 Reserve
B13 Power ON/OFF switch
B14 5V power adapter plug
M
B1 Flip-down 2.5” TFT-LCD display
B2 Speaker
B3 Alarm ON/OFF button
B4 LED indicator for alarm
B5 LED indicator for charging
B6 LED indicator for fully
charged battery
2 1
M
A7 Mounting holes for fixing to
wall etc., centre to centre
distance 33 mm
A8 Battery compartment
A9 7.5V power adapter plug
A10 Switch for channel selection
A11 ON/OFF switch and night
vision switch
SW
M
A1 Lens
A2 Lens knob
A3 Lens body: rotates up to 120
degrees vertically
A4 6 IR LEDs: provide infrared
light for night vision
A5 Microphone
A6 LED indicator for low battery
power
3
M
Camera: Legend
CH
4
M
The box includes
• One camera
• One monitor with an LI-ION battery installed
• One AV (audio/video) cable
• Two power adapters (7.5V DC for the camera and 5V DC for
the monitor)
• This user manual
Using the power adapter
Plug the power adapter labelled OUTPUT:
7.5V DC into a wall outlet and plug the adapter plug into the underside of the camera (A9).
Put the ON/OFF switch (A11) in ON position.
Using batteries
Open the cover of the battery compartment
(A8) on the rear of the camera.
Insert three AA batteries so their plus (+) and
minus (-) ends are facing as shown on the
inside of the battery compartment cover and
close the battery compartment securely.
Move the ON/OFF switch (A11) to the ON
position.
Discard used batteries in an environmentally
friendly and responsible way.
Never mix old and new batteries.
Remove the batteries from the camera if you
are not planning to use it for a period of time.
Channel selection
Always select the same channel (A10) for the
camera and the monitor.
1
M
M
Fine tuning
Place the camera in a suitable location and
point the lens (A1) toward the observation area
by rotating the lens body (A3) vertically.
4 3 2 1
ON
AV IN
CH SEL
OFF
(CHARGE)
ON
SV-1000mA
M
M
Move the ON/OFF switch (B13) to the ON
position.
M
Adjust the volume (B9) to the desired level.
M
Adjust the focus by turning the lens knob (A2)
until the image is sharp.
Adjust the brightness (B10) to the desired level.
3 2 1
AV IN
CH SEL
POWER
M
OFF
ON IR
M
Night vision
The camera has six infrared LEDs (A4) that give
you clear images in the dark. To activate the
infrared function, move the switch (A11) to the IR
position.
When using the night vision function, the picture
automatically goes into black and white mode.
The night vision function is disabled when
running on battery power.
OFF
(CHARGE)
ON
SV-1000mA
AV-OUT
AV-OUT
M
M
Low battery power indicator
The LED indicator for low battery power (A6)
lights up when the batteries need to be replaced.
4 3 2 1
ON
LOW POWER
Monitor: Connections
Power supply
The monitor can run on the power adapter and
the pre-installed LI-ION rechargeable battery.
Charging time is 1 to 4 hours, whether the
monitor is off or on. When the monitor is turned
off and the charging is completed, the indicator
for fully charged battery (B6) lights up. The battery will work approximately 6 hours with the
monitor flipped down and 2 to 3 hours with the
monitor open.
Using the power adapter
Plug the power adapter labelled OUTPUT: 5V
DC into a wall socket and plug the adapter
plug into the rear of the monitor (B14).
AV IN
CH SEL
Channel selection
Only one switch (B11) must be moved to the
ON position.
Select Channel 1 by moving CH SEL 1 to ON
Select Channel 2 by moving CH SEL 2 to ON
Select Channel 3 by moving CH SEL 3 to ON
Select Channel 4 by moving CH SEL 4 to ON
Check that you select the same channel as on
your camera.
M
The battery is connected to a small plug.
Press down the contact (see the shaded field)
and pull up the plug using the two cables.
M
fig. 14
M
M
Voice-activated function (Alarm mode)
Close the monitor (B1).
Discard used batteries in an environmentally
friendly and responsible way.
The NOVA battery has sophisticated electronic
components that prevent the battery from
exploding. Only the battery provided or an
original NOVA battery must be used.
M
Press the alarm button (B3) to select Alarm
mode for the monitor and the LED indicator for
alarm (B4) lights up. By pressing the alarm
button (B3) once more, the alarm LED indicator
(B4) will be turned off, and the monitor returns
to normal mode.
When the camera is activated by a sound from
the baby, you are alerted by a beeping sound in
the monitor and the alarm LED indicator (B4)
blinks until the button (B3) is pressed again.
M
M
Low battery power indicator
A beeping sound and the low battery power
LED indicator (B7) will tell you that the battery
is getting low.
M
Replacing the LI-ION battery
Open the cover of the battery compartment on
the underside of the monitor. The battery is preinstalled at the factory and must not be removed
before it is dead.
M
With NOVA's alarm function you can flip down
the monitor (B1) so that only the sound is transferred from the camera. If there is strong ambient
noise, you can turn the volume off completely
(B9) and the alarm function will alert you when
there is a sound in the child's room without
having to watch the monitor. You also conserve
battery power.
Other applications
AV-OUT
TV
fig.
Connecting to other equipment
The monitor is furnished with an audio/video
output jack (B8) for connecting to a TV, VCR,
DVD or PC.
Put in the mini-jack plug of the provided AV
cable into the AV-OUT jack (B8) of the monitor.
Plug the other end of the AV cable into the
audio/video input of the equipment to be used.
See also the user manual for the equipment to
be used.
You can also use this equipment for another
type of monitoring in your house and home.
3
Troubleshooting
If you do not receive any signal at all
• Check that both the camera and the monitor are switched on
• Check that power cables are firmly plugged in
• Check that the camera and monitor are tuned to the same channel
• If the camera and/or the monitor are running on batteries, replace the
batteries or use the power adapter
Maintenance
• Store all parts and accessories out of reach of children.
• Only use the supplied power adapters for the respective unit.
• Do not shake or knock the units.
• Do not use in dirty or dusty environments.
• Fingerprints or dirt on the lens surface may detrimentally affect the
camera performance. Do not touch the lens.
• f the lens is dirty, use a lens brush or a soft dry cloth to clean.
• Keep in a dry place. Precipitation, humidity and liquids may contain
If the signal is poor or there is interference
• Check that the channel switches on the camera and the monitor are
set to the same channel.
• If a wireless computer network is in operation near you, switch to
another channel or turn off the network if necessary. Alternatively, set
the network to channel 1 and VisionNOVA to channel 3.
• If a microwave oven is used between the camera and the monitor,
move the microwave oven or turn it off.
• Check that the camera and the monitor are within range of each other.
The range is up to 100 metres (open air). This depends on local
conditions. The range is significantly reduced inside because walls,
roofs, large objects and glass limit the range. The picture quality will
give you a good indication of reception conditions.
• Weak batteries will cause interference and reduce the range
substantially.
• In the 2.4GHz frequency band many types of radio traffic are
permitted. Normally this may cause obtrusive interference. With
NOVA's unique alarm function you avoid the noise and poor image
quality, but you will still be alerted when your child wakes up.
4
minerals that corrode electronic circuits.
• Avoid storing in a hot room. High temperatures may damage the
contact between the electronic components and the monitor screen,
shorten the life of electronic equipment and warp or melt some plastics.
• Avoid storing in a cold place. When the units then warm up to their
normal working temperature condensation may form inside, which may
damage the electronic components.
• Bear in mind that public radio frequencies are being used when the
units are functioning and that the sound and the pictures may be picked
up by other equipment on the 2.4 GHz band. Conversations, even from
a room close to the camera, may be captured by others. Always turn off
the camera when not in use in order to protect your private life.
Guarantee
The guarantee lapses if the units have been opened. Unskilled handling
may damage the equipment. Any repairs must only be carried out at an
ESD secure workstation to avoid damage from static electricity. The
guarantee does not include the battery because its life span depends on
use. If you wish to lodge a complaint against the product, a copy of the
receipt must be attached together with a detailed description of the
defect. If you supply a complete description of the defect you are ensured
the best service and you will be just as happy with your NOVA quality
product like thousands of others in Europe.