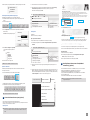
1
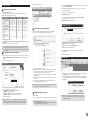
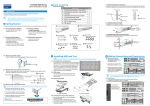
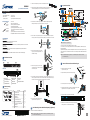
2-2. Remove the front panel to gain access to the side chassis screw holes. EMR9000 QUICK INSTALLATION GUIDE 4 System Connections 2-3. Install the rackmount slide rail by assembling the slide rail (03) by inserting the rear bracket into the ditch (indicated by the blue circle) of the front brackets (01 & 02). Hardware Installation 2 1 Accessories ł Quick Installation Guide x1 DVD x1 (including manuals) łProduct łPower Cord x2 Rail Kits x1 ł(Optional) Enstor DS RAID Subsystem(s) łSlide User-provided Tools 2-4. Determine where the slide rail (03) is going to be installed and adjust the length of the sliding front bracket (01 or 02) till it meets the front / rear rack post. LAN Cable Switch and iSCSI Cable ł łPhillips 3 łGbE Screwdriver (mid-size) łUSB Compatible Mouse and Keyboard Compatible Monitor ł(Optional) PC(s) with Windows XP (or above) Used for Milestone XProtect Remote Client/SANWatch Management ł(Optional) USB Drive Used for Milestone XProtect Remote Client/SANWatch Installation and XProtect License Activation łDVI/HDMI łFlat blade Screwdriver (small-size) 1 2 3 2-5. Screw one M5 x 5mm position screw (05) to the front rack post and two M5 x 5mm position screws (05) to the rear rack post (top and bottom positions) to secure the slide rail to the rack. Further Readings EMR9000 Series For more details, please refer to the EMR Series User manual. (Optional)Eonstor DS RAID Subsystem(s) For more details, please refer to the hardware manuals or quick installation guides that came with the RAID subsystem(s). Milestone XProtect For more details, please refer to Milestone XProtect Enterprise/Professional/Corporate Administrator’s Manual/Getting Started Guide. (Optional)SANWatch For more details, please refer to SANWatch User Manual that came with the RAID subsystem(s). 5 Note: Shaded areas are optional devices. 5 The system connection concept of EMR9000 Series is shown above. You can choose to use remote PC(s) for Milestone XProtect Smart Client/SANWatch (if RAID subsystem(s) is installed) management. Optional RAID subsystem(s) is connected via iSCSI/SAS host connections. When connecting RAID host ports, connect all iSCSI ports to the GbE switch and connect one of the SAS ports on both EMR9000 series and RAID subsystems. 2-6. To fix the slide rails' length, attach a bracket support (04) to slide rail using three M5 x L10 crosshead screws (06). 4 Hardware Overview Front View Note: For detailed RAID operations, please refer to the hardware/software manuals that came with your RAID subsystem(s). 6 1 2 3 Rear View 5 2-7. Attach one cage nut (08) to the front of the rack post. The cage nut will be used to secure the enclosure in place. 9 10 Power Cable Connections and Powering-on 8 5-1. Assemble the cable clamp and the cable strap in the accessory box. anchor 5-2. Wrap the cable clamp around the base of the power plug. 4 1 2 3 4 5 Status LED Hot Swappable Fanx4 System Drivex2 Redundant Power 5 6 7 8 6 7 8 iSCSI Host Port Serial Port USB Portx2 Portx4 Ethernet Portx2 11 2-8. Lift the enclosure and align it with the slide rails on the rack, keeping pressure even on both sides, slowly push the enclosure into the rack. Fasten one M5 x 35mm crosshead screw (07) on each side of the enclosure chassis ears to secure the enclosure onto the rack. 9 HDMI Port 10 DVI Port 11 SAS Expansion Portx2 5-3. Connect the power cord to the power socket. Rack-Mounting 5-4. Insert the push barb anchor to the anchor hole indicated by the blue circle. Adjust the release to suit the position of the power cable. 2-1. Slide Rail Contents 1 2 Item 3 4 5 7 6 8 Description Quantity 01 Front Bracket Left 1 02 Front Bracket Right 1 03 Rear Bracket 2 04 Bracket Support 2 05 M5 x 5mm Position Screw 8 06 M5 x L10 Crosshead Screw 6 07 M5 x 35mm Cross Recess Round Head Screw 2 08 M5 Cage Nut 2 5-5. Flip power buttons to the ON position on BOTH PSUs. 7 7 2-9. Secure the panel back onto the enclosure to complete the rack mount procedure. 5-6. Make sure the status LEDs (front of enclosure) are lit properly (For details, please refer to the related hardware manual). Rack-Mounting EonStor DS RAID Subsystem(s) (Optional) Mount the RAID underneath the EMR9000 system. © by Surveon Technology, Inc. All rights reserved. Note: For more details, please refer to the hardware manuals or quick installation guides that came with the RAID subsystem(s). 3ΉΉ/4 1/3 2-4. The Smart Client window will open. Software Installation 1 4-1. Double click Setup.exe in C:\SANWatch. An auto-run screen provides a hot link to the Windows Installer program. Click on Windows Platform. Milestone XProtect Smart Client Milestone XProtect Installation Live Choosing Milestone XProtect Level Playback Setup The Comparisons between XProtect Enterprise/Professional/Corporate are listed in the following chart. Please select the appropriate level according to your needs. Key Features XProtect Professional XProtect Enterprise XProtect Corporate Number of Connected Cameras 64 64 64 Unlimited Unlimited Maximum Number of Users Video Export Format JPEG, AVI, Native Database Web Client Yes Yes Yes Archiving to Network Storage Yes Yes Yes 3rd Party Application Integration Yes Yes Yes Support for Video Analytics Yes Yes Yes Scalable Multi-server Solution Yes Yes Yes Alarm Manager Yes Yes Yes Yes Yes Map Function Centralized Management Yes Flexible Event Rule Wizard Yes Failover Servers Yes 4-3. Restart your sytem after the installation is complete. Activating SANWatch Commander Unlimited JPEG, AVI, Native Databaset JPEG, AVI, Native Database 4-2. Install the Java-based GUI SANWatch main program. Choose Full Setup (single server) and follow the instructions to start the installation. Private 4-4. Double click the desktop shortcut or select Start > Programs > Infortrend > SANWatch from Windows Start Menu to start the software. Shared 4-5. The Management Host Login window will prompt. Management Host Login 3 Basic System Settings through Wizards The Milestone XProtect Enterprise/Professional/Corporate Management Application Windows will prompt on the monitor display connected to the EMR9000 Series after powering on. IP address 192.168.4.133 Password Go to C:\XProtect Enterprise\ or C:\XProtect Professional\ or C:\XProtect Corporate\ and double-click the installation file. Choose Install Trial and follow the instructions to start the installation. The Open Platform Company Welcome to the XProtect Enterprise Management Application. Use the wizards below to configure the surveillance system. For detailed configuration of all settings, use the Advanced Configuration. Note: (1) The trial version can be used for 30 days. Also, video channels are limited to eight as the maximum. You may purchase licenses for permanent use and channel additions. Please go to p3 Licenses for Milestone XProtect System section for more details. (2) Milestone XProtect Smart Client can also be installed on a remote PC. 2 1. Add Hardware Devices... 2. Configure Video and Recording... 2-1. After the installation is complete, double-click the Smart Client shortcut on your desktop or select Start > Programs > Milestone XProtect Smart Client > Smart Client from Windows Start Menu to start the software. 2-2. The Smart Client login window will prompt. 3. Adjust Motion Dection... 4-6. If you login using the default password, root, a warning message will appear, asking you to change the password. 4-7. SANWatch Commander will appear. SANWatch Commander File View Tools Language Help 4. Configure User Access... Connect to Server Physical View Virtual View XProtect® Smart Client Use the wizards to configure the surveillance system: 3-1. Cameras and other hardware devices, such as Video encoders, NVRs, etc. can be added to your XProtect system through the Add Hardware Devices wizard. If microphones/speakers are attached to a hardware device, they are automatically added as well. 3-2. You can quickly configure your cameras' video and recording properties through Configure Video and Recording wizard. Server address User name: IP address: Enter the IP address of the EMR system. Password: Enter the login password. The default setting is root. Click OK after the address and password are entered. Starting Milestone XProtect Smart Client Authentication Cancel OK Installing Milestone XProtect Basic authentication admin 3-3. The Adjust Motion Detection wizard helps you quickly configure your cameras' motion detection properties. 3-4. The Configure User Access wizard helps you quickly configure clients' access to the XProtect server as well as which users should be able to use clients. Password: Remember password Auto-login Connect Cancel 2-3. Specify your login information in the following fields: Server address: Type the IP address specified by your EMR server. Authentication: Choose Basic authentication. User name: Enter admin in this blank. The user name can be changed later. Password: Enter admin in this blank. The password can be changed later. When ready, click Connect. Note: If you install the Smart Client on a remote PC, you will be authenticated through your current Windows login by default, and do not have to specify any user name or password. Please refer to Milestone XProtect Enterprise/Professional/Corporate Administrator’s Manual for more details. Note: For more details about the Wizards and Management Application, please refer to Milestone XProtect Enterprise/Professional/Corporate Administrator’s Manual. Connection View 4-8. For the first time login, you will be required to assign a range of IP address for your RAID subsystem(s). The Auto Discovery function will scan for every connected RAID arrays. Specify the “from” and “to” addresses in the IP range fields. Click Start to scan the network. Searching for the subsystems might take a few minutes or more. Once the scan is finished, a message will prompt. Click OK to proceed. Auto Discovery IP Range 192.168.4.1 Start 4 to 192.168.4.254 Cancel SANWatch Installation (Optional) Installing SANWatch If you have installed Eonstor DS RAID subsystem(s), please install SANWatch for storage management. Note: You can also get the IP address for every RAID subsystem connected by long pressing the ENT key on its LCD panel. Please refer to the software manual that came with your RAID subsystem(s) for more details. Note: (1) SANWatch can also be installed on a remote PC. (2) Only Windows Platform is introduced in this section. For Linux, Solaris and Mac users, please refer to SANWatch User Manual for more details. 3ΉΉ/4 2/3 4-9. When completed, all storage subsystems within the IP address range will appear in the sidebar. 5-1. Insert the USB drive with the .lic file and SLC to your EMR system. 5-2. Start the Milestone XProtect Smart Client. On the Management Application's toolbar, click File > Manage License Offline > Import License, and select the temporary license file (.lic) to import it. When the file is successfully imported, click OK. In Band Host, IP 192.168.4.133 DS S12S-G2240 IP:192.168.5.51 File RAID Configurations through SANWatch Storage Manager Application Settings Help Save Changes and Restart Services Activate License Online 4-12. Choose Configuration for the user name and enter the password (the password is not needed in default). Manage License Offline Export License for Activation Load Configuration from Restore Point Import License Configuration Precondition Add at least one camera to your EMR system. New to the system? Password: Forgot my password! Login 5-6. Under Current SLCs, select the SLC. SoftwareRegistration RegistrationService ServiceCenter Center Software Current SLCs Step 1: Export License for Activation Password Connect If you have used the system before, log in here: Email: Activating License Enable SSL User Name Wizards To register your Milestone software, and to generate new License Keys, you can use our Software Registration Service Center. Please refer to the software manual for your product (available from our Download area) for a detailed description of how the License Keys are used. If you experience any problems, your Milestone Partner will be able to help. When registering your software, please be aware that the email address used is the email address to which the License Keys will be sent. Please use an email address that all relevant people in your business can access if more people should be able to generate License Keys. Save The SANWatch storage Manager allows you to do subsystem configurations. 4-10. In SANWatch Commander sidebar (Connection View), select the subsystem you want to configure. 4-11. Click the Storage Manager icon. Click Connect. The Storage Manager will appear. Services Software Registration Service Center To export a license file with your currently added devices for activation, do the following: Cancel /SLC Group Setup/Upgraded SLCs/Add SLC/Logout Welcome to the Online Software Registration system! Your current Software License Codes (SLCs) are listed below. Click on a Software License Code (SLC) to view more information and generate DLKs by adding MAC addresses. 5-3. On the Management Application's toolbar, click File > Manage License Offline > Export License for Activation. 5-7. In the menu for SLC properties, use the Upload LRQ function to upload the generated .lrq file. 4-13. Select Device > Configuration > Quick Setup from the sidebar. The Quick Setup window will appear. Configuration Quick Setup Create Logical Drive Existing Logical Drives Follow the instructions to create logical drives. Note: Please refer to SANWatch User Manual for more details. System Event Notifications In SANWatch, the Notification Manager module collects the event status and sends them to the user through various channels. 4-14. Click the Notification Manager icon in SANWatch Commander sidebar. File Services Wizards Application Settings Help Save Changes and Restart Services Step 2: Import License 5-9. Move the USB drive back to your EMR system. Activate License Online Manage License Offline Export License for Activation 5-10. On the Management Application's toolbar, click File > Manage License Offline > Import License, and select your saved .lic file to import it. Load Configuration from Restore Point Import License 5-11. When the permanent license file is successfully imported, click OK. Import Changes to Configuration 5-4. Specify a file name for the license request (.lrq) file (automatically generated by XProtect), and save it in the USB drive. 5-5. Move the USB drive with the .lrq file to a computer with internet access. Open an internet browser and go to Milestone's website at http://www.milestonesys.com. Select Software Registration from the top menu. If you have used the Software Registration Service Center before, log in with your e-mail and password. Otherwise, click New to the System? to create a new user account and register your SLC. The Open Platform Company The Notification Manager will appear in the main window. SNMP, Email, Broadcasting, Fax, MSN and SMS notification receivers can be set by clicking the corresponding icons. 5-8. You will receive the updated permanent license file (.lic) from Milestone via e-mail. Save it in the USB drive. Save Products and Solutions Sales Partners 6 Installing Milestone XProtect Smart Client/SANWatch on Remote PC(s) (Optional) You should install Milestone XProtect Server in the EMR9000 system, but you can choose to install the XProtect Smart Client/SANWatch either in the EMR9000 system or on remote PC(s). To install Milestone XProtect Smart Client/SANWatch for remote managements: 6-1. Copy the Milestone XProtect/SANWatch directory from your EMR9000 and save it in the USB drvie. 6-2. Insert the USB drive to PC(s). 6-3. Double-click the installation files and follow the instructions to start the installation. Note: You can also download the XProtect installation file from Milestone's website at http://www.milestonesys.com. XProtect IP Video Surveillance XProtect Add-on Products Milestone Integration Platform SDK Note: Please refer to SANWatch User Manual for more details. 5 Licenses for Milestone XProtect System (Optional) Please contact your dealer for purchasing Milestone XProtect license key. When you purchase the license key, you receive a temporary license file (.lic) including a Software License Code (SLC). Save the .lic file and SLC in a USB drive. Industry Solutions Where to Buy Customer Stories Software Registration Importing Licenses Note: Offline activation is introduced below. Use online activation for a quick and convenient activation procedure, if your EMR system has Internet access. Please refer to EMR User Manual for more details. 3ΉΉ/4 3/3