1
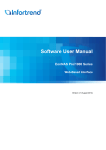
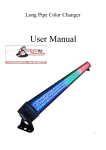
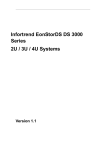
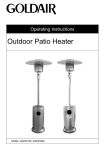
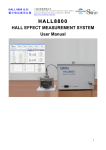
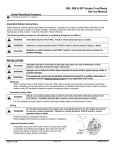
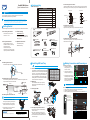
EonNAS 3000 Series
Quick Installation Guide
2 Rack-mounting
Rack-mounting kit
Item
01
Warning
02
• Only qualified service personnel should install and service this product.
• Observe all ESD procedures during installation.
Note
1
03
04
05
• Refer to the Unpacking List for the exact amount of items included in the package.
•EonNAS 3000 series with dual controllers or single controller systems capable of
upgrading to dual controller systems can ONLY use SAS hard drives!
06
07
08
Getting Started
Unpack the equipment and make sure the following tools are available before installation.
1-1. Accessory box content
2-1. Determining the rail locations
1. Measure and determine where in the rack the enclosure is going to be installed.
2. Attach the cage nuts to the rack posts if you have unthreaded holes on the rack.
Description
Quantity
Mounting bracket assembly, L-shape, left-side
Mounting bracket assembly, L-shape, right-side
Inner glides
Filler plates (part of Accessory box content)
Truss head screws M5 x 9.0mm
#6-32 x 10 (12) mm flathead screws
#6-32 L6 flathead screws
M5 cage nuts
1
Front rack posts
1
2
Unit boundary
2
M5 cage nuts
08
8
05
4
05
6
M5 x 9.0mm
M5 x 9.0mm
2-2. Adjusting the rail length
4
1. Loosen the four retention screws.
2. Adjust the mounting bracket length to install it between rack posts.
02 Right mounting bracket
01 Left mounting bracket
Rear rack posts
1-3. Further reading
• Screws: M5, M6, #10-32, #6-32
• Cables: Power cord x 2
EonNAS 3000 Series:
• For more details, please refer to the
manuals (on the CD-ROM) that came
with the system.
1-2. User-provided tools
Inner glides
Filler plates
M5 x 9 mm
Truss head screws
#6-32 x10 (12) mm
Flathead screws
#6-32 L6
Flathead screws
M5 Cage nuts
1-4. Optional accessories
• Phillips screwdriver (mid-size)
• Flat blade screwdriver (small-size)
• Anti-static wrist wrap
• A Windows OS computer
• At least two / four (for dual controller
systems) identical SAS / SATA HDDs
• Solid state disk (SSD)
• SSD Dedicated tray
2-4. Attaching the filler plates
4 Making Connections and Powering-on
3 Installing HDD and Tray
Attach the filler plates to the back on both sides of the enclosure.
Warning Hard drive data will be erased during initialization procedure, please backup all data!
3-1. Hard disk drive configuration
Filler plate 04
Secure using
#6-32 x10mm flathead screws 06
2-5. Attaching the inner glides to the chassis
Attach the inner glides to the side of the chassis. Orientate the inner glides so that
they bend towards the center of the chassis.
03 Inner glide
Rear side
For initialization, install at least two same-specification
HDDs into slots 1 & 2 or four same-specification HDDs
into slots 1, 2, 3 & 4 for dual controller systems. Other
slots are for storage-use using SATA / SAS HDDs or
users can install SSDs as read / write cache. When
installing SSDs, it is recommended to install SSDs in
numeric order into the remaining slots.
Slot 1
Slot 2
Slot 3
Slot 4
Slot 5
Slot 6
Slot 7
Slot 8
Slot 9
Slot 10 Slot 11
Slot 12
Slot 13 Slot 14 Slot 15
Slot 16
3-2. HDDs trays
Press the release button to open up the tray
bezel and gently pull out the HDD tray out of
the enclosure.
Release latch
07
4-1. Making connections
1. Connect to the Ethernet
management port ( in blue )
for host PC access.
CH0
CH1
CH2
3. Should users want to connect
to JBOD expansion enclosures,
please refer to the hardware
manual (on the CD-ROM) that
came with the system.
For power source redundancy, please make sure that the two PSUs are plugged
into two different power sources (ie. to different circuit breakers).
4-2. Powering on
1. Power up network devices such as PCs and network switches.
2. If JBODs are connected, power up JBODs.
3. Power up EonNAS system using the power button / switch (indicated in blue ).
#6-32 L6 screws
2-6. Attaching the chassis to the rack
Service LED: Off
Power LED: Green
Cooling fan LED: Green
Thermal LED: Green
System fault LED: Green
Do NOT install any hard drives / rear panel modules before inserting the chassis to the rack.
Note
1. Insert the chassis into the rack. Due to
the weight, two people might be required.
CH0
2. Flip open the plastic cap on the chassis
ears to access the front mounting holes.
3.5" HDD installation
3. Fasten the M5, M6, or #10-32 screws to
secure the chassis to the rack.
3-4. Inserting the trays to the enclosure
© by Infortrend Technology, Inc. All rights reserved.
QMN A S 3 0 A I R 1 9
1. With the tray bezel open, insert the HDD tray
into the enclosure.
2. Users must install all empty HDD trays into
unused drive bays to ensure regulated air flow.
3. Close the drive bezels and turn the bezel locks
to secure the trays.
CH3
2. Insert power cords into the
PSU power sockets ( in green ).
Note
3-3. Securing the HDD
Front side
2-3. Attaching the rails to the rack posts
1. Secure the mounting brackets to the rack posts with M5 screws.
2. Fasten the four retention screws.
2.5" HDD installation
CH1
CH2
CH3
6. Configuring Your EonNAS
5. Locating Your EonNAS
Hard drive data will be erased!
For dual controller systems, additional settings may appear for Controller B. You may
enter Controller B’s settings during “6. Configuring Your EonNAS” or choose to enter
Note them after the system has been initialized using Controller A.
Warning
5-1. Turning off Windows firewall:
To turn off Windows firewall, please refer to the instructions below.
Windows 8 / 7 / Vista:
Click on the Start button > Control Panel > Security > Windows Firewall > turn off Firewall.
You may be prompted for an administrator password or confirmation, type the password or
click OK to confirm.
6-1. Configure System Settings
Host Name: Enter a unique name for your EonNAS system
Timezone: Select your local timezone.
Password: Enter a new password for the admin account (default password: admin).
Windows XP:
Click on the Start button > Control Panel > Windows Firewall > turn off Firewall.
click on EonOne.exe found in the “fscommand" folder on the CD.
NAS_3016
Timezone
(GMT-08:00)America/Los_Angeles
Password
Confirm Password
5-2. Approximately 5 minutes after pressing the power button (if the user is near the system,
a beep will sound after 2 minutes and two beeps will sound 3 minutes thereafter) double
Host Name
7. Using the Web Interface
7-1. Refresh the existing browser or open a new browser and enter the IP address of
your EonNAS system.
\\192.168.0.2
7-2. Select the preferred language.
7-3. Enter the administrator login account and click Login.
Username: admin
Password: password set during “6. Configuring Your EonNAS” (default: admin)
6-2. Configure the Network Interface
Unless you want to change the IP address, leave the current settings and click the Next button.
Interfaces may vary depending on your system.
5-3. Select your preferred language.
192.168.0.2
10.0.0.3
6-3. Create a Storage Pool
Enter pool name, select a RAID configuration and click the Next button.
Redundant systems have Controller A and B pool creation options. If Controller A is set to:
(1) Configure storage after initialization > This selection will also apply to Controller B.
(2) Create a storage pool > Controller B can choose to or not to create pool at this stage.
5-4. Wait for your EonNAS system to appear in the List.
Name
NAS_3016
Model
EonNAS 3016
IP Address
10.0.0.2
For troubleshooting, advance settings or other initialization methods, please refer
to the documents on the CD-ROM.
5-5. Highlight your EonNAS device and proceed to the next step.
Note
If no EonNAS device was found
• Make sure your PC and EonNAS are connected to the same switch / router.
• Turn off the antivirus’ firewall (please refer to its manual) then close
EonOne and start from step 5-2 again.
• If you are still unable to detect your EonNAS system, please refer to the setup
instructions in the User Manual on the CD.
5-6. When the “Set IP” button lights up,
click on it and EonOne will
automatically assign an IP
address for your EonNAS. Wait for
an IP settings window to appear.
You may be prompted for a
password. If so, please enter
“admin” and click OK.
Miscellaneous
The web interface provides file upload and download functions. Should the user want to
access upload and download functions using the Windows File Manager, please refer to
Note the following procedure.
Press both the Windows key and r key (Windows + r) to bring up the Run Command
interface. Enter “\\IP address” (of your EonNAS system) and click OK.
SELECT
6-4. Add Users
Add at least one user account for accessing the new storage pool and click the Next button.
(The default user account is username: guest, password: guest.)
Enter the user account information that was created during "6. Configuring Your EonNAS”
5-7. Wait for 5 seconds and
a. Click the “Find” button on your EonOne.
b. Highlight the EonNAS system that matches
the IP address set previously.
c. Click the “Connect” button.
b
Name
NAS_3012
Model
EonNAS 3012
\\192.168.0.2
and click OK. Here the default Guest user is used as an example.
Username: guest
Password: guest
6-5.Share
Change the default shared folder settings or add a new folder and click the Next button.
IP Address
192.168.0.2
You should be able to access shared folders in your EonNAS system. Copy and paste
data to and from your EonNAS as if you were using Windows File Manager.
\\192.168.0.2
6-6.Summary
a
Find
Detail
Connect
Set IP
Close
c
Default management port address: 10.0.0.2 (Controller A) / 10.0.0.3 (Controller B)
Default password: admin
Note Default username: admin
Check the configuration summary. Click Back to modify the parameters or Apply to complete
the initialization process. Press OK to initialize or reboot when prompted!
Upon reboot, a beep will sound to indicate successful startup and when you hear two beeps,
you may log into and use your EonNAS system (process takes approximately 10 minutes).
Remember to turn back on your Windows and antivirus’ firewall. Setting can be
Note found in the same location as the turn-off option.