1
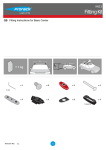
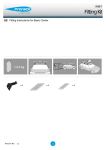
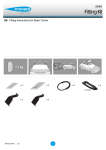
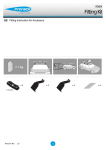
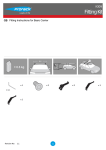
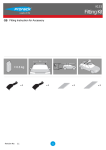
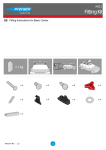
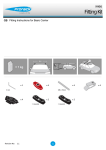
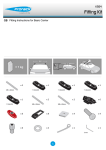
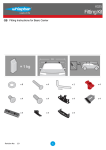
K450
Fitting Kit
GB Fitting Instructions for Basic Carrier
Revision No:
1.2
x4
x8
x8
x4
x4
x4
x1
x1
1
GB
Fitting Kit
K450
First Time Installation
Remove parts from packaging and check
contents. Contact your Prorack dealer if parts
are missing or damaged.
This kit fits type A, B, C and D.
These instructions show type A crossbar
fitted. They also apply to type B, C and D.
Use keys to remove covers.
3
GB
Fitting Kit
K450
Use hex screwdriver to reverse adjusting
screw 10 turns.
Press adjusting screw and pull crossbar legs
out. Refer to the crossbar instructions for
crossbar adjustment.
Ensure each end of the crossbar is adjusted
equally.
Set bars to length (refer to the crossbar
instructions for crossbar adjustment).
Please check the rear of this manual for
information relating specifically to your
vehicle.
4
GB
Fitting Kit
K450
Tighten adjusting screw to 5 Nm.
Remove clamp block by pressing backwards.
Remove both pins from each leg (use
spanner located inside left hand cover to
assist).
5
GB
Fitting Kit
K450
Detach foot from leg. Store loose parts in a
safe place.
Repeat for all legs.
Assemble foot from kit into leg.
Insert pins through foot into leg.
6
GB
Fitting Kit
K450
Select plastic internal block (from fitting kit)
and insert into foot.
Repeat for all legs.
Place T-bolt into track by either inserting it
from the top or sliding in from the end.
Rotate bolt clockwise so it engages in place
in the centre of track.
7
GB
Fitting Kit
K450
Use 4 T-bolts per track
Repeat for both tracks.
Place track pad over T-bolt
Thread the nut over the T-bolt by hand.
Repeat for all four positions.
8
GB
Fitting Kit
K450
Use the 3mm Allen key to hold the T-bolt in a
stationary position and ensure the T-bolt has
correct engagement.
Using the 10mm spanner supplied, tighten
the nut to 5Nm.
Option: Use spanner located in left hand
crossbar cover
Place crossbars over mounting assembly on
tracks.
Tighten the red plastic knob.
9
GB
Fitting Kit
K450
Ensure the red plastic knob is in the position
shown when fully tightened.
Repeat for all four positions.
Check crossbar is securely attached to the
vehicle.
Use keys to fit and lock covers
CAUTION:
Recheck all fasteners immediately after a load is
applied to the crossbars.
Regularly check screws are tight.
10