1
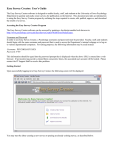
j5 User Manual
Version: 1.13.2
Revision 1
©October 2011
www.sjsoft.com | [email protected]
Copyright © 2011 St James Software IOM Ltd. All rights reserved.
Your rights to the software are governed by the accompanying software license
agreement.
The owner or authorized user of a valid copy of the j5 software may reproduce this
publication for the purpose of learning to use such software. No part of this
publication may be reproduced or transmitted for commercial purposes, such as
selling copies of this publication or for the provision of paid support services.
Whilst every effort is made to ensure that the information in this manual is accurate.
St James Software will not be held responsible for printing or clerical errors.
Note: St James Software frequently releases new versions and updates to its system
software, applications and Internet sites. Newer versions of these systems may differ
from the screenshots shown in this manual
St James Software
Isle of Man
www.sjsoft.com
Page | 1
Contents
Chapter 1 .................................................................................... 4
Introduction................................................................................ 4
General ..................................................................................................................... 4
About j5 .................................................................................................................... 4
What is j5?................................................................................................................ 5
How j5 works ............................................................................................................ 6
Advantages of using j5 ............................................................................................. 7
About the j5 Documentation ................................................................................... 8
Additional Resources................................................................................................ 9
j5 Website ................................................................................................................ 9
St James Software Service and Support Websites ................................................... 9
Chapter 2 .................................................................................. 10
Getting Started ............................................................................................................ 10
Overview ................................................................................................................ 10
Logging in ............................................................................................................... 10
Navigation .............................................................................................................. 11
Adding, modifying and deleting logs ...................................................................... 11
Filtering .................................................................................................................. 14
Exporting logs ......................................................................................................... 18
Chapter 3 .................................................................................. 19
j5 Applications ............................................................................................................. 19
Overview ................................................................................................................ 19
Operator Logbook .................................................................................................. 20
Introduction ........................................................................................................... 20
Operator Logbook fields......................................................................................... 21
Advantages ............................................................................................................. 22
Planning.................................................................................................................. 23
Introduction ........................................................................................................... 23
How to create a work plan ..................................................................................... 23
Ad Hoc Work logbook fields ................................................................................... 25
Work Overview Application ................................................................................... 26
Work Overview Application fields.......................................................................... 27
j5 User Manual – Revision 1 – ©2011
www.sjsoft.com
Page | 2
How to create and use a template ......................................................................... 28
Handover logbook .................................................................................................. 29
Introduction ........................................................................................................... 29
Handover Workflow (Basic model) ........................................................................ 31
Handover logbook: Scenario 1 ............................................................................... 33
Handover logbook: Scenario 2 ............................................................................... 34
Handover logbook: Scenario 3 ............................................................................... 35
Advantages ............................................................................................................. 36
Chapter 4 .................................................................................. 37
Additional Features ..................................................................................................... 37
Overview ................................................................................................................ 37
Preferences ............................................................................................................ 37
Rich text fields ........................................................................................................ 38
Attachments ........................................................................................................... 38
User roles ............................................................................................................... 38
Glossary .................................................................................... 40
Glossary ....................................................................................................................... 40
Appendix 1: User Rights Table .................................................. 42
j5 User Manual – Revision 1 – ©2011
www.sjsoft.com
Page | 3
Chapter 1
Introduction
General
j5 is an extremely flexible and configurable software system. It is designed to have
full functionality with the minimum amount of input whilst still allowing you to
expand its capabilities as your needs grow.
This preface covers the following:
About j5
Additional Resources
What is j5?
How does j5 work?
Advantages of j5
About the j5 Documentation
About j5
j5 is a fully integrated system designed to meet the needs of industrial sites. j5
supports a suite of different Applications, Features and Connectors which fit
seamlessly into the j5 Framework and communicate with each other as and when
required (see figure below). In addition, there are numerous support modules such
as Configuration Modules and Administration Modules to ensure that the System is
well managed and operates smoothly.
Overview of the j5 system
j5 User Manual – Revision 1 – ©2011
www.sjsoft.com
Page | 4
j5 can be divided into three main components: the j5 Framework, Applications
(including the application configuration) and Customization. Users may be set up to
have different levels of access to these components depending on their role, as can
be seen in the diagram below.
j5 System Components
What is j5?
j5 is a collection of integrated web applications that log, organise and manage the
operating processes of industrial sites. j5 collects and collates logs, work plans,
reports and live data from the field, and makes this information instantly available
across the site to all applicable users. j5 not only replaces the paper-based logbook
or Excel spread sheet typically used in most control rooms or technical and
maintenance workshops, but also integrates with your day-to-day operations,
smoothly recording progress and feedback while you focus on the task at hand. j5
can be easily configured to meet almost every business requirement. The basic
configuration includes the following functionality:
Simple, day-to-day logging of events in the Operator Logbook.
Clear handover of responsibility between shifts in the Handover
logbook.
Detailed tasks precisely defined and recorded in the Work Overview
Application and Ad-Hoc Work Application.
Various Configuration Applications.
j5 User Manual – Revision 1 – ©2011
www.sjsoft.com
Page | 5
How j5 works
Because j5 is web based and hosted on the intranet, users can access the system
from any computer which has a web browser. The diagram below shows how a user
on the Intranet gets information from the j5 Applications.
Initially a systems administrator is responsible for the configuration of the
logbooks and applications. The systems administrator sets up the various fields and
logbooks. The configuration information is then stored in the database for each of
the applications.
Basic j5 Architecture
Whenever a user clicks on a link in the Browser on his or her screen:
A request is sent to the main server asking for the relevant information
for that user.
The web server then transfers the request to the j5 Application. j5 then
reads the configuration tables which define the layout of the form to be
presented to the user. (For example: the order in which the logs are
presented to the user is a parameter specified in the configuration
tables.) j5 then creates the html information according to the format
defined in the configuration tables.
The j5 application then sends the information via the Web Server back to
the user's browser. In the browser, the information is translated and
displayed in the relevant form and grid.
In systems with a heavy load a front-end proxy server (such as Apache) is used to run
the j5 server across multiple processes.
Whenever a user adds a new log, the information is stored, together with the
categories associated with that log entry in the data tables. Additional system
j5 User Manual – Revision 1 – ©2011
www.sjsoft.com
Page | 6
categories such as the user name, shift number, date, time, etc. are also stored with
the log information. The function of the j5 web server is to allow many users to
access the information simultaneously across the network.
Note: The j5 application can handle many different configurations
simultaneously. Standard applications are available, but system
administrators may develop their own applications using the framework.
Advantages of using j5
In contrast to the traditional paper-based logbook, j5 provides many advantages
over the conventional form of recording logs.
For example:
There is immediate corporate visibility to log entries made in any of the
logbooks across the sites. As soon as an entry is made to a logbook, that
information is available to all the consoles across the site and to
authorized users off site.
There is an immediate improvement in the coordination of operations
since everyone is aware of the operations being undertaken.
Entries to the logbooks are not limited to operators and may be made by
any of the personnel in any of the areas of the site. For example, a
maintenance manager can add an entry to the control room logbook if
the repairs he is undertaking relates to that area.
It becomes very easy to find information in the logbooks using the
filtering and sorting tools.
The presentation of the logs is improved. Instead of hand written logs,
the information is sorted, ordered and displayed in color-coded form in a
grid.
It becomes much easier to categorize the log information so that the
data entry is simpler making later analysis more meaningful. The
administrator can set up log categories that the operator must choose
from when adding a log. At a later stage, queries can be made against
these categories.
There is password control for each user. Users are allowed to see
exactly what they need to see and no more. Each user may also be
restricted if necessary so that they may not enter new logs, or modify
existing logs or only enter logs in a certain area, or modify logs that have
been in the system for a certain time.
Logs may also be printed out on any of the printers on the network,
which means that your users can have a hard copy of the logs without
j5 User Manual – Revision 1 – ©2011
www.sjsoft.com
Page | 7
having to go to the control room. Logs may also be exported to PDF,
Excel or CSV formats.
The latest logbook entries may be viewed on the Intranet using
standard browsers like Firefox Chrome Safari or Internet explorer or.
This means that anyone who has access to a browser on the Intranet can
view the information without having to install any additional software.
j5 uses standard databases and publishes the table structures. This
means that users may access the logs using any of the off-the-shelf
query tools that are available. With these tools, custom queries or
custom reports may be generated.
The system can be configured for multiple applications and tuned to a
particular site’s requirement.
About the j5 Documentation
j5 comes with various types of documentation in addition to this manual to help you
get started providing detailed information about each application. There are four
manuals, each covering different topics including installation, day-to-day use and
advanced configuration. The manuals that are applicable to each user depends on
their role.
The four documentation modules are listed below:
You are
here
j5 User Manual: This manual describes day-to-day use of j5, such as
logging, managing work and handovers and is applicable to all users.
j5 Installation and Maintenance Guide: This guide describes how to
install, manage and update the j5 system and is typically applicable to
system administrators and system integrators.
j5 Configuration Manual: This manual describes how to configure a j5
site from the front end and is applicable to system administrators and
system integrators.
j5 Advanced Configuration Manual: This manual describes all advanced
configuration techniques and is only applicable to advanced system
integrators.
Important
An understanding of the material in the j5 User Manual is assumed in the j5
configuration manuals.
j5 User Manual – Revision 1 – ©2011
www.sjsoft.com
Page | 8
Additional Resources
j5 Website
For general information and updates, as well as the latest news on j5, go to:
http://www.sjsoft.com/
St James Software Service and Support Websites
For software updates and answers to the most frequently asked questions for all St
James Software products, go to the general Support webpage. You’ll also have
access to product specifications, reference documentation, and St James Software
and third-party product technical articles.
http://www.sjsoft.com/support
For software updates, documentation, discussion forums, and answers to the most
frequently asked questions for j5, go to:
http://www.sjsoft.com/
For discussion forums for all St James Software products from around the world,
where you can search for an answer, post your question, or answer other users’
questions, go to:
http://osqa.sjsoft.com
j5 User Manual – Revision 1 – ©2011
www.sjsoft.com
Page | 9
Chapter 2
Getting Started
Overview
This chapter covers the following:
Logging in
Navigation
Adding, modifying and deleting logs
Filtering
Exporting logs
Logging in
To log in to j5, open your browser (e.g. Internet Explorer, Google Chrome or Mozilla
Firefox). In the address bar, enter the address supplied by your system
administrator. This address will take the form http://<SERVERNAME>/ or
http://<SERVERNAME>:<PORT>/. Alternatively, click on the j5 bookmark if this has
been set up for you. The j5 login screen will appear and you may be required to
enter your assigned username and password. If your system supports LDAP (your
system administrator will advise you of this), then you should use your standard user
name and password to log in (see figure below).
j5 Login Page
Your system may also support single sign-on authentication (SSO), in which case, you
will automatically be logged in to j5. If you are unsure of your user name and
password, then you should contact your system administrator to get this
information. Once you have entered your user name and password and clicked on
the login button, your browser will connect to j5 and your home screen will be
visible.
j5 User Manual – Revision 1 – ©2011
www.sjsoft.com
Page | 10
Navigation
To find your way around j5, you will need to navigate with the menu and become
familiar with how logs appear in the logbook. When you first log in you will see the
navigation bar and the navigation tree, both of which can be used to browse through
the j5 site. You can return to the home page at any time by simply clicking on the
home icon. In the navigation bar you will see the documentation menu with links to
all j5-related documentation. In addition there will be various other menus for the
applications you have access to.
Note: Your home screen may differ slightly, depending on your individual user
rights and which applications you have installed.
Home icon
Log out
Navigation bar
Navigation tree
Adding, modifying and deleting logs
Once you are familiar with navigation in and around the home page, you will need to
learn the basics of j5. We will use the Operator Logbook as an example, but these
principles apply to any of the j5 applications. Firstly, select an Application (in this
case, Operator Logbook, see the figure below) from the Logbooks option in either
the drop down menu or the navigation tree. The logbook will load and a preconfigured view of the logs will be shown in the grid.
j5 User Manual – Revision 1 – ©2011
www.sjsoft.com
Page | 11
Operator Logbook in
application menu
Operator Logbook
A standard series of action icons are available throughout the j5 site and allow you
to perform various actions including Add, Edit, Delete, Save, Cancel and Expand.
These icons are shown on the left-hand side of the grid.
Expand icon
Add icon
Edit icon
Delete icon
Deletion confirmation
Cancel icon
Save icon
Note: If the Add, Edit or Delete icons do not appear on a log, it means that
you are not authorised to perform those actions on that particular log.
By default logs are displayed in a summary view (of only one line), however, you can
expand the log to view more information by clicking on the expand icon. If you wish
to return to the summary view, simply click on the collapse icon.
If you are authorised, you will be able to add new logs to the system. To add a new
log, click on the Add icon. A new, blank log will open in edit mode and you can fill in
all the necessary fields. Some fields are required fields therefore must be filled in
before you can save the log. If any required fields are not filled in the system will
prompt you to do so when you click the save button.
j5 User Manual – Revision 1 – ©2011
www.sjsoft.com
Page | 12
Expanded log
Contracted log
Newly added log
Now that you have filled in the log, you can save it by clicking on the save icon. The
newly saved log will now be the top-most log in your logbook. Should you need to
edit any of the information in the log, if you are authorised to do so, you may click
on the edit icon. The log will open in edit mode so that you can make the required
changes to the log. When you are finished editing the log you can save your updated
log by clicking on the save icon.
Should you need to delete a log, you can do so by clicking the delete icon. To avoid
erroneously deleting a log, the system will ask for confirmation that you want to
delete a log. If you are sure then click yes or confirm. You should only do so if you
are sure that you want to delete the log.
j5 User Manual – Revision 1 – ©2011
www.sjsoft.com
Page | 13
Filtering
As the j5 site continues to be used and more and more logs are added to the system,
there may be more than one page of information for you to look at. If this is the
case, you will see page numbers at the top of the grid. You can navigate to these
pages by clicking on the numbers. To get to the next page or the previous page
quickly you can click on the ‘next’ and ‘previous’ links. If you have a large number of
pages, then only the first 10 pages, and the last page numbers will be shown (as can
be seen in the figure below). In this case, there are 32 pages. If you want to see past
the 11th page, click on the number 11. This will expand the numbers to show the
next 10 pages as shown in the diagrams below.
j5 comes with different filters allowing you to locate the exact log that you are
interested in. Filters are a powerful tool for eliminating unnecessary information in
order to view only relevant logs. Nonvisible (filtered) logs are still available, and will
become visible again when you clear the current filter. There are several filters
available in the form of predefined filters and drop-down filters. In addition you can
create your own custom filters.
To show or hide the different filter options, click on the Filter View button. At any
time you can also sort logs in ascending or descending order by clicking on the
column header, as indicated by the arrow on the right hand side of the column
header.
j5 User Manual – Revision 1 – ©2011
www.sjsoft.com
Page | 14
Drop-down filter
Default filter
Filter view/hide icon
Custom filter
Column header sort
Predefined filters are buttons which when clicked show all logs that meet the
criteria of that filter. For example: a predefined filter which says ‘Current shift’ will
show all the logs in the current shift.
Drop-down filters are identified by the down arrow on the button. To use them,
click on the appropriate drop-down filter button, select one of the options in the
filter list and the drop-down filter will be applied to the logbook. Only logs matching
the selected value will be displayed. You can apply multiple drop-down filters at
once, for example, selecting ‘Closed’ from the Status drop-down filter and ‘Site 1’
from the Site drop-down filter will only show you closed logs from site 1. The text of
the filter will appear green if it is a filter that is currently active. You can clear
individual filters by selecting the ‘Clear filter’ option in the filter’s drop down list. To
clear all the filters, click the ‘Clear filter’ button.
Clears all filters
Clears the individual filter
Green label indicates
an active filter
You may require a filter option that is neither a predefined nor drop-down filter. If
this is the case, you can create your own custom filter. To do this, click on the Edit
filter button. A field drop-down will appear for the logbook and any sub-logbooks.
When you click on the appropriate drop-down menus, filterable fields will appear as
drop-down options.
j5 User Manual – Revision 1 – ©2011
www.sjsoft.com
Page | 15
Custom filter view
To filter by a specific field, select it from the drop-down list, enter any appropriate
information and click ‘Apply’. The custom filter will be applied to the logbook. Only
logs matching the custom filter will be displayed. To remove a specific field from
your custom made filter, click on the remove button (‘-‘) next to the field which you
wish to remove and then click apply. The custom filter will no longer filter by that
field. Click ‘Close’ to close the Edit Filter view and retain your custom filter.
j5 User Manual – Revision 1 – ©2011
www.sjsoft.com
Page | 16
Click to remove
from search
A custom filter searching
by User Name and Log
Type
Add other criteria to your
search
Search fields
found in main
logbook
Search fields found
in sub logbooks
(may be multiple)
Note: Custom filters are not permanent filters and are re-set when you log
out and log in again.
j5 User Manual – Revision 1 – ©2011
www.sjsoft.com
Page | 17
Exporting logs
In this section you will learn how to export the logs you have filtered to a file for a
presentation, to print them out, or to e-mail to someone who does not have access
to the j5 system. j5 can export into the following formats:
CSV or comma-separated values, a popular spread sheet format without
text formatting.
PDF or Portable Document Format, a popular document format for
sharing and printing (only available if the appropriate software has been
installed by the system administrator).
XLS or Microsoft Excel format, a popular spread sheet format with
formatting.
To export or print logs, select one of the icons from the top of the page. Select the
desired format (or combination of formats) and apply the filter to export/print the
logs.
Export filter options
Export buttons
Export/print all rows on the page exports all logs currently on the
page
Export/print all rows in filter exports all logs matching the current
filter (including those not currently on the page).
Export/print X rows exports a fixed number of rows matching the
current filter.
In grid view allows you export logs only in the summary view. If this
box is unticked, then the logs will be exported in expanded view
(where applicable)
j5 User Manual – Revision 1 – ©2011
www.sjsoft.com
Page | 18
Chapter 3
j5 Applications
Overview
This chapter covers the following:
Applications: Overview
Operator Logbook
Planning Applications
Handover logbook
j5 comes with a suite of different applications, the following of which are applicable
to the general user:
Simple, day-to-day logging of events in the Operator Logbook.
Detailed tasks precisely defined and recorded in the Work Overview
Application and Ad Hoc Work Application.
Clear handover of responsibility between shifts in the Handover
logbook.
Note: Many different applications are available for j5. The ones visible to you
will depend on which applications you have purchased or configured
j5 User Manual – Revision 1 – ©2011
www.sjsoft.com
Page | 19
Operator Logbook
Introduction
Whenever an event occurs during the shift, it must be recorded quickly and
accurately. Typically every event has an associated log time, location (where on site
it occurred) and status. These records of events are known as general logs, and they
are all stored in Operator Logbook. The Operator Logbook allows users to view
general logs captured on the system. Depending on your role, you can read, modify
and close some of these logs. Every general log is owned by the user who created it
and remains active until closed by the owner.
In some cases, other users may need to add follow-up comments to an on-going
event (for example, a manager may need to comment on a record that was logged
by an operator). They can do this by adding a quick note to the general log. Notes
take the form of a sub-log (visible as a notes log which sits underneath an expanded
general log). By filtering which logs are visible, users can get a live summary of the
state of a particular area of the site. Closed logs are permanently archived in the
Operator Logbook for future access.
Operator
Logbook
Expanded general log
General notes
Single general log
j5 User Manual – Revision 1 – ©2011
www.sjsoft.com
Page | 20
Operator Logbook fields
The current shift
The type of log you are
recording (required field)
Log status: ‘Open’, ‘Closed’,
‘Cancelled’ or ‘On Hold’
The role of the user
who created the log
Log priority: ‘Emergency’,
‘High’, ‘Medium’ or ‘Low’
Time that event occurred
Time that the log is
closed (automatic)
Tick if log should be added
to handover report
Your authorised areas
Details about the
event
The user name of the
person creating the log
j5 User Manual – Revision 1 – ©2011
www.sjsoft.com
Attach files containing
additional information
about the log
A record of when the
log was last modified
Page | 21
A record of when
the log was created
Page | 21
Advantages
Validated: The j5 system validates logs on entry to ensure data capture
is as accurate as possible.
Traceable: The ownership of logs is clearly defined.
Central: All general logs are stored in one place, accessible to all users
who have permission to view them.
Accessible: General log archives are easily accessible.
j5 User Manual – Revision 1 – ©2011
www.sjsoft.com
Page | 22
Planning
Introduction
Work needs to be planned on an impromptu (ad-hoc) basis, and at the same time
have a well-defined procedure for approval and completion. The Planning
application provides the mechanism to do this. Work plans are drawn up using the
Ad Hoc Work Application and the various tasks contained within this plan are viewed
by operators using the Work Overview Application. The typical work flow for work
plans is shown in the diagram below.
Ad Hoc planning logbook
Work Overview logbook
*
*Note: If a plan is reapproved, all old existing data in the work overview (i.e.
comments, work flows from operators) will be deleted and the work will be
reset. Unapproved work plans may be deleted
How to create a work plan
To create a new plan, add a new log in the Ad Hoc Work Application and fill in all the
necessary fields. These include the site (section/area and/or unit) to which you wish
to assign the work. You will need to fill in a start and finish time as well as a brief
description of the work to be done. You may then add more detailed tasks to the
work plan by clicking on the ‘Add’ button in the Ad Hoc Tasks sub-log.
Once the plan has been saved, it needs to be approved by a manager before the
tasks become visible to operators in the Work Overview Application. Once the plan
has been approved, it is no longer editable. The manager (or other authorised users)
may undo the approval of the work plan at any time (unless the work has been
completed). If a plan is unapproved all tasks relating to that plan will be retracted
until the plan is reapproved.
j5 User Manual – Revision 1 – ©2011
www.sjsoft.com
Page | 23
Ad Hoc Work logbook
Blank work plan
Tasks sub logbook
A single work plan
Button to
approve work
Expanded work plan
Button to undo
approval
A single task
j5 User Manual – Revision 1 – ©2011
www.sjsoft.com
Page | 24
Ad Hoc Work logbook fields
Site/Section/Area/Unit to
which the work is assigned
Description of the work plan
Select plan or template
from the drop down
Assign the work to specific
user group
Start and Finish Time
of the work
Name of the user who
created the plan
Add attachments
Name of the user who
approved the plan
Tasks sub logbook
Add comments here
The order in which the
tasks appear in the list
j5 User Manual – Revision 1 – ©2011
www.sjsoft.com
Description of the task
Add attachments
Page | 25
Work Overview Application
Once a planner has created and saved a work plan and it has been successfully
approved by a manager, the plan will be visible in the Work Overview Application,
ready for the operators to begin work. If the start time of the work plan is in the
future, the status of the work will be ‘Not Yet Started’. This status will tick over to
‘Ready to Start’ as soon as the start time is reached. Note that users may begin work
on tasks even if the start time has not yet passed. The operator may complete each
task by clicking on the ‘Set as Complete’ button. The operator can undo this action
by clicking on the ‘Completed’ button. Operators may also add comments or
attachments to the tasks where necessary. The status of the overall work plan must
also be changed to reflect the progress of the underlying tasks.
Work Overview logbook
Details of the work plan
Individual tasks
Complete a task by clicking
the ‘Set to Complete’ button
The work plan status can be changed from ‘Ready to Start’ to ‘In Progress’, ‘On Hold’,
‘Complete’ or ‘Cancelled’. If the status is changed to ‘Complete’ or ‘Cancelled’ the
status may not be changed again. Once a work plan is marked as ‘Complete’ or
‘Cancelled’ in the Work Overview Application, the actual plan in ‘Ad Hoc Work’ will
now be marked as ‘Finished’ and will no longer be editable. If a work plan is still in
progress and passes the designated finish time, the finish time will be flagged in red
to notify the users that the work is overdue.
j5 User Manual – Revision 1 – ©2011
www.sjsoft.com
Page | 26
Work Overview Application fields
Status of the work
The location to which
the work is applicable
plan
Attachments from
original work plan
Select the log type
The group to which the
work is assigned
The Start and Finish
Time of the work plan
Name of user who
created the plan
Attachments for
Work Overview
Name of user who
approved the plan
The order in which the
tasks appear in the list
j5 User Manual – Revision 1 – ©2011
www.sjsoft.com
Description of the task
Status of the task Attachments applicable
to individual tasks
Page | 27
Comments applicable
to individual tasks
Page | 27
How to create and use a template
In many cases, the same work plan needs to be repeated on a regular basis. Instead
of creating a new work plan from scratch each time, the planner may decide to make
a once off copy of a work plan by clicking on the copy button. This will open up a
work plan (in edit mode) which will be automatically populated with all the
information from the original plan. The planner may edit this information where
necessary, save it and proceed with the work plan as per usual. An even more
efficient way to make copies of different plans is to use a predefined template.
Select ‘Template’ from the drop
down & give template a name
Expanded template
Contracted template
Click to create a new plan
from an existing template
A blank template is created in exactly the same way as a work plan. However, the
planner must ensure that ‘Template’ is selected from the drop down menu as per
the above illustration. Once the work plan and associated tasks are saved, the
template will be stored permanently in the Ad Hoc Work Application. Once the
template has been created, you will notice that the ‘Approve’ button has been
replaced by a ‘Use Template’ button in the Action column. When the ‘Use Template’
button is clicked, a new work plan, with the predefined information will be opened.
The benefit of using templates is that a range of templates are readily available in
your own manageable template library.
j5 User Manual – Revision 1 – ©2011
www.sjsoft.com
Page | 28
Handover logbook
Introduction
At the end of the shift, the outgoing operator may be required to hand responsibility
over to the incoming operator. This action is called the handover and a well-defined
handover procedure is a hallmark of good governance. The handover log is an
automatically generated summary of the shift for a specific location
(site/section/area/unit) and can be found in the Handover logbook. The handover
log contains all relevant information for the current shift including the handover
status, a list of all general logs and works (as sub-logbooks) from the current shift as
well as comments from operators, supervisors and/or managers.
Only current handover
logs are visible
Handover logbook
Expanded handover log
Sub-logbooks
containing additional
logs applicable to the
current handover
Contracted handover log
Handover logs may also have a sub-log, called a handover form, which is a
configurable template used to capture any additional shift information that is
otherwise not automatically recorded in the handover log. For example, operators
may need to complete a check list before handing over responsibility to their relief.
j5 User Manual – Revision 1 – ©2011
www.sjsoft.com
Page | 29
Handover Form
sub-logbook
Select an appropriate status
for the form entry log
User name and date are
automatically saved on the log
Form label (in blue)
Handover form
Form entry log
Note: You may or may not have a handover form as it depends on the
configuration of your handover logbook
j5 User Manual – Revision 1 – ©2011
www.sjsoft.com
Page | 30
Handover Workflow (Basic model)
A typical handover between two shifts adheres to the following workflow (see
diagram below):
During the shift, the handover log is marked as ‘Underway’. Throughout
this period, authorised users can add comments to the handover log if
necessary.
As the end of the shift approaches, the handover log becomes ‘Open for
Approval’. At this point, operators can approve a log (by clicking on
‘Approve’) which indicates that they have reviewed the handover log
and are satisfied with the records and events from the previous shift.
They are now ready to hand over responsibility to the next operator. The
incoming operator then reviews the handover log to ensure that he is
happy with the handover log and to take note of any events that may be
carried over from the previous shift. To complete the final stage of
approval, the incoming operator clicks ‘Approve’ and saves the
handover log.
The names of the individuals involved in approving the handover will be
automatically recorded with the log and the status of the handover log
will now be marked as ‘Complete’. This log will no longer be editable and
a new, underway handover log is created.
At this point, a shift report may be generated and attached to the
outgoing handover log. If the operators fail to approve the handover log
in the allotted time, the system will automatically close the handover log
and mark it as ‘Not Approved’. All completed or not approved handover
logs can be found in the Handover logbook.
j5 User Manual – Revision 1 – ©2011
www.sjsoft.com
Page | 31
Status of the handover
Approval fields:
Date & name of
approver recorded
Summary view
Approve a handover
log by selecting the
‘Approved’ button
(once in edit mode)
Every organisation has their own way in which they perform handovers. Some use
shift based systems when handover occurs at the end of a shift. Other companies are
not restricted by shifts and can hand over at any time. Some may require several
people to approve a handover while others simply require a new handover to be
created automatically after a certain period of time. j5 is easily configured to suite
any handover requirements and will be set up for you by your system administrator.
There are several types of handovers which you, as a user, may encounter; the most
common of which are shown in diagrams on the next few pages.
j5 User Manual – Revision 1 – ©2011
www.sjsoft.com
Page | 32
Handover logbook: Scenario 1
Handover Report (also known as a handover log)
Shift summary
On-site location of
handover
Shift report & other
attachments located here
Start & Finish time of
the handover
Status of handover
General logs will only
appear in the General sublogbook if the ‘Add to
Handover’ box has been
ticked in Operator Logbook
Work & General
sub-logbooks
Note: This handover log does not have any comment fields and does not
require operator approval
j5 User Manual – Revision 1 – ©2011
www.sjsoft.com
Page | 33
Page | 33
Handover logbook: Scenario 2
Handover Report (also known as a handover log)
Shift summary
On-site location of
handover
Shift report & other
attachments located here
Start & Finish time of
the handover
Comment fields
Single approval
Handover status
Work & General
sub-logbooks
Note: This handover log requires only one user to approve the handover.
There are two comment fields, which are editable depending on your user
j5 User Manual – Revision 1 – ©2011
www.sjsoft.com
Page | 34
Page | 34
Handover logbook: Scenario 3
Handover Report (also known as a handover log)
On-site location
of handover
Shift report & other
attachments located
here
Comment fields
Two approvals
required
Handover status
Work & General
sub-logbooks
Note: This handover log requires two users to approve the handover. There
are three comment fields, which are editable depending on your user rights.
j5 User Manual – Revision 1 – ©2011
www.sjsoft.com
Page | 35
Page | 35
Advantages
Accountability: Handover responsibility is recorded
Uniformity: Handover procedure is well-defined
Central: All handover logs are stored in one place, accessible to all users
who have permission to view the relevant area
Accessible: Handover archives are easily accessible
j5 User Manual – Revision 1 – ©2011
www.sjsoft.com
Page | 36
Chapter 4
Additional Features
Overview
This section covers the following:
Preferences
Rich text fields
Attachments
User Roles
Preferences
You can change the language, theme (colour) and your password on the preferences
screen at any time. To do this, click on the Preferences button at the top right-hand
corner of the screen as shown below.
Click this icon to go to the
preferences screen
Select language
preference
Select logbook theme
Change your password
j5 User Manual – Revision 1 – ©2011
www.sjsoft.com
Page | 37
Rich text fields
Many of the j5 comment or description fields are rich text fields. This means that you
can change the style and colour of the text by using the rich text editor. If a field is a
rich text field, the editor will automatically appear above the field in question while
in edit mode. To view which functions are available, see figure below. Functionality
will vary across browsers.
Cut, Copy, Paste
Bullets,
Numbering,
Indents
Full screen mode
Text alignment
and colour
Hyperlink
Text box
Undo & Redo
Bold, Italic,
Underline,
Strikethrough
Attachments
Many of the j5 logs allow you to add attachments. To do this, simply click on ‘Add an
attachment’, browse to the location of the file you wish to attach, and add the
attachment. Attachments may be deleted if necessary by clicking ‘delete’. There may
be file size/type restrictions depending on the set-up of your j5 server.
User roles
Every j5 user is assigned a user role, which reflects their work function and how they
can use j5. Your user role defines which j5 applications you are permitted to access,
and which actions you are permitted to perform in those applications. For example,
all users can access the Operator Logbook, but only technical users and managers
can plan work in the Ad Hoc Work planning Application.
Additional permissions may be defined within each application. For example, an
operator can edit a general log that they have added, but not a log that another
operator has added.
Your username will also determine what kind of rights you have on the applications.
For example, you may be able to see an application but not edit it. Likewise, you may
be able to edit an application's logs but only if you yourself entered that particular
log.
j5 User Manual – Revision 1 – ©2011
www.sjsoft.com
Page | 38
The following user roles are defined in the basic configuration:
Read-only: A user who only needs to read logs, and does not add or
modify them.
Operator: A user who needs to record logs, perform planned work and
hand over responsibility at the end of the shift.
Supervisor: A user who supervises a shift and may need to record
comments at the end of the shift.
Technical: A user who plans work for operators to perform during the
shift.
Manager: A user who comments on handovers and approves planned
work and handovers.
System administrator: An administrator who maintains and configures
the system.
To find out what authorities you have, you can simply try out the functions or
contact your system administrator who will be able to inform you directly.
Note: Whenever you add a log, the system will automatically record your
username and associate it with the log. Similarly, whenever you modify a log,
the system will record your user name and will also make a note in the audit
log of any changes you have made to the system.
j5 User Manual – Revision 1 – ©2011
www.sjsoft.com
Page | 39
Glossary
Glossary
Ad Hoc Work Application: The j5 Application used to create new work plans
Browser: A program that accesses and displays files and other data available on the
Internet and other networks.
Button: A widget that is clicked to perform an action.
Connectors: The ability of j5 to connect and retrieve information from various third
party industrial applications
CSV: Comma-separated values, a popular spread sheet format without text
formatting.
Drop-down: A widget that is clicked to reveal a number of options.
Expanded view: A view on a log that shows many fields in a grid layout.
Field: A storage location for a single value in a log.
Filter: A rule that determines which logs are visible.
Operator Logbook: A j5 application used to record information about the day-to-day
events in an industrial plant.
Handover: The procedure that governs process of handing responsibility on to
another user.
Handover logbook: The j5 application used to facilitate the handover of
responsibility between shifts.
Intranet: a private network that is contained within an organisation.
LDAP: A method of authentication that allows you to enter the same username and
password that you enter elsewhere on the network.
Log: A single record in a given logbook.
Logbook: An application that manages viewing, adding and editing logs or other
information.
Menu: A navigation tool for choosing which application to view.
j5 User Manual – Revision 1 – ©2011
www.sjsoft.com
Page | 40
PDF: Portable Document Format, a popular document format for sharing and
printing
Permission: Whether or not you are allowed to perform an action. See also user role.
Rich text field: Fields where text can be entered and formatted in various ways
including ‘bold’, ‘italics’, ‘underline’ etc.
Role: See user role.
Single sign-on: A method of authentication that automatically logs you in to j5
without prompting for a username and password.
SSO: See single sign-on.
Sub-logbook: A miniature logbook that appears within a log.
Sub-log: A log in a sub logbook.
Summary view: A view on a log that shows fewer fields in a single line.
Template: A preformatted version of a log or a work plan to help the user create
new plans/logs quickly
User role: Your work role as defined in j5, which determines what permissions you
have. See also permission.
Web browser: see browser
Widget: Any interactive element on the screen.
Work Overview Application: The j5 Application that allows users to see and manage
tasks that have been assigned to them
XLS: Microsoft Excel format, a popular spread sheet format with formatting.
j5 User Manual – Revision 1 – ©2011
www.sjsoft.com
Page | 41
Appendix 1: User Rights Table
View
Add
Modify
Delete
View
Add
Modify
Delete
View
Add
Modify
Delete
View
Add
Modify
Delete
View
Add
Modify
Delete
Work Overview*
Delete
Ad Hoc Work
Modify
Handover Logbook Handover Form*
Add
Read-Only
Operator
Supervisor
Manager
Technical/planner
System Administrator
General Notes
View
General Logbook
P
P
P
P
P
P
O
P
P
O
O
P
O
P
P
O
O
P
O
O
O
O
O
P
P
P
P
P
P
P
O
P
P
P
P
P
O
P
P
P
P
P
O
O
O
O
O
P
P
P
P
P
P
P
O
O
O
O
O
O
O
P
P
P
O
P
O
O
O
O
O
O
P
P
P
P
P
P
O
O
O
O
O
O
O
P
P
O
O
P
O
O
O
O
O
O
P
O
O
P
P
P
O
O
O
O
P
P
O
O
O
P
P
P
O
O
O
O
P
P
P
P
P
P
P
P
O
O
O
O
O
P
O
P
P
P
O
P
O
O
O
O
O
P
Note: Table contents for applications marked with * may not be applicable as
it depends on whether that particular feature has been configured for your
site.
Legend
Yes
Yes – only if user owns the log or has rights to approve it
No
j5 User Manual – Revision 1 – ©2011
www.sjsoft.com
Page | 42