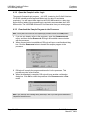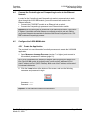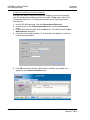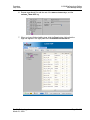
1
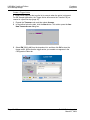
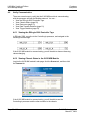
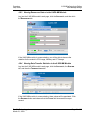
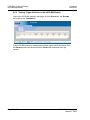
ILX56-MM ControlLogix Platform inRAx Message Manager March 31, 2009 SETUP GUIDE Important Safety Information WARNING – EXPLOSION HAZARD – DO NOT DISCONNECT EQUIPMENT UNLESS POWER HAS BEEN SWITCHED OFF OR THE AREA IS KNOWN TO BE NON-HAZARDOUS. AVERTISSEMENT – RISQUE D'EXPLOSION – AVANT DE DÉCONNECTER L'EQUIPMENT, COUPER LE COURANT OU S'ASSURER QUE L'EMPLACEMENT EST DÉSIGNÉ NON DANGEREUX. Markings CSA/cUL C22.2 No. 213-1987 CSA CB Certified IEC61010 243333 Temp Code T5 0° C <= Ta <= 60° C Warnings North America Warnings A B Warning - Explosion Hazard - Substitution of components may impair suitability for Class I, Division 2. Warning - Explosion Hazard - When in Hazardous Locations, turn off power before replacing or rewiring modules. Warning - Explosion Hazard - Do not disconnect equipment unless power has been switched off or the area is known to be nonhazardous. Conditions of Safe Usage: Power, Input, and Output (I/O) wiring must be in accordance with the authority having jurisdiction A B C D Warning - Explosion Hazard - When in hazardous locations, turn off power before replacing or wiring modules. Warning - Explosion Hazard - Do not disconnect equipment unless power has been switched off or the area is known to be non-hazardous. These products are intended to be mounted in an IP54 enclosure. The devices shall provide external means to prevent the rated voltage being exceeded by transient disturbances of more than 40%. DO NOT OPEN WHEN ENERGIZED. Electrical Ratings Backplane Current Load: 1000 mA @ 5 V DC; 3mA @ 24V DC Operating Temperature: 0 to 60°C (32 to 140°F) Storage Temperature: -40 to 80°C (-40 to 176°F) Shock: 30g Operational; 50g non-operational; Vibration: 5 g from 10 to 150 Hz Relative Humidity 5% to 95% (non-condensing) All phase conductor sizes must be at least 1.3 mm (squared) and all earth ground conductors must be at least 4mm (squared). Battery Life Advisory This module uses a Lithium Vanadium Pentoxide battery to backup the date/time settings of the real-time clock and the BIOS settings in CMOS. The battery recharges whenever the module is receiving power and should not need to be replaced for the life of the module. The module must be powered for approximately twenty hours before the battery becomes fully charged. If the module is left in an unpowered state for approximately 21 or more days, the battery will be completely drained and the module BIOS, date, and time will revert to their default settings. Before you remove a module from its power source, ensure the battery is fully charged. You can tell the battery is fully charged when the Battery State (ERR) LED is OFF. Note: The battery is not user-replaceable. ProSoft Technology® Product Documentation In an effort to conserve paper, ProSoft Technology no longer includes printed manuals with our product shipments. User Manuals, Datasheets, Sample Ladder Files, and Configuration Files are provided on the enclosed CD, and are available at no charge from our web site: http://www.prosoft-technology.com Printed documentation is available for purchase. Contact ProSoft Technology for pricing and availability. Asia Pacific: +603.7724.2080 Europe, Middle East, Africa: +33 (0) 5.3436.87.20 Latin America: +1.281.298.9109 North America: +1.661.716.5100 Your Feedback Please We always want you to feel that you made the right decision to use our products. If you have suggestions, comments, compliments or complaints about the product, documentation or support, please write or call us. ProSoft Technology 1675 Chester Avenue, Fourth Floor Bakersfield, CA 93301 +1 (661) 716-5100 +1 (661) 716-5101 (Fax) http://www.prosoft-technology.com Copyright © ProSoft Technology, Inc. 2009. All Rights Reserved. ILX56-MM Setup Guide March 31, 2009 ProSoft Technology ®, ProLinx ®, inRAx ®, ProTalk®, and RadioLinx ® are Registered Trademarks of ProSoft Technology, Inc. All other brand or product names are or may be trademarks of, and are used to identify products and services of, their respective owners. Contents Setup Guide ILX56-MM ♦ ControlLogix Platform inRAx Message Manager Contents Important Safety Information............................................................................................................... 2 Warnings ............................................................................................................................................. 2 Battery Life Advisory ........................................................................................................................... 3 ProSoft Technology® Product Documentation ...................................................................................3 Your Feedback Please........................................................................................................................ 3 1 Scope 1.1 1.2 1.3 1.4 2 About the ILX56-MM .................................................................................................7 Learning Objectives...................................................................................................7 ProSoft Technology Documentation .........................................................................8 Prerequisites .............................................................................................................8 Before You Begin 2.1 2.2 2.3 2.4 3 The Sample Application 4 11 General Overview....................................................................................................11 Architecture .............................................................................................................11 About the Sample Ladder Logic..............................................................................14 Procedures 4.1 4.2 4.3 4.4 4.5 4.6 5 9 System Requirements ...............................................................................................9 Package Contents ...................................................................................................10 Required Items ........................................................................................................10 Sample Files............................................................................................................10 3.1 3.2 3.3 19 Physical Setup.........................................................................................................19 Configure the ControlLogix Processor ....................................................................23 Configure the CompactLogix Processor .................................................................25 Connect the ControlLogix and CompactLogix racks to the Ethernet Network........ 27 Configure the ILX56-MM Module ............................................................................27 Verify Communication .............................................................................................50 Conclusion 5.1 6 7 53 Frequently Asked Questions ...................................................................................53 Glossary of Terms Index ProSoft Technology, Inc. March 31, 2009 55 61 Page 5 of 62 ILX56-MM ♦ ControlLogix Platform inRAx Message Manager Page 6 of 62 Scope Setup Guide ProSoft Technology, Inc. March 31, 2009 Scope Setup Guide 1 ILX56-MM ♦ ControlLogix Platform inRAx Message Manager Scope In This Chapter About the ILX56-MM ............................................................................... 7 Learning Objectives................................................................................. 7 ProSoft Technology Documentation........................................................ 8 Prerequisites ...........................................................................................8 This document acts as a tutorial in providing step-by-step instructions on how to read data from a CompactLogix controller using the ILX56-MM module in a ControlLogix rack. 1.1 About the ILX56-MM The ILX56-Message Manager is a communications interface that can be installed in a Rockwell Automation® ControlLogix®1756 chassis to provide data transfer functionality between automation systems based on a diverse range of controllers and processors. Supported systems include: 1.2 Rockwell Automation (RA) ControlLogix (CLX) Programmable Automation Controller (PAC) systems RA CompactLogix™ (CPLX) PAC systems Allen-Bradley® (A-B) PLC5® systems A-B SLC™ systems A-B MicroLogix™ systems Siemens S7® systems with Industrial Ethernet communications Schneider Electric® Quantum™ PLC systems with Modbus TCP/IP communications Any devices that support Modbus TCP/IP Protocol Learning Objectives When you have completed all the steps in this Setup Guide, you will have learned how to Understand how the sample application works Install and Configure the ILX56-MM module Import the Add-On Instructions to the ControlLogix and CompactLogix processors (page 24) Verify the ILX56-MM module communication status ProSoft Technology, Inc. March 31, 2009 Page 7 of 62 ILX56-MM ♦ ControlLogix Platform inRAx Message Manager 1.3 Scope Setup Guide ProSoft Technology Documentation ProSoft Technology provides the following documentation (manuals) with your ILX56-MM. Electronic documentation (on the ProSoft Solutions CD-ROM) Quick Start Guide: A printed insert in the product package that describes the basic steps to install the module and locate the configuration tools and documentation Training Video: A video program, playable on your PC with Windows Media Player or QuickTime, that demonstrates the basics of setting up the ILX56MM module Setup Guide: (this manual) Describes the sample application, and takes you through the steps necessary to install, configure, and verify the correct operation of the module User Manual: Detailed reference guide to the module, protocol configuration, functional overview, diagnostics and troubleshooting procedures, and product specifications Datasheet: Brief description of the module hardware and protocol implementation, general and functional specifications Additional documentation, tools, and product support 1.4 Email Technical Support: Send your support questions to [email protected] Web Site Support: Visit the ProSoft Technology web site at http://www.prosoft-technology.com to download additional documentation, tools and application information Telephone Support: Please call ProSoft Technology Technical Support at: (Country Code 1+) 661-716-5100. Support is available 24 hours a day, 7 days a week. ProSoft Technology telephone support is free and unlimited Prerequisites To get the most benefit from this setup guide, you should have the following skills: Rockwell Automation® RSLogix 5000™ software: launch the program, configure and transfer the Add-On Instruction to the processor Microsoft Windows: install and launch programs, execute menu commands, navigate dialog boxes and enter data. Ethernet networking: connect the ILX56-MM module to an Ethernet network using a valid IP address and subnet mask Hardware installation and wiring: install the module and safely connect it to the Ethernet network. Page 8 of 62 ProSoft Technology, Inc. March 31, 2009 Before You Begin Setup Guide 2 ILX56-MM ♦ ControlLogix Platform inRAx Message Manager Before You Begin In This Chapter 2.1 System Requirements .............................................................................9 Package Contents ................................................................................. 10 Required Items ...................................................................................... 10 Sample Files..........................................................................................10 System Requirements The ILX56-MM module requires the following minimum hardware and software components: Rockwell Automation® ™ processor, with compatible power supply and one free slot in the rack for the ILX56-MM module. The module requires 1 Amp of available 5 VDC power Rockwell Automation RSLogix 5000 programming software version 16 or higher Rockwell Automation RSLinx communication software version 2.51 or higher Pentium® II 450 MHz minimum. Pentium III 733 MHz (or higher) recommended Supported operating systems: o Microsoft Windows Vista o Microsoft Windows XP Professional with Service Pack 1 or 2 o Microsoft Windows 2000 Professional with Service Pack 1, 2, or 3 o Microsoft Windows Server 2003 Microsoft Internet Explorer version 7 or higher. Other web browsers are not supported at this time 128 Mbytes of RAM minimum, 256 Mbytes of RAM recommended 100 Mbytes of free hard disk space (or more based on application requirements) 256-color VGA graphics adapter, 800 x 600 minimum resolution (True Color 1024 × 768 recommended) CD-ROM drive Note: The Hardware and Operating System requirements in this list are the minimum recommended to install and run software provided by ProSoft Technology. Other third party applications may have different minimum requirements. Refer to the documentation for any third party applications for system requirements. ProSoft Technology, Inc. March 31, 2009 Page 9 of 62 ILX56-MM ♦ ControlLogix Platform inRAx Message Manager 2.2 Before You Begin Setup Guide Package Contents The following components are included with your ILX56-MM module, and are all required for installation and configuration. Important: Before beginning the installation, please verify that all of the following items are present. Qty. Part Name Part Number Part Description 1 ILX56-MM Module ILX56-MM inRAx Message Manager 1 ProSoft Solutions CD CD-014 Contains sample programs, utilities, and documentation for the ILX56-MM module. 1 Cable RL-CBL025 5 foot Ethernet Straight-Through Cable (Gray) If any of these components are missing, please contact ProSoft Technology Support for replacement parts. 2.3 Required Items This Setup Guide uses a sample application that shows you how to establish communication between the ILX56-MM module, the ControlLogix processor, and a CompactLogix processor. The sample application requires the following equipment. 2.4 Item Description ILX56-MM inRAx Message Manager module 1756-L63 ControlLogix processor 1756-ENBT ControlLogix EtherNet/IP module 1756-A7/B ControlLogix rack 1756-PA72/B ControlLogix rack power supply 1769-L35E CompactLogix processor 1769-PA2 CompactLogix power supply 1769-ECR CompactLogix right end Ethernet cable Ethernet cable to connect ILX56-MM module to Ethernet network (supplied with the module) Sample Files The following files are required for this procedure: Item Description CLX.ACD Sample ControlLogix Ladder File _cLX.ACD Sample CompactLogix Ladder File ILX56-MM-1051020111.backup Backup of the module's default configuration settings Page 10 of 62 ProSoft Technology, Inc. March 31, 2009 The Sample Application Setup Guide 3 ILX56-MM ♦ ControlLogix Platform inRAx Message Manager The Sample Application In This Chapter 3.1 General Overview.................................................................................. 11 Architecture ........................................................................................... 11 About the Sample Ladder Logic ............................................................ 14 General Overview The Sample Application consists of two ladder logic files, one for a 1756-L55 ControlLogix 5555 Controller, and one for a 1769-L35E CompactLogix5335E Controller. These ladder logic files contain controller tags that you will import into the ILX56-MM module. You will then be able to transfer data between both processors from the ILX56-MM module. 3.1.1 Required Steps This Setup Guide takes you through the following steps: 1 2 3 4 5 6 7 3.2 Install the ProSoft Module in the ControlLogix rack (page 20) Set the module's permanent IP Address (page 21) Download the Sample Ladder Logic to the ControlLogix Processor (page 23) Download the Sample Ladder Logic to the CompactLogix Processor (page 25) Connect the ControlLogix and CompactLogix racks to the Ethernet Network (page 27) Configure ILX56-MM Module (page 27) Verify Data Exchange (page 50) Architecture The sample application uses the following hardware and connections. A Personal Computer running a supported version of Microsoft Windows, with Microsoft Internet Explorer version 7 (or higher), RSLogix 5000, RSLinx, and an Ethernet port A ControlLogix processor with 1756-ENBT and ILX56-MM modules A CompactLogix processor An Ethernet network connecting the ControlLogix rack to the CompactLogix rack ProSoft Technology, Inc. March 31, 2009 Page 11 of 62 ILX56-MM ♦ ControlLogix Platform inRAx Message Manager The Sample Application Setup Guide The following illustration shows the sample application. The following illustration, from RSLinx, shows the ControlLogix and CompactLogix processors and networking information. Page 12 of 62 ProSoft Technology, Inc. March 31, 2009 The Sample Application Setup Guide ILX56-MM ♦ ControlLogix Platform inRAx Message Manager 3.2.1 How the Sample Application Exchanges Data In the Sample Application, the ILX56-MM is configured to exchange data between the two processors through its backplane connection to the ControlLogix processor. The module requires no additional programming to accomplish data exchange. Sample Application using ControlLogix Backplane The following diagram illustrates how data is transferred through the ILX56-MM module in the Sample Application. Applications using Modbus TCP/IP or Siemens Industrial Ethernet The following diagram shows how the module can also exchange data through either of its two Ethernet ports, with Modbus TCP/IP or Siemens Industrial Ethernet devices. Refer to the ILX56-MM User Manual for more information on data exchange using the module's Ethernet ports. ProSoft Technology, Inc. March 31, 2009 Page 13 of 62 ILX56-MM ♦ ControlLogix Platform inRAx Message Manager 3.3 The Sample Application Setup Guide About the Sample Ladder Logic The Sample Application uses controller tags to read and exchange data values between the ControlLogix and CompactLogix processors. If you have downloaded the Sample Ladder Logic to both processors, these tags will be available in the ILX56-MM module. To start with, both PLCs need to have tags entered that will serve as the tags that will receive/read data values and tags that will transmit/write values from and to the other PLC. Once these tags have been entered and ladder logic developed in both PLCs, the ILX56-MM module's configuration process can proceed. Note: The sample ladder logic is used only to demonstrate how to put values in tags. Page 14 of 62 ProSoft Technology, Inc. March 31, 2009 The Sample Application Setup Guide ILX56-MM ♦ ControlLogix Platform inRAx Message Manager 3.3.1 ControlLogix Ladder The following illustrations show the Controller Tags and Ladder Rungs for the ControlLogix sample program (CLX.ACD). ProSoft Technology, Inc. March 31, 2009 Page 15 of 62 ILX56-MM ♦ ControlLogix Platform inRAx Message Manager Page 16 of 62 The Sample Application Setup Guide ProSoft Technology, Inc. March 31, 2009 The Sample Application Setup Guide ILX56-MM ♦ ControlLogix Platform inRAx Message Manager 3.3.2 CompactLogix Ladder The following illustrations show the Controller Tags and Ladder Rungs for the CompactLogix sample program (_cLX.ACD). ProSoft Technology, Inc. March 31, 2009 Page 17 of 62 ILX56-MM ♦ ControlLogix Platform inRAx Message Manager Page 18 of 62 The Sample Application Setup Guide ProSoft Technology, Inc. March 31, 2009 Procedures Setup Guide 4 ILX56-MM ♦ ControlLogix Platform inRAx Message Manager Procedures In This Chapter 4.1 Physical Setup....................................................................................... 19 Configure the ControlLogix Processor................................................... 23 Configure the CompactLogix Processor ................................................ 25 Connect the ControlLogix and CompactLogix racks to the Ethernet Network ................................................................................................. 27 Configure the ILX56-MM Module........................................................... 27 Verify Communication ........................................................................... 50 Physical Setup 4.1.1 Setting Jumper There is one Setup Jumper located on the back of the module, labeled J1. The Setup Jumper acts as "write protection" for the module's firmware. In "write protected" mode, the Setup pins are not connected, and the module's firmware cannot be overwritten. The following illustration shows the ILX56-MM jumper configuration, with the Setup Jumper OFF. If you need to update the firmware, apply the Setup jumper to both pins. Note: If you are installing the module in a remote rack, you may prefer to leave the Setup pins jumpered. That way, you can update the module's firmware without requiring physical access to the module. ProSoft Technology, Inc. March 31, 2009 Page 19 of 62 ILX56-MM ♦ ControlLogix Platform inRAx Message Manager Procedures Setup Guide 4.1.2 Install the Module in the Rack If you have not already installed and configured your ControlLogix processor and power supply, please do so before installing the ILX56-MM module. Refer to your Rockwell Automation product documentation for installation instructions. Warning: You must follow all safety instructions when installing this or any other electronic devices. Failure to follow safety procedures could result in damage to hardware or data, or even serious injury or death to personnel. Refer to the documentation for each device you plan to connect to verify that suitable safety procedures are in place before installing or servicing the device. After you have checked the placement of the jumper, insert ILX56-MM into the ControlLogix chassis. Use the same technique recommended by Rockwell Automation to remove and install ControlLogix modules. You can install or remove ControlLogix system components while chassis power is applied and the system is operating. However, please note the following warning. Warning: When you insert or remove the module while backplane power is on, an electrical arc can occur. An electrical arc can cause personal injury or property damage by: sending an erroneous signal to your system’s actuators causing unintended machine motion or loss of process control causing an explosion in a hazardous environment Verify that power is removed or the area is non-hazardous before proceeding. Repeated electrical arcing causes excessive wear to contacts on both the module and its mating connector. Worn contacts may create electrical resistance that can affect module operation. 1 Align the module with the top and bottom guides, and then slide it into the rack until the module is firmly against the backplane connector. 2 3 With a firm but steady push, snap the module into place. Check that the holding clips on the top and bottom of the module are securely in the locking holes of the rack. Turn power ON. 4 Note: If you insert the module improperly, the system may stop working, or may behave unpredictably. Page 20 of 62 ProSoft Technology, Inc. March 31, 2009 Procedures Setup Guide ILX56-MM ♦ ControlLogix Platform inRAx Message Manager 4.1.3 Set the Module's Permanent IP Address If your network is configured to use IP addresses in the range 192.168.1.xxx, open Microsoft Internet Explorer (version 7 or higher), and connect to the following address: http://192.168.1.254 If your network is configured to use a different IP range, follow these steps: 1 2 Disconnect your PC from the network Connect the Ethernet cable between the Ethernet port on your PC and Port 1 on the module 3 Temporarily change the IP address and Subnet Mask on your PC to match the network configuration on the module: IP address: 192.168.1.1 Subnet mask: 255.255.255.0 Important: Make a note of your IP Address settings. You will need to restore these settings before you reconnect to the network. 4 Open Microsoft Internet Explorer (version 7 or higher), and connect to the following address: http://192.168.1.254 ProSoft Technology, Inc. March 31, 2009 Page 21 of 62 ILX56-MM ♦ ControlLogix Platform inRAx Message Manager 5 Procedures Setup Guide Click the LOGIN button at the bottom of the screen, and use the following username and password to login. Username: admin Password: admin 6 7 8 9 Click the ADMINISTRATION tab, and then the NETWORK tab, and configure the IP Address, Subnet Mask and Default Gateway to work with your network. Click the Save button to apply the updated settings. Change the IP Address and Subnet Mask settings on your PC back to their original values, and then reconnect your PC to the network. Connect to the module's web page again at the module's new IP address. The following table describes the default Ethernet port configuration and login information. Factory Default settings Ethernet Ports: Port 1 Port 2 IP: 192.168.1.254. DHCP User Name: admin Password: admin Important: The User Name and Password are case-sensitive. Page 22 of 62 ProSoft Technology, Inc. March 31, 2009 Procedures Setup Guide 4.2 ILX56-MM ♦ ControlLogix Platform inRAx Message Manager Configure the ControlLogix Processor 4.2.1 Connect your PC to the ControlLogix Processor There are several ways to establish communication between your PC and the ControlLogix processor. The following steps show how to establish communication through the serial interface. Refer to your Rockwell Automation documentation for information on other connection methods. 1 Connect the right-angle connector end of the cable to your controller at the communications port. 2 Connect the straight connector end of the cable to the serial port on your computer. ProSoft Technology, Inc. March 31, 2009 Page 23 of 62 ILX56-MM ♦ ControlLogix Platform inRAx Message Manager Procedures Setup Guide 4.2.2 Open the Sample Ladder Logic The sample ControlLogix program, CLX.ACD, located on the ProSoft Solutions CD-ROM, includes custom tags and ladder logic for data I/O and status monitoring. You will import these tags into the ILX56-MM module in a later step. Notice that no ladder logic programming is required to accommodate the ILX56MM module. The ILX56-MM derives all of its information from your existing tags. 4.2.3 Download the Sample Program to the Processor Note: The key switch on the front of the ControlLogix module must be in the REM position. 1 2 3 4 If you are not already online with the processor, open the COMMUNICATIONS menu, and then choose DOWNLOAD. RSLogix will establish communication with the processor. When communication is established, RSLogix will open a confirmation dialog box. Click the DOWNLOAD button to transfer the sample program to the processor. RSLogix will compile the program and transfer it to the processor. This process may take a few minutes. When the download is complete, RSLogix will open another confirmation dialog box. Click OK to switch the processor from Program mode to Run mode. Note: If you receive an error message during these steps, refer to your RSLogix documentation to interpret and correct the error. Page 24 of 62 ProSoft Technology, Inc. March 31, 2009 Procedures Setup Guide 4.3 ILX56-MM ♦ ControlLogix Platform inRAx Message Manager Configure the CompactLogix Processor 4.3.1 Connect your PC to the CompactLogix Processor 1 Connect the right-angle connector end of the cable to your controller at the communications port. 2 Connect the straight connector end of the cable to the serial port on your computer. ProSoft Technology, Inc. March 31, 2009 Page 25 of 62 ILX56-MM ♦ ControlLogix Platform inRAx Message Manager Procedures Setup Guide 4.3.2 Open the Sample Ladder Logic The sample CompactLogix program, _cLX.ACD, located on the ProSoft Solutions CD-ROM, includes custom tags and ladder logic for data I/O and status monitoring. You will import these tags into the ILX56-MM module in a later step. Notice that no ladder logic programming is required to accommodate the ILX56MM module. The ILX56-MM derives all of its information from your existing tags. 4.3.3 Download the Sample Program to the Processor Note: The key switch on the front of the CompactLogix processor must be in the REM position. 1 2 3 4 If you are not already online to the processor, open the COMMUNICATIONS menu, and then choose DOWNLOAD. RSLogix will establish communication with the processor. When communication is established, RSLogix will open a confirmation dialog box. Click the DOWNLOAD button to transfer the sample program to the processor. RSLogix will compile the program and transfer it to the processor. This process may take a few minutes. When the download is complete, RSLogix will open another confirmation dialog box. Click OK to switch the processor from PROGRAM mode to RUN mode. Note: If you receive an error message during these steps, refer to your RSLogix documentation to interpret and correct the error. Page 26 of 62 ProSoft Technology, Inc. March 31, 2009 Procedures Setup Guide 4.4 ILX56-MM ♦ ControlLogix Platform inRAx Message Manager Connect the ControlLogix and CompactLogix racks to the Ethernet Network In order for the ControlLogix and CompactLogix racks to communicate to each other through the ILX56-MM module, you must connect both racks to the Ethernet network. Connect the 1756-ENBT module to an Ethernet hub or switch Connect the CompactLogix processor to an Ethernet hub or switch Important: Both racks must be able to communicate on the same Ethernet network. Verify that the IP Address, Subnet Mask and Default Gateway are configured correctly for each rack. Refer to your Rockwell Automation documentation for assistance with Ethernet configuration for the 1756ENBT module and CompactLogix processor. 4.5 Configure the ILX56-MM Module 4.5.1 Create the Application The next task is to use information from both processors to create the ILX56-MM application. 1 Open MICROSOFT INTERNET EXPLORER (version 7 or higher), and connect to the module's permanent IP address (page 21). Tip: If you do not remember the IP address you assigned, watch the scrolling LED display on the front of the ILX56-MM module. As the display scrolls, you will see the IP addresses for Port 1 (static IP address) and Port 2 (DHCP IP address). Make a note of the IP address, and then enter it in the browser's address bar. 2 Click the LOGIN button at the bottom of the screen, and use the following username and password to login. Username: admin Password: admin Important: The User Name and Password are case-sensitive. ProSoft Technology, Inc. March 31, 2009 Page 27 of 62 ILX56-MM ♦ ControlLogix Platform inRAx Message Manager Procedures Setup Guide Create the ControlLogix Controller Interface Interfaces are used to configure controllers or bridges in the local ControlLogix rack. An Interface defined as a controller will contain a TAGS node under it in the Configuration Editor tree. The TAGS node contains all the Tags referenced for that controller. 1 2 3 4 5 In the ILX56-MM web page, click the CONFIGURATION EDITOR tab. In the left pane of the CONFIGURATION EDITOR tab, select the INTERFACES node. In the toolbar below the tabs, click the NEW button. This action opens the ADD NEW INTERFACE dialog box. Create the ControlLogix interface. Fill in the fields in the dialog box as shown in the following illustration. Click OK to store the interface. Notice that the interface you created now appears in the CONFIGURATION EDITOR tab. Page 28 of 62 ProSoft Technology, Inc. March 31, 2009 Procedures Setup Guide ILX56-MM ♦ ControlLogix Platform inRAx Message Manager Import the ControlLogix Tags Tags refer to individual data objects in the controllers that can be transferred to another controller. 1 Expand the CLX__RW_COMPACTLX node, and then select TAGS. 2 Click the NEW button. This action opens the ADD NEW TAG dialog box. ProSoft Technology, Inc. March 31, 2009 Page 29 of 62 ILX56-MM ♦ ControlLogix Platform inRAx Message Manager Procedures Setup Guide 3 In the ADD NEW TAG dialog box, click GET TAGS. This action retrieves controller tags from the ControlLogix processor. Notice that the tags now appear in the left pane. 4 Select the tag READ_CLX_BOOL. Notice that the tag name and data type now appear in the right pane. 5 Click ADD to store the tag. Notice that the tag you added now appears in the Configuration Editor. Page 30 of 62 ProSoft Technology, Inc. March 31, 2009 Procedures Setup Guide ILX56-MM ♦ ControlLogix Platform inRAx Message Manager 6 Repeat steps 4 and 5 to add the rest of the READ and WRITE tags, and the TRIGGER_TIMER.ACC tag. 7 When you have finished adding tags, click the DONE button. Notice that the tags now appear in the right pane of the CONFIGURATION EDITOR tab. ProSoft Technology, Inc. March 31, 2009 Page 31 of 62 ILX56-MM ♦ ControlLogix Platform inRAx Message Manager Procedures Setup Guide Create the Ethernet Bridge An Interface defined as a bridge will contain a Devices node under it in the Configuration Editor tree. 1 Expand the INTERFACES node. 2 In the toolbar below the tabs, click the NEW button. This action opens the ADD NEW INTERFACE dialog box. Fill in the fields in the dialog box as shown in the following illustration. These settings specify that the ILX56-MM will communicate through the backplane to the 1756-ENBT located in slot 3. 3 Page 32 of 62 ProSoft Technology, Inc. March 31, 2009 Procedures Setup Guide 4 ILX56-MM ♦ ControlLogix Platform inRAx Message Manager Click OK to store the interface. Notice that the interface you created now appears in the CONFIGURATION EDITOR tab. ProSoft Technology, Inc. March 31, 2009 Page 33 of 62 ILX56-MM ♦ ControlLogix Platform inRAx Message Manager Procedures Setup Guide Create the CompactLogix Interface 1 2 3 4 In the left pane of the CONFIGURATION EDITOR tab, select the INTERFACES node. In the toolbar below the tabs, click the NEW button. This action opens the ADD NEW INTERFACE dialog box. Create the CompactLogix interface. Fill in the fields in the dialog box as shown in the following illustration. Click OK to store the interface. Notice that the interface you created now appears in the CONFIGURATION EDITOR tab. Page 34 of 62 ProSoft Technology, Inc. March 31, 2009 Procedures Setup Guide ILX56-MM ♦ ControlLogix Platform inRAx Message Manager Create the CompactLogix Device Devices are used to configure bridges and controllers that are remotely connected through bridges in the local rack or one of the Ethernet ports on the module. 1 Expand the COMPACTLX_RW_CLX node, and then select DEVICES. 2 In the toolbar below the tabs, click the NEW button. This action opens the Add New Device dialog box. Fill in the fields in the dialog box as shown in the following illustration. ProSoft Technology, Inc. March 31, 2009 Page 35 of 62 ILX56-MM ♦ ControlLogix Platform inRAx Message Manager 3 Procedures Setup Guide Click OK to store the device. Notice that the device you created now appears in the CONFIGURATION EDITOR tab. Page 36 of 62 ProSoft Technology, Inc. March 31, 2009 Procedures Setup Guide ILX56-MM ♦ ControlLogix Platform inRAx Message Manager Create the CompactLogix Tags 1 Expand the CLX node, and then select DEVICES. 2 3 Click the NEW button. This action opens the ADD NEW DEVICE dialog box. Create the CLX_TAGS device Fill in the fields in the dialog box as shown in the following illustration. ProSoft Technology, Inc. March 31, 2009 Page 37 of 62 ILX56-MM ♦ ControlLogix Platform inRAx Message Manager 4 Procedures Setup Guide Click OK to store the device. Notice that the device you created now appears in the CONFIGURATION EDITOR tab. Import the CompactLogix Tags Tags refer to individual data objects in the controllers that can be transferred to another controller. 1 Expand the COMPACTLX_RW_CLX node, and then select TAGS. 2 Click the NEW button. This action opens the ADD NEW TAG dialog box. Page 38 of 62 ProSoft Technology, Inc. March 31, 2009 Procedures Setup Guide ILX56-MM ♦ ControlLogix Platform inRAx Message Manager 3 In the ADD NEW TAG dialog box, click GET TAGS. This action retrieves controller tags from the CompactLogix processor. Notice that the tags now appear in the left pane. 4 Select the tag READ_CLX_BOOL. Notice that the tag name and data type now appear in the right pane. 5 Click ADD to store the tag. Notice that the tag you added now appears in the Configuration Editor. 6 Repeat steps 4 and 5 to add the rest of the READ and WRITE tags. ProSoft Technology, Inc. March 31, 2009 Page 39 of 62 ILX56-MM ♦ ControlLogix Platform inRAx Message Manager 7 Procedures Setup Guide When you have finished adding tags, click the DONE button. Notice that the tags now appear in the right pane of the CONFIGURATION EDITOR tab. Page 40 of 62 ProSoft Technology, Inc. March 31, 2009 Procedures Setup Guide ILX56-MM ♦ ControlLogix Platform inRAx Message Manager Create the Transfer List A Transfer List is a list of Transfers that specify what data is transferred between the programmable controllers. 1 Select the TRANSFER LISTS node. 2 In the toolbar below the tabs, click the NEW button. This action opens the ADD NEW TRANSFER LIST dialog box. Create the RW_CLX_CLX Transfer List. Fill in the fields in the dialog box as shown in the following illustration. 3 ProSoft Technology, Inc. March 31, 2009 Page 41 of 62 ILX56-MM ♦ ControlLogix Platform inRAx Message Manager 4 Procedures Setup Guide Click OK to store the transfer list. Notice that the transfer list you created now appears in the CONFIGURATION EDITOR tab. Add Transfers to the Transfer List A Transfer specifies a Source and a Destination and includes a Sequence Number, Wait indicator, and a Transfer on Change indicator. 1 Expand the TRANSFER LISTS node, and then select RW_CLX_CLX. Page 42 of 62 ProSoft Technology, Inc. March 31, 2009 Procedures Setup Guide ILX56-MM ♦ ControlLogix Platform inRAx Message Manager 2 Click the NEW button. This action opens the ADD NEW TRANSFER dialog box. 3 Click to expand all the interfaces. ProSoft Technology, Inc. March 31, 2009 Page 43 of 62 ILX56-MM ♦ ControlLogix Platform inRAx Message Manager Procedures Setup Guide For the Sample Application, the ControlLogix processor will write data to the CompactLogix processor, and the ControlLogix processor will also read data from the CompactLogix processor. In the following steps, you will match the ControlLogix WRITE tags in the Source pane to the CompactLogix READ tags in the Destination pane. 1 In the Source pane, select ControlLogix Tag WRITE_CLX_BOOL. In the Destination pane, select CompactLogix tag READ_CLX_BOOL, and then click the ADD button to store the transfer. Notice that the Transfer appears in the CONFIGURATION EDITOR tab. 2 In the Source pane, select ControlLogix Tag WRITE_CLX_INT. In the Destination pane, select CompactLogix tag READ_CLX_INT, and then click the ADD button to store the transfer. Continue matching Source and Destination tags until you have assigned all of them to the Transfer List. Next, match the ControlLogix WRITE tags in the Source pane to the CompactLogix READ tags in the Destination pane. 3 4 Important: Verify that the Data Type is the same for each pair of Source and Destination tags. Page 44 of 62 ProSoft Technology, Inc. March 31, 2009 Procedures Setup Guide 5 ILX56-MM ♦ ControlLogix Platform inRAx Message Manager When you have finished adding transfers, verify that there are now fourteen transfers in the transfer list, and then click the DONE button. If the transfers in your list do not match the following illustration, go back and correct any errors before continuing. ProSoft Technology, Inc. March 31, 2009 Page 45 of 62 ILX56-MM ♦ ControlLogix Platform inRAx Message Manager Procedures Setup Guide Create a Trigger Triggers are used to define when the data is transferred from one programmable controller to another. 1 Select the TRIGGERS node. 2 Click the NEW button. This action opens the ADD NEW TRIGGER dialog box. Page 46 of 62 ProSoft Technology, Inc. March 31, 2009 Procedures Setup Guide 3 ILX56-MM ♦ ControlLogix Platform inRAx Message Manager Create the trigger. Fill in the fields in the dialog box as shown in the following illustration. Note: When you select the Condition ALWAYS, the COMPARE VALUE fields are not accessible, meaning that this trigger will always be executed, regardless of the contents of each tag. 4 Click OK to store the trigger. Notice that the trigger now appears in the CONFIGURATION EDITOR tab. ProSoft Technology, Inc. March 31, 2009 Page 47 of 62 ILX56-MM ♦ ControlLogix Platform inRAx Message Manager Procedures Setup Guide Create a Trigger Action A Trigger Action specifies the transfer list to execute when the action is triggered. For the Sample Application, the Trigger Action will execute the Transfer List you created in a previous step (page 41). 1 2 Expand the TRIGGERS node, and then select ACTIONS. In the toolbar below the tabs, click the NEW button. This action opens the ADD NEW TRIGGER ACTION dialog box. 3 Select RW_CLX_CLX from the dropdown list, and then click OK to store the trigger action. Notice that the trigger action you created now appears in the Configuration Editor tab. Page 48 of 62 ProSoft Technology, Inc. March 31, 2009 Procedures Setup Guide ILX56-MM ♦ ControlLogix Platform inRAx Message Manager 4.5.2 Save and Start the Sample Application The final task consists of saving the sample application and placing the module in RUN mode. 1 In the toolbar below the tabs, click the SAVE button. This action opens a confirmation dialog box. Click OK to continue. 2 Next, place the module in Run mode. In the status bar at the bottom of the window, click the green Arrow button. 3 Click OK when prompted to confirm Run mode. 4 Notice that the module has switched to Run mode. ProSoft Technology, Inc. March 31, 2009 Page 49 of 62 ILX56-MM ♦ ControlLogix Platform inRAx Message Manager 4.6 Procedures Setup Guide Verify Communication There are several ways to verify that the ILX56-MM module is communicating with the processor and with the Modbus network. You can ... View the RSLogix 5000 Controller Tags. View Chassis Status (page 50) View Resources (page 51) View Data Transfer Statistics (page 51) View Trigger Statistics (page 52) 4.6.1 Viewing the RSLogix 5000 Controller Tags In RSLogix 5000, go online to the ControlLogix processor, and navigate to the following controller tags. If the ILX56-MM module is communicating, you will be able to observe these tag values changing. 4.6.2 Viewing Chassis Status in the ILX56-MM Module Log into the ILX56-MM module's web page, click the STATUS tab, and then click the CHASSIS tab. If the ILX56-MM module is communicating, you will be able to see the ControlLogix processor and the other modules in the chassis. Page 50 of 62 ProSoft Technology, Inc. March 31, 2009 Procedures Setup Guide ILX56-MM ♦ ControlLogix Platform inRAx Message Manager 4.6.3 Viewing Resources Status in the ILX56-MM Module Log into the ILX56-MM module's web page, click the STATUS tab, and then click the RESOURCES tab. If the ILX56-MM module is communicating, you will be able to observe the statistics for the module's CPU usage, Memory and CF Storage. 4.6.4 Viewing Data Transfer Statistics in the ILX56-MM Module Log into the ILX56-MM module's web page, click the STATUS tab, the RUNTIME tab, and then the TRANSFER LISTS tab. If the ILX56-MM module is communicating, these values will be populated. Click the REFRESH button and observe that the COUNT field increments once per second. ProSoft Technology, Inc. March 31, 2009 Page 51 of 62 ILX56-MM ♦ ControlLogix Platform inRAx Message Manager Procedures Setup Guide 4.6.5 Viewing Trigger Statistics in the ILX56-MM Module Log into the ILX56-MM module's web page, click the STATUS tab, the RUNTIME tab, and then the TRIGGERS tab. If the ILX56-MM module is communicating, these values will be populated. Click the REFRESH button and observe that the COUNT field increments once per second. Page 52 of 62 ProSoft Technology, Inc. March 31, 2009 Conclusion Setup Guide 5 ILX56-MM ♦ ControlLogix Platform inRAx Message Manager Conclusion In This Chapter Frequently Asked Questions ................................................................. 53 Now that you have installed, configured, and verified the ILX56-MM module, the next step is to incorporate the module into your own application. 1 2 3 4 5.1 For more information about the ILX56-MM module, including detailed configuration, monitoring and troubleshooting information, refer to the ILX56MM User Manual, on the ProSoft Solutions CD-ROM. For a brief video tutorial, refer to the Training Video, on the ProSoft Solutions CD-ROM. For technical support and warranty information for your ProLinx module, refer to Support, Service and Warranty in the ILX56-MM User Manual. For more information on ProSoft Technology products and services, please visit http://www.prosoft-technology.com. Frequently Asked Questions What advantages does the Message Manager (ILX56-MM) offer over the traditional approach using Message Instructions in ladder logic? The biggest advantage offered by the Message Manager is the ability to easily move data between diverse controller platforms and even between diverse process networks without the need for one single rung of ladder logic. Controllers from Rockwell Automation, Schneider Electric and Siemens use each processor’s high speed Ethernet protocols. Rockwell Automation users have even more protocol choices for moving data, all without any ladder logic required. This allows the Message Manager to act as both a communications coprocessors as well as a cross-platform communications bridge. Programming message instructions in PLCs use PLC program memory, processor scan time and can require complicated sequencing. The Message Manager eliminates all of this. Maintaining data transfers in a control system is now in one location versus message instructions in many PLC programs. If ladder logic is not required for the Message Manager, how can message execution be controlled? Bi-directional data transfers can be sent at regular timed intervals or based on the data value of designated "trigger" tags. Therefore, any tag value read from any configured controller can be designated as triggers to move specific data to and from other controllers on any network where that data may be needed. The built-in web-based configuration tool makes this easy to accomplish. ProSoft Technology, Inc. March 31, 2009 Page 53 of 62 ILX56-MM ♦ ControlLogix Platform inRAx Message Manager Conclusion Setup Guide How do I configure the Message Manager? The ILX56-MM has an easy-to-use, web browser interface for doing all required configuration tasks. No special software is required, as the web interface allows both local and remote access. Configurations are created on-line through the web interface, can be saved Off-Line to a PC and down-loaded to other Message Manager modules. How many users can access the Message Manager configuration at the same time? The Message Manager configuration can be viewed by multiple users at the same time. There is no need to log in to view configuration settings or on-line diagnostic information. For safety reasons, only one user may log in at a time to make changes to the configuration. Why have two built-in Ethernet ports? Having two Ethernet ports allows the Message Manager to operate on two separate subnets (network groups) at the same time. Either port can be used for connecting to your web browser for configuration. Having two ports also allows you to communicate on separate Modbus TCP/IP and/or Siemens Industrial Ethernet networks without having to physically interconnect the two networks. What browsers are supported? To fully implement all the advanced features of the Message Manager, ProSoft Technology recommends the use of Internet Explorer 7.0 (or higher). Older versions of Internet Explorer and other browsers may not offer full access to all Message Manager’s features. For initial connection to the module, what IP address should I use? The default IP address for Port 1 is 192.168.1.254. The default for Port 2 comes from a DHCP server on the network. Page 54 of 62 ProSoft Technology, Inc. March 31, 2009 Glossary of Terms Setup Guide 6 ILX56-MM ♦ ControlLogix Platform inRAx Message Manager Glossary of Terms A Administrator security level The security level given to any username/password login account when the assigned user needs to be able to start or stop ILX56-MM data transfer operations, change the ILX56-MM configuration, or manage Username/Password login accounts and assign security access levels to those accounts. ASCII American Standard Code for Information Interchange. A communication mode in which each eight-bit byte in a message contains one ASCII character code. ASCII characters (or hexadecimal characters) are sometimes used as a key to encrypt data and ensure its secure transmission. B Baud Rate The speed of communication between devices on the network. All devices must communicate at the same rate. C Client A client is software program, or the device on which that program runs, that makes requests for information from a software program, or the device on which that program runs, in a client-server (page 58) relationship. A Client on an Ethernet network is equivalent to a Master (page 57) on a serial network. D DCE Data communications equipment. A modem, for example. Default Gateway The IP address of a network router where data is sent if the destination IP address is outside the local subnet. The gateway is the computer that routes the traffic from the local area network to other networks such as the Internet. ProSoft Technology, Inc. March 31, 2009 Page 55 of 62 ILX56-MM ♦ ControlLogix Platform inRAx Message Manager Glossary of Terms Setup Guide Device A configuration option that is a subset of the Interface configuration that defines all the communication parameters required to make a backplane data transfer link through a Rockwell Automation (RA) 1756 chassis backplane to a communication bridge module in that chassis. The Device configuration is used only when a controller to be accessed is an RA controller and the data transfer link must go through RA network bridges to establish a communications link. DTE Data terminal equipment. A computer or terminal, for example. E ESD Electrostatic Discharge. Can cause internal circuit damage to the coprocessor. Ethernet A set of network cabling and network access (CSMA/CD) protocol standards for bus topology computer networks invented by Xerox but now controlled by the 802.3 subcommittee of the IEEE. F Firmware Software for embedded computers. Full-Duplex Simultaneous two-way independent transmission in both directions H Half-Duplex A circuit designed to transmit in either direction, but not in both simultaneously. I Interface A configuration option that defines all the communication parameters required to make a data transfer link one controller to another controller. An Interface configuration also includes Tag definitions of data points to be used for data transfer between target controllers. Up to 16 separate Interfaces (controller and associated Tags), may be defined for the ILX56-MM. Page 56 of 62 ProSoft Technology, Inc. March 31, 2009 Glossary of Terms Setup Guide ILX56-MM ♦ ControlLogix Platform inRAx Message Manager IP Address An identifier for a computer or device in a TCP/IP network. Networks using the TCP/IP Protocol route messages based on the IP address of the destination. The format of an IP address is a 32-bit numeric address written as four numbers separated by periods. Each number can be 0 to 255. For example, 192.168.0.100 could be an IP address. L LED Light-emitting diode. M MAC ID A unique hexadecimal number that identifies any Ethernet device. Master A Master is a device that makes requests for information from a software program, or the device on which that program runs, in a client-server (page 58) relationship. A Client on an Ethernet (page 56) network is equivalent to a Master (page 57) on a Serial (page 58) network. N Network A series of stations or nodes connected by some type of communication medium. A network may consist of a single link or multiple links. Node An address or software location on the network. P Peer-to-Peer A network relationship between devices where each device can send commands as a master or client, and respond to commands as a slave or server. Poll A data transfer operation whereby one device or controller sends a message to another device or controller, which then generally sends a response message back to the originating device or controller. A Poll message may be a request to either read data from the other controller or write data to the other controller. In the ILX56-MM, polls are created based on the configurations entered for Interface, Tags, Transfer Lists, and Triggers. ProSoft Technology, Inc. March 31, 2009 Page 57 of 62 ILX56-MM ♦ ControlLogix Platform inRAx Message Manager Glossary of Terms Setup Guide Power Supply Device that supplies power to the I/O chassis containing the processor and coprocessor, or to other modules. Project Security Level The security level given to any username/password login account when the assigned user needs to be able to start or stop ILX56-MM data transfer operations or change the ILX56-MM configuration. Protocol The language or packaging of information that is transmitted between nodes on a network. R RS-232 Recommended Standard 232; the standard for serial binary signals between a DTE and a DCE. S Serial Data that is transferred one bit at a time. Server A Server is a software program, or the device on which that program runs, that provides a specific kind of service to a Client (page 55) software program, or the device on which that program runs, on an Ethernet network. A Server on an Ethernet network is equivalent to a Slave (page 58) on a Serial (page 58) network. Simplex A circuit capable of operating in only one direction. Slave A Slave is a software program, or the device on which that program runs, that provides a specific kind of service to a Master (page 57) software program, or the device on which that program runs, on a serial network. A Slave on a Serial network is equivalent to a Server (page 58) on an Ethernet (page 56) network. Page 58 of 62 ProSoft Technology, Inc. March 31, 2009 Glossary of Terms Setup Guide ILX56-MM ♦ ControlLogix Platform inRAx Message Manager Subnet Mask A mask used to determine what subnet an IP address belongs to. An IP address has two components: the network address, and the host address. For example, consider the IP address 150.215.017.009. Assuming this is part of a Class B network (with a subnet mask of 255.255.0.0), the first two numbers (150.215) represent the Class B network address, and the second two numbers (017.009) identify a particular host on this network. T Tag A configuration option that is a subset of the Interface configuration that defines all the parameters required to make a data transfer link to a single data point or data array in a target controller. Target Controller Any controller that has been defined to be part of a Interface configuration for data transfer operations. Memory registers or data structures in a target controller may be used as the Source of data to be transferred or may be the destination into which data will be transferred. Transfer List A configuration option that defines specific data transfer links between any two target controllers. The Transfer List will consist of one or more items that list an Interface/Tag combination as the data Source and an Interface/Tag combination as the data Destination. For successful data transfer, the data type of the Destination Interface/Tag must be the same as the Source Interface/Tag data type; that is, both must be Binary, 8-bit Integer, 16-bit Integer, 32-bit Integer, 32bit Floating Point, String, and so forth. Transfer Lists provide a convenient way of grouping data transfer operations. Trigger A way to control execution of Transfer Lists. Triggers may be configured using time intervals for regular periodic polling or logical events to poll only under the specific Boolean logical conditions of designated Tag values, such as tag value is greater than, less than, equal to, or not equal to another tag value or constant. The same Trigger may be assigned to control more than one Transfer List. ProSoft Technology, Inc. March 31, 2009 Page 59 of 62 ILX56-MM ♦ ControlLogix Platform inRAx Message Manager Page 60 of 62 Glossary of Terms Setup Guide ProSoft Technology, Inc. March 31, 2009 Index Setup Guide ILX56-MM ♦ ControlLogix Platform inRAx Message Manager Full-Duplex • 56 G Index General Overview • 11 H A About the ILX56-MM • 7 About the Sample Ladder Logic • 14 Add Transfers to the Transfer List • 42 Administrator security level • 55 Architecture • 11 ASCII • 55 B Battery Life Advisory • 3 Baud Rate • 55 Before You Begin • 9 I Import the CompactLogix Tags • 38 Import the ControlLogix Tags • 29 Important Safety Information • 2 Install the Module in the Rack • 11, 20 Interface • 56 IP Address • 57 L C Client • 55, 58 CompactLogix Ladder • 17 Conclusion • 53 Configure the CompactLogix Processor • 11, 25 Configure the ControlLogix Processor • 11, 23 Configure the ILX56-MM Module • 11, 27 Connect the ControlLogix and CompactLogix racks to the Ethernet Network • 11, 27 Connect your PC to the CompactLogix Processor • 25 Connect your PC to the ControlLogix Processor • 23 ControlLogix Ladder • 15 Create a Trigger • 46 Create a Trigger Action • 48 Create the Application • 27 Create the CompactLogix Device • 35 Create the CompactLogix Interface • 34 Create the CompactLogix Tags • 37 Create the ControlLogix Controller Interface • 28 Create the Ethernet Bridge • 32 Create the Transfer List • 41, 48 D DCE • 55 Default Gateway • 55 Device • 56 Download the Sample Program to the Processor • 7, 24, 26 DTE • 56 E Learning Objectives • 7 LED • 57 M MAC ID • 57 Master • 55, 57, 58 N Network • 57 Node • 57 O Open the Sample Ladder Logic • 24, 26 P Package Contents • 10 Peer-to-Peer • 57 Physical Setup • 19 Poll • 57 Power Supply • 58 Prerequisites • 8 Procedures • 19 Project Security Level • 58 ProSoft Technology Documentation • 8 ProSoft Technology® Product Documentation • 3 Protocol • 58 R Required Items • 10 Required Steps • 11 RS-232 • 58 S ESD • 56 Ethernet • 56, 57, 58 F Firmware • 56 Frequently Asked Questions • 53 ProSoft Technology, Inc. March 31, 2009 Half-Duplex • 56 How the Sample Application Exchanges Data • 13 Sample Files • 10 Save and Start the Sample Application • 49 Scope • 7 Serial • 58 Server • 55, 57, 58 Page 61 of 62 ILX56-MM ♦ ControlLogix Platform inRAx Message Manager Index Setup Guide Set the Module's Permanent IP Address • 11, 21, 27 Setting Jumper • 19 Simplex • 58 Slave • 57, 58 Subnet Mask • 59 System Requirements • 9 T Tag • 59 Target Controller • 59 The Sample Application • 11 Transfer List • 59 Trigger • 59 V Verify Communication • 11, 50 Viewing Chassis Status in the ILX56-MM Module • 50 Viewing Data Transfer Statistics in the ILX56-MM Module • 50, 51 Viewing Resources Status in the ILX56-MM Module • 50, 51 Viewing the RSLogix 5000 Controller Tags • 50 Viewing Trigger Statistics in the ILX56-MM Module • 50, 52 W Warnings • 2 Y Your Feedback Please • 3 Page 62 of 62 ProSoft Technology, Inc. March 31, 2009