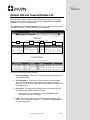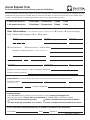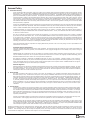
1
InfoClique Physician Manual Training and Education Services, IST Division Notes Table of Contents INTRODUCTION ...................................................................................... 4 WHAT IS INFOCLIQUE?................................................................................... 4 WHAT INFORMATION CAN BE VIEWED? ............................................................... 4 SYSTEM REQUIREMENTS ................................................................................. 5 REQUESTING A USER ID AND PASSWORD ............................................................. 5 LOGGING IN ........................................................................................... 6 LOGGING INTO INFOCLIQUE WITHIN THE KALEIDA NETWORK (INTRANET)..................... 6 Method 1 .....................................................................................................................6 Method 2 .....................................................................................................................6 LOGGING INTO INFOCLIQUE OUTSIDE OF THE KALEIDA NETWORK (INTERNET) ............... 7 INFOCLIQUE ENVIRONMENT.................................................................. 8 NAVIGATION BUTTONS ................................................................................... 9 MAIN PAGE SECTIONS .................................................................................. 11 PERFORMING SEARCHES ..................................................................... 12 RELATED PATIENT SECTION ........................................................................... 12 1) View Current (Non-discharged) Inpatients .......................................................... 12 2) View Inpatients Discharged Up To 180 Days ...................................................... 13 3) View Outpatients within the Last 7 Days .............................................................. 13 4) View Patients by Name Range .............................................................................. 14 RELATED PATIENT SECTION INCLUDING PCP ...................................................... 15 1) View Current (Non-discharged) Inpatients- PCP ................................................ 15 2) View Outpatients in the Last 7 Days..................................................................... 16 3) View ER patients in the Last 7 Days..................................................................... 16 NON-RELATED PATIENT SECTION .................................................................... 17 1) View another Doctor’s Patients by Doctor Last Name ........................................ 17 2) Search for a Patient by Name ............................................................................... 18 3) Search for a Patient by MRN or SSN.................................................................... 19 4) Search for a Patient by Account (Financial) Number .......................................... 20 VISIT LIST SECTION .................................................................................... 21 1) View a Visit List by Site ........................................................................................ 21 2) View a Visit List by Unit Location ........................................................................ 22 SURGERY SCHEDULING SECTION ..................................................................... 23 1) View Scheduled Surgeries from Today Up to 180 Days ....................................... 23 2) View Scheduled Surgeries Today Back to the Past 180 Days............................... 24 3) View Surgeries Within a Specific Date Range ...................................................... 24 4) View a Print Version of Surgeries Within a Specific Date Range ........................ 25 PRINTING INFOCLIQUE INFORMATION .............................................. 26 Printing from the File Menu ..................................................................................... 26 Printing by Right-Clicking ........................................................................................ 26 PATIENT LIST AND COVERED PATIENT LIST ....................................... 27 VIEWING CLINICAL INFORMATION ..................................................... 28 DEMOGRAPHICS .......................................................................................... 29 What is Available for Viewing? ................................................................................ 29 How Do I Access Demographics? ............................................................................ 29 Page 2 InfoClique Physician Manual Revision Date: 03/02/2010 Notes FLOW ...................................................................................................... 31 What is Available for Viewing? ................................................................................ 31 How Do I Access Flow? ........................................................................................... 31 DICTATION ................................................................................................ 32 What is Available for Viewing? ................................................................................ 32 How Do I Access Dictation?..................................................................................... 32 Enlarge the Text of a Dictated Report ...................................................................... 34 ORDERS ................................................................................................... 35 What is Available for Viewing? ................................................................................ 35 How Do I Access Orders? ........................................................................................ 35 RESULTS ................................................................................................... 37 What is Available for Viewing? ................................................................................ 37 How Do I Access Results? ........................................................................................ 37 Apply a Date Range to the Result View .................................................................... 37 Use Quick Links to Jump to a Specific Result Category ........................................... 38 View AP Diagnosis Summary Pathology Reports..................................................... 38 Access PACS from within Results ............................................................................. 39 View Tracemaster ECGs........................................................................................... 41 MEDICATIONS ............................................................................................ 42 What is Available for Viewing? ................................................................................ 42 How Do I Access Medications? ................................................................................ 42 ACCOUNT MAINTENANCE ..................................................................... 44 EDIT MY COVERAGE GROUP ........................................................................... 44 Add a Physician ........................................................................................................ 44 Remove a Physician .................................................................................................. 45 VIEW WHO HAS ACCESSED MY (ATN DR) PATIENTS............................................... 46 VIEW WHO HAS ACCESSED MY PRACTICE GROUP PATIENTS ..................................... 47 VIEW MY PRACTICE GROUP AND SUPPORT STAFF ................................................. 48 CHANGE YOUR PASSWORD ............................................................................. 49 SECURITY REQUEST FORM ................................................................... 51 InfoClique Physician Manual Page 3 Notes Introduction What is InfoClique? InfoClique, a web based application, allows medical staff (including support staff and referring physicians) of Kaleida Health to review clinical and demographic information about their patients throughout the entire Kaleida organization. This is the secure central access point to access this documentation and is provided free in support for our patient care providers. If you currently do not have access to InfoClique, or the appropriate access, see page 5 for more information. You may have access to one or more of the following views: • Physician View • Network Physician View • Physician Support Staff View What Information Can Be Viewed? Certain records and data are accessible according to the type of access granted as well as the type of relationship with the patient (admitting, attending, referring, consulting or PCP). Generally speaking, for the views listed above, the following information is available: • Demographic Information: Basic demographic information, such as name, guarantor and emergency information; as well as visit specific information. • Patient Flow History: Find out how and where the patient is within a Kaleida facility now and in the past. • Dictated Reports: Medical transcriptions such as H&Ps, operative reports, discharge summaries and consultation. • Results: Results of orders, such as radiology, cardiology, endoscopy, and general laboratory results containing procedure, units, ref, and range values over a specified time range. • Orders: All issued orders and status for both in/out-patients, such as ECG/EKG, nursing level, echo’s, labs, etc… • Medications: Medication administration list (MAL) containing scheduled, PRN, and historical drug orders. • Surgery Scheduling: Review past and future surgery schedules. • ED Scanned Documents: BGH and MFS EDs documents are now accessible. • Tracemaster ECGs: ECG strips are available to those users on the Kaleida Health Network prior to May 2009 only. Page 4 InfoClique Physician Manual Revision Date: 03/02/2010 Notes Introduction (Cont.) System Requirements Given that InfoClique is a web based application, it can be accessed through any Internet connected PC via within the Kaleida network (Intranet) or outside of the Kaleida network (Internet). Certain functionality of InfoClique may be only accessible from within the Kaleida Network. The recommended system requirements are as follows: • Internet Explorer (6.0 or higher) supported. • and Safari is preferred and or Netscape be aware If you use Firefox, , Opera InfoClique may not display appropriately and will not be supported. • Broadband Internet access. • An InfoClique user id and password. • VPN access (optional) to access the PACS or Tracemaster ECG functionality within InfoClique. (VPN access allows remote users to connect to the Kaleida Health network.) Requesting a User ID and Password Obtaining InfoClique access can be done by completing the InfoClique Access Request Form and faxing it to the Kaleida Health IS&T Security Service Dept at 859-8676. A request for access will not be granted if the request is not job related or conflicts with Kaleida Health’s Access Request Security Policy. • For your convenience this form has been provided to you on the last page of this manual. • The form can be found directly at www.infoclique.com. There is a link named InfoClique Access Form which will display the form. • If VPN Access is needed in order to access the PACS & Tracemaster ECG functionality make sure to check this option on the access form. InfoClique Physician Manual Page 5 Notes Logging In Logging into InfoClique within the Kaleida Network (Intranet) InfoClique can be accessed directly from within the Kaleida network two different ways: Method 1 icon on your desktop. 1. Double-click the Internet Explorer • KaleidaScope displays as the home page. 2. Click the Log In tab. 3. Type your user name in the User Name field. 4. Type your password in the Password field. 5. Click the Log In button. 6. Click the Applications • tab. The appropriate InfoClique link displays in the Secured Applications section of the page. 7. Click the link to get started. • The InfoClique Main page displays (this is not be confused with the InfoClique Home page) and you are logged in to InfoClique. Method 2 1. Double-click the Internet Explorer • icon on your desktop. KaleidaScope displays as the home page. 2. Type “ic” in the Address Bar at the top of the KaleidaScope home page. • “ic” is a shortcut for the full InfoClique web address, www.infoclique.com • The InfoClique portal web page displays. 3. Type your user name in the Username field. 4. Type your password in the Password field. 5. Click the Go button. Page 6 InfoClique Physician Manual Revision Date: 03/02/2010 Notes Logging In (Cont.) Logging into InfoClique outside of the Kaleida Network (Internet) 1. Double-click the web-browser icon on your computer. • Your home web page displays. 2. Type www.infoclique.com in the address bar at the top of your Web browser. 3. Click the appropriate button (i.e. Go) or press the Enter key on your keyboard to go to the website. 4. After reading the HIPAA Security notice click the Accept button. • If this is your first time signing in, you will be prompted to change your password. (For more information see page 49 on changing passwords.) • The InfoClique Home page is displayed (not to be confused with the InfoClique Main page). Available Applications pane provides access to the versions of InfoClique you have been granted. InfoClique Supportive Links pane provides access to additional functions and features that may be useful. 5. Click the appropriate InfoClique link in the Available Applications pane. • The duration of this manual will be referring to InfoClique – Physician link and all of its functionality. InfoClique Physician Manual Page 7 Notes InfoClique Environment • The InfoClique Main page displays (this is not be confused with the InfoClique Home page). The Main Page Navigation buttons allows views to additional functions and features that may be useful. This returns to the Home page as shown previously. Depending on how InfoClique is accessed you will either go directly to the Main page (The 2nd image on the previous page shown.) or you will be taken to the Home page (The 1st image on the previous page shown.). The Main page is like the “home base” of InfoClique. It is here you can search for patients, schedules, visits and view or modify your account. Page 8 InfoClique Physician Manual Revision Date: 03/02/2010 Notes InfoClique Environment (Cont.) Navigation Buttons The top of the Main page contains a row of navigation buttons. The purple and green shaded buttons on the left are always accessible while the grey shaded (inactive) button on the right are only accessible from within viewing a patient’s clinical information. • The Home • button returns to the Main page. (This would be used if The Main viewing a patient or a report and needing to navigate back to the “home base”.) • The Contacts button opens the Contact page in which you can search for a Kaleida Health aligned physician by name, location, department or specialty. • The News button opens the News page in which you have access to latest information and events that are happening at Kaleida Health. It also provides physicians updates on new and revised policies. • button opens the CPI (Clinical Practice Improvement The CPI Initiative) page which explains the initiative and provides useful links of resources and information concerning the CPI. • The Resources button opens the Resources page which provides access to such things as the PACS system, MedCalc3000, HUB Net Library, and Micromedex among other invaluable tools. • The Forms button opens the Forms page which displays links for all of the clinical/medical forms used at Kaleida Health. It also provides access to the Health Care Proxy form as well as the InfoClique Access form. • The Patients button will return to the Patient List when you are currently inside a specific patient’s clinical information. For more information on the Patient List see page 27. button returns to the Home page. InfoClique Physician Manual Page 9 Notes InfoClique Environment (Cont.) Page 10 • The Demo button will navigate you to the EMPI Demographic Information for a patient. This button only works if you inside another area of patient’s specific clinical information. For more information on the EMPI Demographic information see page 29. • button will navigate you to the Patient History The Flow (Flow) for a patient. This button only works if are inside another area of a patient’s specific clinical information. For more information on Patient History see page 31. • button will navigate you to the Dictated The Dictation Reports for a patient. This button only works if you are inside another area of a patient’s specific clinical information. For more information on Dictated Reports see page 32. • button will navigate you to the Order Display for The Orders a patient. This button only works if you are inside another area of a patient’s specific clinical information. For more information on Orders Display see page 35. • button will navigate you to the Results Display The Results for a patient. This button only works if you are inside another area of a patient’s specific clinical information. For more information on Results Display see page 37. • button will navigate you to the Medication Display The Meds for a patient. This button only works if you are inside another area of a patient’s specific clinical information. For more information Results Display see page 42. • The Exit InfoClique. • button displays the help window where you can The Help access frequent error messages that occur and determine the issue you are facing as well as help with printing from within InfoClique. button will completely log you out and exit you out of InfoClique Physician Manual Revision Date: 03/02/2010 Notes InfoClique Environment (Cont.) Main Page Sections On the Main page, there are several sections available to assist with performing patient searches and managing your personal InfoClique account. Each one of these sections is listed below. All sections are centrally located on the Main page, and can be found by simply scrolling up and down. • Related Patient Section: This allows you to generate a list of patients as long as you are their attending, admitting, referring or consulting physician. • • Related Patient Section – including PCP: This allows you to perform the same type of searches as noted above, with the addition of the PCP’s patients displaying in the list also. • • To learn more about this section, see page 21. Surgery Scheduling Section: This section is utilized to view the provider’s surgery schedules. A date range can be applied to the search for up to 180 days in the past, present or future. • • To learn more about this section, see page 17. Visit List Section: This section is utilized to provide a list of rounds for one or more providers. It can be further defined by facility and/or Unit Location. • • To learn more about this section, see page 15. Non-Related Patient Section: This allows you to generate a list of patients who do not have a defined relationship with you and this only works with Inpatient encounters. • • To learn more about this section, see page 12. To learn more about this section, see page 23. Account Maintenance Section: Several features are available in this section to help you manage your account. • To learn more about this section, see page 44. InfoClique Physician Manual Page 11 Notes Performing Searches Related Patient Section This section generates a list of patients you wish to inquire upon, only pulling patients that have you assigned as the Consulting, ATN, ADM or REF physician. Further filters can be also be defined by discharge days past, outpatient days past, current inpatients and by name. There are four ways to search and each way is explained below. 1) View Current (Non-discharged) Inpatients 1. Select the appropriate provider from the drop-down list. 2. Click the Get List button. • The Patient List and Covered Patients list displays, unless you are prompted with the No Patient Qualifies message. 3. Click the appropriate link in the correct listing to view information. • For more information on viewing the Patient List and the available links for each patient, see page 27. 4. To perform a new search, click the Main wish to exit, click the Exit Page 12 tab. Otherwise, if you tab. InfoClique Physician Manual Revision Date: 03/02/2010 Notes Performing Searches (Cont.) 2) View Inpatients Discharged Up To 180 Days 1. Select the appropriate provider from the drop-down list. 2. Select the appropriate amount of days from the drop-down list. 3. Click the Get List button. • The Patient List and Covered Patients list displays, unless you are prompted with the No Patient Qualifies message. 4. Click the appropriate link in the correct listing to view information. • For more information on viewing the Patient List and the available links for each patient, see page 27. 5. To perform a new search, click the Main wish to exit, click the Exit tab. Otherwise, if you tab. 3) View Outpatients within the Last 7 Days 1. Select the appropriate provider from the drop-down list. 2. Select the appropriate amount of days from the drop-down list. 3. Click the Get List button. • The Patient List and Covered Patients list displays, unless you are prompted with the No Patient Qualifies message. 4. Click the appropriate link in the correct listing to view information. • For more information on viewing the Patient List and the available links for each patient, see page 27. 5. To perform a new search, click the Main wish to exit, click the Exit tab. Otherwise, if you tab. InfoClique Physician Manual Page 13 Notes Performing Searches (Cont.) 4) View Patients by Name Range 1. Select the appropriate provider from the drop-down list. 2. Type in one or more letters in the first criteria box to indicate the beginning range of the last name. • Example: “D” or “Sma” or “Jackson” • Common names will yield more results and may take longer to run. 3. Type in one or more letters in the second criteria box to indicate the ending range of the last name. • Example: “F” or “Smo” or “Jackson” • Common names will yield more results and may take longer to run. 4. Click the Get List button. • The Patient List and Covered Patients list displays, unless you are prompted with the No Patient Qualifies message. • Example: Using the example ranges above, a result for the D to F range will be last names that start with D, E or F. Another example was the range of “Sma” to “Smo”. This will produce patients with last names such as: “Smathers”, “Smith”, and “Smonder”. The last example range of “Smith” to “Smith” will produce patients whose last name is strictly “Smith”. 5. Click the appropriate link in the correct listing to view information. • For more information on viewing the Patient List and the available links for each patient, see page 27. 6. To perform a new search, click the Main wish to exit, click the Exit Page 14 tab. Otherwise, if you tab. InfoClique Physician Manual Revision Date: 03/02/2010 Notes Performing Searches (Cont.) Related Patient Section Including PCP This section generates a list of patients you wish to inquire upon, only pulling patients that have you assigned as the Consulting, ATN, ADM or REF and PCP physician. There are three ways to search in this section and each method is explained below. 1) View Current (Non-discharged) Inpatients- PCP 1. Select the appropriate provider from the drop-down list. 2. If you wish to include Long Term Care patients, click the Include Long Term Care radio button. 3. Click the Get List button. • The Patient List and Covered Patients list displays, unless you are prompted with the No Patient Qualifies message. 4. Click the appropriate link in the correct listing to view information. • For more information on viewing the Patient List and the available links for each patient, see page 27. 5. To perform a new search, click the Main wish to exit, click the Exit tab. Otherwise, if you tab. InfoClique Physician Manual Page 15 Notes Performing Searches (Cont.) 2) View Outpatients in the Last 7 Days 1. Select the appropriate provider from the drop-down list. 2. Select the appropriate amount of days from the drop-down list. 3. Click the Get List button. • The Patient List and Covered Patients list displays, unless you are prompted with the No Patient Qualifies message. 4. Click the appropriate link in the correct listing to view information. • For more information on viewing the Patient List and the available links for each patient, see page 27. 5. To perform a new search, click the Main wish to exit, click the Exit tab. Otherwise, if you tab. 3) View ER patients in the Last 7 Days 1. Select the appropriate provider from the drop-down list. 2. Select the appropriate amount of days from the drop-down list. 3. Click the Get List button. • The Patient List and Covered Patients list displays, unless you are prompted with the No Patient Qualifies message. 4. Click the appropriate link in the correct listing to view information. • For more information on viewing the Patient List and the available links for each patient, see page 27. 5. To perform a new search, click the Main wish to exit, click the Exit Page 16 tab. Otherwise, if you tab. InfoClique Physician Manual Revision Date: 03/02/2010 Notes Performing Searches (Cont.) Non-Related Patient Section This section generates a list of patients you wish to inquire upon, that you, as the provider or support staff, are not related to. There are four ways to search in this section and each method is explained below. 1) View another Doctor’s Patients by Doctor Last Name 1. Click the appropriate link of the alpha group. • Example: To locate Dr. Klein’s patients click the G-R link. • A list of physicians within that alpha group is displayed. 2. Locate and click to select the appropriate physician. 3. Click the View button to view the list of patients. • The Patient List and Covered Patients list displays, unless you are prompted with the No Patient Qualifies message. InfoClique Physician Manual Page 17 Notes Performing Searches (Cont.) 4. Click the appropriate link in the correct listing to view information. • For more information on viewing the Patient List and the available links for each patient, see page 27. 5. To perform a new search, click the Main wish to exit, click the Exit tab. Otherwise, if you tab. 2) Search for a Patient by Name 1. Type the patient’s last name in the Last Name field if the correct spelling is known. Otherwise, type the known part of the last name followed by an asterisk (*). • Example: In order to find a patient whose last name is Koester, type the correct spelling of “Koester”. If you are unsure of the spelling, type as much as you do know, such as “Ko*”. This will yield patients whose last names starts with “Ko” so that you can select the correct patient from the list. 2. Type the patient’s first name in the First Name field if the correct spelling is known. Otherwise, type the known part of the first name followed by an asterisk (*). • Example: To find a patient whose first name is Jeffrey, type “Jeffrey”. If you are unsure of the spelling or if their name may be shortened (Jeff), type as much as you do know, such as “Jeff*”. This will yield patients whose last names starts with “Jeff” so that you can select the correct patient from the list. 3. Click the Search button. • The Patient List and Covered Patients list displays, unless you are prompted with the No Patient Qualifies message. 4. Click the appropriate link in the correct listing to view information. • For more information on viewing the Patient List and the available links for each patient, see page 27. 5. To perform a new search, click the Main wish to exit, click the Exit Page 18 tab. Otherwise, if you tab. InfoClique Physician Manual Revision Date: 03/02/2010 Notes Performing Searches (Cont.) 3) Search for a Patient by MRN or SSN 1. Click to select either the Medical Record Number radio button or the Social Security Number radio button. • Social Security Number’s cannot include dashes. • Medical Record Number’s cannot include leading zeroes (example: 000123456). 2. If desired, click the drop-downs to select the beginning and ending date range for encounters or select the All Encounters radio button. • When choosing these dates, be sure either radio button above is selected. It is not possible to just search by Encounter dates alone in this area. • The default displays the last 30 days Encounters. 3. Click the Search button. • A listing of matching patients displays. Encounter links are located in the last column. 4. Click the Encounter link for the appropriate patient to access the Patient List. • The Patient List and Covered Patients list displays, unless you are prompted with the No Patient Qualifies message. 6. Click the appropriate link in the correct listing to view information. • For more information on viewing the Patient List and the available links for each patient, see page 27. 7. To perform a new search, click the Main wish to exit, click the Exit tab. Otherwise, if you tab. InfoClique Physician Manual Page 19 Notes Performing Searches (Cont.) 4) Search for a Patient by Account (Financial) Number 1. Click the Account (Financial) Number radio button. 2. Type the Account (Financial) Number in the criteria field. • Account Number’s cannot include leading zeroes (example: 000123456). 3. Click the Search button. • A listing of matching patients displays. Encounter links are located in the last column. 4. Click the Encounter link for the appropriate patient to access the Patient List. • The Patient List and Covered Patients list displays, unless you are prompted with the No Patient Qualifies message. 5. Click the appropriate link in the correct listing to view information. • For more information on viewing the Patient List and the available links for each patient, see page 27. 6. To perform a new search, click the Main wish to exit, click the Exit Page 20 tab. Otherwise, if you tab. InfoClique Physician Manual Revision Date: 03/02/2010 Notes Performing Searches (Cont.) Visit List Section The Visit List is used to produce a list of rounds for providers. There are a few ways to do this. Each method is explained below. 1) View a Visit List by Site 1. Select the appropriate provider from the drop-down list. 2. Click to check next to the appropriate Kaleida Health hospitals. • For all hospitals, do make any selections. 3. Click the Get List button. • The Visit List and Covered Patients Visit List displays, unless you are prompted with the No Patient Qualifies message. 4. To perform a new search, click the Main wish to exit, click the Exit tab. Otherwise, if you tab. InfoClique Physician Manual Page 21 Notes Performing Searches (Cont.) 2) View a Visit List by Unit Location 1. Click the Search button. • The Unit Search displays. 2. Select the site from the first column, Select Unit to View. 3. Click the Last Name, Bed or LOS button based on how you wish to view the list. • The Patient List displays, unless you are prompted with the No Patient Qualifies message. 4. Underneath the correct patient’s name, click the appropriate links to view information. • For more information on viewing the Patient List and the available links for each patient, see page 27. 5. To perform a new search, click the Main wish to exit, click the Exit Page 22 tab. Otherwise, if you tab. InfoClique Physician Manual Revision Date: 03/02/2010 Notes Performing Searches (Cont.) Surgery Scheduling Section This section generates a surgery schedule based on the parameters of your inquiry. The inquiry can provide surgery schedules in the past, present or future for a maximum of 180 days. There are four ways to search in this section and each method is explained below. 1) View Scheduled Surgeries from Today Up to 180 Days 1. Select the appropriate provider from the drop-down list. 2. Select the appropriate amount of days from the drop-down list. 3. Click the Get List button. • The Surgery Schedule displays. 4. To view clinical information for the patient, click either the Medical Record Number or the Account Number. • For more information on viewing the available links for each patient, see page 27. 5. To perform a new search, click the Main wish to exit, click the Exit tab. Otherwise, if you tab. InfoClique Physician Manual Page 23 Notes Performing Searches (Cont.) 2) View Scheduled Surgeries Today Back to the Past 180 Days 1. Select the appropriate provider from the drop-down list. 2. Select the appropriate amount of days from the drop-down list. 3. Click the Get List button. • The Surgery Schedule displays. 4. To view clinical information for the patient, click either the Medical Record Number or the Account Number. • For more information on viewing the available links for each patient, see page 27. 5. To perform a new search, click the Main wish to exit, click the Exit tab. Otherwise, if you tab. 3) View Surgeries Within a Specific Date Range 1. Select the appropriate provider from the drop-down list. 2. Use the drop-downs to select the beginning and ending date range for the Surgery cases you wish to view. 3. Click the Get List button. • The Surgery Schedule displays. 4. To view clinical information for the patient, click either the Medical Record Number or the Account Number. • For more information on viewing the available links for each patient, see page 27. 5. To perform a new search, click the Main wish to exit, click the Exit Page 24 tab. Otherwise, if you tab. InfoClique Physician Manual Revision Date: 03/02/2010 Notes Performing Searches (Cont.) 4) View a Print Version of Surgeries Within a Specific Date Range 1. Select the appropriate provider from the drop-down list. 2. Use the drop-downs to select the beginning and ending date range for the Surgery cases you wish to view. 3. Click the Get List button. • The Surgery Schedule displays. 4. To view clinical information for the patient, click either the Medical Record Number or the Account Number. • For more information on viewing the available links for each patient, see page 27. 5. To perform a new search, click the Main wish to exit, click the Exit tab. Otherwise, if you tab. InfoClique Physician Manual Page 25 Notes Printing InfoClique Information Any information within InfoClique is printable. There are two methods for printing documentation. This will illustrate how to print using Internet Explorer as your Web browser. If you have a different browser, utilize the help menu provided by your Web browser instead. Printing from the File Menu 1. Click anywhere on the screen where the information is displayed that you wish to print. • The purpose of this step is to ensure the informational area of the webpage properly prints. Click File then Print from the Menu bar to print. 2. From the Menu bar at the top of Internet Explorer, click the File menu. 3. Click Print from the expanded File menu. • The Printer Dialog box displays. 4. Make sure all settings are appropriate. • For example: The correct printer is selected, portrait or landscape settings, or all frames as laid on screen etc. 5. Click the Print button. • The information displayed on your screen prints. Printing by Right-Clicking 1. Display whatever information that should be printed, on your screen. 2. Right-click anywhere on the screen to display the shortcut menu. 3. Click Print from the shortcut menu. 4. Follow steps 4 and 5 above. Page 26 InfoClique Physician Manual Revision Date: 03/02/2010 Notes Patient List and Covered Patient List After performing searches, different lists will display the results of your inquiry. Encounter lists, Visit lists, and most commonly, the Patient List and Covered Patient List. This list is explained below. The Patient List and Covered Patients List is in a columnar format with readily available information. It will look similar to the image below: 1 2 3 4 There are four different sections available: 1. Patient Information: These first 3 columns display the patients name, sex and date of birth. 2. Visit Information: These next 3 columns display information about which site the patient is/was at and what Unit he/she they were/are staying in. It also contains Admit and Discharge dates and times as well as the type of visit. 3. Physicians: This single column displays some of the physicians who are related to that specific patient’s encounter. • All physicians can be displayed by clicking the Demo link and scrolling to the bottom of the page. 4. Links: This is where you can view clinical information related to the patient and to this specific encounter. This explained in detail beginning on the following page. InfoClique Physician Manual Page 27 Notes Viewing Clinical Information After searching and displaying the Patient List, you will notice there are several links and corresponding tabs available to assist with viewing Clinical Information. (These tabs are briefly explained on page 10.) This section will go through each of these clinical areas and explain them in depth. In order to access these clinical areas, it is important to understand how the links and tabs work. Tabs Links The tabs (as shown above) are not enabled while viewing a list of Patients or viewing a list of Encounters. The only time these tabs are enabled is once you are already viewing clinical information for the patient. See the examples below for clarification. You Can: If you are currently viewing Dictation, and would like to view Results, then you can click the Results tab to view Results for the patient. You Can’t: If you are inside the patient list (as shown above) and wish to go to Results, you can’t click the tab. Instead you will need to click the Results link for the patient. Page 28 InfoClique Physician Manual Revision Date: 03/02/2010 Notes Viewing Clinical Information (Cont.) Demographics What is Available for Viewing? • Name and Address Data: This area contains information such as Home Phone Number, among other general information about the patient. • Visit Data: This area contains information such as Chief Complaint and Facility, among other information related to the patient’s visit. • Emergency Contact Data: This area contains the Relationship and Home Phone of the emergency contact for the patient. • Guarantor Data: This area contains information such as Home Phone Number and Name, among other general information about the guarantor. • Insurance Data: This area contains information such as Primary Insurance and Secondary Insurance, among other specific information needed for appropriate claim billing purposes. • Physician Data: This area lists all providers related to the patient. • Allergy Data: This area contains documented allergy information of the patient. How Do I Access Demographics? 1. Before beginning, make sure the appropriate patient is displayed in the Patient List on the screen. • If you need assistance with this, review the Performing Searches chapter, beginning on page 12. • tab instead, if you are already inside the Click the Demo patient’s record, in another location. 2. Click the Demo link in the patient’s row on the list. InfoClique Physician Manual Page 29 Notes Viewing Clinical Information (Cont.) • The EMPI Demographic Information is displayed. 3. Review the information as necessary by using the scroll bar on the right. 4. Optional: To view another area, click the desired tab at the top of the InfoClique window. 5. Optional: To perform a new search, click the Main if you wish to exit, click the Exit tab. Page 30 InfoClique Physician Manual tab. Otherwise, Revision Date: 03/02/2010 Notes Viewing Clinical Information (Cont.) Flow What is Available for Viewing? Patient Flow information is in a table format, with the most recent visit information in the top row, moving backwards to the bottom row which contains the most historical visit information. Overall, it describes the patient’s physical movement within Kaleida, including admission, transfer and discharge information. The columns are further explained: • Transaction Date/Time: This area contains the date and time stamp of when this documentation took place. • Time: This area contains the total length of stay for the patient and will also display “Discharged” if they have been discharged • Location: This area contains the name of the hospital and unit the patient was at and the time of arrival. • PT Type: This area displays what type of visit the patient was. (Example: Inpatient, Outpatient, PreAdmit, Emergency etc….) How Do I Access Flow? 1. Before beginning, make sure the appropriate patient is displayed in the Patient List on the screen. • If you need assistance with this, review the Performing Searches chapter, beginning on page 12. • tab instead, if you are already inside the Click the Flow patient’s record, in another location. 2. Click the Flow link in the patient’s row on the list. • The Patient History (Flow) is displayed. 3. Review the information as necessary by using the scroll bar on the right. 4. Optional: To view another area, click the desired tab at the top of the InfoClique window. 5. Optional: To perform a new search, click the Main tab. if you wish to exit, click the Exit InfoClique Physician Manual tab. Otherwise, Page 31 Notes Viewing Clinical Information (Cont.) Dictation What is Available for Viewing? Dictated Reports are available from the Cerner system as well as the archived dictation database. If you need access to a dictated report that is not available within InfoClique follow your normal departmental procedures for accessing those reports (phone call, etc.) When viewing Dictated Reports within Info Clique, remember these reports should be considered unverified. Dictation reports are stored in a table format with a description of the report, the facility it derived from and the transaction date the report was processed. How Do I Access Dictation? 1. Before beginning, make sure the appropriate patient is displayed in the Patient List on the screen. • If you need assistance with this, review the Performing Searches chapter, beginning on page 12. • tab instead, if you are already inside the Click the Dictation patient’s record, in another location. 2. Click the Dictation link in the patient’s row on the list. • The Dictated Reports table is displayed. 3. In the Report Desc.column, click the name of the dictated report you wish to preview. Page 32 InfoClique Physician Manual Revision Date: 03/02/2010 Notes Viewing Clinical Information (Cont.) • The dictated report displays. (Below is an example of a Discharge Summary.) 4. Review the information as necessary by using the scroll bar on the right. 5. Optional: To view another area, click the desired tab at the top of the InfoClique window. 6. Optional: To perform a new search, click the Main tab. if you wish to exit, click the Exit InfoClique Physician Manual tab. Otherwise, Page 33 Notes Viewing Clinical Information (Cont.) Enlarge the Text of a Dictated Report This will illustrate how to enlarge the text of a dictated report using Internet Explorer as your Web browser. If you have a different browser, utilize the help menu provided by your Web browser instead. 1. Display the Dictated Report on your screen. 2. From the Menu bar at the top of Internet Explorer, click the View menu. 3. Click Text size from the expanded View menu. • A submenu with various text size choices is displayed. 4. Click the desired text size. • The text size of the dictated report has been resized according to your selection. 5. Optional: If you wish to print the report see page 26 Page 34 InfoClique Physician Manual Revision Date: 03/02/2010 Notes Viewing Clinical Information (Cont.) Orders What is Available for Viewing? • Order #: This is the unique identification number of the order that was placed. Clicking on the order number with a Completed status will display the results of the order. • Department: This area contains the name of the department that placed the order. • Order Status: This is the current status of the order, which can be in an Ordered or Completed status. • Order Detail: This contains all of the required information that was placed on the order. (Example: Priority or Routine, Duration, Modifiers etc…) How Do I Access Orders? 1. Before beginning, make sure the appropriate patient is displayed in the Patient List on the screen. • If you need assistance with this, review the Performing Searches chapter, beginning on page 12. • Click the Orders tab instead, if you are already inside the patient’s record, in another location. 2. Click the Orders link in the patient’s row on the list. • The Orders table is displayed. InfoClique Physician Manual Page 35 Notes Viewing Clinical Information (Cont.) 3. Review the information as necessary by using the scroll bar on the right. 4. If the order is in a Completed status, click the Order # link to view the results of the order • Below is an example of the results for a CBC and Urine Culture order. Clicking the name of the result may display a graph. See the image below. Graphs always contain the last 100 results. 5. Optional: If the Result contains a graphing link, it can be clicked to display a graphical result instead of a text result. 6. Optional: To view another area, click the desired tab at the top of the InfoClique window. 7. Optional: To perform a new search, click the Main if you wish to exit, click the Exit tab. Page 36 InfoClique Physician Manual tab. Otherwise, Revision Date: 03/02/2010 Notes Viewing Clinical Information (Cont.) Results What is Available for Viewing? A complete listing of results is available for the patient. These results are displayed in a columnar format with each documented event in its own date/time column. It is possible to date range to customize which dates and times are displayed for results. The default is to display results which have occurred in the past 6 days. The types of results that are displayed vary depending on the patient How Do I Access Results? 1. Before beginning, make sure the appropriate patient is displayed in the Patient List on the screen. • If you need assistance with this, review the Performing Searches chapter, beginning on page 12. • Click the Results tab instead, if you are already inside the patient’s record, in another location. 2. Click the Results link in the patient’s row on the list. • The Results table is displayed. 3. Review the information as necessary by using the scroll bar on the right. Apply a Date Range to the Result View icon next to the first criteria box in the Date 1. Click the calendar Search area at the top of the table. 2. Select the appropriate date. 3. Repeat steps 1 and 2 for the second criteria box. 4. Click the Results for Dates button. • The new results display based upon the date range selected. InfoClique Physician Manual Page 37 Notes Viewing Clinical Information (Cont.) Use Quick Links to Jump to a Specific Result Category 1. Click the drop-down in the Quick Links area at the top of the table. 2. Select the desired result category that is available. • This list is dynamic and displays the categories unique to this patient’s specific results. • The Results table now displays the category that was selected on the screen. 3. Scroll up the page to see all the results once more. View AP Diagnosis Summary Pathology Reports 1. Verify AP Diagnosis Summary is selected in the drop-down located in the Other Queries area at the top of the table. 2. Click the Run Query button. • Page 38 The AP Pathology Summary report displays, keep in mind this does not reflect the full report. Return to Results to view the full Pathology report. InfoClique Physician Manual Revision Date: 03/02/2010 Notes Viewing Clinical Information (Cont.) 3. Optional: To view another area, click the desired tab at the top of the InfoClique window. 4. Optional: To perform a new search, click the Main tab. if you wish to exit, click the Exit tab. Otherwise, Access PACS from within Results PACS is available to view radiology images, with the exception of mammography. This manual does not provide training related to PACS. • PACS requires an assigned user ID and password to be granted. See page 5 for information on requesting a sign on and password. 1. Before beginning, make sure the appropriate patient is displayed in the Patient List on the screen. • If you need assistance with this, review the Performing Searches chapter, beginning on page 12. • Click the Results tab instead, if you are already inside the patient’s record, in another location. 2. Click the Results link in the patient’s row on the list. • The Results table is displayed. 3. Click the drop-down in the Other Queries section. 4. Click to select PACS. 5. Click the Run Query button. InfoClique Physician Manual Page 39 Notes Viewing Clinical Information (Cont.) • A Welcome to PACS message displays. Click this link to access the PACS portal. 6. In this message, locate the hyperlink (shown circled in the image above) and click it. 7. The PACS portal displays. 8. Follow your standard procedures to log in and get started or to close the application when you are finished. Page 40 InfoClique Physician Manual Revision Date: 03/02/2010 Notes Viewing Clinical Information (Cont.) View Tracemaster ECGs It is important to note that Tracemaster ECG’s are for historical viewing only within the Kaleida Health network. You can view Tracemaster ECG’s that occurred prior to May 2009 only. If you need access to view PowerChart ECG’s, see page 5 for information. 1. Before beginning, make sure the appropriate patient is displayed in the Patient List on the screen. • If you need assistance with this, review the Performing Searches chapter, beginning on page 12. • Click the Results tab instead, if you are already inside the patient’s record, in another location. 2. Click the Results link in the patient’s row on the list. • The Results table is displayed. 3. Click the drop-down in the Other Queries section. 4. Click to select Tracemaster ECGs. 5. Click the Run Query button. • The Active Tracemaster Reports table displays. 6. Click the Report Date link in the first column to display the Tracemaster ECG report. • The report displays. 7. Optional: To view another area, click the desired tab at the top of the InfoClique window. 8. Optional: To perform a new search, click the Main tab. if you wish to exit, click the Exit InfoClique Physician Manual tab. Otherwise, Page 41 Notes Viewing Clinical Information (Cont.) Medications What is Available for Viewing? A complete listing of medications is available for the patient. This includes Kaleida Ordered Medications as well as Home Medications. There is also a drop-down available to quickly locate Kaleida Ordered and Home Medications. (If there are no home medications recorded, the drop-down is not visible.) All information is viewed in a table format. The columns are explained below. • Date/Time: In regards to Kaleida Ordered Medications, this is the date and time of the order. In regards to Home Medications, this is the date and time the information became known to Kaleida Health and documented. • Details: This is a clickable link which displays for both Kaleida Ordered and Home Medications respectively. This contains the details of the medication. These include things such as Dose, Route, and Frequency. It also contains the ingredients of the medication. • Order: For both Kaleida Ordered and Home Medications, this is the name of the medication. • Order Status: In regards to Kaleida Ordered Medications, this states whether the medication has been Ordered or Discontinued. In regards to Home Medications, this states that the medication has been Documented in the patients EMR. • Order Detail: This contains the same information found by clicking the Details link in the Details column. How Do I Access Medications? 1. Before beginning, make sure the appropriate patient is displayed in the Patient List on the screen. Page 42 • If you need assistance with this, review the Performing Searches chapter, beginning on page 12. • tab instead, if you are already inside the Click the Meds patient’s record, in another location. InfoClique Physician Manual Revision Date: 03/02/2010 Notes Viewing Clinical Information (Cont.) 2. Click the Meds link in the patient’s row on the list. • The Kaleida Ordered Medications table and the Home Medications table displays. Ordered Medications Home Medications 3. Review the information as necessary by using the scroll bar on the right. • Details can be viewed by either reading the last column, or clicking the Details link in the Details column. 4. Optional: To view another area, click the desired tab at the top of the InfoClique window. 5. Optional: To perform a new search, click the Main tab. if you wish to exit, click the Exit InfoClique Physician Manual tab. Otherwise, Page 43 Notes Account Maintenance The Account Maintenance provides several methods to help maintain your Info Clique Account. The section is located at the bottom of the Main page. This chapter provides you with instructions how to use each of the available features. Edit My Coverage Group In the event that you are covering for another physician, you have the capability to add another physician’s patients to your Covered Patients list. This is done by adding the physician to the Physicians in Coverage Group. Add a Physician 1. Before beginning, make sure you have signed into Info Clique and are on the Main page. • If you need assistance with this, see page 6. 2. Scroll to the bottom of the Main page and locate the Account Maintenance Section. 3. Click the first link, Edit My Coverage Group. • Edit Coverage Group displays 4. Click the appropriate add button based on the physicians last name that you wish to add. Page 44 InfoClique Physician Manual Revision Date: 03/02/2010 Notes Account Maintenance (Cont.) • For example, to add Dr. White, click the Add Dr. S-Z button. 5. The Physician List displays a listing of physicians whose last name fall within the button group that was selected. 6. Click to select the appropriate physician. 7. Click the Add button. • A message displays stating the Doctor was added to the coverage group. 8. Click the Quit button. • The physician now displays in the Physician Coverage Group setting. Remove a Physician 1. Follow steps 1-3 of the previous exercise (Adding a Physician). • The physician is displayed in the Physicians in Coverage Group section. In order to remove a physician from your Coverage Group, simply click their name in the list and the physician will automatically be removed. 2. To remove the Physician from the coverage group click the Physicians name in the Physicians in Coverage Group. InfoClique Physician Manual Page 45 Notes Account Maintenance (Cont.) View who has Accessed my (Atn Dr) Patients This link will display a list of individuals who are viewing the Attending Physicians patients. You can authorize individual records or you can authorize all records to be viewed by making the appropriate selections. 1. Before beginning, make sure you have signed into Info Clique and are on the Main page. • If you need assistance with this, see page 6. 2. Scroll to the bottom of the Main page and locate the Account Maintenance Section. 3. Click the second link, View who has accessed my (Atn Dr) patients. • A listing of individuals displays. • These users are organized by color category. 4. Optional: To authorize the users to view the records click the checkbox in the corresponding row of the user. To authorize all users, click the button at the end of the list. Page 46 InfoClique Physician Manual Revision Date: 03/02/2010 Notes Account Maintenance (Cont.) View who has Accessed my Practice Group Patients This link will display a list of individuals who are viewing the Practice Group patients. You can authorize individual records or you can authorize all records to be viewed by making the appropriate selections. 1. Before beginning, make sure you have signed into InfoClique and are on the Main page. • If you need assistance with this, see page 6. 2. Scroll to the bottom of the Main page and locate the Account Maintenance Section. 3. Click the third link, View who has accessed my Practice Group patients. • A listing of individuals displays. • These users are organized by color category. 4. Optional: To authorize the users to view the records click the checkbox in the corresponding row of the user. To authorize all users, click the button at the end of the list. InfoClique Physician Manual Page 47 Notes Account Maintenance (Cont.) View My Practice Group and Support Staff This link will display a list of individuals who are a member of your practice group. You can authorize individual records or you can authorize all records to be viewed by making the appropriate selections. 1. Before beginning, make sure you have signed into InfoClique and are on the Main page. • If you need assistance with this, see page 6. 2. Scroll to the bottom of the Main page and locate the Account Maintenance Section. 3. Click the fourth link, View who has accessed my Practice Group patients. • A listing of individuals displays. • These users are organized by color category. 4. Optional: To add or remove members of your group submit an email request to [email protected] containing the individuals that you need to add or remove. Page 48 InfoClique Physician Manual Revision Date: 03/02/2010 Notes Account Maintenance (Cont.) Change Your Password This is the area you will need to go in the event you need to change your password. Password Policy: Passwords are case-sensitive, can range from 7 to 128 characters and MUST contain at least 3 of the 4 following categories: • Uppercase letters (A to Z) • Lowercase letters (a to z) • Numbers (0 to 9) • Non-alphanumeric ("special") characters (!@#&$, etc.) 1. Before beginning, make sure you have signed into InfoClique and are on the Main page. • If you need assistance with this, see page 6. 2. Scroll to the bottom of the Main page and locate the Account Maintenance Section. 3. Click the fifth link, Change Password. InfoClique Physician Manual Page 49 Notes Account Maintenance (Cont.) • The InfoClique Change Password screen displays. 4. Type your old password in the Old Password field. 5. Press the Tab key on your keyboard. 6. Type your new password in the New Password field. 7. Retype your new password in the New Password Verification field. 8. Click the Submit button. 9. Your password has been successfully changed. • Page 50 If you are internal to Kaleida Health, you also have the capability of changing your password globally by using KPass (not shown in this manual.) InfoClique Physician Manual Revision Date: 03/02/2010 Notes Security Request Form The Security Request Form is available on the following page as a convenience to you. Fill out the form and fax it to IS&T Security Service at 859-8676. InfoClique Physician Manual Page 51 Access Request Form For those without access to the eAccess system on KaleidaScope The Access Request Security Policy portion of this form must be read, understood and signed by the requestor. Fax the completed and signed form to the IS&T Security Service at 859-8676. A request for access will not be granted if the request is not job related or conflicts with Kaleida Health’s Access Request Security Policy. InfoClique PowerChart PACS VPN InfoClique PowerChart PACS VPN I would like access to: I will need training for: User Information Staff (To be completed by person requiring access) Kaleida Health Employee? Physician Physician Support Yes No Name: Last Name First Name Middle Initial Last 3 Digits of SS # Day Time Phone Number Extension Sole Practitioner Practice Group - Practice Name: Members of Practice Group: Office Phone Number Extension (or attach preprinted list) Fax Number (required) Street Address Email Address (if applicable) City/Town/State Question to assure identity in case of forgotten password: Zip (ie. Mother’s maiden name, color of house, etc.) Answer to above question: Authorization: (If Physician Support Staff, please complete sponsor information for Responsible Physician) Physician’s Name: Please Print Clearly Day Time Phone Number Last Name Extension First Name Middle Initial Physician Signature: Remote Access: If you do not have an internet service provider to get to https://infoclique.com, you may sign up for a direct dial-up connection to Kaleida Health’s InfoClique server. I have an internet service provider I have a wireless service provider & device I need a dial-up connection via a modem I need a wireless service provider &/or device I have read and understand the policy as stated on the back of this document. Print Name Date Signature Revision Date: 03/02/2010 Access Policy 1. Information Security Access to Kaleida Health’s information systems are subject to the Kaleida Health Corporate Information System Access Request Security Policy (Policy # IS.2). It is the policy of KALEIDA Health to protect its information assets and to allow the use, access, and disclosure of such information only in accordance with its interests and applicable laws and regulations. It is KALEIDA Health’s legal and ethical obligation to protect the confidentiality of patient information. The purpose of this document is to establish the user’s responsibility for safeguarding its computer hardware, software, and information assets in whatever form, such as but not limited to printed, audio, video, electronic, and oral communications. Information assets may be defined as any information within KALEIDA Health’s purview, including information, which it may not own but which is governed by laws and regulations to which it can be held accountable. The use of any information must comply with KALEIDA Health Policies and must comply with all federal and state or local laws and regulations including, but not limited to, HIPAA Security and Privacy regulations. Access to any of KALEIDA Health’s systems is granted on a need-to-know basis. To accomplish this a user may be issued specific and confidential computer system ID’s and/or passwords. These access identification codes may not be shared, disclosed or utilized by any other individual, inside or outside of KALEIDA Health, including staff or people claiming to be staff of the Information System and Technology Division. All printed information, as well as data storage media, including, but not limited to, microfiche, optical and magnetic storage media, is considered the property of KALEIDA Health and is considered confidential matter. As such, this information shall not be shared, distributed, or stored in a careless manner. The use of a computer or computer services without the permission of, or in excess of the permission of the owner or leaser, is prohibited by the Penal Law of the State of New York. The use of the KALEIDA Health’s network and/or computer systems for non-business purposes, or for personal gain, is prohibited. Users are required to preserve the security and confidentiality of any information assessable through the computer or network. Users are required to use all necessary and appropriate safeguards to prevent unauthorized use or disclosure of information they have access to. Users are permitted only to utilize or access information necessary for performance of their job. Use of technology can and will be monitored, thus limiting the potential for abuse. Users and department heads are responsible for notifying IS&T Security Services in the event of any change in user’s responsibilities or the termination of user’s services. Intellectual Property Infringement Copyright, trademark and patent infringement is strictly prohibited. The federal Copyright Act extends to much of what is transmitted over computer networks, such as text, pictures, music and software. Since copyright infringement is a strict liability crime, intent to infringe is not required. KALEIDA Health has purchased the right to use software on personal computers that is protected by federal copyright laws. At no time may this software be copied for use on a personal computer other than the one for which it was originally intended. Additionally, parts of MS-Office Professional and other “suites” can not be split across multiple PC’s. Only software purchased or authorized by KALEIDA Health may be used on its computers. Software brought in from outside or downloaded from the Internet, may not be used without approval from the Information Systems and Technology Division, due to licensing issues, the potential exposure to computer viruses and the potential impact on the computer network. KALEIDA Health has the right to monitor for compliance at any time and without prior notification. Electronic Signature Electronic Signatures are allowed for individuals with appropriate security levels in specific systems and/or application modules. For legal and medical reasons, the user of these systems must adhere to the security criteria setup to support and maintain the authentication of the electronic signature. The user must agree in writing to the fact that the “Electronic Signature” may be used instead of the traditional hand signature and must not be shared with anyone else. 2. Electronic Mail The usage of Electronic Mail system is subject to the terms and conditions in the Corporate Information System Email Policy and Procedures (Policy # IS.4) The Electronic mail system is the property of KALEIDA Health and as such may be subject to disclosure for both business and legal purposes. Access to Kaleida Health’s e-mail system is granted solely for the clinical and business purposes. All messages composed, sent or received on this system are and remain the property of the organization. KALEIDA Health prohibits it to be used in any manner that would be disruptive to the operation or offensive to others. Any employee who receives sexually explicit or personally offensive materials electronically should report this to his or her supervisor and the Information Systems and Technology Division immediately. The use of electronic mail for transmission of information disparaging to others, for promotion of political causes or for personal gain is prohibited. KALEIDA Health has the ability and right to monitor electronic mail at any time and without prior notification. 3. Internet Usage Internet usage is subject to the terms and conditions in the Corporate Information System Internet Access Policy and Procedures (Policy # IS.5) The Internet is an international network of networks that connects businesses, government agencies, universities and individuals. It is considered a public network that poses additional risks to confidential information if proper precautions are not taken. For example, patient information transmitted via e-mail may be intercepted and disclosed without the knowledge of either the sender or receiver. For this reason it is recommended that all confidential information sent over the Internet be encrypted. As such the Internet can be an important professional tool. Internet communications that are not authorized to represent the organization’s opinions should convey this fact within the body of the communication. Such language should convey the fact the user’s opinions are not to be attributed to the organization. While recognizing that the Internet contains hundreds of thousands of sites with potentially useful information, it’s also obvious that it contains thousands of sites containing material, which is offensive, obscene or illegal. Visiting, viewing or downloading material from any Web site containing pornographic, sexist, racist, illegal material or material which is offensive in any way is strictly prohibited. KALEIDA Health has the ability and right to monitor Internet traffic at any time and without prior notification. Breaches of information security, intellectual property, Internet usage, electronic mail and electronic signatures including the sharing of access codes, identifications, or passwords, or wrongful access to the KALEIDA Health network or systems connected to that network, are viewed as serious violations. Users violating this policy will be subject to disciplinary action, which may include but is not limited to termination of access to the system and termination of employment. Violators are also subject to civil or criminal liability. F009.pdf rev020810 BVD