1
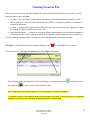
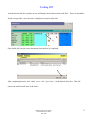
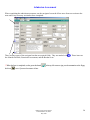
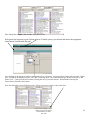
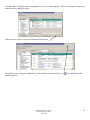
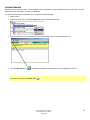
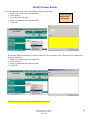
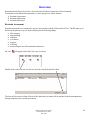
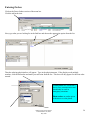
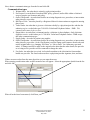
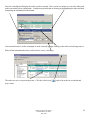
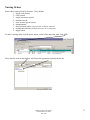
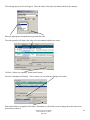
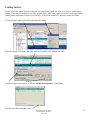
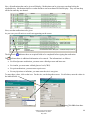
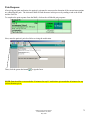
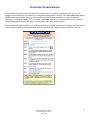
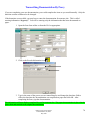
EMR Training Manual
Nurse
Table of Contents
Course objectives…………………………………………………………………………………..3
Introduction………………………………………………………………………………………...4
Information Security and Confidentiality………………………………………………………….5
Definition of Terms………….…………………………………………………………………….6
Logging in to CIS PowerChart…………………………………………………………………….8
Toolbars and Icons...……………………………………………………………………………...10
Patient Access List (PAL)………………………………………………………………………..12
PAL Icons………………………………………………………………………………………...14
Creating your own assignment list……………………………………………………………….15
Charting from the PAL…………………………………………………………………………...16
Tasking Off……………………………………………………………………………………….17
Orders for Nurse Review…………………………………………………………………………18
Admission Documentation………………………………………………………………………..19
Admission Assessment……………………………………………………………………………20
Pressure Ulcer……………………………………………………………………………………..21
Admission History………………………………………………………………………………...23
Medication List…………………………………………………………………………………....26
Past Medical History………………………………………………………………………………28
Adding SNOMED Database………………………………………………………………………30
Adding Past Procedures…………………………………………………………………………...31
Immunization Schedule……………………………………………………………………………33
Entering Allergies………………………………………………………………………………….35
Daily Documentation (ongoing assessment)……………………………………………………....36
Patient Education…………………………………………………………………………………..38
Nursing Plan of Care……………………………………………………………………………….39
Intake and Output…………………………………………………………………………………..43
Modify/Unchart results……………………………………………………………………………..45
Forms……………………………………………………………………………………………….46
Restraints…………………………………………………………………………………………...49
PowerOrders………………………………………………………………………………………..52
Nursing Orders……………………………………………………………………………………...57
Discontinuing Orders……………………………………………………………………………….60
Cancel/Reorder……………………………………………………………………………………...61
Voiding Orders……………………………………………………………………………………...63
Medication Administration…………………………………………………………………………64
Unchart a Medication……………………………………………………………………………….70
Modify a Medication………………………………………………………………………………..71
Reschedule a Medication……………………………………………………………………………72
Requesting a Medication……………………………………………………………………………73
Reference Manual and Education Leaflets………………………………………………………….74
Pain Response……………………………………………………………………………………….75
Handoff Communication……………………………………………………………………………76
Downtime documentation…………………………………………………………………………...77
DRH Clinical Transformation
Pamela Haddox, RN, BSN
May 2009
2
Course Objectives
By the end of this presentation, the student will:
1. Have an increased knowledge of the principles that drive Clinical
Transformation
2. Understand how the DMC integrates technology to support patient safety
and clinical judgment, and achieve excellent outcomes for patients.
3. Understand basic EMR functionality
DRH Clinical Transformation
Pamela Haddox, RN, BSN
May 2009
3
Introduction
When the DMC began its EMR journey in 2006, it made history. We became the first system
across the country to implement EMR across all DMC facilities in 13 months. During the
implementation of the EMR, it was apparent that the DMC was not only implementing
technology, but the DMC was Transforming the way Patients Receive Care. We did this
because at the DMC we intend for our care to be safer and better than any other system. While
this video is to teach you how to use the system, its overriding purpose is the message that EMR
at the DMC is really about excellence, for our clinicians and our patients.
Clinical Transformation was created during our EMR implementation process. It became
obvious during our planning that EMR was not a project but an approach to excellent outcomes
for our patients. Although our class today is going to provide you with education around using
EMR and its functionality, our overall focus is to provide the safest care to our patients using
current evidence that is available to the clinicians. All disciplines can see the story unfold and
use the information to make decisions about patient care and treatment. As a clinician you will
always rely on your clinical judgment and use the information gathered in the EMR to make
clinical decisions that are best for your patient.
We are always looking for ways to improve the ease of use of electronic forms, and new information is
also added based on evidence/ changes in regulatory standards. Therefore by the time you arrive for your
clinical experience, the look of some forms may change due to these continuous improvements but the
main elements and principles of documentation will remain the same - patient safety, clear documentation
of assessment and planning and interdisciplinary communication are always paramount.
DRH Clinical Transformation
Pamela Haddox, RN, BSN
May 2009
4
Information Security and Confidentiality
When dealing with computerized health care records, specific confidentiality and security issues must be
followed to protect the patient. Also, there are increasing HIPAA and JCAHO regulations that dictate how these
records are handled.
•
When selecting a password, do not choose anything obvious, such as your birth date, social security
number, or spouse and children’s names.
•
Do not tell anyone your password.
•
The DMC system requires you to change your password every 90 days.
•
When you open a chart you will be asked to identify your relationship to the patient, for example Staff
Nurse or Chart Review.
•
The system keeps an audit trail, or record, of who enters each chart and when. It records who read the
chart and who recorded each piece of information in the chart.
•
Every employee will not be allowed to see or perform every activity on the computer. For example, a lab
technician will be able to see and do more in the lab application than a nurse will.
•
Do not leave the computer while still signed on.
•
Do not access any charts that do not apply to your current job and caseload.
Help Desk
To get help for any issue with EMR, please call the Help Desk at:
(313) 966-2400
DRH Clinical Transformation
Pamela Haddox, RN, BSN
May 2009
5
Definition of Terms
1. Ad hoc: file cabinet for blank forms.
2. Alerts/warnings: pop-ups on screen to inform the users of possible adverse events.
3. Demographic bar: pink bar across top of chart displaying patient info such as, name, birth date,
allergies, sex, etc.
4. Discern alert: an automatic alert informing users to perform a function based on assessment criteria
that has been entered.
5. Drop down arrow: downward pointing arrow at the end of an entry box that when clicked displays
entry options.
6. Encounter: a specific patient visit.
7. Favorites: a folder in which users can store frequently used items for easy recall at a later time.
8. Filter: a method of arranging data to view only what the user wants to view.
9. FIN number: financial information number used for billing purposes and separates visits.
10. Icon: a symbol.
11. Medication wizard: the screen from which medications are scanned and administrated; (marked
with a barcode icon).
12. Menu bar: a list containing the sections of the chart.
13. Navigator bar: a list of areas within a section of the chart or power form; clicking on an item in the
list will bring that area to the top of the screen.
14. Overdue: a task that has not been completed in the allotted timeframe.
DRH Clinical Transformation
Pamela Haddox, RN, BSN
May 2009
6
15. Patient access list (PAL): a list of patients assigned to the caregiver that contains key information
associated with each patient.
16. Power chart: the electronic medical record.
17. Power form: an electronic form in the medical record.
18. Power orders: electronic order entry.
19. Refresh: updating the current screen.
20. Scratch pad: the orders for signature window.
21. Suspend: a way of logging off for a short time while holding your place in the chart.
22. Tab: a section or heading in the chart.
23. Tasks: patient care items to be carried out for the patient.
24. Time frame: the date and time being viewed.
25. Toolbar: the bar at the top of the screen containing icons and charting options.
DRH Clinical Transformation
Pamela Haddox, RN, BSN
May 2009
7
Logging in to CIS Powerchart
1. On your desktop, double-click the DMC Citrix Desktop icon.
2. Enter your DMC Enterprise User ID and Password.
3. On your DMC Citrix Desktop, double-click the Start CIS icon.
4. Enter your User Name and Password and click OK.
Closing CIS and Citrix
You should always close confidential information before walking away from the PC. However, you don’t want
to close everything you’re working on, log out of Citrix and CIS, and then have to re-open it all again later in
your shift, repeating the process every time you step away to care for a patient. That’s why you have several
options for closing your work: one for only closing PowerChart, one for logging off Citrix completely, and one
for holding your place in all open applications until you return.
Exit — When you are finished in CIS, but wish to leave your Citrix desktop open, click on the Exit
button on the PowerChart toolbar. CIS PowerChart closes completely and returns you to your Citrix Desktop.
DRH Clinical Transformation
Pamela Haddox, RN, BSN
May 2009
8
Suspend — When you need to walk away for a short time, click the Suspend button in your taskbar tray.
Your Citrix session, CIS, and any other applications you have open will be closed for you; however, your exact
location will be bookmarked. The next time you sign on to Citrix from any DMC computer, within four hours,
you will be returned to the exact place you were before you clicked Suspend.
Log Off — Click the Log Off button on your taskbar tray when you are leaving at the end of your shift.
This will close all your applications and log you out of the system entirely. When you return for your next shift,
you will need to log in to any applications you wish to use.
Log Off and Suspend are located in
the lower right corner of your screen,
above the clock.
DRH Clinical Transformation
Pamela Haddox, RN, BSN
May 2009
9
Tool Bars and Icons
Toolbars can be customized to user preference.
Click and hold on the four vertical dots in front of the toolbar. A four point arrow will appear.
While still holding the mouse button down drag the toolbar where desired and release the mouse button.
This will allow you to view all icons. If the toolbars are not showing all icons, you will have to use the
dropdown arrow at the end to view hidden icons.
To customize the icons within the toolbar right click any where on the toolbar and choose customize.
The customize box will appear.
Click and hold on the icon you wish to move. While holding the button down, drag the icon to the new location
and release. (Icons can only be moved within the same toolbar). When finished, close the box.
DRH Clinical Transformation
Pamela Haddox, RN, BSN
May 2009
10
Patient Search
1. Click on the binoculars icon
located to the right of the screen.
2. Enter the patient’s FIN number and click search. (To practice use 613392984).
Verify you have the correct person by checking the birth date and other demographic information. Then
select the encounter and click OK.
Recent
shows the last nine charts the user has opened. Use the drop down arrow and select the
patient’s chart you wish to open.
DRH Clinical Transformation
Pamela Haddox, RN, BSN
May 2009
11
Patient Access List (PAL)
The Patient Access List (PAL) is a list of patients assigned to a caregiver that contains key information
associated with each patient, including location, allergies, attending physician, pharmacy orders, overdue tasks,
and many other pieces of information.
Note: The PAL tab automatically updates every (one) minute, regardless of how many times you click on the
refresh button.
Accessing the PAL Tab
1. In PowerChart, click the Patient Access List (PAL) on the toolbar.
2. The timeframe selection window will open. Select the appropriate shift by highlighting the row and
click OK
.
3. Next, the establish relationship box will appear.
4. Uncheck any patients you are not assigned to by clicking in the box in front of their name.
DRH Clinical Transformation
Pamela Haddox, RN, BSN
May 2009
12
5. Use the drop down arrow to select your relationship.
NOTE: The relationship box will not appear or some names may not be listed if you have previously
established relationship with the patients.
The sections of the PAL are as shown.
Name
Section
Demographic
Section
Notifications
Section
Tasks
Section
Results
Section
Name section: displays patient’s name
Demographic section: displays info such as, age, sex, rm. number, etc.
Notification section: displays new orders as soon as they are signed by provider. Also displays new lab and
radiology reports.
Tasks section: Displays tasks that are due at a given time for a patient.
Results section: displays last entered vital signs.
DRH Clinical Transformation
Pamela Haddox, RN, BSN
May 2009
13
PAL Icons
Icons displayed on your PAL were specifically chosen to give you a good idea of the type of activity they
represent.
All icons on the PAL provide access to additional patient information. You must double-click on the icons for
access. A single click only changes the patient you are focused on.
There are three icons that will display your patient’s Allergy status in the demographics section:
Icon
Action
No Known Allergies
Known Documented Allergy
Allergies not Recorded
In the Notification section, order or result notifications can appear as a clipboard or an eyeglass icon.
Icon
Action
The Clipboard icon indicates a new result. Double click to view details. Click Apply to
acknowledge that the results have been reviewed.
The Eyeglass icon indicates an order that needs to reviewed/noted. Double click to review.
Click Apply to acknowledge that the orders have been reviewed/noted.
A Red icon indicates a STAT order or a result that is out of the normal range. Double click to
view. Click Apply button to acknowledge that they have been reviewed.
Icons that appear in the Task section provide an indication of the type of activity that needs to be done.
Medications: Medication, PRN Response
Activity: Activity/Hygiene
Nursing Assessments/Treatments: Admitting, Audiology, Care Management, Communication Orders, Patient
Assessment/Monitoring, Procedures, Discharge, Vital Signs
Respiratory Nursing Tasks: Respiratory, Respiratory Assessment, Respiratory Treatments, Pulmonary
Diagnostics
IV's: IV, Parenteral Therapy
Interventions: Unit-Based Tests, Interventions, Dressings/Wound/Skin Care, Education,
Tubes/Drains/Fluid/Elim Patterns, Safety Measures/Precautions
Nurse Blood Draw: All blood draw orders where the nurse is indicated to draw the blood.
Unscheduled Task: This activity can be from any of the other types, but is unscheduled.
Communications: Communication Orders, Order Notification, Spiritual Care, Consults
DRH Clinical Transformation
Pamela Haddox, RN, BSN
May 2009
14
Creating your own assignment list for your PAL
Each individual must create an assignment list if his/her area is using the Shift assignment function. This list
will automatically contain any patients assigned using the shift assignment function.
Note: The following steps will only need to be completed the first time the PAL list is accessed.
1. From the PAL, right click on the green bar containing the unit name.
2. Click on “change patient list”
3. Choose “New” at the bottom.
4. Click on “assignment” at the top. Then click next at the bottom.
5. Type the name of your list in the box and click Finish.
DRH Clinical Transformation
Pamela Haddox, RN, BSN
May 2009
15
Charting From the PAL
The tasks section of the PAL includes multiple sub-columns for indicating different types of tasks as well as
times that tasks are due, including:
•
Overdue — An icon in the Overdue column will indicate a scheduled task that is currently overdue.
•
PRN/Continuous — An icon in this column indicates a PRN or continuous treatment or medication is
ordered for the patient.
•
Current — An icon in the Current column indicates a task is due at the current time. The type of icon in
the column will indicate which type of task is due.
•
Individual timeframes — Columns are created to indicate specific times in your shift that treatments or
medications are due. These columns are based on the frequency selected when the order was entered.
To access tasks for charting, double-click the task icon in the appropriate column. For example:
Vital signs are charted from the PAL by double clicking on the
icon in the PRN/ Cont. section
Click in the box for vital signs per protocol then click Chart at the bottom.
This will bring up the vital signs form. After completing, use the green checkmark
the floppy disk
to sign the form or
to save it if you need to return to it later.
Note: Temperature is recorded in degrees Celsius and weight is recorded in kilograms.
** All tasks on the PAL list should be tasked off by the end of your shift. Things that are not yet completed
should be reported off to the oncoming shift during handoff communication.
DRH Clinical Transformation
Pamela Haddox, RN, BSN
May 2009
16
Tasking Off
As tasks become due for a patient, an icon will display in the tasks section of the PAL. These are reminders
for the care provider. Once the task is completed, it must be tasked off.
First, double click on the icon to determine what needs to be completed.
After completing the task, click “chart” (never click “quick chart”) at the bottom of the box. This will
remove the task from all areas of the chart.
DRH Clinical Transformation
Pamela Haddox, RN, BSN
May 2009
17
Orders For Nurse Review
As soon as an order is signed in the EMR an eyeglasses icon
will appear in the notification section of the
PAL. This alerts the nurse that there is a new order and it must be reviewed by the nurse.
1. To review the order, double click on the eyeglasses. This will display the order.
2. Click on the word “apply”
This will display the order in more detail.
3. After reviewing the details of the order click on the word “review”
The icon and the order are now removed from the PAL list. The order can still be viewed from the
orders section of the chart.
DRH Clinical Transformation
Pamela Haddox, RN, BSN
May 2009
18
Admission Documentation
When a patient is admitted an icon will appear on the PAL list that will contain the forms to be completed.
If there is no icon, double click on the patient’s name to open the chart. The forms can be found by clicking
the “ad hoc” icon on the toolbar.
Next, click “EMR forms” and select the needed forms by clicking in the box to the left of them.
The necessary forms include:
Admission assessment
Admission history
Plan of care (will be demonstrated in daily documentation section)
Patient education (will be demonstrated in daily documentation section)
After selecting these forms, click “chart” at the bottom. The forms will come up one at a time to be completed.
DRH Clinical Transformation
Pamela Haddox, RN, BSN
May 2009
19
Admission Assessment
When completing the admission assessment, use the navigator bar on the left to move from one section to the
next until every necessary section has been completed.
There are three areas of the navigator bar that are required fields. They are marked with
the Schmidt Fall Risk, Functional Assessment, and the Braden Score.
**When the form is completed, use the green checkmark
disk icon
. Those items are
at the top left corner to sign your documentation or the floppy
to save if you need to return to it later.
DRH Clinical Transformation
Pamela Haddox, RN, BSN
May 2009
20
Pressure Ulcers
Documenting that a pressure ulcer is present will place “Impaired tissue integrity” on the problem list. An auto alert
(discern) will fire alerting the RN to order the “pressure ulcer management” orderset and a task will be placed on the PAL.
RN Responsibility:
1. Complete all assessment and documentation requirements of the wound.
Pressure ulcer grid
found in integumentary
section of the assessment
2. Go to the Power Orders section of the chart and place the pressure ulcer management orderset.
See PowerOrders
section of manual for
further details about
placing orders.
3. Complete the task on the PAL.
4. Initiate “impaired tissue integrity” care plan. (See page 39 of this manual for explanation)
5. Complete patient education. (See page 38 of this manual for explanation)
DRH Clinical Transformation
Pamela Haddox, RN, BSN
May 2009
21
Documenting a Braden score ≤ 18 will place “risk for impaired tissue integrity” on the problem list. An auto alert (discern)
will fire alerting the RN to order the “pressure ulcer prevention” orderset and a task will be placed on the PAL.
RN Responsibility:
1. Go to the Power Orders section of the chart and place the pressure ulcer prevention orderset.
See PowerOrders
section of manual for
further details about
placing orders.
2. Complete the task on the PAL.
3. Initiate “Risk for impaired tissue integrity” care plan. (See page 39 of this manual for explanation)
4. Complete patient education. (see page 38 of this manual for explanation)
DRH Clinical Transformation
Pamela Haddox, RN, BSN
May 2009
22
Admission History
Again, use the navigator bar on the left to complete each section. Be sure to complete the required fields that are
marked with
.
Vaccine Screening
Every patient at the DMC will be screened for the flu vaccine from October to March and every patient over the
age of 65 will be screened for the pneumonia vaccine all year.
To complete the screening process, select the influenza or pneumococcal assessment from the navigator bar.
If the patient meets criteria, select the administer option. This will automatically place an order for the vaccine.
DRH Clinical Transformation
Pamela Haddox, RN, BSN
May 2009
23
As a part of the admission process, every patient is screened and offered smoking cessation if appropriate. To
begin the process, select the social habits section from the navigator bar of the admission history form.
Answering “YES” to tobacco use in the last year will require you to offer smoking cessation material/support to
the patient. (The box to the right becomes yellow and is a required field).
Answering “patient accepts” the smoking cessation material will automatically place an order for a smoking
cessation consult. (The consult is performed by respiratory, and should not be completed by nursing).
**When the form is completed, use the green checkmark
disk icon
at the top left corner to sign your documentation or the floppy
to save it if you need to return to it later.
Note: Plan of Care and Patient education will be covered in the daily documentation section of this manual.
Once the admission history form is completed the nurse must collect information about the patient’s past
medical history and medications taken at home. These items are documented from the menu bar inside the
patient’s chart. To open the patient’s chart, double click on their name.
DRH Clinical Transformation
Pamela Haddox, RN, BSN
May 2009
24
Menu Bar
The menu bar located on the left side of the patient’s chart can be hidden to allow a larger viewing area.
Click on the pushpin icon ( ) located on the top right of the menu bar.
If menu bar is already hidden, hover mouse over the small tab on left that reads “menu” click on the pushpin to leave
menu bar displayed.
DRH Clinical Transformation
Pamela Haddox, RN, BSN
May 2009
25
Medication List
To enter the list of medications, first go to the “medication list” on the menu bar and click “Document by
History”
The options of “No known home medications” and “Unable to obtain information” are available if applicable.
To begin adding a medication to the list, click
.
Next, type the medication name into the find box and select the item with the correct detail. An order sentence
box will display. The RN is only concerned with the details of how the med is taken. This will not place a
prescription in the file. Choosing 30 tab or 90 tab will have no effect in this area. Click OK.
When all medications have been entered, click “DONE” at the bottom of the screen.
DRH Clinical Transformation
Pamela Haddox, RN, BSN
May 2009
26
The next step is to complete any details that are not already appropriate to the patient. Then compliance must be
completed for each medication. The compliance indicates whether or not the patient is still taking the
medication as prescribed.
When compliance is completed for every medication, click “document history” at the bottom right corner.
If there are previous medications in this section, the nurse is responsible for completing compliance for those
meds as well. To do this, right click on the medication and select “Add/Modify compliance”
All those medications listed under the “prescriptions” section must also have compliance completed.
Physicians cannot perform medication
reconciliation until compliance has been
completed for all medications.
DRH Clinical Transformation
Pamela Haddox, RN, BSN
May 2009
27
Past Medical History
1. To enter the patient’s past medical history, first click on the histories section of the menu bar.
Then choose the past medical tab.
2. Click the “Add” icon.
3. Type the disease/condition in the search box and click the binoculars.
DRH Clinical Transformation
Pamela Haddox, RN, BSN
May 2009
28
4. Choose the appropriate option from the list and click OK.
5. Next complete any of the details that are known and click OK if finished, or click OK& add new if
there is more history to add.
Note: The status will default to “resolved” and will need to be changed to reflect the current status.
DRH Clinical Transformation
Pamela Haddox, RN, BSN
May 2009
29
Adding SNOMED Database
To be able to search for disease/conditions using acronyms such as COPD or AFIB you must first add the
SNOMED database. This must only be completed one time per username.
1. To begin, click on the histories section of the menu bar and click the past medical tab.
2. Click the
icon.
3. Next, click on the binoculars.
4. Click on “show advanced options.”
5. Next, click on the ellipsis icon
6. Place a checkmark in the box in front of SNOMED CT and click OK.
**You are now able to search using acronyms.
DRH Clinical Transformation
Pamela Haddox, RN, BSN
May 2009
30
Adding Past Procedures
To add past procedures or surgeries first click on the histories section of the menu bar and select the
procedure tab.
Click the
icon.
Next, type the procedure in the yellow procedure field and click the binoculars
Now, select the appropriate option from the list and click OK
DRH Clinical Transformation
Pamela Haddox, RN, BSN
May 2009
31
Next, complete any details known about the procedure.
When finished, click “OK & Add New” to add another procedure or click “OK” if all procedures have been
entered.
The procedures will now appear on the procedure tab in the history section for all to view.
DRH Clinical Transformation
Pamela Haddox, RN, BSN
May 2009
32
Immunization Schedule
Documenting vaccines given at the DMC is done through the scanning process on the eMAR. Once the
vaccine is scanned, required fields will display to enter the lot number, expiration date, info sheet given, and
any state programs used for pediatric patients. Once the process is completed all vaccines will display on the
immunization schedule section of the chart.
1. To document a vaccine that was given outside the DMC, first click on the immunization schedule
section of the menu bar.
2. Next click on the word “history” at the bottom.
3. Next click “add to selections”
4. Choose the vaccines from the list. (multiple vaccines can be chosen at once). Then click “add”
5.
Next complete all the details that are known and click “chart”
DRH Clinical Transformation
Pamela Haddox, RN, BSN
May 2009
33
If more than one vaccine is chosen, highlight each one in your list and complete the details before clicking
chart.
The information entered will now display in the previous immunizations column.
The immunization schedule also displays the CDC schedule for immunizations for pediatric patients.
DRH Clinical Transformation
Pamela Haddox, RN, BSN
May 2009
34
Entering Allergies
To begin entering allergies for a patient, first click on the allergies section on the menu bar.
2. Next, click the “add” icon.
3. Then type the name of the allergen into the search field and click “search”
4. Next double click on the appropriate item in the list.
5. Complete all information known about the allergy and click ok when finished, or apply to add another
allergy.
DRH Clinical Transformation
Pamela Haddox, RN, BSN
May 2009
35
Daily Documentation
Ongoing assessment
Nursing documentation is a three part process to be completed each shift. The parts include the ongoing
assessment, plan of care, and patient education.
To begin, click the “ad hoc” icon on the toolbar.
Next, click “EMR forms”
Select the forms needed; ongoing assessment, plan of care, patient education. Then click chart.
The first form to display is the ongoing assessment.
Yellow Fields are
required fields. The
form will not display
as completed until all
required fields are
addressed.
DRH Clinical Transformation
Pamela Haddox, RN, BSN
May 2009
36
The ongoing assessment is charted by exception. This means only variances are documented in detail. If a
particular system does not have any variances, then the WDL (within defined limits) option is selected. The
limits are defined in the blue lettering to the right of the row.
Clicking the exception option will open another page for you to document the findings.
The bottom right corner of each system assessment contains an option for a detailed assessment. If what you
need to document is not found on the first page, then choose the “detailed assessment” option.
When finished documenting on the page, use the blue curved arrow
the upper left corner, to return to the previous page.
, called the circle back button, located in
The left side of the ongoing assessment is the navigator bar. This contains sections that may need to be
documented based on the patient condition. It also contains two required fields that are marked by a blue circle
containing a white X
. These items are the Braden Scale and the Schmidt Fall Risk.
When the form is completed, use the green checkmark
use the floppy disk icon
in the top left corner to sign the documentation, or
to save the form if you need to return to it later..
DRH Clinical Transformation
Pamela Haddox, RN, BSN
May 2009
37
Patient Education
Patient education is an important part of caring for the patient. Education should be completed every shift for
every patient.
To begin documenting education, first click on the
icon on the toolbar.
Next select “EMR forms” and select the patient education form.
Then, click chart.
To complete the form, click on the term “alpha” in each box and complete the appropriate details.
The comment box allows free text and should be used to provide some specifics about what was taught.
NOTE: If a field contains circles in front of the options, only one selection may be chosen.
If a field contains squares in front of the options, multiple selections may be chosen.
When finished with the form, use the
need to return to it later.
in the top left corner to sign the form or use the
DRH Clinical Transformation
Pamela Haddox, RN, BSN
May 2009
to save it if you
38
Nursing Plan Of Care
To begin documenting plan of care, first click on the
Next select “EMR forms” and select the plan of care form.
icon on the toolbar.
Next, click chart.
To begin, click in the category field and make your selection.
Next, choose your problem and goals. Be sure that the suffix in the category field matches the prefixes of the
other fields.
When choosing goals for your care plan, keep in mind that these must be evaluated and a resolution applied to
them. Please be sure that if you choose more than one goal per plan that these goals will always be met at the
same time. If not, you will need to list them on separate lines.
DRH Clinical Transformation
Pamela Haddox, RN, BSN
May 2009
39
The comment section allows for free text and it should contain assessment data to aid in the evaluation of the
care plan. Please see example below.
The care plan will be continued and updated daily by each nurse until the goals are met or the patient is
discharged.
When finished with the form, use the
need to return to it later.
in the top left corner to sign the form or use the
to save it if you
Nursing Interventions
After initiating a care plan, you must order nursing interventions. These only need to be ordered one time and
will remain on the orders profile for all to see until discontinued.
To order nursing interventions, first click on the “Powerorders” section of the menu bar and click the
icon.
Next, click on the folder icon below the find box.
Now, select plan of care from the list.
DRH Clinical Transformation
Pamela Haddox, RN, BSN
May 2009
40
Now choose the category that matches your plan of care.
Each green line represents a goal for that problem. Find the goal(s) you selected and choose the appropriate
interventions listed beneath the goal.
After clicking on the first intervention a communication box will appear. You must enter the name of the provider. In this
case, it would be “Healthcare Provider” since this is a nursing order. The communication type should be entered as “RN
Plan of Care.” Then click OK and continue selecting the rest of your interventions. When finished selecting the
interventions, click OK at the bottom.
Next, the add orders screen will display again. If there are no more orders to enter, click done.
DRH Clinical Transformation
Pamela Haddox, RN, BSN
May 2009
41
Next the orders will display on the scratchpad for you to view before signing. This is your chance to correct any
mistakes before signing the orders.
If the orders are correct, click sign at the bottom right corner.
The orders are now in the processing status. You must now click the refresh icon
signature process.
DRH Clinical Transformation
Pamela Haddox, RN, BSN
May 2009
to complete the order
42
Forms
Completed Forms may be viewed, modified, or uncharted from the Forms section of the menu bar. The options available
to you will vary according to your needs. For example, you may be able to modify forms for which you are the author, but
not forms with another person as the author. You are only allowed the option to view documents completed by someone
else.
Whenever a form is modified or uncharted, the system tracks the care provider and the changes they make in the system.
This ensures accurate documentation. It is important that you do not complete the documentation for care you did not
perform since the system will always associate it with you.
Note: To complete Patient Admission Assessment/History forms if started by another nurse, you must open up a new form
and complete the required information. Do not open and modify another nurse’s form.
View Documents in the Forms section
The Forms section within a patient’s chart lists all of the forms started or completed for that patient. They are displayed in a
tree format with folders grouping forms by similar criteria. Double click or right click and select View, to view the details on
a form.
Sort Forms
1. From within your patient’s chart, click on the Forms section of the menu bar.
2. Review the different sort options by clicking the sort drop down box. Notice how the display changes as you try
each option.
DRH Clinical Transformation
Pamela Haddox, RN, BSN
May 2009
43
Form Icons
Icon colors are used to represent whether or not all of the required fields have been completed on a form. A blue icon
indicates the required documentation is complete, a red icon indicates required documentation has not been completed,
and a yellow icon indicates an Uncharted form.
Red: Incomplete
Blue: Complete
Yellow: In
Error/uncharted
Modify Forms
Depending upon your security, you may be able to modify forms from the Forms tab.
Note: You may modify a form that has an error or incomplete information. However, you should not modify an Ongoing
Assessment form as a way to update a patient’s condition. An update should be entered by opening a new form and
adding the information.
Modify a form by completing the following steps.
1. Select a form.
2. Right-click the form and select Modify.
3. Make the necessary changes.
4. When you are finished, click the Sign Form icon
to chart the information.
5. Find the form you just modified in Forms. Notice that the status is displayed at the end of the form in parentheses.
If the form was saved and not signed, the status will display as (In Progress). If the form was signed, the status will
display as modified.
DRH Clinical Transformation
Pamela Haddox, RN, BSN
May 2009
44
Unchart Results
Results that were entered in error, such as charted to the wrong patient, can be uncharted from the original form. An audit
trail tracking who uncharted it, and why, is maintained.
To Unchart results that were entered in error, complete the following steps:
1. Select a form.
2. Right-click on the form, and select Unchart to open a comments dialog box.
3. Type an explanation in the comments box below describing why you are uncharting the form.
4. Click the Sign Form icon
to unchart the information. Notice that the form is displayed as “In Error.”
Note: Look in Forms to confirm the form was uncharted. If you do not see the information, remember to refresh
the screen by clicking the refresh icon.
DRH Clinical Transformation
Pamela Haddox, RN, BSN
May 2009
45
Intake and Output
Intake and output is an important element of patient care. I/O should be documented for every patient as the
incident occurs or as ordered by the physician.
To begin documenting I/O, click on the I/O section of the menu bar.
Notice that the clinical range or timeframe begins on the previous day. Scroll down to find the yellow
highlighted row. The highlighted yellow row/line serves as your place holder to help keep you on the right date
and time. Charting can take place on any row before the yellow row. Charting can not take place after the
yellow row.
First, click on the start charting icon
. Now click in the field and enter the values.
When finished entering all the values click the green checkmark
DRH Clinical Transformation
Pamela Haddox, RN, BSN
May 2009
to sign the documentation.
46
Notice that the values are added together in the row titled shift totals. There is also a graph that will display at
the bottom of the screen to show the intake and output balance for the patient.
If the patient has other sources of intake or output that are not listed in the I/O section, those columns can be
added by clicking the display hidden category icon
.
Double click on the folder to display the items. Next, select the appropriate options and click OK.
These columns will now display on the I/O section.
DRH Clinical Transformation
Pamela Haddox, RN, BSN
May 2009
47
Modify/Unchart Results
Previously charted results can be modified by doing the following:
1. Right-click on the result to be modified.
2. Select modify.
3. Enter the corrected value.
4. Enter a comment in the comments field.
5. Click OK.
Users can only
modify their
own entries.
The unchart function should be used when results have been charted in error. Results can be uncharted by
doing the following:
1. Right-click on the result to be uncharted.
2. Select unchart.
3. Enter a comment in the comments field.
4. Click OK.
NOTE: Users can only modify or unchart their own entries.
DRH Clinical Transformation
Pamela Haddox, RN, BSN
May 2009
48
Restraints
Restraints should always be used as a last resort after all other measures have been exhausted.
If restraints are needed the documentation is a three part process which includes
1. Restraint Assessment
2. Restraint Monitoring
3. Restraint Education
Restraint Assessment
Restraint assessments are completed every two hours and are tasked off from the PAL list. The RN must go in
and check the patient every two hours checking for the following things:
• Skin integrity
• Repositioning
• Nutrition
• Circulation
• Hygiene
• Toileting
• Reassessing the need for continued restraint use
An icon
will appear on the PAL list every two hours.
Double click on the icon. Be sure the box in front is checked and click Chart.
The item will be removed from all areas of the chart and your name will be attached to the documentation as
having completed your restraint assessment.
DRH Clinical Transformation
Pamela Haddox, RN, BSN
May 2009
49
Restraint Monitoring
The restraint monitoring form should be completed every shift.
The RN must assess the need for continued restraint use and record the findings on the restraint monitoring
form.
The form can be completed from the prn/cont section of the PAL. Double click on the icon
.
Be sure the box in front is checked and click Chart.
Next, complete the sections of the form to show the methods used before applying restraints.
If you choose to discontinue the restraints you must complete the discontinuation section of this form.
DRH Clinical Transformation
Pamela Haddox, RN, BSN
May 2009
50
Restraint Education
The restraint education is completed from the same form.
Each day a patient is in restraints they must be educated on the reason for restraint use and the release criteria.
These can both be selected at the same time.
After completing all necessary sections of the form, click the green checkmark
in the top left corner.
NOTE: When restraints are discontinued, it is nursing’s responsibility to discontinue the order for the restraint
assessment and the restraint monitoring. If these are not discontinued, it will continue to fire a task to the PAL
list.
NOTE: The restraint order must be renewed each day the patient is in restraints. This order must be entered by
a physician. The renewal order can not be taken by a nurse.
DRH Clinical Transformation
Pamela Haddox, RN, BSN
May 2009
51
PowerOrders
The orders section of the patient’s electronic medical record allows physicians and clinicians to place
medication, continuous infusion, consults, lab, radiology, and care orders. In addition to placing orders on a
patient, power orders contains a display that shows all existing orders that were placed on the patient during a
specific encounter. Power orders also enables designated clinicians the ability to review, cancel/discontinue,
cancel/reorder, and void existing orders.
2
3
1
4
5
The navigator bar on the left helps move through the orders profile with little scrolling. The bolded sections
contain orders. Clicking on a section will bring it to the top of the profile.
Columns of the orders profile window
1.
Indicates the order has an active status.
2. Indicator column.
The Mortar and Pestle indicates the order requires pharmacy verification.
The Caduceus (Physician Cosign) indicates the order requires a physician’s
co-signature.
The Eyeglass Icon indicates the order requires nurse review/electronic
notation.
The Decision Support icon indicates that reference information/decision
support is associated with the order.
(These icons only display if they apply to the order)
3 Order name: Displays orders that were placed below each clinical category
4. Order status: Displays order status. For example, Ordered, Discontinued, Transfer/Canceled, Pending,
and Complete.
5. Order details: Displays the details associated with the order.
DRH Clinical Transformation
Pamela Haddox, RN, BSN
May 2009
52
The orders profile contains a filter to enable the user to see different views of the orders profile.
Click the dropdown arrow and choose the selection you wish to see.
If orders are not reviewed from the PAL list they will display in a section of the orders profile.
To review these orders, click on the orders for nurse review button at the bottom of the window.
After reviewing the orders, click the review button at the bottom.
DRH Clinical Transformation
Pamela Haddox, RN, BSN
May 2009
53
Entering Orders
Click on the Power Orders section of the menu bar.
Click the add order icon.
Next, type what you are looking for in the find box and choose the appropriate option from the list.
Then the ordering physician box will appear. Type in the physician name. If the display reads multiple
matches, click the binoculars and make your selection from the list. This box will only appear for the first order
entered.
Verbal orders are considered a
face to face communication and
should only be used in
emergency situations.
Phone orders are orders given
to the nurse over the phone.
DRH Clinical Transformation
Pamela Haddox, RN, BSN
May 2009
54
Next, choose a communication type from the list and click OK.
Communication types
1. Written Order: An order that is written by a physician/provider.
2. Per Protocol: An order that is based on DMC policy, protocol, and/or falls within a clinician’s
scope of practice per licensure and policy.
3. Order Clarification: An order that clarifies an existing diagnostic test, procedure, or intervention
order placed by a provider.
4. RN Plan of Care: An order placed by a Registered Nurse for interventions to support the nursing
plan of care.
5. Verbal Order: An order that is given to a clinician verbally by a physician/provider who has the
authority to give a verbal order per CLN 045A Verbal and Telephone Orders – EMR. This
communication must be face to face.
6. Phone Order: An order that is communicated to a clinician via the telephone. Only clinicians
eligible to receive verbal orders per 1 CLN 045A Verbal and Telephone Orders – EMR accept
this order communication type.
7. Supply Order: An order for patient care supplies.
8. Order Clarification: An order that clarifies an existing diagnostic test, procedure, or intervention
order placed by a provider. Order Clarification is used to change order sentence details only and
not the original order (e.g. changing “RN Draw” to “Lab to Draw” for a laboratory specimen
order). If changes need to be made to the original order other than the order details, the provider
or covering service provider will be contacted to change the order.
9. Fax Order: An order that is received via facsimile machine to the clinician/site from another
health care provider. The faxed order must have a physician/provider signature, date, and time.
If there are more orders from the same physician you can enter them now.
When entering a medication order an order sentence box will appear. Select the appropriate details from the list
and click OK
When all orders have been entered, click Done.
DRH Clinical Transformation
Pamela Haddox, RN, BSN
May 2009
55
Next, the scratchpad will display the orders you have entered. Here you have a chance to review the orders and
make corrections before signing them. Complete any details that are missing by highlighting the order and then
completing the information at the bottom.
If an unwanted order is on the scratchpad it can be removed by right clicking on the order and selecting remove.
When all the information has been verified and is correct, click Sign.
The orders are now in a processing status. Click the refresh icon
active status.
DRH Clinical Transformation
Pamela Haddox, RN, BSN
May 2009
to place the orders in an ordered and
56
Nursing Orders
Some orders can be placed by the nurse. They include:
1. Social work consult
2. CMS consult
3. wound care nurse consult
4. nutrition consult
5. nurse to nurse psych consult
6. immunizations
7. initial restraint orders (can not order restraint renewal)
8. nursing interventions (includes pressure ulcer ordersets)
9. supply orders
To enter a nursing order click the power orders section of the menu bar, then click ADD.
Next, enter the order in the find box and choose the appropriate option from the list.
DRH Clinical Transformation
Pamela Haddox, RN, BSN
May 2009
57
Next the physician name box will display. For nursing orders the physician name is entered as “Healthcare
Provider”
The communication type for most nursing orders should be per protocol since policy allows nurses to enter the
orders.
When entering an order for a social work consult the decision support box will appear.
This box is giving you information to help you make a decision. It is letting you know what things require a
social work consult and which would require a CMS consult, since they are often confused. After reading the
information, click OK. If you have entered the wrong consult by mistake you can remove it from the
scratchpad.
DRH Clinical Transformation
Pamela Haddox, RN, BSN
May 2009
58
Now you are returned to your order window.
Enter any other nursing orders, when finished click Done.
Next, complete the necessary details from the scratchpad. The
be completed before signing the order.
indicates there are required details that must
Click on the required field on the left side, and then select the appropriate details from the list on the right.
When all the required fields and details are completed, click Sign. Remember to refresh in order to change the
order status from processing to ordered.
DRH Clinical Transformation
Pamela Haddox, RN, BSN
May 2009
59
Discontinuing Orders
To cancel an order that is no longer needed, right click on the order and select Cancel/DC.
Again, the physician name box will appear. Enter the physician’s name that authorized the discontinuation.
Enter the appropriate communication type and click OK.
The order will display with lines through it and the status will read discontinue.
Click the “orders for signature” button at the bottom.
DRH Clinical Transformation
Pamela Haddox, RN, BSN
May 2009
60
Next, click Sign. Remember to refresh. The order will now display as discontinued in the orders profile.
Cancel/Reorder
The cancel/reorder option should be used when you would like to keep the same order, but change some of the
order details. This option is available so that you don’t have to cancel the order, and then completely re-enter
the same order.
To cancel/reorder, right-click on the order and select Cancel/Reorder.
DRH Clinical Transformation
Pamela Haddox, RN, BSN
May 2009
61
The ordering physician box will appear. Enter the name of the physician whom asked for the changes.
Enter the appropriate communication type and click OK.
The orders profile will display the order to be discontinued and the new order.
Click the “Orders for signature” button at the bottom.
Next, the scratchpad will display. This is where you can make the changes to the order.
When the details are completed, click Sign. Remember to refresh the screen to change the order status from
processing to ordered.
DRH Clinical Transformation
Pamela Haddox, RN, BSN
May 2009
62
Voiding Orders
Use the void order option when the order that was entered and signed, was done so in error or on the wrong
patient. It is meant to completely cancel the original order. Only orders that have not been acted upon can be
voided (orders with status of Ordered or Pending). Orders with a status of Completed can not be voided.
To void an order, right-click on the order and select Void.
The orders profile will display the order status as Void with a line through the order.
Complete any necessary details. Click the “Orders For Signature” at the bottom.
Sign the order and refresh the screen.
DRH Clinical Transformation
Pamela Haddox, RN, BSN
May 2009
63
Medication Administration
Medications are viewable from the electronic medication administration record or MAR section of the chart as
soon as the orders are entered. Medication administration is charted on the MAR by using the scanning process.
The scanning process must be used to ensure patient safety. Benefits of the scanning process include:
1.
2.
3.
4.
5.
6.
Improves patient safety through reduction of human errors in the patient care process.
Automates positive patient identification.
Verifies the five rights through barcode technology.
Eliminates illegible notations
Automates the documentation of medication administration.
Automates the documentation of tasks at the point of care related to specific physician and/or nursing
orders.
MAR Overview
Scheduled dose
Current date/time
Overdue dose
Discontinued med
Navigator bar
Medication details
Medications are divided into four categories:
• Scheduled: A medication order that has fixed dose times.
• Unscheduled: A medication that does not have a scheduled time. It is always displayed as available to
administer at the current time.
• PRN: Medications that are not scheduled but should be carried out in specific circumstances or on an as
needed basis.
• Continuous infusions: A continuous infusion order displays as pending so additional infusions can be
added at any time.
DRH Clinical Transformation
Pamela Haddox, RN, BSN
May 2009
64
Medication Column Indicators
Administration events are designated by a color under the appropriate date and time column.
• Yellow represents the current date/time column.
• Teal represents current or future medication.
• Red represents past due or STAT medication.
• Gray represents canceled, voided, and discontinued medications.
MAR Icons
Pharmacy needs to verify the medication order.
Pharmacy rejected the medication order.
Pharmacy comment has been entered. Right click on the medication details and select Order Info then
select the Comments tab to view the comment.
Administrative note will display a nurse to nurse communication. Right click on the medication details
and select Create Admin Note or View Admin Note. Only one Admin Note icon will display on the MAR but
multiple entries can be displayed on the same note.
Needs Nurse to Review. Review/Note orders from the Orders section or the PAL.
Medication Scanning
To begin medication administration, first review the MAR and collect the medications needed.
Proceed to the patient’s room with scanning device in tow.
Perform the Five Rights.
From the toolbar, click on the barcode icon
.
Next, a screen will display telling you to scan the patient’s armband.
DRH Clinical Transformation
Pamela Haddox, RN, BSN
May 2009
65
Now, all medications that can be given will display. Medications can be given up to one hour before the
scheduled time. Medications that are overdue and have not been charted will also display. They will not drop
off the list until they are charted.
Next, scan the medications to be given.
As you scan you will notice several icons appearing on the screen.
The blue circle
The
indicates there are required fields to be completed before signing the medication.
indicates there is additional information to be entered. The information is as follows:
•
For blood pressure medication, you must enter a blood pressure and heart rate.
•
For insulin, you must enter a blood glucose level (CBG).
•
For pain medications, you must enter a pain score.
•
For any injections or infusions, you must enter the site it was given.
To enter these values, click on the icon. For the site, use the dropdown arrow. For all others, enter the values in
the labeled fields.
Click OK when done.
DRH Clinical Transformation
Pamela Haddox, RN, BSN
May 2009
66
To chart a medication was not taken, click on the blue checkmark.
When the medication window opens, Click the not given box at the bottom.
Choose the reason the medication was not given from the drop down menu and click OK.
When all medications have been scanned and all required fields and values have been entered, click Sign.
DRH Clinical Transformation
Pamela Haddox, RN, BSN
May 2009
67
Notice how the given medications display on the MAR. They will display in a column marked with the actual
time it was scanned and will be listed beneath the teal line.
The PRN medications that are given are listed the same as other medications. However, they are also still listed
in the current date/time column and ready to be given again. This column will list the last time the PRN
medication was given. The RN must read the medication details to determine if it is time for another dose
before administering. The computer will not stop you from giving the medication sooner than what the order
states because it is ordered as a PRN.
Warnings and Cautions
The Warning icon
will display if the medication scanned:
•
Has a dose greater (overdose) than what has been ordered (Dosage sent needs to be divided, ex. give half
tab).
•
Is from a multi-dose container (the total container dosage is scanned, therefore not the dosage that is
ordered, ex. insulin).
•
Is in a different form (liquid vs. tablet) than what has been ordered (medication needs to be reordered in
correct form).
The scanned line will be highlighted in RED. A pop up warning message will display the reason for the warning.
The Sign button will not be active.
Click OK on the warning page.
DRH Clinical Transformation
Pamela Haddox, RN, BSN
May 2009
68
Click in the red line. The medication administration details form will display. If the warning is dose related, the
dose number field will be highlighted, indicating that field needs to be corrected.
Change the amount to be administered and click OK.
Caution Icon
The Caution icon
will display if the scanned medication dosage is less than what was ordered. If two Tabs of the
medication were ordered and only one Tab was scanned, then the Caution icon
will display.
Scan the additional dose(s) to get the ordered dosage. The caution icon will disappear when the scanned amount
matches the ordered amount. Then click Sign.
DRH Clinical Transformation
Pamela Haddox, RN, BSN
May 2009
69
Unchart a Medication
To unchart a medication that has been charted, right click in the cell containing the charted medication and
select unchart.
Enter a reason for uncharting in the comment box.
Then, click the green checkmark
to sign the form.
DRH Clinical Transformation
Pamela Haddox, RN, BSN
May 2009
70
Modify a Medication
A charted medication can be modified to make corrections. To modify a charted dose, right click in the cell
containing the charted medication and select modify.
Enter the necessary changes.
Then click the green checkmark
to sign the form.
DRH Clinical Transformation
Pamela Haddox, RN, BSN
May 2009
71
Reschedule a Medication
To reschedule a medication dose, right click on the cell containing the dose to be rescheduled and select
reschedule this dose.
Enter the new date and time for the medication.
Then, click OK.
NOTE: Nursing can only reschedule one dose. If the entire schedule needs to be adjusted (e.g. antibiotic
dosing) then pharmacy must be notified.
DRH Clinical Transformation
Pamela Haddox, RN, BSN
May 2009
72
Requesting a Medication
If a medication is missing or another dose is needed, it can be requested from pharmacy through the electronic
MAR.
To request a medication, right click on the medication details and select med request.
Select a reason for the request from the list.
Then, click OK.
NOTE: Pharmacy has scheduled delivery times and will deliver the medication at the next scheduled time.
Please do not perform a med request more than once, as this will delay delivery.
DRH Clinical Transformation
Pamela Haddox, RN, BSN
May 2009
73
Reference Manual and Education Leaflets
The electronic MAR also serves as a reference guide for medications.
To access the reference manual, right click on the medication details and select reference manual.
The first to display will be information for the healthcare provider. After reading the information, click OK to
return to the MAR.
The information can also be displayed in terminology appropriate for the patient by clicking the tab labeled
education leaflet.
To print the information for the patient, right click any where in the window. The only option available is print.
DRH Clinical Transformation
Pamela Haddox, RN, BSN
May 2009
74
Pain Response
After giving any pain medication, the patient’s pain must be reassessed to determine if the current interventions
are controlling the pain. The electronic MAR will aid the nurse in this process by sending a task to the MAR
and the PAL list.
To complete the pain response from the MAR, click on the cell labeled pain response.
Next, enter the patient’s pain level after receiving the medication.
Then, click the green checkmark
to sign the form.
NOTE: Pain should be re-assessed after 30 minutes for any IV medications given and after 60 minutes for any
oral medications given.
DRH Clinical Transformation
Pamela Haddox, RN, BSN
May 2009
75
Handoff Communication
When giving or receiving report, the nurse must use the information in the EMR. Using the EMR gives the
nurse the opportunity to ask questions as well as making sure all tasks have been completed before transfer of
care.
During handoff communication, several of the tabs within the EMR are utilized. There is also a flowsheet
available to aid in the process.
To access the flowsheet, first click on the results review section of the menu bar. From the all results tab,
click the dropdown arrow.
Select handoff from the list.
The handoff flowsheet will display information that was recorded from nursing assessments.
DRH Clinical Transformation
Pamela Haddox, RN, BSN
May 2009
76
Downtime Documentation
Occasionally, the system needs to be taken down temporarily to be updated. During this time, there is one
computer on each unit that is available for viewing patient information if needed. The PowerChart local Access
(PCLA) application provides access to view patient results for different categories (i.e. labs, medications,
radiology, etc) during downtime. PCLA is strictly a view only application. It does not allow for any changes
(such as changing the clinical date range, entering orders and sorting patient results.)
Each designated computer will have a card displayed next to it with the instructions for logging in to the system.
In the event this happens, all documentation must be entered into the computer when the system is back up.
DRH Clinical Transformation
Pamela Haddox, RN, BSN
May 2009
77
Transcribing Documentation By Proxy
If you are completing your own documentation, you would complete the items as you would normally. Only the
date/time section would need to be changed.
If the downtime crosses shifts, you may have to enter the documentation for someone else. This is called
entering information “by proxy.” You will be entering only the information that has been documented on
paper.
1. Open the form from ad hoc or from the PAL as appropriate.
2. Click on the Results Information icon
..
3. Type in the name of the person you are transcribing for and change the date/time field to
reflect the date/time the documentation was completed on paper and click OK. After
completing the form, sign the documentation.
The information will now display completed by you for someone else. The paper documentation is placed in the
paper chart and retained as the original documentation.
DRH Clinical Transformation
Pamela Haddox, RN, BSN
May 2009
78
Documenting Medications By Proxy
Prior to downtime, pharmacy will print paper MARs for all patients. Medication administration will be
documented on the paper forms during downtime. When the system is back up, the medications from the paper
MAR must be documented on eMAR.
If you are documenting medications that you administered, then you will enter the medications manually
(without scanning). If you are entering medications that were administered by another nurse, then they are being
entered by proxy.
To begin click on the dose you wish to document.
Enter the any details required for the medication. Then entered the name of the nurse who administered the
medication and the date/time reflected on the paper MAR. sign the documentation
The paper MAR is placed in the paper chart and retained as the original documentation.
DRH Clinical Transformation
Pamela Haddox, RN, BSN
May 2009
79
What’s Next?
At the DMC, we are committed to improving our technology to ensure patient safety, support clinical judgment,
and achieve excellent outcomes for our patients. One of the ways in which we do that is by listening to those
individuals taking care of the patients at the bedside. If you have an idea that would support our goals then we
want to hear from you. Please find a super user and submit your idea for the quarterly EMR awards.
If you need further assistance understanding any portion of the material covered in this manual please contact
your site clinical transformation team at (313) 745-7796 for other resources that may be available.
DRH Clinical Transformation
Pamela Haddox, RN, BSN
May 2009
80