1
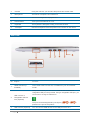
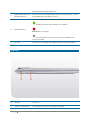
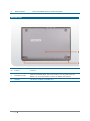
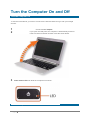
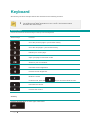
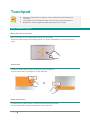
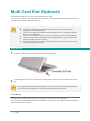
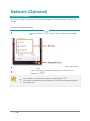
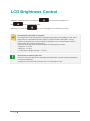
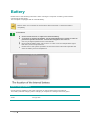
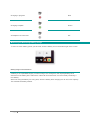
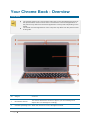
Your Chrome Book - Overview
Front View
The pictures used for the cover and the main body in the User Manual are those of
the representative model of each series. Therefore the colors and appearance of
the pictures may differ from the actual appearance of the product depending on the
model.
The actual color and appearance of the computer may differ from the pictures used
in this guide.
No
Subject
Contents
1
Illumination Sensor
This sensor detects the amount of light in your surroundings and
adjusts the LCD backlight accordingly.
2
Camera Operating LED When the camera is in use, this light turns blue.
3
Camera
Using this camera, you can take still pictures and record video.
4
Microphone
The built-in microphone is located here.
5
LCD
The screen images are displayed here.
6
Power Button
Turns your Chromebook on or off.
7
Keyboard
The keyboard is designed to help you browse the web.
8
Touchpad
Use the touchpad to move the pointer on the screen or click items.
Rear View
No
Subject
Contents
1
USIM Card Slot (if
available)
Insert USIM cards into this slot, if available for your Chromebook
model.
2
USB 3.0 Port or
Chargeable USB 3.0
Port (Optional)
USB ports to which you can connect USB devices as well as a
chargeable USB port are provided. Using a chargeable USB port, you
can access or charge a USB device.
The port can be distinguished by the figure (
printed on the port of the product.
3
USB 2.0 Port (Optional)
or
You can connect USB devices to the USB port such as a
)
keyboard/mouse, digital camera, etc.
4
Digital Video/Audio Port
(HDMI) (Optional)
You can connect an HDMI cable to this port. Using this port, you can
enjoy digital video and audio on the TV.
Check this light to see the status of your battery and power source.
Green: Battery is either fully charged or not installed.
5
Status Indicators
Red: Battery is charging.
Off: The Chromebook is not connected to an AC adapter and is
running on battery.
6
DC Jack
Connect the AC adapter that supplies power to the Chromebook.
Left View
No
Subject
Contents
1
Earset / headset Jack
Use this jack to connect your earset or headset.
2
Multi Card Slot
Insert compatible memory cards into this slot.
Bottom View
No
Subject
Contents
1
Emergency Hole
Insert an unfolded paper clip into this hole to cut off power from the
battery. For more information, refer to the Safety Precautions.
2
Speaker
The built-in speaker is located here.
Turn the Computer On and Off
Turn the Computer On
To use the Chromebook, you have to connect to the Internet and then log in with your Google
account.
1
2
3
Connect the AC adapter.
If you open the LCD panel, the computer is automatically turned on.
If the LCD panel is already opened, press the power button.
Power button LED is lit while the computer is turned on.
Turn the Computer Off
Press and hold the power button for approximately 4 seconds to shut the Chromebook down. Press
and hold the power button for approximately 2 seconds to lock the Chromebook.
When the system is frozen, press and hold down the power button for at least 8 seconds to shutdown
the computer.
Controlling the power of the Chromebook
When there is no input for
a predetermined period of
time
If the Power button is
pressed
Signed-in state Enters sleep mode
Enters sleep mode
The state changes to the
signout state.
Signed-out
state
The computer is turned off The computer is turned off
If the Lid is closed
The computer is turned
off
Press any key or swipe the touchpad to wake the Chromebook from sleep mode.
Keyboard
Shortcut key functions and procedures are discussed in the following sections.
The keyboard image may differ from the actual keyboard.
The keyboard may differ depending on your country. The following mainly
describes the shortcut keys.
Shortcut Keys
Here is an overview of the shortcut keys on the top row of the keyboard.
Shortcut Keys
Function
Go to the previous page in your browser history.
Go to the next page in your browser history.
Reload your current page.
Open your page in full-screen mode
Switch to your next window.
Decrease screen brightness.
Increase screen brightness.
Mutes the sound.
In Mute mode, press the
Decrease the volume.
Increase the volume.
Shift Key
Hold the Shift key down to enter upper case letters.
key to cancel the Mute function.
Hot key function
Press the following keys at the same time. You can check the hot keys in Chrome OS.
+
+
Search key
Where you’d find the Caps Lock key on a traditional keyboard, we’ve put the Search key.
Press it to go to the address bar on the New Tab page where you can do a web search.
If you really need Caps Lock, go to the Settings page to make the Search key behave like a Caps
Lock key.
Touchpad
Use the Touchpad with your fingers. Using a sharp object may damage the
Touchpad.
The pictures in this manual may differ from the actual screenshots and the
appearance of the touchpad may differ depending on the model.
Basic Touchpad Functions
Moving the cursor on the screen
Place your finger on the touchpad slightly and move your finger.
The mouse cursor will move accordingly. Move your finger in the direction you wish to move the
cursor.
Click Function
To click on an item, place a finger on the touch area and tap once.
You can also do this by clicking once on the click area.
Double-Click Function
To select an item, place a finger on the touch area and quickly tap twice.
You can also do this by quickly clicking twice on the click area.
Right Button Function
To right-click, place two fingers on the touch area and tap once.
You can also do this by placing two fingers on the click area and clicking once.
Drag Function
Dragging refers to moving an item to another place after selecting it.
To drag an item to a new location, press the click area and hold while dragging the item to the new
location.
Adjusting your Touchpad Settings
If your touchpad is too sensitive, you can adjust your settings by following these steps:
1
Click the wrench icon
on the browser toolbar.
2
Select Settings.
3
On the System tab, find the Touchpad section and adjust your settings.
Multi Card Slot (Optional)
Using the multi card slot, you can read and write data to cards.
You can use a card as a removable disk and conveniently exchange data with digital devices such as
a digital camera, digital camcorder, MP3, etc.
Supported cards : SD card, SDHC card, SDXC card
You have to additionally purchase a multi card with the necessary capacity
depending on your requirements.
You can use a multi card just like any data storage device. A copyright protection
function is not supported.
Since you can lose a card when moving the computer, keep the card separately.
The figures used for the description are of a representative model. Therefore the
figures may differ from the real ones.
If a slot protection dummy card is inserted into your computer, remove the dummy
card before using the computer.
Using the card
1
Insert the card into the multi card slot in the indicated direction.
2
A new tab opens and the list of files on the card appears. Click on a file to read the data for the
file.
The supported data may differ depending on the version of the Chrome operating system.
You cannot save the data on the card to the Chromebook storage device.
Using a Mini SD
Since the above cards are too small, you cannot insert the cards into the slot directly.
Insert the card into the dedicated adapter (available from most electronic retailers) and then insert the
adapter into the multi card slot.
To remove a memory card
Take hold of the end of the card and remove the card.
Network (Optional)
Connecting to a Network
When the Chromebook is turned on, the login window appears. In the login window, connect to the
network.
Connecting to a Wireless Network
1
2
Click the network icon
APs.
at the top right to view the list of available
To connect to a network, simply select its name in the network
menu.
If the connection is successfully established, the network icon is
3
displayed as
.
If the network is not properly connected, it is represented as
.
The number of activated bars in the network icon represents the signal strength of
the wireless LAN.
LCD Brightness Control
Adjust the LCD brightness by pressing the
the
key to decrease brightness or
key to increase brightness.
Whenever you press the
key, the LCD brightness increases by one level.
LCD bad pixels principle of computer
Samsung observes the specifications regarding strict quality and reliability of LCD. But in
spite of that, it is inevitable that there might be a small number of bad pixels. A large
number of bad pixels can cause problems in appearance, but a small number of pixels
doesn't affect the computer performance.
Therefore Samsung observes and manages the following dot principles :
- Bright dot : 2 or less
- Black dot : 4 or less
- Combination of Bright and Dark : 4 or less
Instructions for Cleaning the LCD
Clean the LCD panel with a soft cloth lightly moistened with computer cleansing detergent
moving in one direction.
Cleaning the LCD panel with excessive force can damage the LCD.
Battery
Please refer to the following instructions when running the computer on battery power without
connecting the AC power.
This computer is equipped with an internal battery.
Before using your computer for the first time after purchasing it, charge the battery
completely.
Precautions
Users cannot remove or replace the internal battery.
To remove or replace the battery, use an authorized service center in order to
protect the product and users. You will be charged for this service.
Use only chargers specified in the User Manual.
Never heat the battery pack, put it near or in a fire or use at a temperature higher
than 60°C, as this may cause fire.
Please refer to the system operation environment of this manual and operate and
store the battery at room temperature.
How to Charge the Battery
Connect the AC adapter to the power input jack on the left side of the Chromebook.
The battery will start charging. When charging is complete, the Charge LED turns green.
Status
Charge LED
Charging in progress
Red
Charging complete
Green
AC adapter not connected
Off
Measuring the Remaining Battery Charge
To see how much battery power you have left, click the battery icon in the bottom right of the screen.
Battery Usage Time Information
A battery is an expendable supply, so when using it over a long time, the capacity/battery life is
shortened. If the battery life is reduced to under half of its initial time, we recommend purchasing a
new battery.
When not using the battery for a long time, store the battery after charging it to 30-40% of its capacity.
This extends the battery lifetime.