1
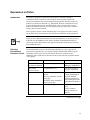
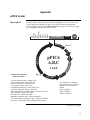
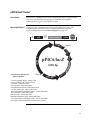
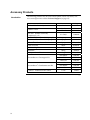
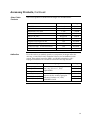
pPIC6 A, B, and C Pichia expression vectors for selection on blasticidin and purification of recombinant proteins Catalog no. V210-20 Rev. date: 7 June 2010 Manual part no. 25-0344 MAN0000164 Corporate Headquarters Invitrogen Corporation 1600 Faraday Avenue Carlsbad, CA 92008 T: 1 760 603 7200 F: 1 760 602 6500 E: [email protected] For country-specific contact information visit our web site at www.invitrogen.com User Manual ii Table of Contents Kit Contents and Storage........................................................................................................................... iv Introduction .............................................................................................................. 1 Product Overview ........................................................................................................................................1 Methods .................................................................................................................... 2 Cloning into pPIC6 A, B, and C..................................................................................................................2 Pichia Transformation ..................................................................................................................................8 Expression in Pichia....................................................................................................................................12 Purification ..................................................................................................................................................14 Appendix ................................................................................................................ 16 pPIC6 Vector ...............................................................................................................................................16 pPIC6/lacZ Vector......................................................................................................................................18 Recipes .........................................................................................................................................................19 Blasticidin ....................................................................................................................................................21 Lithium Chloride Transformation Method.............................................................................................23 Constructing In Vitro Multimers ..............................................................................................................25 Accessory Products ....................................................................................................................................33 Technical Support.......................................................................................................................................35 Purchaser Notification ...............................................................................................................................36 References....................................................................................................................................................38 iii Kit Contents and Storage Shipping and Storage pPIC6 vectors are shipped on wet ice. Upon receipt, store vectors at –20°C, and store the X-33 stab at 4°C. Kit Contents The kit contents are listed below. Item X-33 Pichia Strain Composition Amount pPIC6 A, B and C 40 L of 0.5 g/L vector in 10 mM Tris-HCl, 1 mM EDTA, pH 8.0 20 g pPIC6/lacZ 40 L of 0.5 g/L vector in 10 mM Tris-HCl, 1 mM EDTA, pH 8.0 20 g X-33 Pichia strain 1 stab in YPD medium 1 stab The X-33 Pichia strain has the following genotype and phenotype: Genotype: Wild-type Phenotype: Mut+ For long term storage of your Pichia strain stab, we recommend preparing a glycerol stock immediately upon receipt and storing at –80°C. Reference Sources The pPIC6 A, B, and C vectors may be used with the EasySelect™ Pichia Expression Kit or the Original Pichia Expression Kit available from Invitrogen (see page 34 for ordering). Additional information about recombinant protein expression in Pichia pastoris is provided in the manuals for the EasySelect™ Pichia Expression Kit and the Original Pichia Expression Kit. The manuals can be downloaded from www.invitrogen.com or obtained by contacting Technical Support (see page 35). More detailed information and protocols dealing with Pichia pastoris may also be found in the following general reference (see page 34 for ordering information): Higgins, D. R., and Cregg, J. M. (1998) Pichia Protocols. In Methods in Molecular Biology, Vol. 103. (J. M. Walker, ed. Humana Press, Totowa, NJ) Intended Use For research use only. Not intended for any animal or human therapeutic or diagnostic use. Continued on next page iv Kit Contents and Storage, Continued Materials Supplied For the procedures described in this manual, you will need the following reagents and equipment. Additional reagents may be required. Check each by the User experiment to ensure you have all the reagents necessary. Equipment Microbiological equipment Electroporation device and 0.2 cm cuvettes or reagents for transformation 16°C, 37°C, and 65°C water baths or temperature blocks 30°C and 37°C shaking and non-shaking incubators Hemocytometer or Countess™ Automated Cell Counter (see page 33) Microtiter plates (optional) Reagents Electrocompetent or chemically competent E. coli (must be recA, endA) for transformation (see page 33). Restriction enzymes and appropriate buffers Agarose and low-melt agarose S.N.A.P.™ Gel Purification Kit or glass milk Sterile water CIAP (calf intestinal alkaline phosphatase, 1 unit/L) 10X CIAP Buffer Phenol/chloroform 3 M sodium acetate 100% ethanol 80% ethanol T4 Ligase (2.5 units/L) 10X Ligation Buffer (with ATP) Low Salt LB medium (see page 19 for recipe) Blasticidin antibiotic (page 21) Low Salt LB plates containing 100 g/mL blasticidin (see page 19 for recipe) YPDS plates containing the appropriate concentration of blasticidin (see page 20 for recipe) 50 mL conical centrifuge tubes 15 mL polypropylene tubes ProBond™ Purification System (optional, see page 33 for ordering) v Introduction Product Overview Description of the System pPIC6 A, B, and C are 3.4 kb vectors used to express recombinant proteins in Pichia pastoris. The vector allows high-level, methanol inducible expression of the gene of interest in Pichia, and can be used in any Pichia strain including the X-33 strain supplied with the kit. pPIC6 contains the following elements: 5 fragment containing the AOX1 promoter for tightly regulated, methanolinduced expression of the gene of interest (Ellis et al., 1985; Koutz et al., 1989; Tschopp et al., 1987a) Blasticidin resistance gene (Kimura et al., 1994; Takeuchi et al., 1958; Yamaguchi et al., 1965) for selection in both E. coli and Pichia C-terminal peptide containing the c-myc epitope and a polyhistidine (6xHis) tag for detection and purification of a recombinant fusion protein (if desired) Three reading frames to facilitate in-frame cloning with the C-terminal peptide The control plasmid, pPIC6/lacZ, is included for use as a positive control for expression. Experimental Overview The following table describes the basic steps needed to clone and express your gene of interest in pPIC6. Step Action Page 1 Propagate pPIC6 A, B, and C by transformation into a recA, endA1 E. coli strain such as TOP10, DH5, or JM109. 2 2 Develop a cloning strategy and ligate your gene into one of the pPIC6 vectors in frame with the C-terminal tag. 3–6 3 Transform into E. coli and select transformants on Low Salt LB 7 plates containing 100 g/mL blasticidin. 4 Analyze 10–20 transformants by restriction mapping or sequencing to confirm in-frame fusion of your gene with the C-terminal tag. 7 5 Purify and linearize the recombinant plasmid for transformation into Pichia pastoris. 7–10 6 Transform X-33 or your Pichia strain and plate onto YPDS plates containing the appropriate concentration of blasticidin. 10–11 7 Select for blasticidin-resistant transformants. 10–11 8 Optimize expression of your gene. 12–13 9 Purify your fusion protein on metal-chelating resin (e.g., ProBond™). 14–15 Methods Cloning into pPIC6 A, B, and C General Molecular Biology Techniques For assistance with E. coli transformations, restriction enzyme analysis, DNA biochemistry, and plasmid preparation, refer to Molecular Cloning: A Laboratory Manual (Sambrook et al., 1989) or Current Protocols in Molecular Biology (Ausubel et al., 1994). E. coli Strain Many E. coli strains are suitable for the propagation of the pPIC6 vectors including TOP10, JM109, and DH5. We recommend that you propagate the pPIC6 vectors in E. coli strains that are recombination deficient (recA) and endonuclease A deficient (endA). For your convenience, TOP10 E. coli are available as chemically competent or electrocompetent cells from Invitrogen (see page 33). Transformation Method You may use any method of choice for transformation. Chemical transformation is the most convenient for many researchers. Electroporation is the most efficient and the method of choice for large plasmids. Maintaining Plasmids The pPIC6 and pPIC6/lacZ vectors contain the blasticidin resistance gene to allow selection of the plasmid using blasticidin. To propagate and maintain the pPIC6 and pPIC6/lacZ plasmids, we recommend using the following procedure: 1. Use a small amount of the supplied plasmid stock solution in TE, pH 8.0 to transform a recA, endA E. coli strain like TOP10, DH5, JM109, or equivalent. 2. Select transformants on Low Salt LB plates containing 100 g/mL blasticidin (see page 19 for a recipe). 3. Prepare a glycerol stock from each transformant containing plasmid for longterm storage (see page 7). Continued on next page 2 Cloning into pPIC6 A, B, and C, Continued General Considerations Cloning Considerations The following are some general points to consider when using pPIC6 to express your gene of interest in Pichia: The codon usage in Pichia is believed to be similar to Saccharomyces cerevisiae. Many Saccharomyces genes have proven to be functional in Pichia. The premature termination of transcripts because of "AT rich regions" has been observed in Pichia and other eukaryotic systems (Henikoff and Cohen, 1984; Irniger et al., 1991; Scorer et al., 1993; Zaret and Sherman, 1984). If you have problems expressing your gene, check for premature termination by northern analysis and check your sequence for AT rich regions. It may be necessary to change the sequence in order to express your gene (Scorer et al., 1993). The native 5´ end of the AOX1 mRNA is noted in the diagram for each multiple cloning site. This information is needed to calculate the size of the expressed mRNA of the gene of interest if you need to analyze mRNA for any reason. Your insert should contain a Kozak translation initiation sequence with an ATG start codon for proper initiation of translation (Kozak, 1987; Kozak, 1991; Kozak, 1990). An example of a Kozak consensus sequence is provided below. Note that other sequences are possible, but the G or A at position –3 and the G at position +4 are the most critical for function (shown in bold). The ATG initiation codon is shown underlined. Constructing Multimeric Plasmids (G/A)NNATGG pPIC6 is a terminal fusion vector. To express your gene as a recombinant fusion protein, you must clone your gene in frame with the C-terminal peptide containing the c-myc epitope and the polyhistidine tag. The vector is supplied in three reading frames to facilitate cloning. Refer to the diagrams on pages 4–6 to develop a cloning strategy. If you wish to express your protein WITHOUT the C-terminal peptide, be sure to include a stop codon. pPIC6 A, B, and C contain unique Bgl II and BamH I sites to allow construction of plasmids containing multiple copies of your gene. For information on how to construct multimers, refer to the Appendix, pages 25–32. Continued on next page 3 Cloning into pPIC6 A, B, and C, Continued Multiple Cloning Site of pPIC6 A Below is the multiple cloning site for pPIC6 A. Restriction sites are labeled to indicate the cleavage site. The boxed nucleotides indicate the variable region. The multiple cloning site has been confirmed by sequencing and functional testing. The vector sequence of pPIC6 A is available for downloading from www.invitrogen.com or from Technical Support (see page 35). For a map and a description of the features of pPIC6, refer to the Appendix, pages 16–17. 5´ end of AOX1 mRNA 5´ AOX1 priming site 811 AACCTTTTTT TTTATCATCA TTATTAGCTT ACTTTCATAA TTGCGACTGG TTCCAATTGA 871 CAAGCTTTTG ATTTTAACGA CTTTTAACGA CAACTTGAGA AGATCAAAAA ACAACTAATT 931 ATTCGAAACG AGGAATTCAC GTGGCCCAGC CGGCCGTCTC GGATCGGTAC CTCGAGCCGC Sfu I EcoR I Sac II Not I 991 Pml I Sfi I Asp718 I Kpn I Xho I c-myc epitope Apa I GGCGGCCGCC AGCTT GGGCCC GAA CAA AAA CTC ATC TCA GAA GAG GAT CTG Glu Gln Lys Leu Ile Ser Glu Glu Asp Leu Polyhistidine tag 1042 AAT AGC GCC GTC GAC CAT CAT CAT CAT CAT CAT TGA GTTTGTAGCC TTAGACATGA Asn Ser Ala Val Asp His His His His His His *** 1098 CTGTTCCTCA GTTCAAGTTG GGCACTTACG AGAAGACCGG TCTTGCTAGA TTCTAATCAA 3´ AOX1 priming site 1158 GAGGATGTCA GAATGCCATT TGCCTGAGAG ATGCAGGCTT CATTTTTGAT ACTTTTTTAT 3´polyadenylation site 1218 TTGTAACCTA TATAGTATAG GATTTTTTTT GTCATTTTGT TTC Continued on next page 4 Cloning into pPIC6 A, B, and C, Continued Multiple Cloning Site of pPIC6 B Below is the multiple cloning site for pPIC6 B. Restriction sites are labeled to indicate the cleavage site. The boxed nucleotides indicate the variable region. The multiple cloning site has been confirmed by sequencing and functional testing. The vector sequence of pPIC6 B is available for downloading from www.invitrogen.com or from Technical Support (see page 35). For a map and a description of the features of pPIC6, refer to the Appendix, pages 16–17. 5´ end of AOX1 mRNA 5´ AOX1 priming site 811 AACCTTTTTT TTTATCATCA TTATTAGCTT ACTTTCATAA TTGCGACTGG TTCCAATTGA 871 CAAGCTTTTG ATTTTAACGA CTTTTAACGA CAACTTGAGA AGATCAAAAA ACAACTAATT 931 ATTCGAAACG AGGAATTCAC GTGGCCCAGC CGGCCGTCTC GGATCGGTAC CTCGAGCCGC Sfu I Sac II Not I 991 EcoR I Pml I Sfi I Asp718 I Kpn I Xho I c-myc epitope Xba I GGCGGCCGCC AGCTT TCTA GAA CAA AAA CTC ATC TCA GAA GAG GAT CTG Glu Gln Lys Leu Ile Ser Glu Glu Asp Leu Polyhistidine tag 1040 AAT AGC GCC GTC GAC CAT CAT CAT CAT CAT CAT TGA GTTTGTAGCC TTAGACATGA Asn Ser Ala Val Asp His His His His His His *** 1096 CTGTTCCTCA GTTCAAGTTG GGCACTTACG AGAAGACCGG TCTTGCTAGA TTCTAATCAA 3´ AOX1 priming site 1156 GAGGATGTCA GAATGCCATT TGCCTGAGAG ATGCAGGCTT CATTTTTGAT ACTTTTTTAT 3´ polyadenylation site 1216 TTGTAACCTA TATAGTATAG GATTTTTTTT GTCATTTTGT TTC Continued on next page 5 Cloning into pPIC6 A, B, and C, Continued Multiple Cloning Site of pPIC6 C Below is the multiple cloning site for pPIC6 C. Restriction sites are labeled to indicate the cleavage site. The boxed nucleotides indicate the variable region. The multiple cloning site has been confirmed by sequencing and functional testing. The vector sequence of pPIC6 C is available for downloading from www.invitrogen.com or from Technical Support (see page 35). For a map and a description of the features of pPIC6, refer to the Appendix, pages 16–17. 5´ end of AOX1 mRNA 5´ AOX1 priming site 811 AACCTTTTTT TTTATCATCA TTATTAGCTT ACTTTCATAA TTGCGACTGG TTCCAATTGA 871 CAAGCTTTTG ATTTTAACGA CTTTTAACGA CAACTTGAGA AGATCAAAAA ACAACTAATT 931 ATTCGAAACG AGGAATTCAC GTGGCCCAGC CGGCCGTCTC GGATCGGTAC CTCGAGCCGC Sfu I Sac II Not I 991 EcoR I Pml I Sfi I Asp718 I Kpn I Xho I c-myc epitope SnaB I GGCGGCCGCC AGCTT ACGTA GAA CAA AAA CTC ATC TCA GAA GAG GAT CTG Glu Gln Lys Leu Ile Ser Glu Glu Asp Leu Polyhistidine tag 1041 AAT AGC GCC GTC GAC CAT CAT CAT CAT CAT CAT TGA GTTTGTAGCC TTAGACATGA Asn Ser Ala Val Asp His His His His His His *** 1097 CTGTTCCTCA GTTCAAGTTG GGCACTTACG AGAAGACCGG TCTTGCTAGA TTCTAATCAA 3´ AOX1 priming site 1157 GAGGATGTCA GAATGCCATT TGCCTGAGAG ATGCAGGCTT CATTTTTGAT ACTTTTTTAT 3´ polyadenylation site 1217 TTGTAACCTA TATAGTATAG GATTTTTTTT GTCATTTTGT TTC Continued on next page 6 Cloning into pPIC6 A, B, and C, Continued E. coli Transformation Important Transform your ligation mixtures into a competent recA, endA E. coli strain (e.g. TOP10, DH5, JM109) and select on Low Salt LB agar plates containing 100 g/mL blasticidin (see below). Note that there is no blue/white screening for the presence of insert with pPIC6 A, B, or C. Once you have obtained blasticidinresistant colonies, pick 10 transformants and screen for the presence and orientation of your insert. To facilitate selection of blasticidin-resistant E. coli, the salt concentration of the medium must remain low (<90 mM) and the pH must be 7.0. Prepare Low Salt LB broth and plates using the recipe in the Appendix, page 19. MEND ION AT RECOM Failure to lower the salt content of your LB medium will result in nonselection due to inhibition of the drug. Preparing a Glycerol Stock Plasmid Preparation 7 We recommend that you sequence your construct to confirm that your gene is in the correct orientation for expression, cloned in frame with the C-terminal peptide, and contains an ATG start codon and a stop codon. We suggest using the 5 AOX1 Pichia and 3 AOX1 Pichia primer sequences. Refer to the diagrams on pages 4–6 for the sequences and location of the priming sites. Once you have identified the correct clone, be sure to purify the colony and make a glycerol stock for long-term storage. It is also a good idea to keep a DNA stock of your plasmid at –20°C. 1. Streak the original colony on Low Salt LB plate containing 100 g/mL blasticidin. Incubate the plate at 37°C overnight. 2. Isolate a single colony and inoculate into 1–2 mL of Low Salt LB containing 100 g/mL blasticidin. 3. Grow the culture to mid-log phase (OD600 = 0.5–0.7). 4. Mix 0.85 mL of culture with 0.15 mL of sterile glycerol and transfer to a cryovial. 5. Store at –80°C. Once you have cloned and sequenced your insert, generate enough plasmid DNA to transform Pichia (5–10 g of each plasmid per transformation). We recommend isolating plasmid DNA using the PureLink™ HiPure Plasmid Miniprep Kit or the PureLink™ HiPure Plasmid Midiprep Kit or equivalent (see page 33). Once you have purified plasmid DNA, proceed to Pichia Transformation, next page. Pichia Transformation Introduction You should now have your gene cloned into one of the pPIC6 vectors. Your construct should contain a Kozak consensus sequence (initiation ATG) and be correctly fused to the C-terminal peptide. This section provides general guidelines to prepare plasmid DNA, transform your Pichia strain, and select for blasticidinresistant clones. Blasticidin Selection We generally use 300 g/mL blasticidin to select for transformants when using the X-33 Pichia strain. If you wish to transform your pPIC6 construct into another Pichia strain, note that selection conditions may vary. We recommend performing a dose response curve to determine the appropriate concentration of blasticidin to use for selection of transformants in your strain. Method of Transformation We recommend electroporation for transformation of Pichia with pPIC6 A, B, or C. Electroporation yields 103 to 104 transformants per g of linearized DNA and does not destroy the cell wall of Pichia. If you do not have access to an electroporation device, use the LiCl protocol on page 23 or the Pichia EasyComp™ Transformation Kit available from Invitrogen (see below). If you wish to perform chemical transformation of your Pichia strain with pPIC6 Pichia A, B, or C, the Pichia EasyComp™ Transformation Kit is available from Invitrogen EasyComp™ ™ Transformation Kit (see page 34 for ordering information). The Pichia EasyComp Transformation Kit provides reagents to prepare 6 preparations of competent cells. Each preparation yields enough competent cells for 20 transformations. Competent cells may be used immediately or frozen and stored for future use. For more information, visit www.invitrogen.com or contact Technical Support (page 35). The pPIC6 vectors do not contain a yeast origin of replication. Transformants can only be isolated if recombination occurs between the plasmid and the Pichia genome. Important Since pPIC6 does not contain the HIS4 gene, integration can only occur at the AOX1 locus. Vector linearized within the 5´ AOX1 region will integrate by gene insertion into the host 5´ AOX1 region. Therefore, the Pichia host that you use will determine whether the recombinant strain is able to metabolize methanol (Mut+) or not (MutS). To generate a Mut+ recombinant strain, you must use a Pichia host that contains the native AOX1 gene (e.g. X-33, SMD1168H). If you wish to generate a MutS recombinant strain, then use a Pichia host that has a disrupted AOX1 gene (e.g. KM71H). Note: The X-33 strain supplied with the pPIC6 vector contains the native AOX1 gene; therefore, the recombinant strain will be Mut+. Continued on next page 8 Pichia Transformation, Continued Positive Control The pPIC6/lacZ plasmid is provided as a positive control vector for blasticidin resistance in Pichia and may be used to optimize expression and purification conditions for your host strain. The pPIC6/lacZ plasmid expresses -galactosidase fused at the C-terminus to the c-myc epitope and the polyhistidine tag (see page 18 for more information). Expression of the 119 kDa fusion protein is driven by the PAOX1 promoter and is inducible with methanol. The fusion protein is visible on a Coomassie-stained SDS-polyacrylamide gel and can be detected using the Antimyc antibodies (see page 34) or using an ONPG assay (-Gal Assay Kit, see page 33). Before Starting You will need the following reagents for transforming Pichia and selecting transformants on blasticidin. Note: Inclusion of sorbitol in YPD plates stabilizes electroporated cells as they appear to be somewhat osmotically sensitive. Linearizing Your pPIC6 Construct 5–10 g pure pPIC6 plasmid containing your insert YPD Medium 50 mL conical polypropylene tubes 1 liter cold (4°C) sterile water (place on ice the day of the experiment) 25 mL cold (4°C) sterile 1 M sorbitol (place on ice the day of the experiment) 30°C incubator Electroporation device and 0.2 cm cuvettes YPDS plates containing the appropriate concentration of blasticidin (see page 20 for recipe) To promote integration, we recommend that you linearize your pPIC6 construct within the 5 AOX1 region. The table below lists unique sites that may be used to linearize pPIC6 prior to transformation. Other restriction sites are possible. Note that for the enzymes listed below, the cleavage site is the same for versions A, B, and C of pPIC6. Be sure that your insert does not contain the restriction site you wish to use to linearize your vector. Enzyme Restriction Site (bp) Supplier Sac I 209 Many Pme I 414 New England Biolabs BstX I 707 Many Continued on next page 9 Pichia Transformation, Continued Restriction Digest Preparing Pichia for Electroporation Transformation by Electroporation 1. Digest ~5–10 g of plasmid DNA with one of the enzymes listed above. 2. Check a small aliquot of your digest by agarose gel electrophoresis for complete linearization. 3. If the vector is completely linearized, heat inactivate or add EDTA to stop the reaction, phenol/chloroform extract once, and ethanol precipitate using 1/10 volume 3 M sodium acetate and 2.5 volumes of 100% ethanol. 4. Centrifuge the solution to pellet the DNA, wash the pellet with 80% ethanol, air-dry, and resuspend the DNA in 10 L sterile, deionized water. Use immediately or store at -20°C. Follow the procedure below to prepare your Pichia pastoris strain for electroporation. 1. Grow 5 mL of your Pichia pastoris strain in YPD in a 50 mL conical tube at 30°C overnight. 2. Inoculate 500 mL of fresh medium in a 2 liter flask with 0.1–0.5 mL of the overnight culture. Grow overnight again to an OD600 = 1.3–1.5. 3. Centrifuge the cells at 1,500 × g for 5 minutes at 4°C. Resuspend the pellet with 500 mL of ice-cold, sterile water. 4. Centrifuge the cells as in Step 3 and resuspend the pellet with 250 mL of icecold, sterile water. 5. Centrifuge the cells as in Step 3 and resuspend the pellet in 20 mL of ice-cold 1 M sorbitol. 6. Centrifuge the cells as in Step 3 and resuspend the pellet in 1 mL of ice-cold 1 M sorbitol for a final volume of approximately 1.5 mL. Keep the cells on ice and use that day. Do not store cells. 1. Mix 80 L of the cells from Step 6 (above) with 5–10 g of linearized pPIC6 DNA (in 5–10 L sterile water) and transfer them to an ice-cold 0.2 cm electroporation cuvette. 2. Incubate the cuvette with the cells on ice for 5 minutes. 3. Pulse the cells according to the parameters for yeast (Saccharomyces cerevisiae) as suggested by the manufacturer of the specific electroporation device being used. 4. Immediately add 1 mL of ice-cold 1 M sorbitol to the cuvette. Transfer the cuvette contents to a sterile 15 mL tube. 5. Let the tube incubate at 30°C without shaking for 1 to 2 hours. 6. Spread 50–200 L each on separate, labeled YPDS plates containing the appropriate concentration of blasticidin. 7. Incubate plates for 2 to 3 days at 30°C until colonies form. 8. Pick 10–20 colonies and purify (streak for single colonies) on fresh YPD or YPDS plates containing the appropriate concentration of blasticidin. 10 MEND ION AT RECOM Pichia Transformation, Continued When selecting for blasticidin-resistant transformants, we often observe colonies of two different sizes (large and small) on YPD plates containing 300 g/mL blasticidin. Generally, large colonies represent transformants containing pPIC6 integrants, while small colonies represent transformants containing pPIC6 nonintegrants. These non-integrants have transduced the pPIC6 plasmid, and therefore, exhibit a low level of blasticidin resistance in the initial selection process. Upon subsequent screening, these non-integrant transformants do not retain blasticidin resistance. When choosing a blasticidin-resistant transformant for your expression studies, we recommend that you pick blasticidin-resistant colonies from the initial transformation plate and streak them on a second YPD plate containing the appropriate concentration of blasticidin. Select transformants which remain blasticidin-resistant for further studies. Generally several hundred blasticidin-resistant colonies are generated using the protocol on the previous page. If more colonies are needed, the protocol may be modified as described below. Note that you will need ~20 150 mm plates with YPDS agar containing the appropriate concentration of blasticidin. Mut Phenotype 1. Set up two transformations per construct and follow Steps 1 through 5 of the Transformation by Electroporation protocol, previous page. 2. After 1 hour in 1 M sorbitol at 30°C (Step 5, previous page), add 1 mL YPD medium to each tube. 3. Shake (~200 rpm) the cultures at 30°C. 4. After 1 hour, take one of the tubes and plate out all of the cells by spreading 200 L on 150 mm plates containing the appropriate concentration of blasticidin. 5. (Optional) Continue incubating the other culture for three more hours (for a total of four hours) and then plate out all of the cells by spreading 200 L on 150 mm plates containing the appropriate concentration of blasticidin. 6. Incubate plates for 2 to 4 days at 30°C until colonies form. If you used a Pichia strain containing a native AOX1 gene (e.g., X-33, GS115, SDM1168H) as the host for your pPIC6 construct, your blasticidin-resistant transformants will be Mut+. If you used a strain containing a deletion in the AOX1 gene (e.g., KM71H), your transformants will be MutS. If you wish to verify the Mut phenotype of your blasticidin-resistant transformants, refer to the general guidelines provided in the EasySelect™ Pichia Expression Kit manual or the Original Pichia Expression Kit manual or to published reference sources (Higgins and Cregg, 1998). You are now ready to test your transformants for expression of your gene of interest. Proceed to Expression in Pichia, next page. 11 Expression in Pichia Introduction The primary purpose of small-scale expression is to identify/confirm a recombinant Pichia clone that is expressing the correct protein. Small-scale expression conditions may not be optimal for your protein. For this reason, the method you choose for detection (e.g. SDS-PAGE, Western, or functional assay) may be an important factor in determining the success of expression. If your method of detection does not reveal any expression, you may want to consider using a more sensitive method. Once a positive clone has been identified, large-scale expression can be carried out in shake flask or fermentation, and expression conditions can be optimized. Once you have obtained blasticidin-resistant transformants, it is not necessary to maintain your recombinant Pichia clone in medium containing blasticidin for expression studies. Blasticidin is only required for initial screening and selection of recombinant clones. Detecting Recombinant Proteins in Pichia We recommend that you use the following techniques to assay expression of your protein. Note that the c-myc epitope and the polyhistidine (6xHis) tag will contribute 2.5 kDa to the size of your protein. Be sure to account for any additional amino acids that are in between the end of your native protein and the c-myc epitope. Technique Method of Detection Sensitivity SDS-PAGE Visualization by eye (Coomassie-stained) Can detect as little as 100 ng in a single band. SDS-PAGE (Silver-stained) Visualization by eye Can detect as little as 2 ng in a single band. Western Analysis Antibody to your particular protein Anti-myc antibodies (see the next page) Anti-His(C-term) antibodies (see the next page) Can detect as little as 1-10 pg, depending on detection method (alkaline phosphatase, horseradish peroxidase, radiolabeled antibody). Functional assay Varies depending on assay. Varies depending on assay. Used to compare relative amounts of protein. Continued on next page 12 Expression in Pichia, Continued Polyacrylamide Gel Electrophoresis To facilitate separation and visualization of your recombinant protein by polyacrylamide gel electrophoresis, a wide range of pre-cast NuPAGE® and Tris-Glycine polyacrylamide gels are available from Invitrogen. In addition, Invitrogen also carries a large selection of molecular weight protein standards and staining kits. For more information about the appropriate gels, standards, and stains to use to visualize your recombinant protein, visit www.invitrogen.com or call Technical Support (see page 35). Western Analysis To detect expression of your recombinant fusion protein by western blot analysis, you may use the Anti-myc antibodies or the Anti-His(C-term) antibodies available from Invitrogen (see page 34 for ordering information) or an antibody to your protein of interest. In addition, the Positope™ Control Protein is available from Invitrogen for use as a positive control for detection of fusion proteins containing a c-myc epitope or a polyhistidine (6xHis) tag. WesternBreeze® Chromogenic Kits and WesternBreeze® Chemiluminescent Kits are available from Invitrogen to facilitate detection of antibodies by colorimetric or chemiluminescent methods (see page 33 for ordering). For more information, visit www.invitrogen.com or call Technical Support (see page 35). Control Strain If you have transformed the pPIC6/lacZ plasmid into your Pichia host strain, you may use this recombinant strain as a positive control for expression. Expression of -galactosidase in shake flasks is detectable after 48 hours and reaches the maximum at 96 hours. -galactosidase may be detected using SDS-PAGE and staining the gel with Coomassie Blue or by ONPG assay (-Gal Assay Kit, see page 33). Cells expressing -galactosidase can be detected by plating on medium containing methanol and X-gal. For a small-scale Mut+ expression protocol, refer to the EasySelect™ Pichia Expression Kit manual or to general reference texts. Important Expression Guidelines 13 Because the pPIC6 vector does not contain the HIS4 gene, his4 Pichia strains containing the integrated plasmid must be grown in medium containing 0.004% histidine. If histidine is not present in the medium the cells will not grow. If you used X-33 as the host strain, supplementation of the medium with histidine is not required. General guidelines to perform small-scale expression, optimize expression, and scale-up of expression are provided in the EasySelect™ Pichia Expression Kit manual or the Original Pichia Expression Kit manual. Purification Introduction In this section, you will grow and induce a 10–200 mL culture of your Pichia transformant for trial purification on a metal-chelating resin such as ProBond™ or Ni-NTA. You may harvest the cells and store them at –80°C until you are ready to purify your fusion protein, or you may proceed directly with protein purification. Note that this section only describes preparation of cell lysates and sample application onto ProBond™. For instructions on how to prepare and use ProBond™ resin, refer to the ProBond™ Purification manual. Metal-Chelating Resin You may use the ProBond™ Purification System or Ni-NTA Purification System, or a similar product to purify your 6xHis-tagged protein (see page 33 for ordering). Both purification systems contain a metal-chelating resin specifically designed to purify 6xHis-tagged proteins. Before starting, be sure to consult the ProBond™ Purification System manual or Ni-NTA Purification System manual to familiarize yourself with the buffers and the binding and elution conditions. If you are using another resin, consult the manufacturer’s instructions. Binding Capacity of ProBond™ One milliliter of ProBond™ resin binds from 1–5 mg of recombinant protein. This amount can vary depending on the protein. Important Preparing Cell Lysates Throughout the following protocol, be sure to keep the cell lysate and fractions on ice. Small-scale purifications using the 2 mL ProBond™ columns and buffers can be done at room temperature on the bench top. For large scale purifications, all reagents must be kept at 4°C. Express your protein using a small-scale culture (10–20 mL for MutS strains; 100– 200 mL for Mut+) and the optimal conditions for expression (if determined). Once your protein is expressed, follow the protocol below to prepare a cell lysate for chromatography on ProBond™. Prepare Breaking Buffer (BB) as described in the Recipes, page 20. 1. Wash cells once in BB by resuspending them and centrifuging 5–10 minutes at 3,000 × g at 4°C. 2. Resuspend the cells to an OD600 of 50–100 in BB. 3. Add an equal volume of acid-washed glass beads (0.5 mm). Estimate volume by displacement. 4. Vortex the mixture for 30 seconds, then incubate on ice for 30 seconds. Repeat 7 more times. Alternating vortexing with cooling keeps the cell extracts cold and reduces denaturation of your protein. 5. Centrifuge the sample at 4°C for 5–10 minutes at 12,000 × g. 6. Transfer the clear supernatant to a fresh container and analyze for your protein. The total protein concentration should be around 2–3 mg/mL. 7. Save the pellet and extract with 6 M urea or 1% Triton® X-100 to check for insoluble protein. Continued on next page 14 Purification, Continued Sample Application (Native Conditions) Sample Application (Denaturing Conditions) For sample application onto ProBond™, you need Native Binding Buffer, pH 7.8 and a 2 mL ProBond™ column, pre-equilibrated using native conditions. 1. Combine 1 mL (2–3 mg/mL total protein) of Pichia lysate with 7 mL Native Binding Buffer. 2. Take a pre-equilibrated ProBond™ column and resuspend the resin in 4 mL of the diluted lysate from Step 1. 3. Seal the column and batch-bind by rocking gently at room temperature for 10 minutes. 4. Let the resin settle by gravity or low speed centrifugation (800 × g) and carefully remove the supernatant. Save the supernatant to check for unbound protein. 5. Repeat Steps 2 through 4 with the remaining 4 mL of diluted lysate. Proceed to Column Washing and Elution Under Native Conditions in the ProBond™ Purification manual. Use the recommendations noted for bacterial cell lysates. Use the protocol above except pre-equilibrate the ProBond™ column using Denaturing Binding Buffer and combine 1 mL of the Pichia cell lysate with 7 mL of the Denaturing Binding Buffer. We have observed that some Pichia proteins may be retained on the ProBond™ column using native purification conditions. Optimization of the purification (see ProBond™ Purification manual) or using denaturing purification may remove these non-specific Pichia proteins. Analysis of Purification Be sure to save all fractions, washes, and flow-through for analysis by SDSPAGE. You may need to use western blot analysis to detect your protein if expression is low or not enough protein was loaded onto the column. Refer to the ProBond™ Purification System manual for a guide to troubleshoot chromatography. Scale-up You may find it necessary to scale-up your purification to obtain sufficient amounts of purified protein. Adjust the pH and NaCl concentration of your lysate with 1/10 volume of 10X Stock Solution B (ProBond™ Purification Kit) before adding it to the column. The pH should be ≥ 7.5 and the NaCl concentration should be ~500 mM. Using 10X Stock Solution B to adjust the pH and the ionic strength keeps the total volume small for sample application. 15 Appendix pPIC6 Vector The figure below summarizes the features of the pPIC6 A, B, and C vectors. The vector sequences for pPIC6 A, B, and C are available for downloading from www.invitrogen.com or from Technical Support (see page 35). See the next page for a description of the features of the vector. Sfu I EcoR I Pml I Sfi I Asp718 I Kpn I Xho I Sac II Not I Apa I* Map of pPIC6 c-myc epitope AOX1 T 6xHis Stop BamH I T 1 EF PT t i c id in PEM7 5 ´ AO X1 pPIC6 A,B,C Bl as 3.4 kb Comments for pPIC6 A: 3382 nucleotides Bgl II pUC 5´ AOX1 promoter region: bases 1-942 5´ AOX1 priming site: bases 855-875 Multiple cloning site: bases 932-1011 c-myc epitope: bases 1012-1041 Polyhistidine (6xHis) tag: bases 1057-1074 3´ AOX1 priming site: bases 1160-1180 AOX1 transcription termination region: bases 1078-1419 TEF1 promoter: bases 1420-1828 EM7 promoter: bases 1833-1899 Blasticidin resistance gene: bases 1900-2298 CYC1 transcription termination region: bases 2327-2644 pUC origin: bases 2655-3328 (complementary strand) ori C 1 YC TT * The restriction site between Not I and the c-myc epitope is different in each version of pPIC6: Apa I in pPIC6 A Xba I in pPIC6 B SnaB I in pPIC6 C Continued on next page 16 pPIC6 Vector, Continued Features of pPIC6 A, B, and C pPIC6 A (3382 bp), pPIC6 B (3380 bp), and pPIC6 C (3381 bp) contain the following elements. All features have been functionally tested. Feature Benefit 5´ AOX1 promoter A 942 bp fragment containing the AOX1 promoter that allows methanol-inducible, high-level expression of the gene of interest in Pichia Targets plasmid integration to the AOX1 locus. Multiple cloning site Allows insertion of your gene into the expression vector. c-myc epitope Allows detection of your recombinant fusion (Glu-Gln-Lys-Leu-Ile-Ser-Glu- protein with the Anti-myc Antibodies (Evans et al., 1985). Glu-Asp-Leu) 17 C-terminal polyhistidine (6xHis) tag Allows purification of your recombinant fusion protein on metal-chelating resin such as ProBond™ In addition, the C-terminal polyhistidine tag is the epitope for the Anti-His(C-term) Antibodies. AOX1 transcription termination (TT) region Native transcription termination and polyadenylation signal from AOX1 gene (~260 bp) that permits efficient 3´ mRNA processing, including polyadenylation, for increased mRNA stability. TEF1 promoter (GenBank accession numbers D12478, D01130) Transcription elongation factor 1 gene promoter from Saccharomyces cerevisiae that drives expression of the blasticidin resistance gene in Pichia. EM7 promoter Synthetic prokaryotic promoter that drives constitutive expression of the blasticidin resistance gene in E. coli. Blasticidin resistance gene (bsd) Allows selection of transformants in E. coli and Pichia. CYC1 transcription termination region 3´ end of the Saccharomyces cerevisiae CYC1 gene that allows efficient 3´ mRNA processing of the blasticidin resistance gene for increased stability. pUC origin Allows replication and maintenance of the plasmid in E. coli. pPIC6/lacZ Vector Map of pPIC6/lacZ The figure below summarizes the features of the pPIC6/lacZ vector. The complete sequence for pPIC6/lacZ is available for downloading from www.invitrogen.com or from Technical Support (see page 35). lacZ Not I Xba I pPIC6/lacZ is a 6386 bp control vector containing the gene for -galactosidase. The vector was constructed by ligating a 3.1 kb BstB I/Not I fragment containing the lacZ gene into the pPIC6 B vector. Sfu I Description c-myc epitope Stop 6xHis AOX1 T BamH I T 1 EF PT in PEM7 t i c id 6386 bp Bl as 5 ´ AO X1 pPIC6/lacZ Comments for pPIC6/lacZ: 6386 nucleotides Bgl II pUC ori C 1 YC TT 5´ AOX1 promoter region: bases 1-942 5´ AOX1 priming site: bases 855-875 LacZ ORF: bases 941-3997 c-myc epitope: bases 4016-4045 Polyhistidine (6xHis) tag: bases 4061-4078 3´ AOX1 priming site: bases 4164-4184 AOX1 transcription termination region: bases 4082-4423 TEF1 promoter: bases 4424-4832 EM7 promoter: bases 4837-4903 Blasticidin resistance gene: bases 4904-5302 CYC1 transcription termination region: bases 5331-5648 pUC origin: bases 5659-6332 (complementary strand) 18 Recipes Low Salt LB Medium with Blasticidin 10 g Tryptone 5 g NaCl 5 g Yeast Extract 1. Combine the dry reagents above and add deionized, distilled water to 950 mL. Adjust pH to 7.0 with 1N NaOH. Bring the volume up to 1 liter. For plates, add 15 g/L agar before autoclaving. 2. Autoclave on liquid cycle at 15 psi and 121°C for 20 minutes. 3. Allow the medium to cool to at least 55°C before adding the blasticidin to 100 g/mL final concentration. 4. Store plates at 4°C in the dark. Plates containing blasticidin are stable for up to 2 weeks. YPD (+ Blasticidin) Yeast Extract Peptone Dextrose Medium (1 liter) 1% yeast extract 2% peptone 2% dextrose (glucose) + 2% agar + the appropriate concentration of blasticidin 1. Dissolve: 10 g yeast extract 20 g of peptone in 900 mL of water. 2. Include 20 g of agar if making YPD slants or plates. 3. Autoclave for 20 minutes on liquid cycle. 4. Add 100 mL of 20% dextrose (filter-sterilize dextrose before use). 5. Cool solution to ~60°C and add the appropriate amount of blasticidin from a 10 mg/mL stock solution. Note: It is necessary to include blasticidin in the medium for selection of Pichia transformants only. Blasticidin may be omitted from the medium when performing expression studies. Store YPD slants or plates containing blasticidin at 4°C. The shelf life is one to two weeks. Continued on next page 19 Recipes, Continued YPDS + Blasticidin Yeast Extract Peptone Dextrose Medium with Sorbitol (1 liter) Agar 1% yeast extract 2% peptone 2% dextrose (glucose) 1 M sorbitol + 2% agar + the appropriate concentration of blasticidin 1. Dissolve: 10 g yeast extract 182.2 g sorbitol 20 g of peptone in 900 mL of water. 2. Add 20 g of agar. 3. Autoclave for 20 minutes on liquid cycle. 4. Add 100 mL of 20% dextrose (filter-sterilize dextrose before use). 5. Cool solution to ~60°C and add the appropriate amount of blasticidin from a 10 mg/mL stock solution. Note: It is necessary to include blasticidin in the medium for selection of Pichia transformants only. Blasticidin may be omitted from the medium when performing expression studies. Store YPDS slants or plates containing blasticidin at 4°C. The shelf life is one to two weeks. Breaking Buffer 50 mM sodium phosphate, pH 7.4 1 mM PMSF (phenylmethylsulfonyl fluoride. You may use other protease inhibitors) 1 mM EDTA 5% glycerol 1. Prepare a stock solution of your desired protease inhibitors and store appropriately. Follow manufacturer's recommendations. 2. For 1 liter, dissolve: 6 g sodium phosphate (monobasic) 372 mg EDTA 50 mL glycerol in 900 mL deionized water. 3. Use NaOH to adjust pH to 7.4 and bring up the volume to 1 liter. Store at 4°C. 4. Add protease inhibitors immediately before use. 20 Blasticidin Description Blasticidin S HCl is a nucleoside antibiotic isolated from Streptomyces griseochromogenes which inhibits protein synthesis in both prokaryotic and eukaryotic cells (Takeuchi et al., 1958; Yamaguchi et al., 1965). Resistance is conferred by expression of either one of two blasticidin S deaminase genes: BSD from Aspergillus terreus (Kimura et al., 1994) or bsr from Bacillus cereus (Izumi et al., 1991). These deaminases convert blasticidin S to a non-toxic deaminohydroxy derivative (Izumi et al., 1991). Handling Blasticidin Always wear gloves, mask, goggles, and protective clothing (e.g., a laboratory coat) when handling blasticidin. Weigh out blasticidin and prepare solutions in a hood. Preparing and Storing Stock Solutions Blasticidin is soluble in water. Water is generally used to prepare stock solutions of 5 to 10 mg/mL. Dissolve blasticidin in sterile water and filter-sterilize the solution. Aliquot in small volumes suitable for one time use (see last point below) and freeze at –20°C for long-term storage or store at 4°C for short term storage. Aqueous stock solutions are stable for 1–2 weeks at 4°C and 6–8 weeks at -20°C. pH of the aqueous solution should not exceed 7 to prevent inactivation of blasticidin. Do not subject stock solutions to freeze/thaw cycles (do not store in a frostfree freezer). Upon thawing, use what you need and discard the unused portion. Continued on next page 21 Blasticidin , Continued Molecular Weight, Formula, and Structure The formula for blasticidin is C17H26N8O5-HCl, and the molecular weight is 458.9. The diagram below shows the structure of blasticidin. NH2 N N HOOC NH N NH O -HCl CH3 H2N O NH2 O 22 Lithium Chloride Transformation Method Introduction This is a modified version of the procedure described for S. cerevisiae (Gietz and Schiestl, 1996), and is provided as an alternative to transformation by electroporation. Transformation efficiency is between 102 to 103 cfu/g linearized DNA. Preparing Solutions Lithium acetate does not work with Pichia pastoris. Use only lithium chloride. Preparing Cells 1 M LiCl in distilled, deionized water. Filter-sterilize. Dilute as needed with sterile water. 50% polyethylene glycol (PEG-3350) in distilled, deionized water. Filtersterilize. Store in a tightly capped bottle. 2 mg/mL denatured, sheared salmon sperm DNA in TE (10 mM Tris-HCl, pH 8.0, 1.0 mM EDTA). Store at –20°C. 1. Grow a 50 mL culture of Pichia pastoris in YPD at 30°C with shaking to an OD600 of 0.8 to 1.0 (approximately 108 cells/mL). 2. Harvest the cells, wash with 25 mL of sterile water, and centrifuge at 1,500 × g for 10 minutes at room temperature. 3. Resuspend the cell pellet in 1 mL of 100 mM LiCl and transfer the suspension to a 1.5 mL microcentrifuge tube. 4. Pellet the cells at maximum speed for 15 seconds and remove the LiCl with a pipet. 5. Resuspend the cells in 400 L of 100 mM LiCl. 6. Dispense 50 L of the cell suspension into a 1.5 mL microcentrifuge tube for each transformation and use immediately. Do not store on ice or freeze at -20°C. Continued on next page 23 Lithium Chloride Transformation Method, Continued Transformation 1. Boil a 1 mL sample of single-stranded DNA for 5 minutes, then quickly chill on ice. Keep on ice. Note: It is not necessary to boil the carrier DNA prior to each use. Store a small aliquot at –20°C and boil every 3–4 times the DNA is thawed. 2. Centrifuge the cells from Step 6, above, and remove the LiCl with a pipette. 3. For each transformation , add the following reagents IN THE FOLLOWING ORDER to the cells. PEG shields the cells from the detrimental effects of the high LiCl concentration. 50% PEG 1 M LiCl 2 mg/mL single-stranded DNA Plasmid DNA in 50 L sterile water 240 L 36 L 25 L 5–10 g 4. Vortex each tube vigorously until the cell pellet is completely mixed (~1 minute). 5. Incubate the tube at 30°C for 30 minutes without shaking. 6. Heat shock in a water bath at 42°C for 20–25 minutes. 7. Centrifuge the cells at 3,800 to 6,800 × g to pellet. 8. Resuspend the pellet in 1 mL of YPD and incubate at 30°C with shaking. 9. After 1 hour and 4 hours, plate 25 to 100 L on YPD plates containing the appropriate concentration of blasticidin. Incubate the plates for 2–3 days at 30°C. 24 Constructing In Vitro Multimers Experimental Outline Alternative Procedure At this point you should have your gene cloned into the multiple cloning site of pPIC6 A, B, or C. To generate multiple copies of your expression cassette: Step Description 1 Digest pPIC6 containing your gene of interest with Bgl II and BamH I to release the expression cassette (PAOX1 plus your gene). 2 To clone multiple copies of the expression cassette, linearize pPIC6 containing your gene of interest using BamH I. Note that the BamH Ilinearized vector already contains one copy of your expression cassette. 3 Treat the Bgl II-BamH I expression cassette with ligase in vitro. Note that Bgl II and BamH I share 4 bases in common between their recognition sites (GATC). 4 Generate head-to-tail, head-to-head, and tail-to-tail multimers (Headto-tail ligation, which is the correct orientation for expression, will destroy both the BamH I and Bgl II sites). 5 Treat the ligation mix with BamH I and Bgl II to eliminate head-tohead and tail-to-tail multimers. 6 Ligate into BamH I-linearized recombinant pPIC6. 7 Transform into E. coli and analyze recombinant plasmids for copy number by digesting with Bgl II and BamH I. You may wish to build each desired multimer in increments by ligating each additional expression cassette one (or two) at a time into pPIC6 A, B, or C. For example: Step Description 1 Digest pPIC6 containing one copy of your gene with BamH I 2 Ligate a single copy of the Bgl II-BamH I expression cassette into BamH I-digested vector 3 Transform E. coli and analyze the transformants for the vector with 2 copies of your insert 4 Isolate and digest this vector (with 2 copies of your gene) with BamH I and Bgl II to release a cassette with 2 copies of your gene (optional) 5 Digest the vector with 2 copies of your gene with BamH I and ligate 1 or 2 copies (see Step 4) of the expression cassette into the vector 6 Transform E. coli and analyze the transformants for the vector with 3 or 4 copies of your insert 7 Repeat until the desired multimer is reached Continued on next page 25 Constructing In Vitro Multimers, Continued Controls Important Digestion of Recombinant pPIC6 To evaluate your transformants and expression data later on, we recommend transforming Pichia with pPIC6 (the parent vector) and pPIC6 containing one copy of your gene of interest. This will allow you to compare expression levels to see if multiple copies significantly increase the amount of protein produced. Also, if you elect to determine how many copies of your gene are in a recombinant by dot or Southern blot, the strain with the parent vector will control for background hybridization and the strain with the single copy gene will provide a signal to normalize your data. Once you have created a pPIC6 plasmid containing multimers, note that this plasmid cannot be linearized because any enzyme that cuts in the 5´ AOX1 region will cut in all of the 5´ AOX1 regions present in the multimer. You can transform with uncut plasmid, but you will need to use 50–100 g of DNA to compensate for the 10 to 100-fold drop in transformation efficiency. However, with selection on blasticidin, any transformants you obtain will probably contain your construct. For best results: Use electroporation to transform your cells Use at least 50 g plasmid DNA for each transformation Plate out all of the transformation mix on several YPDS plates containing the appropriate concentration of blasticidin. You will need to use the optional outgrowth procedure on page 11. Set up two separate digests of recombinant pPIC6 containing one copy of your gene: 1. Double digest 1–2 g of recombinant pPIC6 in 20 L with 10 units each of Bgl II and BamH I. Proceed to Producing Expression Cassettes for Multimerization, Step 1. 2. Digest 2 g of recombinant pPIC6 in 20 L with 10 units of BamH I only. Proceed to Dephosphorylating the Vector, Step 1. Continued on next page 26 Constructing In Vitro Multimers, Continued Producing Expression Cassettes for Multimerization The S.N.A.P.™ Gel Purification Kit available from Invitrogen (see page 33) allows you to rapidly purify DNA fragments from regular agarose gels. Alternatively, you may use glass milk. To use the S.N.A.P.™ Gel Purification Kit, follow the steps below: 1. Electrophorese your digest from Step 1, above, on a 1 to 5% regular TAE agarose gel. Note: Do not use TBE to prepare agarose gels. Borate interferes with the sodium iodide step, below. 2. Cut out the gel slice containing the PCR product and melt it at 65°C in 2 volumes of the 6 M sodium iodide solution. 3. Add 1.5 volumes Binding Buffer. 4. Load solution (no more than 1 mL at a time) from Step 3 onto a S.N.A.P.™ column. Centrifuge 1 minute at 3000 x g in a microcentrifuge and discard the supernatant. 5. If you have solution remaining from Step 3, repeat Step 4. 6. Add 900 L of the Final Wash Buffer. 7. Centrifuge 1 minute at full speed in a microcentrifuge and discard the flowthrough. 8. Repeat Step 7. 9. Elute the purified DNA in 15 L of sterile water. Store on ice if proceeding immediately to Ligating the Expression Cassette, next page. Store at –20ºC for long-term storage. Continued on next page 27 Constructing In Vitro Multimers, Continued Dephosphorylating Dephosphorylation of the BamH I-digested vector is necessary to prevent selfligation. the Vector 1. Take your BamH I digest from Digesting Recombinant pPIC6, Step 2 and phenol extract, then ethanol precipitate the DNA. Resuspend in 17 L of sterile water. 2. Set up a 20 L dephosphorylation reaction in a microcentrifuge tube as follows: BamH I digested recombinant pPIC6 (page 26, Step 2) 10X CIAP Buffer CIAP (1 Unit/L) 17 L 2 L 1 L 3. Incubate at 37°C for 15 minutes. 4. Add 30 L of sterile water to the reaction for a final volume of 50 L. 5. Add 50 L of phenol/chloroform and extract your DNA solution. 6. Precipitate the DNA by adding 5 L of 3 M sodium acetate and 110 L of 100% ethanol. Incubate on ice for 30 minutes. 7. Centrifuge at maximum speed in a microcentrifuge for 10 minutes at 4°C. Carefully decant the supernatant. 8. Wash the nucleic acid pellet with 80% ethanol, centrifuge 2 minutes, and remove the ethanol. 9. Centrifuge again for 1 minute, remove residual ethanol, and air dry the pellet. 10. Resuspend pellet in 8 L sterile water. Save on ice if you plan to ligate your insert immediately (see Ligation and Digestion of Expression Cassette) or store at –20°C. Ligating and Digesting the Expression Cassette Ligation of the expression cassette will generate head-to-tail, head-to-head, and tail-to-tail multimers. Creation of head-to-tail multimers will be in the correct orientation for expression and will destroy both the BamH I and Bgl II sites between the expression cassettes. Digestion of the multimers with BamH I and Bgl II will eliminate those multimers with tail-to-tail and head-to-head orientation. After digestion with these two restriction enzymes, you will have a mixture of multimers containing 1, 2, 3, etc. copies of your gene that can be ligated into BamH I-linearized, recombinant pPIC6. 1. Set up a 20 L ligation reactions as follows: Bgl II-BamH I digested expression cassette Sterile water 10X Ligation Buffer (with ATP) T4 DNA Ligase (2.5 units/L) 2. 15 L 2 L 2 L 1 L Incubate at 16°C for 2.5 hours. Continued on next page 28 Constructing In Vitro Multimers, Continued Ligation and Digestion of Expression Cassette, Continued 3. Heat inactivate the ligase by incubating at 65°C for 20 minutes. 4. Add the following reagents for restriction enzyme digestion (cut-back). Note that BamH I and Bgl II may be used with the same reaction buffer: Sterile water 10X restriction enzyme buffer Bgl II (10 units/L) BamH I (10 units/L) 23 L 5 L 1 L 1 L 5. Incubate the reaction at 37°C for 2 hours. 6. Add 50 L of phenol/chloroform and extract the restriction enzyme digestion to remove the enzymes. Transfer the aqueous solution to a new microcentrifuge tube. 7. To ethanol precipitate the DNA, add 5 L of 3 M sodium acetate and 110 L of 100% ethanol. 8. Centrifuge at maximum speed in a microcentrifuge for 10 minutes at 4°C. Carefully decant the supernatant. 9. Wash the nucleic acid pellet with 80% ethanol, centrifuge 2 minutes, and remove the ethanol. Centrifuge again for 1 minute, remove residual ethanol, and air dry the pellet. 10. Resuspend pellet in 4 L sterile water. Save on ice if you plan to ligate your insert immediately or you can store at –20°C. Proceed to Ligating Multimers into Linearized Vector. You may wish to combine the ligation reaction with the restriction enzyme digestion to enrich for head-to-tail multimers. Use the reaction buffer for the restriction enzymes and add 1 mM ATP to the reaction in order to ensure ligase activity. Perform the reaction at 37°C. T4 ligase will retain most of its activity in the restriction buffer. As head-to-head and tail-to-tail multimers form, they will be digested, increasing the likelihood of obtaining head-to-tail multimers over time. Ligating Multimers You are now ready to ligate the mixture of multimers generated in Step 10, above, into dephosphorylated, linearized vector. into Linearized Vector 1. Set up the following ligation reactions: Dephosphorylated vector (page 28, Step 10) Expression cassette multimers (Step 10, above) 10X Ligation Buffer T4 DNA Ligase (2.5 units/L) Total volume 4 L 4 L 1 L 1 L 10 L Continued on next page 29 Constructing In Vitro Multimers, Continued For the vector only control: Ligating Multimers into Linearized Vector, Continued Transformation into E. coli Dephosphorylated vector Sterile water 10X Ligation Buffer T4 DNA Ligase (2.5 units/L) Total volume 4 L 4 L 1 L 1 L 10 L 2. Incubate overnight at 16°C. 3. You may store the ligation reactions at –20°C until ready to use, or transform 1–10 L of each ligation mix into competent E. coli. Note that the amount of the ligation mixture you transform depends on whether you use electrocompetent or chemically competent cells. You may have to decrease the amount you to transform into electrocompetent cells to prevent arcing. Remember to include the "vector only" and "cells only" controls to evaluate your experiment. The "vector only" will indicate whether your vector was dephosphorylated. Since the CIAP reaction is not 100% and because you often get degradation of the ends, there might be a few colonies on this plate. The "cells only" plate should have no colonies at all. 1. Transform competent E. coli by your method of choice. 2. After adding medium to the transformed cells and allowing them to recover, plate 10 L and 100 L of each transformation mix onto Low Salt LB plates containing 100 g/mL blasticidin. Save the remainder of your transformation mix at 4°C. 3. Incubate overnight at 37°C. If you do not get transformants or very few transformants, plate out the remainder of the transformation mix onto Low Salt LB-blasticidin plates. Continued on next page 30 Constructing In Vitro Multimers, Continued Analyzing Transformants 1. Pick 20 transformants and inoculate each colony into 2 mL Low Salt LB containing 100 g/mL blasticidin. Grow overnight at 37°C. 2. Isolate plasmid DNA and digest with Bgl II and BamH I to release any multimers from pPIC6. (Be sure to include Bgl II-BamH I digested pPIC6 as a control. It is possible to get vector rearrangements and deletions with large recombinant vectors in E. coli. Including Bgl II-BamH I digested pPIC6 will allow you to detect these rearrangements-deletions in the vector backbone.) 3. Analyze your digests on a 1% agarose gel. You should see bands corresponding to 1 copy, 2 copies, 3 copies, etc. of your expression cassette along with the vector backbone. (The number of copies you obtain may depend on how well a large vector is tolerated by the host strain.) 4. Once you have identified plasmids with multiple copies of your expression cassette, be sure to purify by streaking for single colonies and confirming your construct. 5. Prepare frozen glycerol stocks of E. coli containing each of your multimeric constructs. 6. Prepare at least 100 g of each plasmid for transformation into Pichia. You need more DNA because you will be transforming with uncut plasmid DNA. Transformation efficiency is about 1 to 2 orders of magnitude less for uncut versus linearized DNA. 7. Proceed to Pichia Transformation, page 8. Use the outgrowth protocol on page 11 to isolate transformants. Continued on next page 31 Constructing In Vitro Multimers, Continued Troubleshooting The table below will help you optimize formation and isolation of multimers in Pichia. Problem No multimers or low number of multimers in your vector after transformation into E. coli Possible Reason CIAP defective Solution Use fresh CIAP. Add more CIAP. Add 1 unit of CIAP and incubate 15 more minutes at 37°C. This is somewhat risky as CIAP can degrade the ends of your DNA. Not enough insert DNA to ligate Add more BamH I-Bgl II expression cassette to your ligation. Construct is unstable in E. coli Decrease the number of cassettes in the vector. Multimers are too long to Try ligating each expression cassette ligate efficiently stepwise. Recombinant vector rearranges and deletions are detected Construct is unstable in E. coli Decrease the number of cassettes in the vector. No blasticidin-resistant Pichia transformants Integration efficiency is low Transform using more DNA and/or do multiple transformations with more DNA and cells. For More Information There are a number references in the literature you can consult to optimize synthesis of in vitro multimers. A partial list is provided below: Cohen, B. and Carmichael, G. G. (1986) A Method for Constructing Multiple Tandem Repeats of Specific DNA Fragments. DNA 5: 339-343. Eisenberg, S., Francesconi, S. C., Civalier, C. and Walker, S. S. (1990) Purification of DNA-Binding Proteins by Site-specific DNA Affinity Chromatography. Methods Enzymol. 182: 521-529. Graham, G. J. and Maio, J. J. (1992) A Rapid and Reliable Method to Create Tandem Arrays of Short DNA Sequences. BioTechniques 13: 780-789. Rudert, W. A. and Trucco, M. (1990) DNA Polymers of Protein Binding Sequences Generated by Polymerase Chain Reaction. Nucleic Acids Res. 18: 6460. Simpson, R. T., Thoma, F. and Brubaker, J. M. (1985) Chromatin Reconstituted from Tandemly-repeated Cloned DNA Fragments and Core Histones: A Model System for the Study of Higher-order Structure. Cell 42: 799-808. Takeshita, S., Tezuka, K.- i., Takahashi, M., Honkawa, H., Matsuo, A., Matsuishi, T. and Hashimoto-Gotoh, T. (1988) Tandem Gene Amplification in vitro for Rapid and Efficient Expression in Animal Cells. Gene 71: 9-18. Taylor, W. H. and Hagerman, P. J. (1987) A General Method for Cloning DNA Fragments in Multiple Copies. Gene 53: 139-144. 32 Accessory Products Introduction The following products may be used with the pPIC6 vectors. For details, visit www.invitrogen.com or contact Technical Support (see page 35). Amount Catalog no. 6 purifications K850-01 50 mL R801-01 150 mL R801-15 One Shot TOP10F´ Chemically Competent E. coli) 21 × 50 L C3030-03 PureLink™ HiPure Plasmid Miniprep Kit 100 preps K2100-03 25 preps K2100-04 25 preps K1999-25 80 mL K1455-01 1 kit K1465-01 50 mg R210-01 5 g R900-50 Anti-Mouse WB7103 Anti-Rabbit WB7105 Anti-Goat WB7107 Anti-Mouse WB7104 Anti-Rabbit WB7106 Anti-Goat WB7108 1 each C10227 Item ™ ProBond Purification System ProBond™ Resin ® ™ PureLink HiPure Plasmid Midiprep Kit ™ S.N.A.P. Gel Purification Kit -Gal Assay Kit -Gal Staining Kit Blasticidin ™ Positope Control Protein ® WesternBreeze Chromogenic Kit ® WesternBreeze Chemiluminescent Kit ™ Countess Automated Cell Counter Continued on next page 33 Accessory Products, Continued Other Pichia Products Other Pichia products available from Invitrogen are described below: Item Amount Catalog no. X-33 Pichia strain 1 stab C180-00 KM71H Pichia strain 1 stab C182-00 SMD1168H Pichia strain 1 stab C184-00 pPIC6 A, B, and C 20 g each V215-20 pPICZ A, B, and C 20 g each V190-20 pPICZ A, B, and C 20 g each V195-20 1 kit K1710-01 1 kit K1740-01 1 kit K1730-01 1 book G100-01 Original Pichia Expression Kit ™ EasySelect Pichia Expression Kit ™ Pichia EasyComp Transformation Kit Pichia Protocols Antibodies If you do not have an antibody specific to your protein, Invitrogen offers the Anti-myc, or Anti-His(C-term) antibodies to detect your recombinant fusion protein. Horseradish peroxidase (HRP)- and alkaline phosphatase (AP)– conjugated antibodies are available for convenient one-step detection. Antibody Anti-myc Anti-myc-HRP Anti-myc-AP Anti-His(C-term) Anti-His(C-term)-HRP Anti-His(C-term)-AP Epitope Detects a 10 amino acid epitope derived from c-myc (Evan et al., 1985): EQKLISEEDL Detects the C-terminal polyhistidine tag (requires the free carboxyl group for detection) (Lindner et al., 1997): HHHHHH-COOH Catalog no. R950-25 R951-25 R952-25 R930-25 R931-25 R932-25 34 Technical Support Web Resources Contact Us Visit the Invitrogen website at www.invitrogen.com for: Technical resources, including manuals, vector maps and sequences, application notes, SDSs, FAQs, formulations, citations, handbooks, etc. Complete technical support contact information Access to the Invitrogen Online Catalog Additional product information and special offers For more information or technical assistance, call, write, fax, or email. Additional international offices are listed on our website (www.invitrogen.com). Corporate Headquarters: 5791 Van Allen Way Carlsbad, CA 92008 USA Tel: 1 760 603 7200 Tel (Toll Free): 1 800 955 6288 Fax: 1 760 602 6500 E-mail: [email protected] Japanese Headquarters: LOOP-X Bldg. 6F 3-9-15, Kaigan Minato-ku, Tokyo 108-0022 Tel: 81 3 5730 6509 Fax: 81 3 5730 6519 E-mail: [email protected] European Headquarters: Inchinnan Business Park 3 Fountain Drive Paisley PA4 9RF, UK Tel: +44 (0) 141 814 6100 Tech Fax: +44 (0) 141 814 6117 E-mail: [email protected] SDS Safety Data Sheets (MSDSs) are available on our website at www.invitrogen.com/sds. Certificate of Analysis The Certificate of Analysis provides detailed quality control and product qualification information for each product. Certificates of Analysis are available on our website. Go to www.invitrogen.com/support and search for the Certificate of Analysis by product lot number, which is printed on the box. Limited Warranty Invitrogen (a part of Life Technologies Corporation) is committed to providing our customers with high-quality goods and services. Our goal is to ensure that every customer is 100% satisfied with our products and our service. If you should have any questions or concerns about an Invitrogen product or service, contact our Technical Support Representatives. All Invitrogen products are warranted to perform according to specifications stated on the certificate of analysis. The Company will replace, free of charge, any product that does not meet those specifications. This warranty limits the Company’s liability to only the price of the product. No warranty is granted for products beyond their listed expiration date. No warranty is applicable unless all product components are stored in accordance with instructions. The Company reserves the right to select the method(s) used to analyze a product unless the Company agrees to a specified method in writing prior to acceptance of the order. Invitrogen makes every effort to ensure the accuracy of its publications, but realizes that the occasional typographical or other error is inevitable. Therefore the Company makes no warranty of any kind regarding the contents of any publications or documentation. If you discover an error in any of our publications, report it to our Technical Support Representatives. Life Technologies Corporation shall have no responsibility or liability for any special, incidental, indirect or consequential loss or damage whatsoever. The above limited warranty is sole and exclusive. No other warranty is made, whether expressed or implied, including any warranty of merchantability or fitness for a particular purpose. 35 Purchaser Notification Limited Use Label License No. 22: Vectors and Clones Encoding Histidine Hexamer This product is licensed under U.S. Patent Nos. 5,284,933 and 5,310,663 and foreign equivalents from Hoffmann-LaRoche, Inc., Nutley, NJ and/or Hoffmann-LaRoche Ltd., Basel, Switzerland and is provided only for use in research. Information about licenses for commercial use is available from QIAGEN GmbH, Max-Volmer-Str. 4, D-40724 Hilden, Germany. Limited Use Label License No. 51: Blasticidin and the Blasticidin Selection Marker Blasticidin and the blasticidin resistance gene (bsd) are the subject of U.S. Patent No.5,527,701 sold under patent license for research purposes only. For information on purchasing a license to this product for purposes other than research, contact Licensing Department, Life Technologies Corporation, 5791 Van Allen Way, Carlsbad, California 92008. Phone (760) 603-7200. Fax (760) 6026500. email: [email protected] Limited Use Label License No. 74: Pichia pastoris Expression System The Pichia Expression System is based on the yeast Pichia pastoris. Pichia pastoris was developed into an expression system by scientists at Salk Institute Biotechnology/ Industry Associates (SIBIA) and Phillips Petroleum for highlevel expression of recombinant proteins. All patents for Pichia pastoris and licenses for its use as an expression system are owned by Research Corporation Technologies (RCT), Inc., Tucson, Arizona. Life Technologies has an exclusive license to sell Pichia expression kits and vectors to scientists for research purposes only, under the terms described below. Use of Pichia pastoris by commercial entities for any commercial purpose requires the user to obtain a commercial license as detailed below. Before using any Pichia expression product, please read the following license agreement. If you do not agree to be bound by its terms, contact Life Technologies within 10 days for authorization to return the unused Pichia expression products and to receive a full refund. If you do agree to the terms of this license agreement, please complete the User Registration Card and return it to Life Technologies before using the product. Life Technologies Corporation (”Life Technologies”) grants you a non-exclusive license to use the enclosed Pichia expression vectors (”Expression Vector”) for academic research or for evaluation purposes only. The Expression Vectors are being transferred to you in furtherance of, and reliance on, such license. You may not use the Expression Vectors for any commercial purpose without a license for such purpose from Research Corporation Technologies, Inc., Tucson, Arizona. . Continued on next page 36 Purchaser Notification, Continued Limited Use Label License No. 74: Pichia pastoris Expression System, Continued 37 Commercial purposes include: any use of Expression Products or Expression Vectors in a Commercial Product; any use of Expression Products or Expression Vectors in the manufacture of a Commercial Product; any sale of Expression Products; any use of Expression Products or the Expression Kit to facilitate or advance research or development directed to a Commercial Product; and any use of Expression Products or the Expression Kit to facilitate or advance any research or development program the results of which will be directly applied to the development or manufacture of a Commercial Product. “Expression Products” means products expressed with the Expression Kit, or with the use of any Pichia expression vectors (including the Expression Vector) or host strains. “Commercial Product” means any product intended for sale or commercial use Commercial entities may conduct their evaluation for one year at which time this license automatically terminates. Commercial entities will be contacted by Research Corporation Technologies during the evaluation period regarding their desire for a commercial license. Access to the Expression Kit and Vector must be limited solely to those officers, employees and students of your institution who need access to perform the above-described research or evaluation. You must inform each such officer, employee and student of the provisions of this license agreement and require them to agree, in writing, to be bound by the provisions of this license agreement. You may not distribute any Expression Vector or host strain contained herein or in the Expression Kit to others, even those within your own institution. You may only transfer modified, altered, or original material from the Expression Kit or Vector to a third party following written notification of, and written approval from, Life Technologies so that the recipient can be licensed. You may not assign, sublicense, rent, lease or otherwise transfer this license agreement or any of the rights or obligation there under, except as expressly permitted by Life Technologies and RCT. This license agreement is effective until terminated. You may terminate it at any time by destroying all Pichia Expression products in your control. It will also terminate automatically if you fail to comply with the terms and conditions of the license agreement. You shall, upon termination of the license agreement, destroy all Pichia Expression products in your control, and so notify Life Technologies in writing. You may contact Research Corporation Technologies at the following address: Bennett Cohen, Ph.D., Research Corporation Technologies, 101 North Wilmot Road, Suite 600, Tucson, Arizona 85711-3335. Tel: 520-748-4443, Fax: 520-748-0025. References Ausubel, F. M., Brent, R., Kingston, R. E., Moore, D. D., Seidman, J. G., Smith, J. A., and Struhl, K. (1994). Current Protocols in Molecular Biology (New York: Greene Publishing Associates and WileyInterscience). Ellis, S. B., Brust, P. F., Koutz, P. J., Waters, A. F., Harpold, M. M., and Gingeras, T. R. (1985). Isolation of Alcohol Oxidase and Two other Methanol Regulatable Genes from the Yeast, Pichia pastoris. Mol. Cell. Biol. 5, 1111-1121. Evans, G. I., Lewis, G. K., Ramsay, G., and Bishop, V. M. (1985). Isolation of Monoclonal Antibodies Specific for c-myc Proto-oncogene Product. Mol. Cell. Biol. 5, 3610-3616. Gietz, R. D., and Schiestl, R. H. (1996) Transformation of Lithium-Treated Yeast Cells and the Selection of Auxotrophic and Dominant Markers. In Methods in Molecular Biology, I. H. Evans, ed. (Totowa, NJ: Humana Press). Henikoff, S., and Cohen, E. H. (1984). Sequences Responsible for Transcription Termination on a Gene Segment in Saccharomyces cerevisiae. Mol. Cell. Biol. 4, 1515-1520. Higgins, D. R., and Cregg, J. M. (1998) Pichia Protocols. In Methods in Molecular Biology, Vol. 103. (J. M. Walker, ed. Humana Press, Totowa, NJ. Irniger, S., Egli, C. M., and Braus, G. H. (1991). Different Classes of Polyadenylation Sites in the Yeast Saccharomyces cerevisiae. Mol. Cell. Bio. 11, 3060-3069. Izumi, M., Miyazawa, H., Kamakura, T., Yamaguchi, I., Endo, T., and Hanaoka, F. (1991). Blasticidin SResistance Gene (bsr): A Novel Selectable Marker for Mammalian Cells. Exp. Cell Res. 197, 229-233. Kimura, M., Takatsuki, A., and Yamaguchi, I. (1994). Blasticidin S Deaminase Gene from Aspergillus terreus (BSD): A New Drug Resistance Gene for Transfection of Mammalian Cells. Biochim. Biophys. Acta 1219, 653-659. Koutz, P. J., Davis, G. R., Stillman, C., Barringer, K., Cregg, J. M., and Thill, G. (1989). Structural Comparison of the Pichia pastoris Alcohol Oxidase Genes. Yeast 5, 167-177. Kozak, M. (1987). An Analysis of 5´-Noncoding Sequences from 699 Vertebrate Messenger RNAs. Nuc. Acids Res. 15, 8125-8148. Kozak, M. (1991). An Analysis of Vertebrate mRNA Sequences: Intimations of Translational Control. J. Cell Biol. 115, 887-903. Kozak, M. (1990). Downstream Secondary Structure Facilitates Recognition of Initiator Codons by Eukaryotic Ribosomes. Proc. Natl. Acad. Sci. USA 87, 8301-8305. Lindner, P., Bauer, K., Krebber, A., Nieba, L., Kremmer, E., Krebber, C., Honegger, A., Klinger, B., Mocikat, R., and Pluckthun, A. (1997). Specific Detection of His-tagged Proteins With Recombinant Anti-His Tag scFv-Phosphatase or scFv-Phage Fusions. BioTechniques 22, 140-149. Sambrook, J., Fritsch, E. F., and Maniatis, T. (1989). Molecular Cloning: A Laboratory Manual, Second Edition (Plainview, New York: Cold Spring Harbor Laboratory Press). Scorer, C. A., Buckholz, R. G., Clare, J. J., and Romanos, M. A. (1993). The Intracellular Production and Secretion of HIV-1 Envelope Protein in the Methylotrophic Yeast Pichia pastoris. Gene 136, 111-119. Takeuchi, S., Hirayama, K., Ueda, K., Sakai, H., and Yonehara, H. (1958). Blasticidin S, A New Antibiotic. The Journal of Antibiotics, Series A 11, 1-5. Tschopp, J. F., Brust, P. F., Cregg, J. M., Stillman, C., and Gingeras, T. R. (1987a). Expression of the lacZ Gene from Two Methanol Regulated Promoters in Pichia pastoris. Nucleic Acids Res. 15, 3859-3876. Continued on next page 38 References, Continued Yamaguchi, H., Yamamoto, C., and Tanaka, N. (1965). Inhibition of Protein Synthesis by Blasticidin S. I. Studies with Cell-free Systems from Bacterial and Mammalian Cells. J. Biochem. (Tokyo) 57, 667-677. Zaret, K. S., and Sherman, F. (1984). Mutationally Altered 3´ Ends of Yeast CYC1 mRNA Affect Transcript Stability and Translational Efficiency. J. Mol. Biol. 177, 107-136 ©2009 Life Technologies Corporation. All rights reserved. 39