1
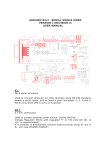
!
!
Do :
How to connect?
•
•
•
•
•
•
•
Be gentle while handling the board
Power ON the board ONLY after making the complete connection.
Keep the board on a dry surface.
Use RED wire for 5V [+ve] and BLACK wire for GND[GROUND –ve] in
experiments for better clarity
See the complete circuit once before starting the experiment.
Read about the components before using them in experiments
Check your connections TWICE before powering ON the board
Don’t:
•
•
•
•
•
Spill any liquid on board. Always keep it dry.
Never drop the board. Components will be damaged.
Never connect +ve to GND or –ve to 5V of any component.
Turn the POT knob slowly and carefully.
Never change any or make new connections when power [GREEN light] is
ON.
Output:
•
The two LEDs turn ON and turn OFF with some amount of delay.
Observation:
• Can you change the duration for which led flashes?
More Details at:
www.scienceadda.com/hobbyzone/electronics/led_flasher
©"2012!!
www.scienceadda.com!
Page!2!of!24"!
©"2012!!
www.scienceadda.com!
Page!23!of!24"!
!
!
User Manual
Notes:
Jump Start Board
Power!Switch!
Components on board:
•
•
•
•
•
•
•
•
•
•
•
•
©"2012!!
www.scienceadda.com!
Page!24!of!24"!
Diodes – 3 nos
DIP switch – 4 nos
RGB LED – 1 no
Potentiometers – 8 nos
Electrolytic Capacitors – 13 nos
Light Sensor (LDR) – 1 no
Sound Sensor – 1 no
Transistors – 6 nos
Switches – 4 nos
IC slot – 1 nos
Colour LED – 8 nos
Connecting Terminal – 2 nos
©"2012!!
www.scienceadda.com!
Page!1!of!24"!
!
!
•
Make the connections of the experiment. Check your connections twice
and press the Power supply switch. The Green Light indicates board is
powered and you can check your output.
Output:
•
The intensity of the RGB LED changes when the 1K POT is varied.
Observation:
ACTION
OUTPUT
Change the POT for Red, Green and
Blue
More Details at:
www.scienceadda.com/hobbyzone/electronics/rgbLed
©"2012!!
www.scienceadda.com!
Page!4!of!24"!
©"2012!!
www.scienceadda.com!
Page!21!of!24"!
!
!
Experiment 07 - LED FLASHER
Getting started with board:
Powering ON:
How it works?
•
Connect the DC Adapter to the board as shown.
•
Power ON the Adapter. The RED light indicates power ON
A simple pair of resistor and capacitor when connected in a specific manner
creates a time delay in the path of the electricity. If this delay has to be
repeated to blink an LED, a set of two such pairs are needed. Such a circuit can
be seen at railroad signals, blinking rear light for bicycles, decorations, etc.
What do you need?
•
Board
•
2 x 330 ohm resistors – ( | | | ) Orange Orange Brown
•
2 x 10k ohm resistors – ( | | | ) Brown Black Orange
•
2 x 100uF capacitors (already on board)
•
2 x BC547 transistors (already on board)
•
2 x LEDs (any colour)
Caution
1. Capacitors have polarity, i.e + (POSITIVE) and – (NEGATIVE) marked on
them.
2. DO NOT connect 5V to NEGATIVE of the Capacitor or GND to
POSITIVE of the Capacitor, it will explode.
3. Transistors have three pins – Emitter [E], Base [B] and Collector [C].
Connect them properly as shown in the wiring diagram.
What to do?
©"2012!!
www.scienceadda.com!
Page!22!of!24"!
©"2012!!
www.scienceadda.com!
Page!3!of!24"!
!
!
2) Capacitor:
How to connect?
Capacitors are components that can store electrical
pressure (Voltage) for long periods of time. It has
polarity, i.e Positive and Negative terminal marked on
its sides.
3) Potentiometer [POT]:
Potentiometers are variable resistors. Turning the knob varies
its resistance.
4) Light Dependant Resistor [LDR] [Light Sensor]
LDR is a resistor which has high resistance normally
and very low resistance when there is lots of light
falling on it.
Observation:
5) Diode:
ACTION
An electronic device that allows current to flow
in one direction only.
OUTPUT
LDR covered in hands
LDR in open
Shine a torch directly on LDR
6) Transistors:
A device that amplifies or switches the flow of current,
between its terminals [Collector(c) and Emitter(e)]. The
switching or amplification is controlled through Base [b]
©"2012!!
www.scienceadda.com!
More Details at:
www.scienceadda.com/hobbyzone/electronics/Led_Ldr
Page!6!of!24"!
©"2012!!
www.scienceadda.com!
Page!19!of!24"!
!
!
Know your Component
Experiment 06 – RGB LED Colour Mixer
1) Resistor:
Why?
Red, Green and Blue are the most basic colours. By mixing them in different
proportions, we can get different colour output. In a TV screen, each point is
similar to RGB led. By mixture of these three colours, it creates white, black,
violet, pink and much more. Let us try it by mixing red, green and blue colours.
The resistor is an electronic component that has electrical friction. It opposes
the flow of electrons in the circuit.
How it works?
RGB led contains a red, a green and a blue led in a single pack. By using a pot, you
can vary the resistance in the circuit, which results in varying intensity of the
particular colour.
What do you need?
•
Board
•
3 x 330 ohm resistors – ( | | | ) Orange Orange Brown
•
1 x RGB LED
Caution!
3. RGB LED had 4 pins in which + pin goes to +5v and the
rest 3 pins goes to 330 Ohms resistors.
Example 1:
What to do?
The colours here are Yellow-Violet-OrangeGold.
The value of the colours (refer to the table) are,
yellow=4; violet=7; orange=3 [ignore gold]
47 X
=47000Ω Or 47kΩ
Example 2:
The colours here are Brown-Black-Red-Gold.
The value of the colours (refer to the table) are,
Brown=1; Black=0; Red=2 [ignore gold]
10 X 102=1000 Ω or 1K Ω
©"2012!!
www.scienceadda.com!
Page!20!of!24"!
©"2012!!
www.scienceadda.com!
Page!5!of!24"!
!
!
How to connect?
How to read the Circuit
Resistor
LED
+ve
-ve
Transistor:
Switch
Potentiometer
[POT]:
Light Sensor
[LDR]:
Capacitor
Output:
•
The LEDs will turn ON and turn OFF based on pot value, turn the pot in
clockwise and Anti-clockwise to make out the changes in the brightness
of the LEDs.
OUTPUT
ACTION
POT varied clockwise
POT varied anti-clockwise
More Details at:
www.scienceadda.com/hobbyzone/electronics/led_pot
©"2012!!
www.scienceadda.com!
Page!8!of!24"!
©"2012!!
www.scienceadda.com!
Page!17!of!24"!
!
!
Experiment 05 - Light Based LED Intensity
7) LED [Light Emitting Diode]:
Why?
Smart Street Lights will turn ON during night times and turn OFF
during the day automatically. These lights use a LIGHT SENSOR
called LIGHT DEPENDANT RESISTOR [LDR]. Try a simple
experiment using a LDR in the board and record the output.
How it works?
As light falling on the LDR increases, its resistance decreases. As a
result more current flows through the LED, increasing its
brightness.
A device which emits light when powered ON. It is
available in various colours. As it is a diode, it works
only in one direction. It has polarity, so
8) Switch:
A mechanical device which opens or closes a circuit.
It is used to turn ON or turn OFF Lights and
speakers.
When you cover the LDR, its resistance increases. So due to high
resistance, brightness of the LED reduces.
What do you need?
• Board
•
1 x LDR [LIGHT SENSOR]
•
1 x LED (any color)
What to do?
©"2012!!
www.scienceadda.com!
Page!18!of!24"!
©"2012!!
www.scienceadda.com!
Page!7!of!24"!
!
!
Experiment 04 – LED Intensity using Potentiometer
box!1!
Why?
When you want to control the flow of water in two different pipes,
you will use a master tap and regulate the flow. You can let more
water through tap1 and less through tap2. Let us try something
similar.
box!2!
How to connect?
How it works?
Intensity of LED1 and LED2 changes on turning the Pot Knob. When
the resistance varies, the LED with least resistance in its path glows
with more brightness.
What do you need?
• Board
• 1 x 330 ohm resistors – ( | | | ) Orange Orange
Brown
2 x LED (any color)
•
1 x 1K pot
CAUTION:
• Handle the POT very carefully using hands.
• Don’t use sharp objects to turn the POT
• Do NOT move the POT beyond the given limit as shown
below.
Output:
•
•
The LED turns ON when two wires are touched with hands.
Observation:
ACTION
OUTPUT
Wire touched with hands
NORMAL POSITION
Wire touched with shade no 1
Wires touched with shade no 2
More Details at:
www.scienceadda.com/hobbyzone/electronics/led_touch
©"2012!!
www.scienceadda.com!
Page!10!of!24"!
©"2012!!
www.scienceadda.com!
Page!15!of!24"!
!
!
Experiment 01 – LED Control with Touch and Graphite
Anti -Clockwise
MAXIMUM
Why?
How does resistance change with length and width of a conducting body? Does
human body offer resistance? Let us find out.
How it works?
Clockwise MAXIMUM
The human body is very much like a thin rubber bag full of salt water. By
touching the wires the Circuit will be closed and thereby causing the LED to
GLOW. Also shade the box given using pencil and make the wires touch its end
and observe the change.
What do you need?
What to do?
•
Board
•
1 x 330 ohm resistors – ( | | | ) Orange Orange
Brown
•
1 x BC547(NPN) transistors (already on board)
•
1 x LED (any colour)
Caution
1. Transistors have three pins – Emitter [E] , Base [B] and Collector [C].
Connect them properly as shown in the wiring diagram.
What to do?
©"2012!!
www.scienceadda.com!
Page!16!of!24"!
©"2012!!
www.scienceadda.com!
Page!9!of!24"!
!
!
Experiment 03 – AND GATE
Why?
Switches are used to open or close a circuit. Here we work on an AND GATE,
where when only both the switches are pressed, the light glows. You can
implement a circuit with multiple switches for a single light where until the main
switch is ON, the light will not turn ON.
How it works?
When the mains are turned OFF in your home, none of the switches will be able
to turn ON fans or TV. Here the MAIN switch is the master and other switches
are slaves. Only when the master switch is ON, slave switches can function. Let
us try an experiment on this.
What do you need?
• Board
•
•
1 x LEDs (any colour)
Caution!
Output:
•
1 x 330 ohm resistors – ( | | | ) Orange
Orange Brown
The LED will turn ON if any one switch is pressed or even if both
switches are pressed.
2. LED`s have polarity connect the +VE terminal to 330 Ohm resistor and
negative to ground.
What to Do?
Observation:
OUTPUT
ACTION
S1 and S2 both pressed
Only S1 is pressed
Only S2 is pressed
More Details at:
www.scienceadda.com/hobbyzone/electronics/or_gate
©"2012!!
www.scienceadda.com!
Page!12!of!24"!
©"2012!!
www.scienceadda.com!
Page!13!of!24"!
!
!
Experiment 2 – OR Gate [switch]
Why?
Switches are used to open or close a circuit. Here we work on an OR
GATE, where if any of the switch is pressed, the light glows. You can
implement a circuit with multiple switches for a single light. If there
is a single bulb in a corridor, you can use OR Gate to control it from
two different switches in different places.
How it works?
A simple pair of switch (S1 & S2) and a resistor when connected to a
LED as shown creates an OR GATE. Here when any of the switch is
pressed, it closes the circuit and LED turns ON.
What do you need?
• Board
• 1 x 330 ohm resistors – ( | | | ) Orange
Orange Brown
Output:
•
•
1 x LED (any colour)
The LED turns ON only when both the switches S1 & S2 are pressed
together.
Observation:
Caution
1. LED`s have polarity connect the +VE terminal to 330 Ohm resistor and
negative to ground.
OUTPUT
ACTION
What to Do?
S1 and S2 both pressed
Only S1 is pressed
Only S2 is pressed
More Details at:
www.scienceadda.com/hobbyzone/electronics/and_gate
©"2012!!
www.scienceadda.com!
Page!14!of!24"!
©"2012!!
www.scienceadda.com!
Page!11!of!24"!