1
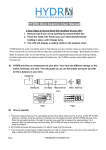
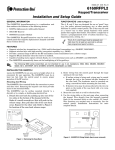
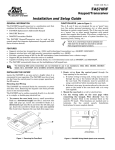
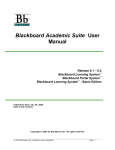
Blackboard Academic Suite
User Manual
Virtual Classroom
Overview
Users can ask questions, draw on the whiteboard, and participate in breakout sessions from the
Virtual Classroom. The Session Admin establishes which tools in the Virtual Classroom users can
access.
Find this page
Follow the steps below to open the Virtual Classroom.
1.
Click Communication on the Course Menu.
2.
Select Collaboration Tools.
3.
Click Join next to a Virtual Classroom session.
Virtual Classroom areas
The table below details the areas of the Virtual Classroom.
©
Part
F un ct io n
Menu Bar
Allows the Session Admin to control the Virtual Classroom. This
includes managing participation, monitoring breakout sessions, and
ending the session.
Classroom Tool box
Includes all of the tools used during the Virtual Classroom session.
This includes searching for Web sites, asking and answering
questions, utilizing the Whiteboard, and accessing the Course Map.
Chat
Allows users to compose messages, raise their hands to ask
questions, and activate private messages.
2007 Blackboard Inc. Proprietary and Confidential.
Page 69
Blackboard Academic Suite
User Manual
Menu Bar
Overview
Only users with Active privileges have access to the options on the Menu Bar. The functions
available in the Menu Bar include:
x
View - Choose an option for viewing Personal Messages in the Virtual Classroom.
x
Clear - Clear the session display.
x
Breakouts - Create a breakout room for a group of users.
View
Select Show in-line to view private messages within the chat area. Select Show in separate
frame to view private messages in a separate window.
Clear
Clear erases the users chat display.
Breakouts
Select the checkboxes for the users who will participate in the Breakout session. Users may only
join a Breakout session if they are selected by the creator of the Breakout session.
Users who enter a Breakout session are still active in the main Virtual Classroom Session. If a
Breakout session is closed users are still active in the main session. Breakout sessions default to
the same settings as the main session.
©
2007 Blackboard Inc. Proprietary and Confidential.
Page 70
Blackboard Academic Suite
User Manual
Classroom Tool box
Overview
If granted access to these tools by the Session Admin, users can use the Whiteboard, access
Web sites, and view the Course Map.
The Classroom Tool box appears on the left side of the Virtual Classroom. To begin using items
in the Tool box click the name of the tool.
Tools
The following tools are available in the Classroom Tool box.
©
Tool
Description
Whiteboard
Enables users to present different types of information as they would
on a blackboard in a classroom.
Group Browser
Enables users to collaboratively browse the Web.
Content Map
Enables users to browse the Course Content while they are in a
Virtual Classroom.
Ask Question
Enables users to ask questions during the session.
Question Inbox
Enables users to answer questions submitted by other users during a
session.
2007 Blackboard Inc. Proprietary and Confidential.
Page 71
Blackboard Academic Suite
User Manual
Whiteboard
Overview
The Whiteboard enables users in a Virtual Classroom to present different types of
information as they would on a blackboard in a classroom. Using the tools in the
Whiteboard Tools palette, users can draw images, type text, and present equations. The
Session Admin determines whether or not this function is made available to users.
Note: Only users who have privileges (assigned by the Instructor) can access
the Whiteboard.
Functions
The table below details the tools available for use on the Whiteboard.
©
To . . .
click . . .
select an item
the Arrow tool. Then click on an item for selection. The following may be
performed on selected items:
Enlarge: Click one of the small black boxes that surround the item and
drag it to the desired size.
Move: Click the item and move it to the desired location.
Cut: Click the Whiteboard item. Then click the Cut icon.
Copy: Click the Whiteboard item. Then click the Copy icon.
Paste: Click the Whiteboard item. Then click the Paste icon.
Delete: Click the Whiteboard item. Click on the selected object. Then
click the Delete icon.
Group items: Click the Whiteboard items. Then click the Group icon.
Ungroup: Click a Whiteboard item in a group. Then click the Ungroup
icon.
Bring front: Click the Whiteboard item. Click on selected object. Then
click the Bring to front icon.
Bring back: Click the Whiteboard item. Click on selected object. Then
click the Send to back icon.
Select all figures on the Whiteboard: Click the Selects all Figures icon.
draw free hand
the Pen tool. Choose the color of the pen in the Fill Color drop-down list.
enter text using
the keyboard
the text tool (T) then the Whiteboard area. A Whiteboard Text Input box
appears. Type the text in the box and click Insert. Use the options in the
Tools palette to select color, font, and size.
draw a straight
line
the Slanted Line tool.
highlight
something with
an arrow
the Pointer.
2007 Blackboard Inc. Proprietary and Confidential.
Page 72
Blackboard Academic Suite
©
User Manual
To . . .
click . . .
draw a square
the Square tool. Choose the color of the square from the Fill Color dropdown list.
draw a circle
the Oval tool. Choose the color of the circle from the Fill Color dropdown list.
input an equation
The Math and Science Equation Editor icon (). The Equation Editor
appears. Input the equation and click Insert Equation.
2007 Blackboard Inc. Proprietary and Confidential.
Page 73
Blackboard Academic Suite
User Manual
Group Browser
Overview
The Group Browser enables users to collaboratively browse the Web. This tool opens a
URL that is viewable by all users. URLs used in the session are recorded in the archive
if one is created. The Session Admin determines whether or not this function is made
available to users.
Note: Only users who have an Active role can access the Group Browser.
Functions
The table below details the available functions in the Group Browser.
©
To . . .
click . . .
open a Web site
type the URL in the Enter Address field.
choose where to
display the Web
site
Display To Class to display the window in the Whiteboard or click
Preview in New Window to open the Web site in a new browser window.
The preview window is only displayed to the user that opened it.
2007 Blackboard Inc. Proprietary and Confidential.
Page 74
Blackboard Academic Suite
User Manual
Content Map
Overview
The Content Map enables users to browse the Course while in a Virtual Classroom. By default,
the Session Admin has access to operate the Map. Users must have Active privileges to use the
Content Map in a Virtual Classroom.
Functions
The table below details the available functions in the Content Map.
©
To . . .
click . . .
display an element on the
map to all users
the Content Area in the Map and select Display To Class in
the drop-down list.
display an element on the
map in a separate window
the Content Area in the Map and select Preview in New
Window in the drop-down list. The new window is only visible
to the User who opens it.
refresh the Map during a
Collaboration Session
Refresh Tree in the drop-down list. This updates the Map to
match the Course Menu .
2007 Blackboard Inc. Proprietary and Confidential.
Page 75
Blackboard Academic Suite
User Manual
Ask Question
Overview
Users are able to ask questions during the session. As users submit questions during
the session the Session Admin can view and respond to them.
Note: Only users who have an Active role can ask questions.
Ask a Question
To ask a question, select Compose in the Ask Question area. Enter the question in the
text box and click Send.
©
2007 Blackboard Inc. Proprietary and Confidential.
Page 76
Blackboard Academic Suite
User Manual
Question Inbox
Overview
Questions from users are sent to the Question Inbox during the Virtual Classroom
session. The Question Inbox is used to manage and respond to questions during a
Collaboration Session.
Note: Only users who have an Active role can access the Question Inbox.
Function
The table below details the functions available in the Question Inbox Tool.
To . . .
click . . .
respond to a question
the Username in the From list and click the Respond to
Question icon. The Respond to Question pop-up window
appears.
delete a question
the Username in the From list and click the Delete icon.
view only questions that
have not been answered
the checkbox next to Show unanswered only.
Respond to Question fields
The table below details the fields on the Respond to Question pop-up window.
©
F i e ld
Description
Question
Question that was submitted.
Response
Enter the response to the question.
Private
Select this check box to make the response to the question private. If marked
private, the response is only sent to the person who submitted the message.
2007 Blackboard Inc. Proprietary and Confidential.
Page 77
Blackboard Academic Suite
User Manual
Chat
Overview
The Chat allows the users to interact with each other via a text-based chat. Chat is part of the
Virtual Classroom. It can also be accessed separately.
Note: Some of the functions in the chat are limited to those users with an Active
role
Find this page
Follow the steps below to open a Chat:
1.
Click Communication on the Course Menu.
2.
Select Collaboration Tools.
3.
Click Join to next to a Chat session.
Functions
The table below details the functions available in the Chat.
©
To . . .
then . . .
enter a message for
the class to read
type the message in the Compose field. Click Send. The message
appears in the chat area. There 1000 character limit for chat
messages.
become an Active
user
click the hand symbol. A hand appears next to the Username. The
Session Administrator clicks on the hand to make the user Active.
view user information
Select a Username in the Participant list and then click User Info.
send a private
message to a user
Select a Username in the Participant list and then click Private
Message.
2007 Blackboard Inc. Proprietary and Confidential.
Page 78
Blackboard Academic Suite
User Manual
Private Messages
Overview
Users can send private messages to each other if the Session Admin enables this tool in
the Session Controls. Private messages are not recorded or archived.
Note: Only users who have an Active role can send Private Messages.
©
2007 Blackboard Inc. Proprietary and Confidential.
Page 79
Blackboard Academic Suite
User Manual
User Information
Overview
The User Information pop-up window displays personal information about a user such as name,
email address, and any other information the user has chosen to add to their profile.
Click User Info in the Chat area and the User Information pop-up window appears.
Send a Private Message
Click Private Message to send a message to the user. The Compose Private Message pop-up
window appears.
©
2007 Blackboard Inc. Proprietary and Confidential.
Page 80
Blackboard Academic Suite
User Manual
Session Archives
Introduction
Session Archives allow users to review the discussions and questions raised during a
Collaboration Session. Sessions are archived by date and the option to remove an archive is
available to all group members.
Find this page
Follow the steps below to open the Session Archives page.
1.
Click Communication on the Course Menu.
2.
Select Groups from the Communication Center.
3.
Click Collaboration.
4.
Click Archives next to a Collaboration Session.
Functions
The table below describes the functions available on this page
©
To . . .
click . . .
search for an Archive in the
Collaboration Session
the Archive Name or Creation Date option in the Search by:
field. Enter the name of the archive or the date it was created.
Click Search.
open an archive
the archive in the Archive Name column.
change the name or
availability of an archive
Manage. The Archive Properties page appears.
remove an archive
Remove. This action is irreversible.
2007 Blackboard Inc. Proprietary and Confidential.
Page 81