1
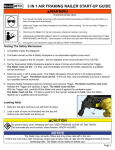
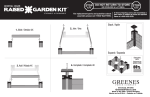
99 Washington Street
Melrose, MA 02176
Phone 781-665-1400
Toll Free 1-800-517-8431
Visit us at www.TestEquipmentDepot.com
DOVETAIL JIG No. 860
USER’S MANUAL
INTRODUCTION
Thank you for purchasing General’s DOVETAILER™ Dovetail Jig. A simple and easy way to make professional furniture joints.
SAFETY RULES FOR A HANDHELD ROUTER AND ROUTERS USED WITH A ROUTER TABLE
1. KNOW YOUR ROUTER. Read the owner’s manual carefully before use. Learn the router's applications and limitations, as well as the
specific potential hazards involved in its use.
2. KEEP GUARDS IN PLACE and in working order.
3. GROUND ALL TOOLS. Most routers are equipped with a three-prong plug, and it should be plugged into a three-hole electrical outlet. If an
adapter is used to accommodate a two-prong outlet, the adapter lug must be attached to a known ground, such as the outlet holding
screw. Never remove the third prong.
4. REMOVE ANY ADJUSTING KEYS AND WRENCHES. Make it a habit to check that keys and adjusting wrenches are removed from the router
before operating.
5. KEEP WORK AREA CLEAN. Cluttered areas and benches invite accidents.
6. AVOID POTENTIAL DANGERS. Don’t use your router in damp or wet locations, or expose them to rain. Keep work area well lighted.
7. KEEP CHILDREN AND VISITORS AWAY. Distractions can easily lead to accidents — your own or others’.
8. MAKE YOUR WORKSHOP CHILDPROOF. Use pad-locks, master switches, or remove start keys.
9. DON’T FORCE THE ROUTER. It will do the job better and safer at the rate for which it was designed.
10. WEAR PROPER APPAREL. No loose clothing, gloves, neckties, or jewelry to get caught in moving parts. Nonslip footwear is recommended.
Wear protective hair covering to contain long hair.
11. USE SAFETY GLASSES.
12. USE A FACE OR DUST MASK.
13. DON’T OVERREACH. Keep your proper footing and balance at all times.
14. MAINTAIN YOUR ROUTER IN TOP CONDITION. Keep router bits sharp and clean for best and safest performance. Follow instructions for
lubricating and changing accessories.
15. DISCONNECT YOUR ROUTER BEFORE SERVICING. Also when changing bits, blades, cutters and other accessories.
16. USE ONLY RECOMMENDED ACCESSORIES. Consult the owner's manual for recommended accessories. The use of improper accessories
may cause hazards.
17. AVOID ACCIDENTAL STARTING. Make sure switch is in “OFF” position before plugging in cord.
18. NEVER STAND ON A TOOL. Serious injury could occur if the tool is tipped or if the cutting tool is accidentally contacted.
19. CHECK FOR DAMAGED PARTS. Before further use of the router, a guard or other part that is damaged should be carefully checked to
ensure that it will operate properly and perform its intended function. Check for alignment of moving parts, breakage of parts, mounting,
and any other conditions that may affect its operation. A guard or other part that is damaged should be properly repaired or replaced.
20. ROUTER TABLE DIRECTION OF FEED. Feed work into the cutter.
21. NEVER LEAVE THE ROUTER RUNNING UNATTENDED. Turn power off, and stay with router until it comes to a complete stop. Before leaving,
assure that power cannot be turned on accidentally. Use pad-locks, master switches, or remove start keys.
22. AVOID DRUGS, ALCOHOL, AND MEDICATION. Do not operate the a router while under the influence of drugs, alcohol or medication.
1
POINTS TO NOTE BEFORE STARTING
• Ensure that the bit is sharp. Blunt tools cannot produce good quality work, and increase the risk of a kickback and machine overload.
• Advance the bit evenly and at a moderate pace to ensure longer bit life and to protect against overloads.
• Cut long sockets in stages if necessary to avoid any buildup of chips.
• After installation of a new milling bit make sure that it turns easily in the milling position.
• Check the operation and setting of the tool on a sample piece before using on good wood.
• Make sure both pieces of wood to be joined are perfectly flat by placing them against one another. Warped wood will cause an
unsatisfactory joint.
DOVETAIL JIG ASSEMBLY
1. Remove all components from hardware bag and ensure that all are present and undamaged. (FIG.1)
2. Install thumb screws into tapped holes as shown. Screw locations may be adjusted as needed. (FIG. 2)
3. Press non-marring ends onto thumbscrews. (FIG. 3)
FIG. 1
QTY. 1
14º
1/2"x1/4"
QTY. 2
1/2" - OD
1/4" - ID
QTY. 4
1/4" - 20
QTY. 4
FIG. 2
QTY. 1
FIG. 3
Included bearings are 1/2" outside diameter (OD). Router sleeves or bushings can be substituted as long as they are also 1/2" OD.
Included router bit is 14° x 1/2". Other bits can be substituted providing they are also 1/2" diameter and their length is no greater than 3/4".
USING THE DEPTH GAUGE
The depth Gauge is used to set the
depth of the Dovetail Cutter during
router setup. It is also used to control
the length of the pins during cutting.
1. Loosen the two screws (A) on
the face of the depth gauge
2. Align the top surface (B) with
the desired measurement on
the ruled edges (C).
3. Tighten the two screws (A) to
lock the depth stop in position.
B
C
A
FIG. 4
2
ROUTER SETUP
1. Install both bearings onto dovetail cutter and insert into Router. (FIG. 5)
2. Set the height of the Dovetail Cutter Bit using the Depth Gauge. (FIG. 6)
For instructions on setting the depth gauge see USING THE DEPTH GAUGE on page 2.
3. FIG. 7 shows the dimension of the dovetail joint that the cutter height affects.
4. The tightness of the joint (the fit between the two boards) can be adjusted by raising or lowering the height of the cutter as show in
FIG. 8. This will be described in greater detail later.
FIG. 5
FIG. 6
FIG. 7
Setting a HIGHER bit height
will produce a TIGHTER joint.
Setting a LOWER bit height
will produce a LOOSER joint.
FIG. 8
CUTTING A HALF BLIND DOVETAIL JOINT
*The “PINS” side of the joint must be thicker than
1/2" for Half-Blind Joints
PINS
TAILS
1. When cutting a half-blind dovetail joint, use the included
1/2" x 1/2" cutter and start with a bit height setting of 1/2".
2. Cut a test joint with scrap wood to confirm the fit of the joint.
If the boards do not fit together easily, the joint may be too
tight. The joint can be made looser or tighter by setting the
cutter depth shallower or deeper as shown in FIG. 8.
3. Begin with the “TAILS” side of the joint.
4. Center the board in the “TAILS” portion of the jig with the
outside face of the board facing inward. (FIG. 10)
5. Tighten the thumbscrews. CAUTION: DO NOT OVERTIGHTEN THE
THUMBSCREWS AS THIS HAS THE ABILITY TO WARP THE JIG.
6. Clamp the board to a workbench or secure it in a vice as
shown. (FIG. 11)
7. Cut the “TAILS” portion of the joint. Be sure to follow the jig
profile as the slots are wider than the cutter bearings. This is
to allow for a rough and a finish pass.
8. Now it is time to make the “PINS” side of the joint.
9. Set the depth gauge to the desired length of the “PINS”. This
should be slightly greater than the thickness of the wood used
for the “TAILS” board. (FIG. 12)
FIG. 9
3
Test Equipment Depot - 800.517.8431 - 99 Washington Street Melrose, MA 02176
FAX 781.665.0780 - TestEquipmentDepot.com
10. Loosely clamp the “PINS” wood into the jig with the outside face
pointing inward.
11. Insert the “TAILS” from previous cut into the teeth on the bottom of
adjuster plate. Position the wood to be cut by lining up the sides
with the first piece. (FIG. 13)
12. With the edges of both boards aligned; tighten the thumbscrews
(NOTE THE CAUTION FROM STEP #5) and secure the stock to the
bench. Remove the “TAILS” board before proceeding.
13. Make all cuts. For this cut the router should ride on the surface of
the depth plate as shown in FIG. 14. Be sure to follow the jig profile
as the slots are wider than the cutter bearings. This is to allow for
a rough and a finish pass.
14. Before gluing, fit the two sections together. The joint should be
tight and even with no gaps. If problems arise, file or trim the
joint to improve the fit.
FIG. 10
INSIDE FACE
FIG. 11
FIG. 12
FIG. 13
FIG. 14
SIDES LINE UP
CUTTING A FULL THROUGH DOVETAIL JOINT
*This requires a dovetail cutter bit with a greater depth than
the wood you are cutting.
FIG. 15
PINS
TAILS
The steps required to cut a full through joint (FIG. 15) are very similar
to those described in the previous section CUTTING A HALF BLIND
DOVETAIL JOINT. With the following exceptions:
1. When cutting the “TAILS” (FIG. 15) portion of the joint, set the bit
depth to slightly greater than the thickness of the “PINS” board.
This will ensure that the tails are slightly proud when fit and can
be sanded down for a flush fit. (FIG. 16)
2. When cutting the “PINS” portion of the joint, set the cutter depth
deeper (tighter) first and adjust to the desired joint fit.
CUTTING JOINTS WIDER THAN 6"
Joints over 6" wide must be cut in multiple
segments. To align the jig with the previous cut,
the aligning tool must be used.
FIG. 16
1. Move the wood in the jig and position the last slot from the
previous cut in the last channel of the jig.
2. Loosely clamp the wood in the jig.
3. Insert the aligning tool into the slot to properly center the wood
with the jig. (FIG. 17)
4. Tighten the thumbscrews, (CAUTION: DO NOT OVERTIGHTEN),
and continue cutting.
5. Repeat as necessary.
4
FIG. 17
ROUND-OVER
FIG. 18
FACE JOINTING
1. In order to join two pieces of wood using a Dovetail-Joint the
round-over created by the dovetail jig must be avoided. (FIG. 18)
2. Insert the first board into the “TAILS” section of the Dovetail Jig
along with a thin piece of scrap to offset the first board and the
jig. (FIG. 19)
3. Align one edge of the board to be cut with the outside edge of
the jig. (FIG. 20)
FIG. 19
4. Tighten the thumbscrews, (CAUTION: DO NOT OVERTIGHTEN),
and make all cuts.
5. Insert the second board into the jig along with the scrap wood and
offset one edge of the board 1/2" from the outside edge of the jig.
This spacing will offset the “TAILS” of the second board so that
they align with the slots cut into the first board. (FIG. 21)
SCRAP
FIG. 20
FIG. 21
1/2"
Test Equipment Depot - 800.517.8431 - 99 Washington Street Melrose, MA 02176
FAX 781.665.0780 - TestEquipmentDepot.com
5