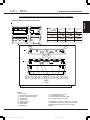
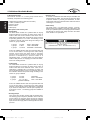
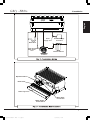
1
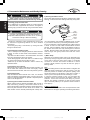
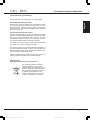
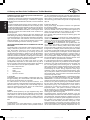
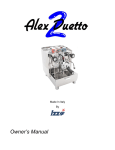
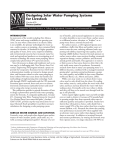
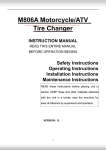
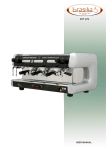
HANDMADE IN FLORENCE
HANDMADE IN FLORENCE
GB/5
FB/80
Operating Manual
available
Also available in UL - NSF version
Ver. 1.3
La Marzocco s.r.l.
Via Bolognese 68 Pian Di San Bartolo 50010 Firenze, Italy
t: +39.055.401.390 f: +39.055.401.349
e-mail: [email protected]
www.lamarzocco.com
GB/5 - FB/80
English
Table of Contents
Chapters
1. General Warnings and Safety Specifications
pag 2
2. Definition of Available Models
pag 3
3. Installation
pag 5
4. Operating the Espresso Machine and Preparing Coffee
pag 7
5. Preparing Other Hot Drinks
pag 9
6. Preventative Maintenance and Weekly Cleaning
pag 10
7. De-Commissioning and Demolition
pag 11
8. History and Use of the “La Marzocco” Coffee Machines
pag 12
www.lamarzocco.com
Operators Manual - ENG - V 1.3.pmd 1
V1.3
30/10/2006, 14.34
1. General Warnings and Safety Specifications
1)
English
2)
3)
This operating manual is an integral and essential part of
the product and must be supplied to users. Users are
asked to read the enclosed warnings and cautions carefully,
as they provide valuable information concerning safety
during installation, operation and maintenance. This
manual must be kept in a safe place and be available for
consultation to new and experienced users alike.
Ensure product’s integrity by inspecting the packaging,
making sure it presents no signs of damage which might
have affected the enclosed machine.
Packaging (boxes, plastic bags, foam parts and whatever
else) must not be left around within easy reach of children,
due to the potential danger it represents, nor be discarded
in the environment.
5)
Check to see that data on the rating plate corresponds to
those of the main electrical supply which the machine will
be hooked up to.
6)
The installation must be performed according to local
electrical and plumbing codes and regulations. The
installation also must comply to the manufacturer’s
instructions, and must be performed by qualified and
authorized personnel.
7)
8)
9)
The manufacturer shall not be held responsible for any
damages caused by improper and/or irrational use.
12) Using any electrical device requires that certain
fundamental rules be observed. In particular:
- do not touch the device with wet or humid hands and feet;
- do not use the device while having no shoes on your feet;
- do not use extension cords in bath or shower rooms;
- do not unplug the device from the power outlet by pulling on the power
Check the machine’s integrity after having carefully
removed the packaging.
Note:
In case of doubt, do not go on any further and contact your
dealer or retailer immediately. They will send out specialized
personnel authorized to perform service on the espresso
machine.
4)
11) This device must be used exclusively for the functions it
has been designed and built for. Any other application is
inappropriate and dangerous.
Incorrect installation may cause for injury/damages to
people, animals or objects, for which the manufacturer shall
not be held responsible.
Safe electrical operation of this device will be achieved
only when the connection to the power outlet has been
completed correctly and in observance of all local, national,
and international electrical codes and safety regulations,
and particularly by grounding the unit. Make sure grounding
has been done properly as it represents a fundamental
safety requirement. Ensure qualified personnel check such
connection.
Furthermore, you must ensure that the capacity of the
available electrical system is suitable for the maximum
power consumption indicated on the espresso machine.
supply cable;
- do not expose the device to atmospheric agents (rain, sun, etc.);
- do not allow children or untrained people to use this device.
13) Before carrying out any maintenance and/or cleaning
operations, turn the main switch, which is located on the
front left of the machine, to the “0” or OFF position, and
disconnect the machine from the electrical network by
unplugging the cord or by switching off the relative circuit
breaker. For any cleaning operation, follow exclusively the
instructions contained in this manual.
14) In case the machine is operating in a faulty manner or
breaks down, disconnect it from the electrical network (as
described in the preceding point) and close the water
supply valve. Do not attempt to repair it. Contact a qualified
and authorized professional to perform any repair. Any
repairs must be performed exclusively by the manufacturer
or by an authorized centre using only original parts. Non
compliance with the above could compromise the safe
operation of the machine.
15) You should plan to make use of an omnipolar connector
during installation, as required by local, national, and
international electrical codes and regulations.
16) In order to avoid dangerous overheating problems, it is
recommended that the power supply cable be fully unfurled.
17) Do not obstruct air intake and exhaust grilles and, in
particular, do not cover the cup warmer tray with cloths or
other items.
18) The machine’s power supply cable must not be replaced
by users. In case the power supply cable becomes
damaged, shut off the machine and disconnect the machine
from the electctrical network by switching off the relative
circuit breaker and close off the water supply; to replace
the power supply cord, contact qualified professionals
exclusively.
10) We do not recommend using adapters, multiple plugs and/
or extension cords. If you cannot avoid using them, make
sure that they are exclusively of the kind which conforms to
local, national, and international electrical codes and safety
regulations, being careful not to exceed the power and
current ratings indicated on such adapters and extension
cords.
2
Operators Manual - ENG - V 1.3.pmd 2
V1.3
La Marzocco, S.r.l.
30/10/2006, 14.34
Firenze, Italia
GB/5 - FB/80
2. Definition of Available Models
This operating manual refers exclusively to the following models, of our own manufacture:
GB/5 or FB/80, Model EE & AV into 2, 3 and 4 groups
C
B
GB/5
A
2 gr.
A [mm]
C
3 gr.
4 gr.
FB/80
B [mm]
B
475
475
485
627
627
627
750
1190
950
955
755
WEIGHT [kg]
485
622
622
622
C [mm]
A
475
485
90
100
1195
130
13
12
EE
6
5
2
3
AV
9
1
8
4
7
10
8
9
11
Fig. 1 - Model AV & EE with 2, 3, or 4 groups
Legend
1) Main Switch
2) Pressure Gauge (Steam Water)
3) Pressure Gauge (Brew Water)
4) Brew Groups
5) Control Panel
6) Group #1 Keypad
7) Digital Display
8) Steam Wand
9) Steam Knob
www.lamarzocco.com
Operators Manual - ENG - V 1.3.pmd 3
10)
11)
12)
13)
Hot Water dispense nozzle
Removable Drain Tray
Manual Brew Switch (EE model)
Hot Water Switch ( EE model)
For additional information on electronics, keypads,
and software programming, please see the section
entitled Software Programming your Espresso
Machine.
V1.3
3
30/10/2006, 14.34
English
1) Common Dimensions, Weights, and Features
2. Definition of Available Models
2) General Description
The machine is built in 2, 3, and 4 group versions and is
essentially composed of the following parts:
English
1)
2)
3)
4)
5)
Steam Boiler (produces steam and hot water)
Coffee (“saturation”) boiler
Brewing groups
Exterior Cover
Water pump
3) Description of the various parts
• Steam Boiler
The Steam Boiler consists of a cylindrical tank, of varying
length according to the number of coffee groups, which is
made of AISI 300 series stainless steel. Each unit is
subjected to a hydraulic test, at a pressure of 6 bar, and has
an operating pressure of 1.3-1.5 bar. The following is a list
of effective volumes and power ratings according to the
number of groups installed:
2 groups
3 groups
4 groups
7.0 liters
11 liters
14,5 liters
• Exterior Cover
It consists of a stainless sheet steel body for the GB/5 and
painted plastic for FB/80. The structure has been the object
of specific studies to provide good aesthetics, to lower
ergonometric costs for the operator and to reduce the chance
of damage to a minimum.
• Water Pump
The water pump, is a differential pressure, “positivedisplacement” type installed on the water supply tubing and
is set-up to operate anytime the coffee groups are activated,
and through an electric level gauge whenever the steam
boiler needs to be replenished.
The Coffee Boiler and Steam Boiler contain water at elevated temperature.
Water temperature over 125゚F / 52゚C can cause severe burns instantly or
death from scalding.
(Coffee Boiler 200゚F / 93.3゚C- Steam Boiler 260゚F / 127゚C)
2000 or 3000 Watts
3000 or 4000 Watts
3000/3800 or 5000 Watts
Covers are installed at either end of the cylindrical tank and
on one of them there is a housing for the water heating
element, which allows the steam boiler to operating
pressure within approximate 25 minutes. Operating
pressure is maintained by a pressure switch or a
temperature probe. The steam boiler has various fittings
used for safety devices, for supplying hot water and steam,,
and for the heating element.
• Coffee Boiler
The Coffee Boiler consists of a cylindrical tank, of varying
length according to the number of coffee groups, which is
made of AISI 300 series stainless steel. Each unit is
subjected to a hydraulic test, at a pressure of 18 bar, and
has an operating pressure of 9 bar. The following, table is a
list of effective volumes and power ratings according to the
number of groups installed:
2 groups
3 groups
4 groups
3.4 liters
5.0 liters
3.4 + 3.4 liters
(2 Boilers Installed)
1400 Watts
1600 or 1900 Watts
1400 + 1400 Watts
Covers are installed at either end of the cylindrical tank and
on one of them there is a housing for the water heating
elements. The temperature of the coffee boiler is maintained
by an electronic temperature controller (PID capable) with
an accuracy of 0.2°C. The brewing groups are installed on
the boiler.
• Brewing Groups
They consist of a precision casting made of stainless steel.
The brewing group accepts the portafilter used to hold the
ground coffee; the espresso flows through the brewing
group, through the portafilter basket, through the portafilter
spout, and into the cup(s) after the brewing button has been
pressed.
4
Operators Manual - ENG - V 1.3.pmd 4
V1.3
La Marzocco, S.r.l.
30/10/2006, 14.34
Firenze, Italia
GB/5 - FB/80
English
3. Installation
Power
Supply Cord
Electrical Supply
Connection
Waste/Drain
Water Pump
Motor Power
Cord
Water
Filtration/Softener
Water Pump
and Motor
Expansion Valve
Drain Grate
Drain Tray
Drain Hose
Connection
Water Supply
Connection
www.lamarzocco.com
Operators Manual - ENG - V 1.3.pmd 5
V1.3
5
30/10/2006, 14.34
3. Installation
English
1) Accessories
pump is operating, otherwise air can be introduced into the
brew boiler causing an undesireable condition.
Check the package to make sure that the following
accessories are included:
•
a number of 1-dose and 2-dose portafilters
corresponding to the number of groups;
•
replacement 1-dose and 2-dose filters (one of each)
•
1 tamper
•
1 blind filter
•
cleaning detergent, for the groups
•
3 stainless steel braided hoses for water connections
•
1,5 mt of reinforced plastic tubing for drainage
•
1 hose clamp
3) Electrical Connections
a) Power Supply Cord
Before making any electrical connections make sure
that the 2 strain relief connectors are firmly secured to
the body of the machine in order to prevent inadvertent
stress on the power cables.
In order to proceed with installation, it is necessary that the
following are available:
a) Pipes carrying drinking water with a 3/8"G (BSP) end
connection; (3/8" Compression for USA and Canada)
b) Electrical Supply according to the specification of the
espresso machine purchased:
• Single/Three phase 220VAC - 50/60 Hz electrical
connection with ground, protected socket and approved
interlock switch
• Single phase 200VAC - 50/60 Hz electrical connection with
ground, protected socket and approved interlock switch
• Three-phase, 380VAC - 50/60 Hz electrical connection with
neutral + ground, near the bench on which the machine is
installed and terminating in a suitable protected fivepole
socket equipped with an approved interlock switch
This is the main power supply cable that provides power to the
entire espresso machine. There are different types of cable
based upon the electrical requirements of the espresso
machine purchased
•
200/220VAC 1 Phase 3-core cable with 2.5/4/6/10mm2
cross section or AWG 12/10/8 (for UL version), secured to
espresso machine via a strain relief connector
•
220VAC 3 Phase 4-core cable with 4 mm2 cross section
for versions with 1, 2 , 3 and 4 groups secured to espresso
machine via a strain relief connector
•
380 VAC 3 Phase 5-core cable with 2.5/6 mm2 cross
section for versions with 1, 2, 3 and 4 groups secured to
espresso machine via a strain relief connector
b) Water Pump Motor Power Cord
This is the power supply for the water pump motor. The internal
electronics will switch the pump motor on when needed.
•
3-core cable with 1.5 mm2 cross section or 3-core AWG
16 (for UL version) secured to espresso machine via a strain
relief connector
c) Waste water drain system
NOTE:
The drinking water stopcock and the terminal switches for the
electrical system need to be located in the most convenient
position for the operator to access them easily and quickly.
3) Waste Water Drain Connection
The espresso machine drain is to be connected by means of
the included reinforced plastic tubing. Connect one end of the
reinforced plastic tubing to the drain hose connection on the
left side of the espresso machine, secure with included hose
2) Water Supply Connection
Connect the inlet of the water filter/softener to the drinking
water supply using one of the supplied stainless steel
braided hoses. Before connecting the water pump to the
espresso machine, flush the water supply line and the
filtration system in order to eliminate any residual particles
which could otherwise get stuck in taps or valves thus
preventing them from working properly.
Connect the water supply connection of the espresso
machine to the water pump outlet using one of the supplied
stainless steel braided hoses. Then connect the water
pump inlet to the water filter/softener outlet.
NOTE: The water pump is differential pressure, volumetric
pump and has been designed to be used exclusively with
cold water. Make sure that water is always present while the
The manufacturer declines any responsibility for any event
leading to liability suits whenever GROUNDING has NOT
BEEN COMPLETED according to current local, national,
and international regulations and electrical codes, or other
electrical parts have been connected improperly.
— U.S.A. and Canada Only —
Do Not Connect To A Circuit Operating At More Than
150 V To Ground
clamp. Connect the other end to a suitable waste water
collection system. In case such a system is not available,
drained liquids may be collected in a suitable bucket and any
necessary drain pipe extensions shall be made using steellined PVC tubing and suitable hose clamps.
HAZARDOUS VOLTAGE DISCONNECT FROM
POWER SUPPLY BEFORE SERVICING
6
Operators Manual - ENG - V 1.3.pmd 6
V1.3
La Marzocco, S.r.l.
30/10/2006, 14.34
Firenze, Italia
4. Operating the Espresso Machine and Preparing Coffee
1) Starting the Espresso Machine
a) Filling the Boilers with Water
Once the installation procedures have been completed, it is
necessary to fill the boiler tanks with water. Complete the
following procedure to properly fill the boiler tanks:
• Coffee Boiler
The water flows inside the coffee boiler directly, as soon as
the water system and water filter/softener taps are opened.
Since the inflow of water will compress the air in the boiler it
will be necessary to remove or “bleed” the air from the coffee
boiler. All air must be removed in order to completely “saturate”
the coffee boiler/group assemblies. To remove the air from
the boiler, “bleed the groups”, it will be necessary to remove
the cup tray from the top of the machine. First remove the cup
tray grates from the top of the machine exposing the cup tray.
Remove the screws securing the cup tray and then remove.
Once removed the top of the groups will be exposed.
2)Waiting for the Espresso Machine to Heat to Operating
Temperature
During this time, it may happen that the pointer of the coffee
boiler pressure gauge reaches as high as 14-15 bar. This may
happen anytime that the heating element is in the on condition.
In this case it is necessary to adjust the expansion valve (Fig. 3)
in such a way that the pressure may never exceed 11-12 bar. In
normal operating conditions, the coffee boiler pressure gauge
can read anywhere from 0-12 bar. When brewing, the pressure
should be set to 9 bar.
When the steam boiler reaches operating temperature, the light
on the Tea dispense button will light.
EE
AV
When the espresso machine is ready to operate all lights on
the keypads will light.
EE
AV
3)Installing the Portafilters
Install the portafilter(s) by inserting them into the group and
rotate the handle from left to right. When the portafilters are
inserted properly, you can press any of brew buttons to start the
Loosen the bleed screws one at a time (see picture above)
to allow air to escape until water flows from below the screw
head. Tighten the screw to stop the water from flowing. Over
tightening can cause damage to the sealing washer and the
group cover. Repeat this procedure for all groups. Once all
air is removed from the coffee boiler, reinstall the cup tray by
following the removal instructions in reverse.
• Steam Boiler
Turn the main switch (item 1 in Fig. 1) to position “1” or ON,
the automatic steam boiler level gauge will be switched on,
activating the auto-fill solenoid valve and the motor pump.
This will fill the steam boiler to a predetermined level and will
shut off when full.
Note:
It may happen that the air inside the steam boiler builds up
pressure (which may be detected through the pressure gauge
- item 2, fig. 1) when the water is allowed to flow in; this “false”
pressure must be eliminated by opening the steam valves (item
9, Fig. 1).
b)Turning the Espresso Machine On
Once you have completed these procedures, check the display.
The message “Coffee Boiler Filled?” should be displayed.
Press enter to confirm that the preceding procedures are
complete.
The installation is now complete and the espresso machine
should be heating to the operating temperatures.
www.lamarzocco.com
Operators Manual - ENG - V 1.3.pmd 7
Portafilter
Basket
Portafilter
Portafilter
Spout
flow of water through the portafilter. You should allow hot water
to pass through the portafilter(s) for a few seconds each time,
in order to pre-heat the portafilter.
Note:
It is important to leave the portafilters installed in the espresso
machine when not in use. The portafilter must remain heated
for the brew process to function correctly.
4)Brewing Coffee
It is now possible to remove one of the portafilters to make an
espresso beverage. Place some ground coffee in the filter
itself: 1 dose (approximately 6 g) for the small filter, 2 doses (2
approximately 10-14 g) for the larger filter. Press down on the
ground coffee with the supplied tamper and install the filter
holder up again to the bottom of the group and then press a
button to begin the brewing process.
Note:
Some barista believe it is important to press the brewing button
prior to installing the portafilter to flush any remaining coffee
oils and particles from the group. Some also flush just after
brewing to do the same. Please experiment to make the best
possible procedure for your coffee.
V1.3
7
30/10/2006, 14.34
English
GB/5 - FB/80
4. Operating the Espresso Machine and Preparing Coffee
English
1)Controlling the Brew Process Using Volumetric
Programming.
This espresso machine allows the volumetric programming of
each of the first 4 buttons on each group (numbered left to
right). Please consult the Software Programming Manual for
further instructions.
2) General Notes for Coffee Preparation
The potafilters must remain heated since they are at the lowest
position of the group itself, and they are partially isolated from
the same due to the rubber gasket between them. This can be
accomplished by leaving the portafilters installed in the machine
when not in use. The portafilters may also be actively heated.
This procedure may be carried out by activating one of the brew
buttons to flush hot water through the portafilter then turning off
the water flow.
Do not remove the portafilter when its relative group is brewing
hot liquids. The Coffee Boiler contains water at elevated
temperature. Water temperature over 125゚F / 52゚ C can cause
severe burns instantly or death from scalding.
It is important to remember that coffee left over in the filters
must be removed only when you need to prepare another cup,
and only at that time should you place a new dose of ground
coffee in the filter.
The size of the coffee granules is extremely important in
preparing a good cup of coffee, other than the type of coffee mix
used, quite obviously. The ideal grinding can be determined by
making various coffees using the amount of ground coffee that
you would normally use for each cup (we recommend at least
6g). The best grinding is that which allows coffee to flow out
from the filter holder spouts neither too slowly, drop by drop, nor
too quickly. A general rule is that a double dose should dispense
approximately 2 fluid oz. of espresso in approximately 25
seconds.
IMPORTANT
To improve the flavor profile of the espresso, the temperature of
the water in the coffee boiler, and therefore of the groups, may
eventually be raised or lowered via the digital display (please
consult the Software Programming Manual for detailed
instructions).
8
Operators Manual - ENG - V 1.3.pmd 8
V1.3
La Marzocco, S.r.l.
30/10/2006, 14.34
Firenze, Italia
GB/5 - FB/80
5. Preparing Other Hot Drinks
English
1) Steaming Milk or Other Liquids
Dip one of the 2 steam wands (part 8, fig. 1) which are connected
to the steam valve, into the liquid to be heated, turn the steam
knob (part 9, fig. 1) gradually until steam comes out at the end
of the wand.
The steam will transfer heat to the liquid raising its temperature
up to boiling point.
Be careful not to allow liquid to overflow in order to avoid severe
burns.
In order to prepare milk for making cappuccino with the right
amount of foam, go through the following steps:
• Place the container half-full of milk under the steam wand,
open the steam valve and bring the temperature of the milk
almost up to 149/158° F 65/70° C.
• Lower the container so as to bring the wand end to a point
just below the surface of the milk; at this point, move the
container up and down just enough to dip the nozzle end in and
out of the milk until you get the right amount of foam. You can
then pour this milk into a cup containing warm espresso and
you will end up with a fresh cup of cappuccino.
In order to prevent the heated liquid from being sucked
back into the steam boiler it is recommended that you
purge the steam valve and steam wand by opening the
valve for a few seconds to allow steam to escape to the
atmosphere from the end of the steam wand. Failure to
do so can cause the heated liquid to transfer from the
heated liquid container to the steam boiler (via vacuum
created from cooling parts). This condition is
undesireable and can cause contamination in the steam
boiler.
2) Preparing Tea and Other hot Drinks.
You may dispense hot water by using the fixed nozzle (item 10
fig 1). To dispense hot water, press the tea water button on the
right most group.
AV
EE
This button commands the hot water delivery. The volume of
water delivered may be adjusted via the display (see the
Software Programming Manual for further instructions). The
temperature of the water dispensed may be adjusted by
adjusting the mixing valve under the right side cover of the
espresso machine.
www.lamarzocco.com
Operators Manual - ENG - V 1.3.pmd 9
V1.3
9
30/10/2006, 14.34
6. Preventative Maintenance and Weekly Cleaning
6) Cleaning the Diffuser Screen
Due to filter holder discharge operations (subsequent to coffee
brewing), a certain amount of coffee grounds may slowly build-
The machine must not be dipped in, nor splashed with,
water in order to clean it. For cleaning operations,
please follow the instructions listed below very carefully.
English
1) Cleaning groups and drain wells
- Put a tablespoon of detergent powder for coffee machines
into the blind filter, supplied with the machine, and tighten it
onto the group you want to clean by using a normal filter holder.
Group
Assembly
Do not remove the portafilter when its relative group is brewing
hot liquids. The Coffee Boiler contains water at elevated
temperature. Water temperature over 125゚F / 52゚ C can cause
severe burns instantly or death from scalding.
Diffuser
Screen
Diffuser
Screw
- Activate the automating rinsing (backflushing) routine (see
the Software Programming Manual for more detailed
instructions)
- Rinse the group using a normal filter, by running hot water
through it several times.
2) Cleaning filters and filter holders
- Put 2 or 3 teaspoons of detergent powder for coffee machines
in about 1/2 a litre of water inside a heat-resistant container
and boil.
- Dip filters and filter holders in the boiled solution and leave
them fully submerged for about 30 minutes.
- Rinse thoroughly with clean water and run hot water through
one group several times with the filters in place.
- Make one cup of coffee and discard in order to remove any
unpleasant flavor.
3) Cleaning the drain collector
Remove the drain tray grill at least twice a week and clean, pull
out the water drain collector and clean it thoroughly. Inspect
and clean the drain well also, and remove any leftover grounds.
4) Cleaning the body
Wipe the stainless steel surfaces with a soft, non abrasive
cloth in the direction of the glazing marks, if any. Do not use any
alcohol or solvents whatsoever on painted or imprinted parts in
order not to damage them.
5) Cleaning the hot water and steam nozzles
Steam nozzles must be cleaned immediately after use with a
damp cloth and by producing a short burst of steam so as to
prevent the formation of deposits inside the nozzles themselves,
which may alter the flavor of other drinks to be heated. Hot
water nozzles must be cleaned periodically with a damp cloth.
10
Operators Manual - ENG - V 1.3.pmd 10
up on and obstruct, even partially, the diffuser screen. To clean
it, you must first remove it by unscrewing the diffuser screw.
Put 2 or 3 teaspoons of cleaning detergent for coffee machines
in about 1/2 a litre of water inside a heat-resistant container
and boil. Place the diffuser screen(s) and diffuser screw(s) in
the solution and leave them fully submerged for about 30
minutes. Rinse thoroughly with clean water. Install and run hot
water through each group several times with the screen
installed.
7) Water Pump
Whenever you are brewing coffee, and you can adjust the pump
pressure by turning the by-pass screw (below the plug located
on the side to which the pump power supply is connected)
clockwise to increase and counter-clockwise to reduce
pressure. Adjust pressure only when at least one group is
brewing coffee.
Note:
When the heating element in the coffee boiler is energized, the
water will expand increasing the start-up pressure. Once the
maximum pressure is reached, the expansion (safety) valve
should start working by discharging a few drops of water, in
order to prevent such pressure from exceeding 11-12 bar.
In case the pressure exceeds 12 bar, you must adjust the
expansion valve by unscrewing the cap slightly. If this is not
sufficient, remove the valve and clear away any calcium
deposits. This remedy is valid also in case the valve remains
open in the drain position (i.e. the pressure cannot increase to
8 bar approx.).
8) Water Filter/Softener
Please see the documentation that accompanied the water
filter/softener for the proper operating and cleaning instructions.
V1.3
La Marzocco, S.r.l.
30/10/2006, 14.34
Firenze, Italia
GB/5 - FB/80
7. De-Commissioning and Demolition
1) De-Commissioning and Demolition
English
Start by setting the main switch to the “0” or OFF position.
Disconnecting from the power outlet
Disconnect the espresso machine from the electrical network
by switching off the associated circuit breaker or circuit
protection device. Remove the power supply cord from the
power connection. Remove the Pump Motor Power Cord from
the water pump motor.
Disconnecting from the water system
Shut off the water supply by closing the specific tap located
upstream of the water filter/softener inlet. Disconnect the water
pipe at the water filter/softener inlet. Remove the hose
connecting the espresso machine to the water pump. Remove
the reinforced plastic tubing on the drain connection.
At this point, the machine may be removed from the bar, being
very careful not to drop it or squash your fingers.
The machine is made out of various materials and therefore, if
you do not intend to put it back in service, it must be taken to a
special disposal company which will select the materials which
can be recycled and discard the others.
Current regulations make it illegal to discard such machine by
leaving it on public grounds or on any private property.
Recycling notice:
Warning for the protection of the environment.
Old electrical equipment is made of
valuable materials, it is not normal
domestic waste! We kindly ask that our
clients to contribute to the protection of
the environment and natural resources
by delivering this equipment to the
relevant recycling centers, if they such
centers are available in their country.
www.lamarzocco.com
Operators Manual - ENG - V 1.3.pmd 11
V1.3
11
30/10/2006, 14.34
8. History and Use of the “La Marzocco” Coffee Machines
English
La Marzocco has been producing espresso coffee machines
for use in cafés since 1927.
In February of 1939, when machines being manufactured were
exclusively of the vertical boiler type, “La Marzocco” designed
and built the first horizontal boiler machines, for which it obtained
a “patent”.
The Second World War brought an end to production of coffee
machines, and the fact that La Marzocco was a company of just
the right size (small-medium) allowed it to keep in touch directly
with its clients and specialty “cafés”, which meant being able to
get more accurate feedback information, concerning the needs
of the final consumer and market trends, which could then be
put into practice.
Throughout time, various machines have been designed and
built: of the type operating on “Water/Steam” and on the principle
of “Hydrocompression”, and of the lever operated, air and steam
type; semi-automatic and automatic, with mechanical and
electrical actuators, up until current production which consists
of machines allowing continuous “brewing” operation.
PECULIAR CHARACTERISTICS OF LA MARZOCCO COFFEE
MACHINES
The great majority of the espresso coffee machines being built
today, of almost any brand, are of the “continuous brewing”
type, whose basic concept is to use the same water in the
tubing, directly to brew coffee by increasing its pressure
mechanically and heating it in advance. This has eliminated a
particular problem encountered with older machines, which
made use of water from the boiler, consisting of the “overheating”
of the brewing groups which, at times of heavy workload, would
give coffee a particularly unpleasant burned taste.
In any case, a good cup of coffee is the result of 4 highly
interdependent components, to such extent that if only one of
them is not quite in perfect harmony with the others, the resulting
cup of coffee will turn out not quite as pleasant in taste.
The 4 basic components are:
1.
2.
3.
4.
coffee bean mix;
water;
coffee grinder;
espresso machine.
1) Coffee Mix
Independent of the various qualities of coffee that make it up,
the type of toasting, etc., the freshness of the coffee beans and
the way they are preserved is very important.
For coffee beans to be used on espresso machines, it’s a
good rule of thumb to wait at least 8-10 days after toasting, so
that the beans may re-absorb part of the humidity they lost
during the toasting process itself, and to use coffee beans
within 3-4 days of opening their container.
2) Water
Within the limits imposed by the type supplied locally, water
should be free of bad savours and “softened” using a suitable
water softener in order to avoid calcium build-up; in any case,
hardness should not exceed 3-5 grains. If water tastes like
chlorine it is recommended that you use an actived carbon
filter.
3) Coffee Grinder
It must allow you to grind coffee beans in a wide variety of
granule sizes, in the most uniform manner possible and once
12
Operators Manual - ENG - V 1.3.pmd 12
you have established the amount of ground coffee required for
each cup, the grinder must guarantee a constant amount from
dose to dose. It is best to grind coffee from time to time, trying
not to leave any ground coffee in the grinder overnight and during
days off.
4) Espresso Machine
Among other things, the espresso machine must guarantee
the following qualities:
a) the most appropriate water temperature for the type of coffee
mix used, constant in time so as to ensure that a good cup of
coffee may be prepared any time, whether you have to make
several, one after the other, or one from time to time.
b) a constant water pressure through the brewing group and
the coffee mix.
As far as the quality b) is concerned, it is usually obtained by
means of the same system in all the “continuous brewing” type
machines, that is by using a positive-displacement motor pump,
while quality a) can be obtained with various systems.
The great majority of manufacturers uses systems which are
very similar to one another. The underlying principle is to heat
up the water used for brewing coffee, which comes directly
from the pipes and is pushed by the motor pump, by running it
through coils or cartridges (small containers) which are located
in the boiler. It follows that the latter must be quite large, which
entails a noticeable power consumption, and the temperature
may be controlled exclusively through a pressure switch, a
device which is specifically designed for controlling pressure
and not temperature; indeed, the temperature changes every
time the water/steam ratio in the boiler changes, and even more
so when the latter is replenished with cold water.
It is quite obvious that the coils or cartridges which supply water
to the brewing groups are very sensible to the above changes.
Furthermore, the heat exchange between the main boiler and
the coil varies greatly when, as time goes on, conduction of
heat is reduced due to calcium deposits forming on the inside
and outside of coils or cartridges. In light of the above, and to
avoid wastage of electric energy required to keep large
quantities of water at operating temperature/pressure, when
only a small part is utilized, our machines have been designed
with 2 small boilers, of the size which is most suited to the kind
of services they have to offer.
One of them, a “STEAM GENERATOR”, is used to deliver steam
and hot water for various drinks while the other, a “HOT WATER
GENERATOR”, is used for the coffee. The latter, therefore,
produces hot water used exclusively for brewing coffee, which
will flow out, every time the specific group is activated, thanks to
the force of the cold water (actually produced by the positivedisplacement pump). The temperature of such water is
controlled by an electronic temperature controller and a
temperature probe. This system is extremely sensitive and
has an accuracy of 0.2 C, electronically adjustable to 1/10 of a
degree in order to adapt it to the optimal temperature, depending
on the type of coffee mix being used.
The brewing groups, work like thermal “flywheels”. They are
welded directly to the coffee boiler and are thus an integral part
of the boiler itself. The boiler assembly is shaped in such a way
that each group is located at a greater height than the boiler, so
that, just like in the elements of a thermosiphon, a natural
circulation of hot water takes place within each group, at the
same temperature of the boiler and kept constant by the
electronic temperature control system described previously. The
use of these small boilers, completely independent from one
V1.3
La Marzocco, S.r.l.
30/10/2006, 14.34
Firenze, Italia
8. History and Use of the “La Marzocco” Coffee Machines
another, the special manifold and fastening system of the
groups to the boiler as well as the electronic temperature
control, have allowed us to:
1) achieve an excellent thermal equilibrium between the
brewing groups, both at times of discontinuous operation and
during peak times;
2) be able to control the temperature of the water running
through the brewing groups, independently of the “pressure”
and the level in the small steam boiler, and therefore to optimize
the water temperature itself in order to obtain the best possible
coffee with whatever coffee mixes are available commercially;
3) save on electrical energy by more than 30%, in many cases,
when compared to other machines.
The “GB/5” series machines are produced in the 2, 3 and 4
group versions.
CONTROL SYSTEMS AND SAFETY DEVICES BUILT INTO
“LA MARZOCCO” COFFEE MACHINES
All models are equipped with:
- automatic level regulator;
- automatic pressure regulator;
- automatic temperature regulator;
- safety devices
spring operated safety valve;
manual reset thermostats.
In all models, coffee is brewed by opening a solenoid valve,
one for each group. For the “EE” model, the quantity of coffee
brewed is regulated manually by the operator through a switch,
while in the “AV” model the quantity is regulated automatically
in 4 different doses, which may be programmed at will for each
brewing group. This last model is equipped with control panels,
one located above each group, with 4 buttons which may be
programmed in such a way that by pressing the 1st button you
get 1 regular coffee, pressing the 2nd one you get one weak
coffee (tall), pressing the 3rd you get 2 regular coffees and by
pressing the 4th one you get 2 weak coffees. The fifth button,
which has a spiral sign, allows continuous brewing operation
which can be interrupted by pressing the very same button again.
-Hydraulic test at 18 bar performed on the ready-to-use small
boilers, at our factory;
2) Description of the Steam Boiler (C.V.)
Composed of AISI 300 series stainless steel tube.
Heating is accomplished through an immersion-type plated
heating element.
-Operating pressure of 1.3-1.5 bar, controlled automatically
through a pressure switch or a temperature probe, adjusted so
as to open the heating element supply circuit at 1.5 bar and
close it at 1.3 bar.
-The pressure is displayed by means of a pressure gauge with
a scale of 0 to 2 bar.
-Safety device, based on an expansion type mechanical valve,
with counter-acting spring adjusted to 1.8 bar.
-Testing:
a) hydraulic test at 4.5 bar performed on the ready-to-use small
boilers, at our factory;
Capacity and Power Ratings
1) C.C.
- 2 groups
- 3 groups
- 4 groups
3.4 litres
5.0 litres
2x3.4 litres
2) C.V.
- 2 groups 7 litres
- 3 groups 11 litres
- 4 groups 14.5 litres
1400 Watts
1600 or 1900-(HI-Power) Watts
2x1400 Watts
2000 or 3000-(HI-Power) Watts
3000 or 4000-(HI-Power) Watts
3000/3800 or 5000-(HI-Power)Watts
CONSTRUCTION DETAILS
They consist essentially of 2 small boilers, of which:
1) Coffee Boiler (hot water generator for brewing coffee)
2) Steam Boiler (steam generator for producing steam and hot
water for making tea and other hot drinks)
1) Description of the Coffee Boiler (C.C.)
Composed of an AISI 300 series stainless steel tube.
Heating is accomplished through an immersion-type plated
heating element.
-Operating temperature 95°C (adjustable), controlled
automatically by an electronic temperature controller with an
accuracy of 0.2 °C. Operating pressure of 9 bar, developed
mechanically by a special positive-displacement pump which
is activated automatically every time coffee is brewed.
-Pressure is displayed through a pressure gauge with a scale
from 0 to 15 bar.
-Safety device, based on an expansion type mechanical valve,
with counter-acting spring adjusted to 12 bar.
-Testing:
www.lamarzocco.com
Operators Manual - ENG - V 1.3.pmd 13
V1.3
13
30/10/2006, 14.34
English
GB/5 - FB/80
HANDMADE IN FLORENCE
HANDMADE IN FLORENCE
GB/5
FB/80
Operating Manual
available
Also available in UL - NSF version
Ver. 1.3
La Marzocco s.r.l.
Via Bolognese 68 Pian Di San Bartolo 50010 Firenze, Italy
t: +39.055.401.390 f: +39.055.401.349
e-mail: [email protected]
www.lamarzocco.com