1
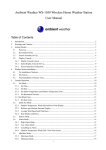
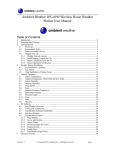
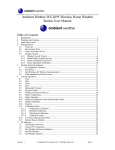
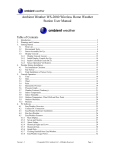
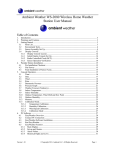
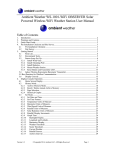
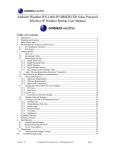
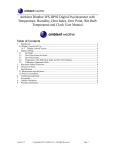
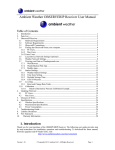
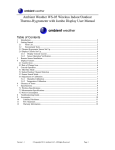
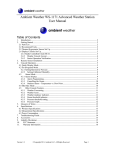
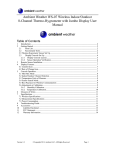
Ambient Weather WS-5305 Wireless Home Weather Station User Manual Table of Contents 1. 2. 3. Introduction ..................................................................................................................................... 2 Warnings and Cautions ................................................................................................................... 2 Getting Started ................................................................................................................................ 2 3.1 Parts List................................................................................................................................. 2 3.2 Recommend Tools .................................................................................................................. 3 3.3 Sensor Assembly Set Up ........................................................................................................ 4 3.4 Display Console ..................................................................................................................... 7 3.4.1 Display Console Layout ..................................................................................................... 7 3.4.1 Initial Display Console Set Up ........................................................................................... 9 3.4.2 Radio Controlled Clock (RCC) .......................................................................................... 9 3.4.3 Sensor Operation Verification ............................................................................................ 9 4. Weather Station Installation .......................................................................................................... 10 4.1 Pre Installation Checkout ..................................................................................................... 10 4.2 Site Survey ........................................................................................................................... 10 4.3 Wireless Reception ............................................................................................................... 10 4.4 Final Installation of Sensor Array......................................................................................... 10 5. Console Operation......................................................................................................................... 12 5.1 Set Mode .............................................................................................................................. 12 5.2 Quick Set Mode.................................................................................................................... 14 5.3 Alarm Mode ......................................................................................................................... 15 5.3.1 Setting Alarms .................................................................................................................. 15 5.3.2 Cancelling the Alarm While Sounding ............................................................................. 19 5.4 Min / Max Mode .................................................................................................................. 19 5.4.1 Max Mode ........................................................................................................................ 19 5.4.2 Min Mode ......................................................................................................................... 20 5.5 Calibration Mode.................................................................................................................. 20 5.5.1 Calibration Discussion ..................................................................................................... 20 5.5.2 Calibration Procedure....................................................................................................... 21 5.6 History Mode........................................................................................................................ 22 5.7 Reset Factory Default ........................................................................................................... 23 6. Glossary of Terms ......................................................................................................................... 23 7. Specifications ................................................................................................................................ 23 7.1 Wireless Specifications ........................................................................................................ 23 7.2 Measurement Specifications................................................................................................. 23 7.3 Power Consumption ............................................................................................................. 24 8. Maintenance .................................................................................................................................. 24 9. Sensor Replacement ...................................................................................................................... 24 9.1 Thermo-Hygrometer Sensor Replacement ........................................................................... 25 9.2 Anemometer Sensor Replacement ....................................................................................... 30 10. Troubleshooting Guide ............................................................................................................. 30 11. Accessories ............................................................................................................................... 32 12. Liability Disclaimer .................................................................................................................. 32 13. FCC Statement.......................................................................................................................... 32 14. Warranty Information ............................................................................................................... 33 Version 1.1 ©Copyright 2015, Ambient LLC. All Rights Reserved. Page 1 1. Introduction Thank you for your purchase of the Ambient Weather WS-5300 wireless weather station. The following user guide provides step by step instructions for installation, operation, maintenance and troubleshooting. To download the latest manual and additional troubleshooting tips, please visit: http://ambientweather.wikispaces.com/ws5300 2. Warnings and Cautions Warning: Any metal object may attract a lightning strike, including your weather station mounting pole. Never install the weather station in a storm. Warning: Installing your weather station in a high location may result in injury or death. Perform as much of the initial check out and operation on the ground and inside a building or home. Only install the weather station on a clear, dry day. 3. Getting Started The WS-5300 weather station consists of a display console (receiver), a thermo-hygrometer rain gauge transmitter unit (transmitter), a wind direction sensor, a wind speed sensor, and mounting hardware. 3.1 Parts List The WS-5300 weather station consists of the following parts (as referenced in Figure 1 and Figure 2). QTY 1 1 1 1 2 4 4 Version 1.1 Item Display Console Frame Dimensions (LxWxH): 5.5” x 3.5” x 1.0” LCD Dimensions (LxW): 3.25” x 2.5” Thermo-hygrometer / Rain Gauge / Transmitter Wind Vane / Wind Speed Sensor (anemometer) Weather station mounting kit Pole mounting U-bolt Pole mounting clamps Pole mounting nuts ©Copyright 2015, Ambient LLC. All Rights Reserved. Page 2 Figure 1 Figure 2 3.2 Recommend Tools Precision screwdriver (for small Phillips screws) Compass or GPS (for wind direction calibration) Adjustable Wrench Version 1.1 ©Copyright 2015, Ambient LLC. All Rights Reserved. Page 3 3.3 Sensor Assembly Set Up 1. Insert batteries into the thermo-hygrometer / rain gauge transmitter. Locate the battery door on the thermo-hygrometer / rain gauge transmitter, as shown in Figure 3. Turn the set screw counter clockwise to loosen the screw, and rotate the sheet metal bracket to open the battery compartment. Figure 3 Version 1.1 ©Copyright 2015, Ambient LLC. All Rights Reserved. Page 4 Pull out the battery compartment, as shown in Figure 4. Figure 4 Version 1.1 ©Copyright 2015, Ambient LLC. All Rights Reserved. Page 5 Insert 2 x AA batteries in the battery compartment, as shown in Figure 5. Note: Do not install the batteries backwards. You can permanently damage the thermo-hygrometer. Do not use rechargeable batteries. Note: We recommend installing Lithium AA batteries: http://www.ambientweather.com/enaaliba4pa.html Lithium batteries provide longer life and operate in colder temperatures. Figure 5 Reinsert the battery compartment into the thermo-hygrometer / rain gauge transmitter (hold upright so the batteries do not slide out), and close the battery compartment door and tighten the set screw. The LED on the back of the rain collector will turn on for four seconds and normally flash once every 45 seconds (the sensor transmission update period). Version 1.1 ©Copyright 2015, Ambient LLC. All Rights Reserved. Page 6 2. Attach the wind cups to the anemometer assembly (if necessary, some weather stations come pre-assembled). Push the wind cups into the anemometer shaft, as shown in Figure 6. Tighten the set screw with the Allen Wrench (included), as shown in Figure 6. Make sure the wind cups spin freely. Figure 6 3.4 Display Console 3.4.1 Display Console Layout The display console layout is shown in Figure 7. Note: The following illustration shows the full segments of the LCD for description purposes only and will not appear like this during normal operation. Version 1.1 ©Copyright 2015, Ambient LLC. All Rights Reserved. Page 7 Figure 7 1. Time alarm on icon 2. Daylight Savings Time (DST) icon 3. Radio Controlled Clock (RCC) icon for time reception 4. Date of the week/time zone 5. Date 6. Wind direction alarm 7. Maximum record 8. Wind direction 9. Minimum record 10. Rainfall high alarm 11. Indoor temperature high alarm and low alarm 12. Temperature units of measure 13. Indoor temperature 14. Indoor humidity high alarm and low alarm Version 1.1 15. Indoor humidity 16. Rainfall units of measure 17. Outdoor temperature high alarm and low alarm 18. Outdoor temperature 19. Outdoor reception signal 20. Outdoor Humidity 21. Outdoor transmitter low battery indicator 22. Outdoor humidity high alarm and low alarm 23. Rainfall 24. Rainfall 1h,24h, week, month or total display 25. Wind speed 26. Wind speed units of measure 27. Wind speed high alarm 28. Time ©Copyright 2015, Ambient LLC. All Rights Reserved. Page 8 3.4.1 Initial Display Console Set Up Note: The sensor array must be powered and updating before powering up the console, or the console will time out searching for the sensors. Power the console last. Make certain the weather station sensor array is at least 10’ away from the console and within 100’ of the console. If the weather station is too close or two far away, it may not receive a proper signal. Insert three AA batteries into the battery compartment on the back of the display. After inserting the batteries into the console, all of the LCD segments will light up for a few seconds to verify all segments are operating properly. Fold out the desk stand. The unit will instantly display indoor temperature, humidity, date and time. The wind speed, wind direction, rain, and outdoor temperature and humidity will update on the display within a few minutes. Do not Press any menu buttons until the outside transmitter report in, otherwise the outdoor sensor search mode will be terminated. When the outdoor transmitter data has been received, the console will automatically switch to the normal mode from which all further settings can be performed. If it does not update, please reference the troubleshooting guide in Section 8. 3.4.2 Radio Controlled Clock (RCC) After the remote sensor is powered up, the sensor will transmit weather data for 30 seconds, and then the sensor will begin radio controlled clock (RCC) reception. During the RCC time reception period, no weather data will be transmitted to avoid interference. If the RCC signal reception is not successful within 1 minute, the signal search will be cancelled and will automatically resume every two hours until the signal is successfully captured. The regular RF link will resume once RCC reception routine is finished. In some locations, RCC reception may take a several days to receive the signal. In the mean time, you can manually set the clock. 3.4.3 Sensor Operation Verification The following steps verify proper operation of the sensors prior to installing the sensor array. 1. Verify proper operation of the rain gauge. Tip the sensor array back and forth several times. You should hear a “clicking” sound within the rain gauge. Verify the rain reading on the display console is not reading 0.00. Each “click” represents 0.01 inches of rainfall. 2. Verify proper operating of the wind speed. Rotate the wind cups manually or with a constant speed fan. Verify the wind speed is not reading 0.0. 3. Verify proper operation of the indoor and outdoor temperature. Verify the indoor and outdoor temperature match closely with the console and sensor array in the same location (about 10’ apart). The sensors should be within 4°F (2°C) (the accuracy is ± 2°F / 1°C). Allow about 30 minutes for both sensors to stabilize. 4. Verify proper operation of the indoor and outdoor humidity. Verify the indoor and outdoor humidity match closely with the console and sensor array in the same location (about 10’ apart). The sensors should be within 8% (the accuracy is ± 4%). Allow about 30 minutes for both sensors to stabilize. Version 1.1 ©Copyright 2015, Ambient LLC. All Rights Reserved. Page 9 4. Weather Station Installation 4.1 Pre Installation Checkout Before installing your weather station in the permanent location, we recommend operating the weather station for one week in a temporary location with easy access. This will allow you to check out all of the functions, insure proper operation, and familiarize you with the weather station and calibration procedures. This will also allow you to test the wireless range of the weather station. 4.2 Site Survey Perform a site survey before installing the weather station. Consider the following: 1. You must clean the rain gauge once per year and change the batteries every two years. Provide easy access to the weather station. 2. Avoid radiant heat transfer from buildings and structures. In general, install the sensor array at least 5’ from any building, structure, ground, or roof top. 3. Avoid wind and rain obstructions. The rule of thumb is to install the sensor array at least four times the distance of the height of the tallest obstruction. For example, if the building is 20’ tall, install 4 x 20’ = 80’ away. Use common sense. If the weather station is installed next to a tall building, the wind and rain will not be accurate. 4. Wireless Range. The radio communication between receiver and transmitter in an open field can reach a distance of up to 300 feet, providing there are no interfering obstacles such as buildings, trees, vehicles, high voltage lines. Wireless signals will not penetrate metal buildings. Most applications will only reach 100 feet due to building obstructions, walls and interference. 5. Radio interference such as PCs, radios or TV sets can, in the worst case, entirely cut off radio communication. Please take this into consideration when choosing console or mounting locations. 6. Visit Ambient Weather Mounting Solutions for assistance and ideas for mounting your weather station: http://www.ambientweather.com/amwemoso.html 4.3 Wireless Reception The following is a table of reception loss vs. the transmission medium. Each “wall” or obstruction decreases the transmission range by the factor shown below. Medium Glass (untreated) Plastics Wood Brick Concrete Metal RF Signal Strength Reduction 5-15% 10-15% 10-40% 10-40% 40-80% 90-100% 4.4 Final Installation of Sensor Array Prior to installation, you will need to calibrate the wind direction. There is a “S” indicator on the wind vane that indicates South, as shown in Figure 8. Align this “S” marker in the direction of South. Version 1.1 ©Copyright 2015, Ambient LLC. All Rights Reserved. Page 10 Figure 8 Fasten the mounting pole to your mounting pole or bracket (purchased separately) with the two U-bolts, mounting pole brackets and nuts, as shown in Figure 2. Tighten the mounting pole to your mounting pole with the U-Bolt assembly, as shown in Figure 9. Version 1.1 ©Copyright 2015, Ambient LLC. All Rights Reserved. Page 11 Figure 9 5. Console Operation Note: The display console has six buttons for basic operation: SET button, + button, HISTORY button, ALARM button, and MIN/MAX button. There are five modes of operation: 1. Set Mode to program the display 2. Quick Set Mode to change general display settings 3. Alarm Mode to set and clear alarms 4. Min/Max Mode to view and clear minimum and maximum values 5. History Mode to view historical values 5.1 Set Mode To enter the Set Mode from the normal mode, press and hold the SET button until the backlight turns on and the console beeps, and then release the button. The Set Mode can be exited at any time by either pressing the HISTORY button or waiting for the 30-second time-out to take effect. You can skip over any setting by pressing the SET button again. The MIN/MAX button doubles as the minus (-) button. Holding the + button or MIN/MAX button for two seconds will change the setting values rapidly. 1. Display (LCD) Contrast Level. After entering the Set Mode, the display contrast value will Version 1.1 ©Copyright 2015, Ambient LLC. All Rights Reserved. Page 12 begin flashing (example, lcd0 thru lcd8). The lowest LCD contrast level 0 and the highest LCD contrast level is 8. Press the + button or MIN/MAX button to adjust the contrast level from 0 to 8 (the default is 5). 2. Time Zone. Press the SET button to display the time zone. The time zone value will begin flashing. Press the + button or MIN/MAX button to adjust the time zone from -12 to 12, based on the number of hours from Coordinated Universal Time, or Greenwich Mean Time (GMT). The following table provides times zones throughout the world. Locations in the eastern hemisphere are positive, and locations in the western hemisphere are negative. Hours from GMT -12 -11 -10 -9 -8 -7 -6 -5 -4 -3 -2 -1 0 1 2 3 4 5 6 7 8 9 10 11 12 Time Zone IDLW: International Date Line West NT: Nome AHST: Alaska-Hawaii Standard CAT: Central Alaska HST: Hawaii Standard YST: Yukon Standard PST: Pacific Standard MST: Mountain Standard CST: Central Standard EST: Eastern Standard (default value) AST: Atlantic Standard --AT: Azores WAT: West Africa GMT: Greenwich Mean WET: Western European CET: Central European EET: Eastern European BT: Baghdad --------CCT: China Coast JST: Japan Standard GST: Guam Standard --IDLE: International Date Line East NZST: New Zealand Standard Cities --Nome, AK Honolulu, HI Yukon Territory Los Angeles, CA, USA Denver, CO, USA Chicago, IL, USA New York, NY, USA Caracas São Paulo, Brazil Azores, Cape Verde Islands --London, England Paris, France Athens, Greece Moscow, Russia Abu Dhabi, UAE Tashkent Astana Bangkok Bejing Tokyo Sydney Magadan Wellington, New Zealand 3. 12/24 Hour Format. Press the SET button to change the 12/24 hour format. button to alternate the display between 12 hour format and 24 hour format. Press the + 4. Set Hour. Press the SET button to set the hour. Press the + button or MIN/MAX button to Version 1.1 ©Copyright 2015, Ambient LLC. All Rights Reserved. Page 13 change the hour setting. The RCC time will override the manual set time. 5. Set Minute. Press the SET button to set the minute. Press the + button or MIN/MAX button to change the minute setting. The RCC time will override the manual set time. 6. Set Date Format. Press the SET button to change the Month/Day format. Press the + button to alternate the display between Month/Day (MD) and Day/Month (DM). 7. Set Year. Press the SET button to set the year. Press the + button or MIN/MAX button to change the year setting. The RCC time will override the manual set date. 8. Set Month. Press the SET button to set the month. Press the + button or MIN/MAX button to change the month setting. The RCC time will override the manual set date. 9. Set Day. Press the SET button to set the day of month. Press the + button or MIN/MAX button to change the day setting. The RCC time will override the manual set date. 10. Wind Speed Units of measure. Press the SET button to set the wind speed units of measure. Press the + button to alternate the display units between km/h, mph, m/s, knots, and bft (or Beaufort scale). 11. Wind Direction Calibration. Press the SET button to calibrate the wind direction. Press the + button to change the wind direction (in increments of 22.5 degrees, or 8 point wind rose). Reference Section 4.4 for more information on calibrating the wind direction. 12. Rainfall Units of Measure. Press the SET button to set the rainfall units of measure. Press the + button to alternate the display units between mm and inches. 13. Temperature Units of Measure. Press the SET button to set the temperature units of measure. Press the + button to alternate the display units between °F and °C. Press the SET button to exit the SET mode. 5.2 Quick Set Mode To enter the Quick Set mode from the normal mode, press (do not hold) the SET button. The backlight turns on and the console beeps. The Quick Set mode can be exited at any time by either pressing the HISTORY button or waiting for the 30-second time-out to take effect. You can skip over any setting by pressing the SET button again. 1. Wind Speed Average vs. Wind Speed Gust. After entering the Quick Set Mode, the wind speed value will begin flashing. Press the + button to alternate the display between average and gust. 2. Rain Increments. Press the SET button to set the rainfall increments. Press the + button to alternate the display between 1 hour, 24 hour (daily, resets at midnight), week, month and total. 3. Resetting Total Rain. While the total rain is flashing (from the previous step), press and hold the SET button for two seconds until the total rain reads 0 and the display beeps. 4. Outdoor Temperature, Dew Point and Wind Chill. Press the SET button to view alternate Version 1.1 ©Copyright 2015, Ambient LLC. All Rights Reserved. Page 14 temperature calculations (temperature, dew point and wind chill). The temperature will begin flashing. Press the + button to alternate the display between outdoor temperature, dew point and wind chill. Press the SET button to exit the SET mode. 5.3 Alarm Mode 5.3.1 Setting Alarms To enter the Alarm mode from the normal mode, press (do not hold) the ALARM button. The backlight turns on and the console beeps. The high alarm values and the HIAL icon will be displayed. To set the low alarm values, press the ALARM button again and the LOAL icon will be displayed. To exit the alarm mode, press the ALARM button again. The following section outlines setting alarm values. The process is identical for high and low alarm settings (depending on which alarm mode is displayed). The high and low alarm modes can be exited at any time by either pressing the HISTORY button or waiting for the 30-second time-out to take effect. You can skip over any setting by pressing the SET button again. Holding the + button or MIN/MAX button for two seconds will change the alarm setting values rapidly. Note: If an alarm has not been set, dashes (--.--) will be shown. If an alarm is enabled, the alarm icon will be turned on. 5.3.1.1 Setting High Alarms 1. Set Alarm Hour. After entering the High Alarm Mode (reference Section 5.3.1), press the SET button and the alarm time hour will begin flashing. Press the + button or MIN/MAX button to change the alarm hour setting. 2. Set Alarm Minute. Press the SET button again and the alarm time minute will begin flashing. Press the + button or MIN/MAX button to change the alarm minute setting. To set the time alarm, press the ALARM button while the time is flashing, and the alarm icon will turn on. To turn off the alarm, press the ALARM button again, and the alarm icon will turn off. 3. Set High Wind Speed Alarm. Press the SET button again and the high wind speed alarm will begin flashing. Press the + button or MIN/MAX button to change the wind speed alarm setting. To set the wind speed alarm, press the ALARM button while the wind speed is flashing, and the alarm icon HI AL will be on. To turn off the alarm, press the ALARM button again, and the alarm icon will turn off. When the wind speed exceeds the alarm setting, the alarm will sound. Version 1.1 ©Copyright 2015, Ambient LLC. All Rights Reserved. Page 15 4. Set High Gust Alarm. Press the SET button again and the high gust speed alarm will begin flashing. Press the + button or MIN/MAX button to change the gust alarm setting. To set the gust alarm, press the ALARM button while the wind gust is flashing, and the alarm icon HI AL will turn on. To turn off the alarm, press the ALARM button again, and the alarm icon will turn off. When the wind gust exceeds the alarm setting, the alarm will sound. 5. Wind Direction Alarm. Press the SET button again and the wind direction alarm will begin flashing. Press the + button or MIN/MAX button to change the wind direction alarm setting. To set the wind direction alarm, press the ALARM button while the wind direction is flashing, and the alarm icon will turn on. To turn off the alarm, press the ALARM button again, and the alarm icon will turn off. When the wind direction equals the alarm setting, the alarm will sound. 6. 1 Hour Rain Alarm. Press the SET button again and the hourly rain alarm will begin flashing. Press the + button or MIN/MAX button to change the hourly rain alarm setting. To set the hourly rain alarm, press the ALARM button while the wind direction is flashing, and the alarm icon HI AL will turn on. To turn off the alarm, press the ALARM button again, and the alarm icon will turn off. When the hourly rain exceeds the alarm setting, the alarm will sound. 7. 24 Hour Rain Alarm. Press the SET button again and the 24 hour rain alarm will begin flashing. Press the + button or MIN/MAX button to change the 24 hour rain alarm setting. To set the 24 hour rain alarm, press the ALARM button while the hourly rain is flashing, and the alarm icon HI AL will turn on. To turn off the alarm, press the ALARM button again, and the alarm icon will turn off. When the 24 hour rain exceeds the alarm setting, the alarm will sound. 8. Weekly Rain Alarm. Press the SET button again and the weekly rain alarm will begin flashing. Press the + button or MIN/MAX button to change the weekly rain alarm setting. To set the weekly rain alarm, press the ALARM button while the wind direction is flashing, and the alarm icon HI AL will turn on. To turn off the alarm, press the ALARM button again, and the alarm icon will turn off. When the weekly rain exceeds the alarm setting, the alarm will sound. 9. Outdoor Humidity High Alarm. Press the SET button again and the outdoor humidity alarm will begin flashing. Press the + button or MIN/MAX button to change the outdoor humidity alarm setting. Version 1.1 ©Copyright 2015, Ambient LLC. All Rights Reserved. Page 16 To set the outdoor humidity alarm, press the ALARM button while the outdoor humidity is flashing, and the alarm icon HI AL will turn on. To turn off the alarm, press the ALARM button again, and the alarm icon will turn off. When the outdoor humidity exceeds the alarm setting, the alarm will sound. 10. Outdoor Temperature High Alarm. Press the SET button again and the outdoor temperature alarm will begin flashing. Press the + button or MIN/MAX button to change the outdoor temperature alarm setting. To set the outdoor temperature alarm, press the ALARM button while the outdoor temperature is flashing, and the alarm icon HI AL will turn on. To turn off the alarm, press the ALARM button again, and the alarm icon will turn off. When the outdoor temperature exceeds the alarm setting, the alarm will sound. 11. Wind Chill Temperature High Alarm. Press the SET button again and the wind chill temperature alarm will begin flashing. Press the + button or MIN/MAX button to change the wind chill temperature alarm setting. To set the wind chill temperature alarm, press the ALARM button while the wind chill temperature is flashing, and the alarm icon HI AL will turn on. To turn off the alarm, press the ALARM button again, and the alarm icon will turn off. When the wind chill temperature exceeds the alarm setting, the alarm will sound. 12. Dew Point Temperature High Alarm. Press the SET button again and the dew point temperature alarm will begin flashing. Press the + button or MIN/MAX button to change the dew point temperature alarm setting. To set the dew point temperature alarm, press the ALARM button while the dew point temperature is flashing, and the alarm icon HI AL will turn on. To turn off the alarm, press the ALARM button again, and the alarm icon will turn off. When the dew point temperature exceeds the alarm setting, the alarm will sound. 13. Indoor Humidity High Alarm. Press the SET button again and the indoor humidity alarm will begin flashing. Press the + button or MIN/MAX button to change the indoor humidity alarm setting. To set the indoor humidity alarm, press the ALARM button while the indoor humidity is flashing, and the alarm icon HI AL will turn on. To turn off the alarm, press the ALARM button again, and the alarm icon will turn off. When the indoor humidity exceeds the alarm setting, the alarm will sound. 14. Indoor Temperature High Alarm. Press the SET button again and the indoor temperature alarm will begin flashing. Press the + button or MIN/MAX button to change the indoor temperature alarm setting. Version 1.1 ©Copyright 2015, Ambient LLC. All Rights Reserved. Page 17 To set the indoor temperature alarm, press the ALARM button while the indoor temperature is flashing, and the alarm icon HI AL will turn on. To turn off the alarm, press the ALARM button again, and the alarm icon will turn off. When the outdoor temperature exceeds the alarm setting, the alarm will sound. Press the SET button again to exit the high alarm setting mode. 5.3.1.2 Setting Low Alarms 1. Set Alarm Hour. After entering the Low Alarm Mode (reference Section 5.3.1), press the SET button and the alarm time hour will begin flashing. Press the + button or MIN/MAX button to change the alarm hour setting. 2. Set Alarm Minute. Press the SET button again and the alarm time minute will begin flashing. Press the + button or HISTORY button to change the alarm minute setting. To set the time alarm, press the ALARM button while the time is flashing, and the alarm icon will turn on. To turn off the alarm, press the ALARM button again, and the alarm icon will turn off. 3. Outdoor Temperature Low Alarm. Press the SET button again and the outdoor temperature alarm will begin flashing. Press the + button or MIN/MAX button to change the outdoor temperature alarm setting. To set the outdoor temperature alarm, press the ALARM button while the outdoor temperature is flashing, and the alarm icon LO AL will turn on. To turn off the alarm, press the ALARM button again, and the alarm icon will turn off. When the outdoor temperature exceeds the alarm setting, the alarm will sound. 4. Wind Chill Temperature Low Alarm. Press the SET button again and the wind chill temperature alarm will begin flashing. Press the + button or MIN/MAX button to change the wind chill temperature alarm setting. To set the wind chill temperature alarm, press the ALARM button while the wind chill temperature is flashing, and the alarm icon LO AL will turn on. To turn off the alarm, press the ALARM button again, and the alarm icon will turn off. When the wind chill temperature exceeds the alarm setting, the alarm will sound. 5. Dew Point Temperature Low Alarm. Press the SET button again and the dew point temperature alarm will begin flashing. Press the + button or MIN/MAX button to change the dew point temperature alarm setting. To set the dew point temperature alarm, press the ALARM button while the dew point temperature is flashing, and the alarm icon LO AL will turn on. To turn off the alarm, press the ALARM button again, and the alarm icon will turn off. When the dew point temperature exceeds the alarm setting, the alarm will sound. Version 1.1 ©Copyright 2015, Ambient LLC. All Rights Reserved. Page 18 6. Indoor Humidity Low Alarm. Press the SET button again and the indoor humidity alarm will begin flashing. Press the + button or MIN/MAX button to change the indoor humidity alarm setting. To set the indoor humidity alarm, press the ALARM button while the indoor humidity is flashing, and the alarm icon LO AL will turn on. To turn off the alarm, press the ALARM button again, and the alarm icon will turn off. When the indoor humidity exceeds the alarm setting, the alarm will sound. 7. Indoor Temperature Low Alarm. Press the SET button again and the indoor temperature alarm will begin flashing. Press the + button or MIN/MAX button to change the indoor temperature alarm setting. To set the indoor temperature alarm, press the ALARM button while the indoor temperature is flashing, and the alarm icon LO AL will turn on. To turn off the alarm, press the ALARM button again, and the alarm icon will turn off. When the outdoor temperature exceeds the alarm setting, the alarm will sound. Press the SET button again to exit the high alarm setting mode. 5.3.2 Cancelling the Alarm While Sounding To cancel an alarm that is sounding, press any key and the alarm will be silenced. Otherwise, the alarm will time out in 120 seconds. When a weather alarm is triggered (all alarms except for the time alarm), the alarm will also turn off if the alarm set point is no longer exceeded. After an alarm is activated, the icon will flash for three hours but the alarm will not continue to sound to avoid repeated triggering of the same alarm value (nuisance alarms). After three hours, if the alarm set point is exceeded, the alarm will sound again. 5.4 Min / Max Mode To enter the Min/Max mode from the normal mode, press (do not hold) the MIN/MAX button. The backlight turns on and the console beeps. The maximum values and the MAX icon will be displayed. To view the minimum values, press the MIN/MAX button again and the MIN icon will be displayed. To exit the min/max mode, press the MIN/MAX button again. The following section outlines resetting min/max values. The process is identical for minimum and maximum settings (depending on which mode is displayed). The min/max modes can be exited at any time by either pressing the HISTORY button or waiting for the 30-second time-out to take effect. You can skip over any setting by pressing the SET button again. 5.4.1 Max Mode After entering the maximum display mode (reference Section 5.4), press the + button to display the Version 1.1 ©Copyright 2015, Ambient LLC. All Rights Reserved. Page 19 maximum values and associated time and date stamp it occurred as referenced in Table 1. While the value is flashing, hold the SET button for three seconds to reset to the current value and current date and time. Press the + button to proceed to the next maximum value, as defined in Table 1. No 1 2 3 4 5 6 7 8 9 10 11 12 Maximum Parameter Wind Speed Wind Gust 1 Hour Rain 24 Hour Rain Weekly Rain Monthly Rain Outdoor Humidity Outdoor Temperature Wind Chill Dew Point Indoor Humidity Indoor Temperature Table 1 5.4.2 Min Mode After entering the minimum display mode (reference Section 5.4), press the + button to display the minimum values and associated time and date stamp it occurred as referenced in Table 1. While the value is flashing, hold the SET button for three seconds to reset to the current value and current date and time. Press the + button to proceed to the next minimum value, as defined in Table 2. No 1 2 3 4 5 6 Minimum Parameter Outdoor Humidity Outdoor Temperature Wind Chill Dew Point Indoor Humidity Indoor Temperature Table 2 5.5 Calibration Mode 5.5.1 Calibration Discussion Note: The purpose of calibration is to fine tune or correct for any sensor error associated with the devices margin of error. Errors can occur due to electronic variation (example, the temperature sensor is a resistive thermal device or RTD, the humidity sensor is a capacitance device), mechanical variation, or degradation (wearing of moving parts, contamination of sensors). Calibration is only useful if you have a known calibrated source you can compare it against, and is optional. This section discusses practices, procedures and sources for sensor calibration to reduce manufacturing and degradation errors. Do not compare your readings obtained from sources such as the internet, radio, television or newspapers. The purpose of your weather station is to measure Version 1.1 ©Copyright 2015, Ambient LLC. All Rights Reserved. Page 20 conditions of your surroundings, which vary significantly from location to location. 5.5.2 Calibration Procedure To enter the calibration mode from the normal mode, press and hold the HISTORY button for eight seconds. The backlight turns on and the console beeps. The first calibration factor will being flashing. To exit the calibration mode, press the HISTORY button again. The following section outlines setting the calibration values. The calibration mode can be exited at any time by either pressing the HISTORY button or waiting for the 30-second time-out to take effect. You can skip over any setting by pressing the SET button again. Holding the + button or MIN/MAX button for two seconds will change the calibration values rapidly. 1. Wind Speed (Gust) Calibration. After entering the Calibration Mode, the Wind Speed Calibration value will begin flashing (the default is 1.0). Press the + button or MIN/MAX button to adjust the wind speed calibration factor from -0.75 to 1.25, where: Calibrated Wind Speed = Calibration factor x Measured Wind Speed Note: The wind gust is also affected by the wind speed calibration factor. Discussion: Wind speed and wind gust are adversely affected by installation constraints. The rule of thumb is to install the weather station four times the distance of the height of the tallest obstruction (for example, a 20’ house would require an installation 80’ away). In many instances, due to trees and other obstructions, this is not possible. The wind speed calibration allows you to correct for these obstructions. In addition to installation challenges, wind speed bearings (any moving part) wears over time. To correct for wear, the correction value can be increased until the wind cups must be replaced. Without a calibrated source, wind speed is a difficult parameter to measure. We recommend using a calibrated wind meter and constant, high speed fan. 2. Rainfall Calibration (1 Hour, 24 Hour, Daily, Monthly, Total). Press the SET button again and the Rain Calibration value will begin flashing (the default is 1.0). Press the + button or MIN/MAX button to adjust the rain calibration factor from -0.75 to 1.25, where: Calibrated Rain = Calibration factor x Measured Rain Discussion: The rain collector is calibrated at the factory based on the funnel diameter. The bucket tips every 0.01” of rain (referred to as resolution). The accumulated rainfall can be compared to a sight glass rain gauge with an aperture of at least 4”. The following is a link to an accurate sight glass rain gauge: http://www.ambientweather.com/stprraga.html Version 1.1 ©Copyright 2015, Ambient LLC. All Rights Reserved. Page 21 Note that debris and insects can collect inside the tipping mechanism (they make a good spiders nest). Carefully remove the funnel and inspect the tipping mechanism for debris prior to calibration. 3. Outdoor Humidity Calibration. Press the SET button again and the outdoor humidity value will begin flashing. Press the + button or MIN/MAX button to adjust the humidity value to the calibrated value. Discussion: Humidity is a difficult parameter to measure electronically and drifts over time due to contamination. In addition, location has an adverse affect on humidity readings (installation over dirt vs. lawn for example). Official stations recalibrate or replace humidity sensors on a yearly basis. Due to manufacturing tolerances, the humidity is accurate to ± 5%. To improve this accuracy, the indoor and outdoor humidity can be calibrated using an accurate source, such as a sling psychrometer or one step humidpak calibration kits (reference Section 11). 4. Outdoor Temperature Calibration. Press the SET button again and the outdoor temperature value will begin flashing. Press the + button or MIN/MAX button to adjust the temperature value to the calibrated value. Discussion: Temperature errors can occur when a sensor is placed too close to a heat source (such as a building structure, the ground or trees). To calibrate temperature, we recommend a mercury or red spirit (fluid) thermometer. Bi-metal (dial) and other digital thermometers are not a good source and have their own margin of error. Using a local weather station in your area is also a poor source due to changes in location, timing (airport weather stations are only updated once per hour) and possible calibration errors (many official weather stations are not properly installed and calibrated). Place the sensor in a shaded, controlled environment next to the fluid thermometer, and allow the sensor to stabilize for 48 hours. Compare this temperature to the fluid thermometer and adjust the console to match the fluid thermometer. 5. Indoor Humidity Calibration. Press the SET button again and the indoor humidity value will begin flashing. Press the + button or MIN/MAX button to adjust the humidity value to the calibrated value. 6. Indoor Temperature Calibration. Press the SET button again and the indoor temperature value will begin flashing. Press the + button or MIN/MAX button to adjust the temperature value to the calibrated value. Press the SET button to exit the SET mode. 5.6 History Mode The history mode allows you to review historical data for the last 24 hours in 3 hour increments. To enter the history mode from the normal mode, press (do not hold) the HISTORY button. The Version 1.1 ©Copyright 2015, Ambient LLC. All Rights Reserved. Page 22 backlight turns on and the console beeps. The HIS icon will be displayed. Press the MIN/MAX button to review records in increments of -3 hours, -6 hours, -9 hours, -12 hours, -15 hours, -18 hours, -21 hours and -24 hours. Press the HISTORY button again to exit the History Mode, or wait for the 30-second time-out to take effect. To clear historical data, while in the History Mode, press the SET button and the CLEAR icon will begin flashing. Hold the SET button for two seconds to clear all history records. 5.7 Reset Factory Default While in normal display mode, press and hold the + button for 20 seconds to reset all settings to the factory default settings. 6. Glossary of Terms Term Accuracy Hygrometer Radio Controlled Clock (RCC) Range Resolution Wind Vane Definition Accuracy is defined as the ability of a measurement to match the actual value of the quantity being measured. A hygrometer is a device that measures relative humidity. Relative humidity is a term used to describe the amount or percentage of water vapor that exists in air. The United States government distributes time-of-day to the public using radio broadcasts. The low frequency (LF) station WWVB is located in Fort Collins, Colorado and broadcasts on 60 kHz. The high frequency (HF) stations WWV and WWVH are located in Colorado and Hawaii respectively, and broadcast on five different frequencies ranging from 2.5 to 20 MHz. At least one HF signal should always be usable at any given time anywhere in the United States. Range is defined as the amount or extent a value can be measured. Resolution is defined as the number of significant digits (decimal places) to which a value is being reliably measured. A wind vane is a device that measures the direction of the wind. The wind vane is usually combined with the anemometer. Wind direction is the direction from which the wind is blowing. 7. Specifications 7.1 Wireless Specifications Line of sight wireless transmission (in open air): 300 feet Update Rate: 48 seconds Frequency: 433 MHz 7.2 Measurement Specifications The following table provides the specifications for the measured parameters. Measurement Indoor Temperature Outdoor Temperature Indoor Humidity Version 1.1 Range 32 to 140 °F -40 to 149 °F 1 to 99% Accuracy ± 2 °F ± 2 °F ± 5% ©Copyright 2015, Ambient LLC. All Rights Reserved. Resolution 0.1 °F 0.1 °F 1% Page 23 Outdoor Humidity Barometric Pressure 1 to 99% 8.85 to 32.50 inHg Rain Wind Direction 0 to 394 in. 0 - 360 º Wind Speed 0 to 110 mph ± 5% ± 0.08 inHg (within range of 27.13 to 32.50 inHg) ± 10% 22.5º (16 point compass) ± 2.2 mph or 10% (whichever is greater) 1% 0.01 inHg 0.01 in 22.5º (16 point compass) 0.1 mph 7.3 Power Consumption Base station : 2XAA 1.5V LR6 Alkaline batteries Remote sensor : 3xAA 1.5V LR6 Alkaline batteries Battery life: Minimum 12 months for base station Minimum 24 months for thermo-hygrometer sensor (use lithium batteries in cold weather climates) 8. Maintenance 1. Clean the rain gauge once every 3 months 2. Replace the thermo-hygrometer transmitter batteries once every 1-2 years 9. Sensor Replacement Before removing the thermo-hygrometer or anemometer assembly, you will need to unplug the connecting cable from the anemometer to the thermo-hygrometer rain gauge assembly. Version 1.1 ©Copyright 2015, Ambient LLC. All Rights Reserved. Page 24 9.1 Thermo-Hygrometer Sensor Replacement 1. Reference Figure 10. Loosen the three recessed screws on the bottom of the thermo-hygrometer rain gauge assembly until there is little tension. Figure 10 Version 1.1 ©Copyright 2015, Ambient LLC. All Rights Reserved. Page 25 2. Pull the rain gauge funnel from the assembly as shown in Figure 11. Figure 11 Version 1.1 ©Copyright 2015, Ambient LLC. All Rights Reserved. Page 26 3. Remove the sensor electronics door by removing four screws as shown in Figure 12. Figure 12 Version 1.1 ©Copyright 2015, Ambient LLC. All Rights Reserved. Page 27 4. Remove the sensor wire from the guide, and with a small flathead screwdriver to provide force, pull the connector from the socket, as shown in Figure 13 (the block size in the image has been exaggerated for illustration purposes). You will need to work the connector back and forth and carefully pull out of the socket. Figure 13 Version 1.1 ©Copyright 2015, Ambient LLC. All Rights Reserved. Page 28 5. Unscrew the set screw from the rain gauge assembly, as shown in Figure 14. Free the connector wire from the side of the unit and gently pull off the thermo-hygrometer rain gauge assembly from the mounting pole. Do not twist, or you may damage the wire insulation. Figure 14 Version 1.1 ©Copyright 2015, Ambient LLC. All Rights Reserved. Page 29 9.2 Anemometer Sensor Replacement To replace the anemometer, you must perform all of the steps defined in Section 9.1. Next, remove the anemometer from the mounting bracket, as shown in Figure 15. Figure 15 10. Troubleshooting Guide If your question is not answered here, you can contact us as follows: 1. Email Support: [email protected] 2. Live Chat Support: www.ambientweather.com/chat.html (M-F 8am to 4pm Arizona Time) 3. Technical Support: 480-283-1644 (M-F 8am to 4pm Arizona Time) Problem Wireless remote not reporting in to console. There are dashes (--) on the display console. Version 1.1 Solution 1. Resync the unit. Press and hold the + key for 30 seconds to resynchronize. The remote sensor search icon will turn on. Wait several minutes for the remote sensor to report in, or the search icon to turn off. Do not press any buttons ©Copyright 2015, Ambient LLC. All Rights Reserved. Page 30 Problem Indoor and Outdoor Temperature do not agree Indoor and Outdoor Humidity do not agree Rain gauge reports rain when it is not raining Wind speed appears low Display console is difficult to read Can the lamp be turned on all of time? Version 1.1 Solution while in the search mode. 2. Install a fresh set of batteries in the remote sensor array. For cold weather environments, install lithium batteries. 3. The maximum line of sight communication range is 300’, 100’ under most conditions. Move the sensor assembly closer to the display console. 4. If the sensor assembly is too close (less than 5-10’), move the sensor assembly away from the display console. 5. Make sure the remote sensors are not transmitting through solid metal (acts as an RF shield), or earth barrier (down a hill). 6. Move the display console around electrical noise generating devices, such as computers, TVs and other wireless transmitters or receivers. 7. Move the remote sensor array to a higher location. Move the remote sensor array to a closer location. Allow up to one hour for the sensors to stabilize due to signal filtering. The indoor and outdoor temperature sensors should agree within 4 °F (the sensor accuracy is ± 2 °F) Allow up to one hour for the sensors to stabilize due to signal filtering. The indoor and outdoor humidity sensors should agree within 10 % (the sensor accuracy is ± 5 %) An unstable mounting solution (sway in the mounting pole) may result in the tipping bucket incorrectly incrementing rainfall. Make sure you have a stable mounting solution. Move the rain gauge from the pole mount to a flat, stable mount (fixed, flat structure). Average wind speed may have the appearance of low wind. Try switching the display to wind gust. Change the display contrast level. Replace the batteries in the console with a fresh set of batteries. No, to prevent the bulb from burning out, it can only turn on temporarily. ©Copyright 2015, Ambient LLC. All Rights Reserved. Page 31 11. Accessories The following software and hardware accessories are available for this weather station at www.AmbientWeather.com . Accessory Ambient Weather BCY29 4 in 1 Pocket Precision Screwdriver Image Description This precision screwdriver kit is a must for assembling this weather station due to the small, precision screws. Ambient Weather Humidity Calibration Kits Humidity calibration kits allow for accurate calibration of the humidity sensors. Weather Station Mounting Solutions Pole mounting solutions, tripods, mast to mast mounting kits. The WS-1080 pole mount can be attached to a pole mounting solution with the included hose clamps. 12. Liability Disclaimer Please help in the preservation of the environment and return used batteries to an authorized depot. The electrical and electronic wastes contain hazardous substances. Disposal of electronic waste in wild country and/or in unauthorized grounds strongly damages the environment. Reading the “User manual” is highly recommended. The manufacturer and supplier cannot accept any responsibility for any incorrect readings and any consequences that occur should an inaccurate reading take place. This product is designed for use in the home only as indication of weather conditions. This product is not to be used for medical purposes or for public information. The specifications of this product may change without prior notice. This product is not a toy. Keep out of the reach of children. No part of this manual may be reproduced without written authorization of the manufacturer. Ambient, LLC WILL NOT ASSUME LIABILITY FOR INCIDENTAL, CONSEQUENTIAL, PUNITIVE, OR OTHER SIMILAR DAMAGES ASSOCIATED WITH THE OPERATION OR MALFUNCTION OF THIS PRODUCT. THIS PRODUCT. 13. FCC Statement Statement according to FCC part 15.19: This device complies with part 15 of the FCC rules. Operation is subject to the following two conditions: 1. This device may not cause harmful interference. 2. This device must accept any interference received, including interference that may cause undesired operation. Version 1.1 ©Copyright 2015, Ambient LLC. All Rights Reserved. Page 32 Statement according to FCC part 15.21: Modifications not expressly approved by this company could void the user's authority to operate the equipment. Statement according to FCC part 15.105: NOTE: This equipment has been tested and found to comply with the limits for a Class B digital device, pursuant to Part 15 of the FCC Rules. These limits are designed to provide reasonable protection against harmful interference in a residential installation. This equipment generates, uses and can radiate radio frequency energy and, if not installed and used in accordance with the instructions, may cause harmful interference to radio communications. However, there is no guarantee that interference will not occur in a particular installation. If this equipment does cause harmful interference to radio or television reception, which can be determined by turning the equipment off and on, the user is encouraged to try to correct the interference by one or more of the following measures: • Reorient or relocate the receiving antenna. • Increase the separation between the equipment and receiver. • Connect the equipment into an outlet on a circuit different from that to which the receiver is connected. • Consult the dealer or an experienced radio/TV technician for help. 14. Warranty Information Ambient, LLC provides a 1-year limited warranty on this product against manufacturing defects in materials and workmanship. This limited warranty begins on the original date of purchase, is valid only on products purchased and only to the original purchaser of this product. To receive warranty service, the purchaser must contact Ambient, LLC for problem determination and service procedures. Warranty service can only be performed by a Ambient, LLC. The original dated bill of sale must be presented upon request as proof of purchase to Ambient, LLC. Your Ambient, LLC warranty covers all defects in material and workmanship with the following specified exceptions: (1) damage caused by accident, unreasonable use or neglect (lack of reasonable and necessary maintenance); (3) damage resulting from failure to follow instructions contained in your owner’s manual; (4) damage resulting from the performance of repairs or alterations by someone other than an authorized Ambient, LLC authorized service center; (5) units used for other than home use (6) applications and uses that this product was not intended (7) the products inability to receive a signal due to any source of interference or metal obstructions and (8) extreme acts of nature, such as lightning strikes or floods. This warranty covers only actual defects within the product itself, and does not cover the cost of installation or removal from a fixed installation, normal set-up or adjustments, claims based on misrepresentation by the seller or performance variations resulting from installation-related circumstances. Version 1.1 ©Copyright 2015, Ambient LLC. All Rights Reserved. Page 33