1
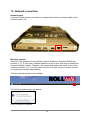
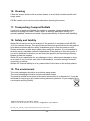
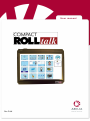
U ser ma nual Rev D UK 2 Contents 1. 2. 3. 4. 5. 6. 7. 8. 9. 10. 11. 12. 13. 14. 15. 16. 17. 18. 19. The Compact Rolltalk basic package contains ........................................... 4 Product overview ........................................................................................ 5 Start-up ...................................................................................................... 8 Charging and power supply........................................................................ 8 Connecting an electric wheelchair .............................................................. 8 External battery pack.................................................................................. 8 USB inputs ................................................................................................. 9 Internal speaker ......................................................................................... 9 Environmental control (remote control) and switch module ........................ 9 Text messages ......................................................................................... 10 External monitor and projector ................................................................. 11 Audio scanning ......................................................................................... 12 Network connection .................................................................................. 15 Secure your computer from malicious software ....................................... 18 Technical specifications ........................................................................... 19 Cleaning ................................................................................................... 20 Transporting Compact Rolltalk ................................................................. 20 Safety and liability .................................................................................... 20 The environment ...................................................................................... 20 3 Compact Rolltalk is a communication tool with a dynamic display. 1. The Compact Rolltalk basic package contains Rolltalk Workshop software Windows 7 WiFi Bluetooth Switch module and additional speaker Charger Internal battery Mouse, keyboard Bracket for Daessy Mounting System User guides 4 2. Product overview 1. LED-indicator Hard Drive 2. LED-indicator batteries 3. Touch Screen 4. Volume Up 5. Volume Down 7. Headphones 8. Audio scanning 9. Firewire 10. USB 2.0 11. USB 12. Input for Scan switch 13. Input for Select switch 6. VGA output 14. IR transmitter for enviromental control 15. Microphone Ikke i bruk 16. eSATA 17. USB 2.0 18. Firewire 20. HDMI 19. Network connection Ikke i bruk 5 21.IR transmitter for enviromental control 22. Relay output 23. Switch input for Mouce Click 24. Rolltalk 25. Power wheelchair controller supply connection 26.On/Off Switch 27. Product information 28. IR transmitter for enviromental control 29. Speaker 30. Daessy bracket 31. Internal battery 6 1. 2. 3. 4. 5. 6. 7. 8. Light diode hard drive Light diode batteries Touch screen Volume up (See Internal speaker) Volume down (See Internal speaker) VGA output: For connecting an additional monitor and projector Headphones: Input for external speaker or headphones Audio scanning: Connect speaker or headphones here when using audio scanning. Read more about audio scanning on page 13 9. Firewire: High-speed input for connecting equipment such as eye control 10. USB 2.0: High-speed input for connecting equipment such as eye control, webcam, USB hard drive 11. 2 x USB: For connecting equipment such as mouse, keyboard and head mouse 12. Switch input for “Scan” switch: Is used for scanning between screen selections. 13. Switch input for “Select” switch: Is used for selecting the highlighted window on the screen with a switch. 14. IR transmitter for environmental control: Transmits and broadcasts IR signals 15. Microphone: For audio recording 16. eSATA: For hard drive connection 17. 2 x USB 2.0: High-speed input – we recommend that the inputs at the back of Compact Rolltalk be used for connecting permanent devices such as webcam, head mouse or IntelliGaze See USB inputs on page 7 for more information 18. Firewire: High-speed input for connecting equipment such as eye control 19. Network connection: For connecting a network cable 20. HDMI: For connection external monitor. 21. IR transmitter for environmental control: Transmits and broadcasts IR signals 22. Relay outputs: For accessing specially adapted functions 23. Switch input for Mouce Click: For operating mouce click in Windows with a switch. 24. Connection for Rolltalk wheelchair controller: For controlling an electric wheelchair 25. Power supply (Mains power, transformer for electric wheelchair, battery pack) PS! Only use an original power supply device designed for Compact Rolltalk 26. On/Off button: For switching Compact Rolltalk on and off 27. Product information: Serial number information 28. IR transmitter for environmental control: Transmits and broadcasts IR signals 29. Stereo speaker 30. Daessy bracket: For wheelchair, table mount and rolling mount 31. Internal battery 7 3. Start-up 1. Turn on the Compact Rolltalk by sliding the On/Off button (26) to the left. Compact Rolltalk is supplied with Windows 7 and Rolltalk Workshop preinstalled. If speech synthesis and additional picture libraryies have been ordered they will also come preinstalled. 2. Connect the mouse and keyboard to start personalising the system. See the Rolltalk Workshop user guide for details of how to personalise the user interface. 4. Charging and power supply Compact Rolltalk is recharged using main power and the power supply device. Connect the charger to the power supply socket (25). Compact Rolltalk has a rechargeable internal battery with a battery life of around 1.5 hours. We therefore recommend using external power supply solutions to ensure uninterrupted supply throughout the day (see Connecting an electric wheelchair and External battery pack below) The batteries also have a hot swap function. The batteries can be charged separately and exchanged during operation. Replace one battery at a time, so that the remaining battery placed in Compact Rolltalk ensure that the machine is not switched off. 5. Connecting an electric wheelchair If Compact Rolltalk is to be used with an electric wheelchair you can connect Compact Rolltalk to the wheelchair batteries with a Compact Rolltalk transformer. This will ensure uninterrupted power supply throughout the day. Product number 4x0139: Transformer, electric weelchair, Compact Rolltalk 6. External battery pack If Compact Rolltalk is to be used with a manual wheelchair or in locations where mains power is not available we recommend installing Compact Rolltalk battery pack to ensure uninterrupted power supply throughout the day. Product number 4x0380: Battery pack, manual wheelchair, Compact Rolltalk 8 7. USB inputs These inputs are designed for external devices with a USB connection. You can connect equipment such as webcam, USB backup drives, mouse and keyboard. We recommend using the inputs at the rear of Compact Rolltalk (10, 11) for connecting permanent devices such as webcam, head mouse or IntelliGaze. Control units such as IntelliGaze eye control are connected using the USB 2.0 input. Webcams and external hard drives should also be connected using USB 2.0. When combining IntelliGaze eye control with webcam, make sure to connect the IntelliGaze eye control to the USB 2.0 input and the webcam to the USB 1.0 input. 8. Internal speaker Compact Rolltalk comes with a preinstalled additional speaker. The volume is controlled from Rolltalk Workshop, and adjustments can be made in this programme to allow the user to control the volume from the user interface. The Volume Up (4) and Volume Down (5) buttons on the Compact Rolltalk front panel adjust the volume in Windows. Please note that if the volume is set to 0 using these buttons the user will be unable to increase the volume from the user interface. Wherever possible we recommend always adjusting the volume using the user interface. See the Rolltalk Workshop user guide for details of how to personalise the system. 9. Environmental control (remote control) and switch module The environmental control in Compact Rolltalk can be trained. This means it can learn to interpret the signals used by other remote controls. Environmental control is programmed in Rolltalk Workshop. Most equipment that can be accessed via a remote control can also be accessed via Compact Rolltalk, including TVs, CD players, DVD players etc. The Rolltalk environmental control can also be used to control equipment specifically designed for home control, such as door openers, lights on/off, curtains, opening/closing of windows etc. See the Rolltalk Workshop user guide for details of how to personalise Rolltalk environmental control. 9 10. Text messages To send and receive text messages requires a USB SIM card holder to be installed on your Device. Prior to use The SIM card must not be a dual card. It must be a dedicated SIM card. If a microSIM card is to be used, this must be fitted with an adapter before it is inserted. In addition, we also ask the user to not use Compact Rolltalk for accessing mobile broadband together with the SIM-card GSM holder. This may result in loading the SIM card for all charges and not the mobile broadband. 1. The PIN code on the SIM card needs to be disabled before the USB SIM card holder can be inserted. This can be done by placing the SIM card in a mobile phone. See the user guide provided by your mobile phone supplier for information about this. 2. Compact Rolltalk must be switched off when the USB SIM card holder is placed into the device. 3. Place the SIM card into the USB SIM card holder, as shown on the pictures. 4. Pull out the card holder with a tweezer or similar item 5. Insert the SIM card into the holder. Note the angled corner. 6. Push the card holder into place, as shown on picture 7. Connect the included USB cable to the USB SIM card holder 8. Plug the other end into USB port (10 or 17) on Compact Rolltalk 9. Attach the USB SIM card holder with the included Velcro on the back 10 11. External monitor and projector Use the VGA output at the rear of Compact Rolltalk (6) to connect an additional monitor or projector. In Windows Vista – the operating system used with Compact Rolltalk – the monitor or projector is automatically connected when the cable is inserted into the VGA output. The following dialogue box appears when connecting a monitor or projector for the first time: Select Duplicate my desktop on all displays, then click OK This menu can also be accessed from Start > Control Panel > Windows Mobility Center. Then select Connect display. Additional settings can be found in Start > Control Panel > Personalize > Display settings 11 12. Audio scanning Audio scanning allows the user to hear an audio signal when moving the highligter or right-clicking, for example. This can be useful for users who are visually impaired and for those requiring additional information about the position of the highlighter or mouse pointer. One of the two Compact Rolltalk speakers will be deactivated when connecting an external speaker/headphones to the Audio scannning output (8). The external speaker/headphones replace this speaker and are automatically set to act as the right-hand speaker. Audio scanning can be personalised in Rolltalk Workshop. The fields to be read out when moving/right-clicking must have the command Read text or Play sound. Speak text The Speak text command can be used if speech synthesis for Rolltalk Workshop has been installed on the machine. Same sound for audio scanning and for selection: In the Speak text dialogue box the command must be set to be executed both for moving/right-click and for selection. 12 Different sounds for audio scanning and for selection: In the Speak text dialogue box the right-hand speaker must be chosen as the channel, and the command must be set to be executed for moving/right-click. In Tools > Options speech synthesis must be set to apply to moving/right-click. Here you can adjust both the speed and volume of the speech synthesis. You can use different speech syntheses for moving/right-click and for selections in order to clearly distinguish between the scanning sound and texts being read out. 13 Play sound The Play sound command can be used if speech synthesis is not installed or if you wish to record audio using a microphone. Same sound for audio scanning and for selection: In the Play sound dialogue box the command must be set to be executed both for moving/right-click and for selection. Different sounds for audio scanning and for selection: In the Play Sound dialogue box the right-hand speaker must be chosen as the channel, and the command must be set to be executed for moving/right-click. The volume for audio scanning can be adjusted in this dialogue box. The sounds files to be used for audio scanning can be selected either from the sound libraries or by selecting the Record button and recording audio using a microphone. 14 13. Network connection Network cable Compact Rolltalk can be connected to a network by inserting a network cable to the network socket (19). Wireless network Attention! The channels on the wireless network adapter for Compact Rolltalk are between 1 -11. If the router's channel selection is set to Auto, this may be outside the Compact Rolltalk’s range. Therefore, we recommend setting the router to one of the channels between 1-11. For information on how to do this, see your router's manual or contact your network administrator. Click the network symbol on the taskbar. The following dialogue box will appear: Click Connect to a network. 15 The follow window will appear: This shows all available networks. Additional networks may be displayed if you click the refresh button . Select the desired network and click Connect. Unsecured networks If you are connecting to an unsecured network the following dialogue boxes will appear: Click Close to complete network connection. 16 Security-enabled networks If you are connecting to a securityenabled network the following dialogue box will appear after you click Connect. Enter a security key or pass phrase. Contact the wireless network administrator to obtain the key / pass phrase. The following dialogue boxes will appear after you have entered your security key / pass phrase. If you will be using the wireless network more than once you can tick the boxes for Save this network and Automatically connect to this network. Compact Rolltalk will then remember the network and automatically connect to it next time Compact Rolltalk is within range. Click Close to complete network connection. 17 14. Secure your computer from malicious software Compact Rolltalk has preinstalled antivirus program from Microsoft, Microsoft Security Essentials. It’s not recommended to install another antivirus program, as this will affect the capacity of the Compact Rolltalk. A computer virus is intended to do something unexpected or undesirable with the computer. The term "virus" is often used as a generic term for all types of malicious software. Viruses, worms, trojans and spyware can take destroy your computer contents, or take over control without you noticing it. Malicious software can be a significant risk to you and your computer. It is therefore necessary to take certain precautions to protect themselves against viruses. How to get malicious software on your computer: • by opening email attachments from unknown • by opening email attachments that appear to come from someone you trust, but use a language other than the sender typically uses • by trying to start a program you're not sure where came from • by browsing the web pages that contain malicious software • by receiving files from unknown when you participate in chat and social media • by downloading files through file sharing networks • using pirated software Compact Rolltalk is set up to always download the latest updates from Microsoft over the Internet. The chance of being infected by a virus is small, so long as you follow the advice above. 18 15. Technical specifications Processor: Intel CoreDuo i7 640LM RAM: 4 GB Hard drive 500 GB Operating system: Windows 7 Power consumption Approx. 1.5 hours with internal battery Monitor 1024 x 800 AFFS Size 12,1” Storage temperature -20 to +50 °C Usage temperature -10 to +40 °C Humidity 30–70 % relative humidity (non-condensing) External dimensions 34 x 24 x 4.8 cm Weight 2670 g Holder: Metal holder 19 16. Cleaning Clean the screen surface with a screen cleaner or a soft cloth moistened with mild soapy water. PS! Be careful not to use too much water when cleaning the screen. 17. Transporting Compact Rolltalk If you have to send your Rolltalk for repairs or upgrades, please send the entire machine including the holder. Ensure that it is securely packaged, ideally in a specially padded container and send it by express delivery to ensure safe handling. 18. Safety and liability Abilia AS has carried out a risk analysis of the product in accordance with NS-EN 1441 for medical devices. The user guide and technical specifications for the product have been produced with the safety evaluations given in this document in mind. Please remember to think about safety when using the product. It is not possible to describe every unsuitable method of application of the product in this user guide. If you are in doubt as to whether you are using the product and its settings correctly, please contact the supplier. Abilia AS is not responsible for any damage or injury, subsequent damage or injury as a result of use, incorrect use, lack of maintenance, incorrect settings, incorrect connection or similar. Abilias AS’ financial liability is in any case limited to the value of the actual product. 19. The environment The outer packaging should be recycled as paper waste. The inner packaging should be recycled as plastic waste. The product should be recycled as electronic waste when it is disposed of. It may be delivered for recycling to any retailer selling electronic products, to your supplier or to a municipal recycling facility. Abilia AS, Buvikveien 22, 4950 Risør, Norway Phone +47 37 14 94 50 | Fax +47 37 14 94 51 | [email protected] | www.abilia.no 4X1220_User_manual_Compact_Rolltalk_S6_RevD.docx, 2013-04-26 20