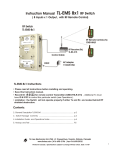
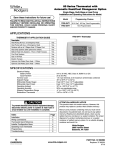
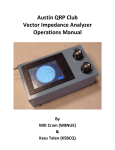
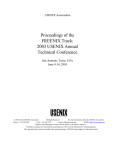
1
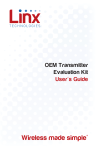
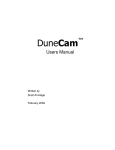
Little DARling System User Guide
Little DARling Distributed Audio Recorder
Little DARling Distributed Audio Recorder with DARlink
DARlink Wireless Remote Control
© 2015 juicedLink, LLC
All Rights Reserved
Little DARling System User Guide
v0.90
1 Contents
Click on heading to jump to page …
1 Contents...........................................................................................2
2 READ THIS FIRST.............................................................................4
2.1 Introduction.................................................................................4
2.1.1 Thank You!.............................................................................4
2.1.2 How to Print/View This Document........................................4
2.1.3 Document Notation Conventions..........................................5
2.2 Warnings – General.....................................................................5
3 Quick Start Guide.............................................................................6
3.1 Preparation..................................................................................6
3.2 Insert Battery and microSD Card, and Power On.....................7
3.3 Navigation of Menus...................................................................7
3.4 Basic Recording/Playback..........................................................8
3.5 Wireless Remote Control..........................................................10
4 Little DARling Distributed Audio Recorders..................................12
4.1 Part Number Key.......................................................................12
4.1.1 Little DARling Distributed Audio Recorder.........................12
4.1.2 Little DARling Distributed Audio Recorder with DARlink...12
4.1.3 DARlink Hand-held Remote Control Transmitters..............12
4.2 Firmware Version......................................................................12
4.3 Control Descriptions.................................................................12
4.4 Theory of Operation..................................................................13
4.4.1 Audio Signal Path.................................................................13
4.4.1.1 Microphone Input and Plug-in Power...................................................13
4.4.1.2 Preamplifier and Codec Input...............................................................13
4.4.1.3 Headphone Output...............................................................................13
4.4.2 Slate Tone............................................................................13
4.4.3 Buzzer...................................................................................13
4.4.4 Output..................................................................................14
4.4.5 Recording.............................................................................14
4.4.5.1 Audio File..............................................................................................14
4.4.5.2 File Corruption Avoidance....................................................................14
4.4.5.3 System Actions During Record.............................................................15
4.5 Other Operational Items...........................................................15
4.5.1 Microphone Selection and Performance............................15
4.5.2 Batteries and Battery Life...................................................16
5 DARlink Hand-held Remote Control Transmitters.........................17
5.1 Part Number Key.......................................................................17
6 Advanced Topics............................................................................18
6.1 Use of Config Files....................................................................18
6.2 General......................................................................................18
6.3 Command List...........................................................................18
6.4 Example.....................................................................................19
6.5 Codec Register Commands......................................................20
7 Appendix.........................................................................................21
7.1 Transmitter DIP Switch Map.....................................................21
7.1.1 Left Display Settings for Transmitter Switches 1-5...........21
7.1.2 Right Display Settings for Transmitter Switches 6-0.........22
7.1.3 Display Setting to Ignore DIP Settings (not recommended)
........................................................................................................23
7.1.4 Examples..............................................................................24
7.2 Firmware Update Procedure....................................................24
7.3 Document Revision History......................................................24
2 READ THIS FIRST
2.1
Introduction
2.1.1
Thank You!
Congratulations on your new Little DARling! I have so much fun bringing you these
unique juicedLink products, so I thank you for your support! In addition to the
products, I really enjoy sharing my experience, and teaching the community about
the best practices for achieving great audio on a budget. So, make sure you
subscribe to the juicedLink Blog. In addition to getting notified on updates to our
Audio University series and Free Field Guide to Audio Production eBook, you'll get
notified on any firmware updates for the Little DARling and other new product
introductions.
Before operating the unit, please read this manual thoroughly. If you need any
clarification of what is presented in the manual, then please don't hesitate to Contact
me for assistance.
- Robert from juicedLink
2.1.2
How to Print/View This Document
Many PDF type documents are very difficult to read in the field on the small screens
of smart phones, requiring the user to zoom in and scroll right and left to read each
line in a paragraph. The font size and margin in this document were selected as the
best option for viewing on a variety of screen sizes, from desktops down to smart
phones. Here are recommended viewing configurations:
• Desktop/Laptop: Adobe Reader set to VIEW > PAGE DISPLAY > TWO PAGE
VIEW
• Tablet: Hold tablet in vertical orientation.
• Smart Phone: Hold phone in horizontal orientation.
The margins are very small in order to fit the text to the entire page width. So, to
print this document, you will need to use page scaling, and fit the document to the
printable area. A better option is to use the page scaling option, select multiple
pages per sheet, and specify 2 sheets per page. This will print with a readable font,
and more information with less page flipping.
Questions? Contact juicedLink
4 - jump to CONTENTS
Little DARling System User Guide
2.1.3
Document Notation Conventions
• References to markings/labels on the unit are denoted in underline/bold.
• Example: MIC IN
• References to characters on the display will use a 7-segment font.
• Example: P represents the character “P” displayed for “play”.
• Commands used in the Config File will be represented in the font Courier.
• Warnings will be preceded with WARNING
• Hyperlinks are used to navigate within the document and to link to external web
pages.
• For example, CONTENTS brings you back to the document Table of
Contents, and juicedLink links to the juicedLink website.
• There are also links to external tutorial videos.
The link to the video and description will be enclosed in a box like this.
2.2
Warnings – General
WARNING: Failure to read and observe notes and warnings may result in personal
injury, and/or possible damage to this device and your other equipment.
WARNING - LOSS OF HEARING: This device, as well as any device with
aheadphone amplifier, is capable of driving the signal at levels that can be
damaging to hearing. Always operate the headphone volume at the lowest practical
level. Do not wear the headphones over your ears in any of the following
circumstances:
• While plugging the headphones into the headphone driving device.
• While plugging a microphone or other source into the device input.
• While turning on or off the device.
WARNING - RISK OF ELECTRICAL SHOCK: This device, its enclosure, and the
connections to cable shields that plug into this device are conductive. Avoid
electrocution and observe caution with cable runs near areas where high-voltages
and/or currents may exist.
Questions? Contact juicedLink
5 - jump to CONTENTS
Little DARling System User Guide
3 Quick Start Guide
This section is a quick outline of the steps needed to get up and running. There will
be links to other sections in the document and/or tutorial videos, to provide further
detail and direct to more advanced features beyond the scope of the Quick Start
Guide.
3.1
1
2
3
4
Preparation
Watch a tutorial video covering the following steps.
Download Required Files - Visit the Little DARling Downloads page on the
juicedLink website, and download the Firmware Boot Image (bootimg.bin)
and the Config File (config0.ini). Note the revisions on the download page.
The firmware revisions that this document was written for is found in the
Firmware Version section.
Subscribe to the juicedLink Blog – Subscribe to the juicedLink Blog to get
notified on any future updates to the firmware or config files.
Create Other Config Files – The unit can load up to 10 user created
configuration files, which can provide even more control and features than
what is available from the front panel menu user interface. Understanding
the capabilities provided in the configuration files is beyond the scope of the
Quick Start Guide, and is covered in the Use of Config Files section. Here
are some examples of parameters that can be controlled via the config file:
• Activate/Deactivate stitched sequential 10min recorded files.
• Activate/Deactivate stitched sequential 10min recorded files to be
turned on, only when battery becomes low or card approaches getting
filled up.
• Specify the battery type (Alkaline, NiMH rechargeable, Li-Ion
rechargeable, Lithium) for low battery threshold calculation.
• Direct programming of Texas Instruments codec audio parameter
registers (such as filters, AGC, limiters).
• Assignment, activation, or deactivation of DARlink wireless remote
control buttons, for functions such as record, stop, buzzer, slate tone
type.
• Base filename.
Copy Files to microSD Card – Save the Firmware Boot Image bootimg.bin
and the Config File config0.ini (and any other created config files config1.ini,
Questions? Contact juicedLink
6 - jump to CONTENTS
Little DARling System User Guide
5
3.2
… config9.ini) to the root directory of the microSD card.
Copy Config Files to your Smart Phone – In the field, it is handy to be
able to view the contents of the Config File for making your configuration
selection. You can get it to your smart phone a variety of ways. Probably,
the easiest method is to email it to yourself.
Insert Battery and microSD Card, and Power On
Watch a tutorial video covering the following steps
6
Open Battery/microSD Cover – Twist the thumbscrew counterclockwise to
loosen, and remove the cover.
7 Insert microSD card – Insert the microSD card with bootimg.bin and any
config files that you wish to use into the microSD slot in the orientation with
the microSD electrical contacts facing the surface of the printed circuit
board. Push it in all of the way until it clicks.
8 Insert AA battery – As a distributed audio recorder, you will not be within
eyesight of the recorder to check the battery level. So, it's recommended to
always begin operation with a fresh battery. The bottom of the battery holder
has “+” and “-” indicators. Insert a single AA battery into the battery holder
with the proper orientation. For more information about powering the device
including battery types and battery life estimates, please jump to the
Batteries and Battery Life section.
9 Close Battery/microSD Cover – Place the cover over the battery, and
position the alignment pin and hole. Make sure the plastic tab has been
tucked inside the enclosure to cover the microSD slot.
Twist the
thumbscrew clockwise to secure the cover.
10 Power On – The M (middle) buttons is recessed, and will require a pointed
object (pen, etc) to operate. The button is recessed for operations that must
not be accidentally interrupted (such as stopping the recording) while in the
pocket of your talent. Press the M (middle) button to power on the device.
Once powered, the displays will show a rotating effect while the unit boots.
• TIP: Although I usually have a pen around in the field to use as a tip,
you may not. You can drop a pin in the battery tray, or cut a pin down
and trap it between the battery and the side of the battery tray. This
way, you will always have one in the field with you.
3.3
Navigation of Menus
Watch a tutorial video covering the following steps
Questions? Contact juicedLink
7 - jump to CONTENTS
Little DARling System User Guide
11 Get Familiar with Menus – Pressing the R (right) and L (left) buttons will
cycle through the menu. Holding one of the buttons will scan quickly through
the menu.
11.1 g = gain of mic amplifier
11.2 r = record
11.3 P = Play
11.4 h = headphone volume control.
11.5 c = configuration: Displays current configuration file loaded, and
selects a configuration file to load.
11.6 t = transmitter switch settings : Displays
11.7 b = battery: Relative battery voltage.
11.8 S = Storage: Amount of storage left on microSD card
11.9 F = Firmware: Displays the Firmware Version
12 Selecting a Menu Item – Pressing both the R and L buttons simultaneously
will select that menu item for execution or manipulation of the parameters.
Pressing both the R and L buttons simultaneously again will exit that menu
item, and return to the main menu.
13 Check Battery Level – Select b, and a number from 0-9 will be displayed
indicating the relative battery strength. For more information about powering
the device including battery types, battery life estimates, and the limitations
in the accuracy of the meter, please jump to the Batteries and Battery Life
section.
14 Check Storage Availability – Select S, and a number from 0-9 will be
displayed indicating the % of memory available on the microSD card.
3.4
Basic Recording/Playback
Watch a tutorial video covering the following steps
15 Select a Configuration File – The c menu will display the current config file
loaded, and also allow you to select a different config file to load.
Understanding the capabilities provided in the configuration files is beyond
the scope of the Quick Start Guide, and is covered in the Use of Config Files
section. It is not necessary to select a configuration, and default registers
will be loaded for basic recording and playback.
16 Connect a Microphone – The input is a 3.5mm locking TRS (tip/ring/sleeve)
jack. Plug-in power (which is not the same as phantom power) is provided
on the tip and ring for electret elements common in lavalier mics. The audio
feeding the preamp is taken from the tip. The preamp then feeds 2 channels
Questions? Contact juicedLink
8 - jump to CONTENTS
Little DARling System User Guide
17
18
19
20
of the codec recording 2 files (the second recorded at a lower level as a
safety track, in case the main recording gets blown out). More information
on the operational details can be obtained in the Error: Reference source not
found section.
Mic selection and proper use - Lav mic selection (polar pattern and signalto-noise performance) as well as proper microphone placement will effect
the recording quality of your talent. This is beyond the scope of the Quick
Start Guide, but more information can be found in the free juicedLink Field
Guide to Audio Production. There, you will learn the “SANASENECYA”
techniques for achieving excellent audio, even on a budget.
Adjust the Gain using Meter as guide – Entering the g menu allows for
adjustment of the codec audio gain, and the signal level meter is displayed
on the right display. You will want to adjust the gain so the peaks splash up
to the J on the display. More information on the operational details can be
obtained in the Error: Reference source not found section.
Check Audio Quality with Headphones – The meter provides an indication
as to the signal level, but it does not provide any indication as to the quality
of the audio signal. For instance, you may be experiencing a lot of wind
noise, but you would not know this by observing the meter only. So, you will
plug headphones into the headphone jack. Going to the h menu allows for
adjustment of the headphone volume. The headphone signal is present in
the left earcup. The right output is used for a slate tone initiated from a
DARlink wireless remote.
Start a Recording – Entering the r menu starts a recording. The display
will go blank, with the exception of a blinking decimal point indicating
recording in progress. While recording, the R and L buttons will lock to
prevent undesired changes to settings while on your talent. Also, the
headphone out will mute. The only signal present at the output jack will be
the slate signal initiated by a DARlink wireless remote.
20.1 Adjustments during Recording – Although the headphone is
muted and both the L and R buttons are disabled during a recording
event, the unit can be put into a temporary state to monitor and
adjust limited audio parameters while recording, without having to
completely stop a recording.
• Press both the L and R buttons simultaneously, and the left
decimal point will start blinking rapidly. You then have 5
seconds to press the recessed M button.
◦ The battery indicator will be displayed for ~2sec.
Questions? Contact juicedLink
9 - jump to CONTENTS
Little DARling System User Guide
21
22
23
24
3.5
◦ The Storage amount remaining indicator will be displayed for
~2sec.
◦ The gain menu and meter will be displayed and the
headphone un-muted. You have ~60sec to make your
desired gain adjustments, before the headphone mutes and
the L and R buttons become inactive, as it returns to the
normal recording state.
Stop Recording – Press the recessed M button to stop the recording.
Playback a Recording – Enter the P menu to playback recordings. Hitting
the L button will rewind the current file to the beginning. Hitting the L button
again will jump to the beginning of the previous file. Hitting the R button will
jump to the beginning of the next file.
Power Off – Press and hold the recessed M button for ~5sec to power off
the unit.
• TIP: Although I usually have a pen around in the field to use as a tip,
you may not. You can drop a pin in the battery tray, or cut a pin down
and trap it between the battery and the side of the battery tray. This
way, you will always have one in the field with you.
Save recorded file to your computer – Remove the microSD card from
the DAR, and insert it into your computer.
Wireless Remote Control
Watch a tutorial video covering the following steps
25 Equipment – This section requires a Little DARling Distributed Audio
Recorder with DARlink, and a DARlink Hand-held Remote Control
Transmitters. A single transmitter can control multiple DAR recorder units.
26 Match the Transmitter DIP switch settings – If you are using a Little
DARling model that is enabled with DARlink and capable of receiving
wireless remote commands, then you will need to select a code in the t
menu. Then, you will set the DIP switches in the transmitter according to the
Transmitter DIP Switch Map section.
27 Select a Configuration File – The c menu will display the current config file
loaded, and also allow you to select a different config file to load.
Understanding the capabilities provided in the configuration files is beyond
the scope of the Quick Start Guide, and is covered in the Use of Config Files
section. It is not necessary to select a configuration, and default registers
will be loaded for basic transmitter button functionality. Here are some of the
Questions? Contact juicedLink
10 - jump to CONTENTS
Little DARling System User Guide
28
29
30
31
parameters that can be controlled by the config file:
• Disable/enable remote recording stop, so it can not be accidentally
triggered.
• Enable/disable buzzer.
• Customize number of slate tones generated for each slate button
Start a recording – Hitting the REC button will remotely commence
recordings on the target DARs. This can be enabled/disabled by the the
Use of Config Files.
Slate a recording – Hitting one of the numbered buttons will remotely
activate a slate signal recorded in the target DARs. A number of slate
parameters for each button can be customized by the Use of Config Files.
Send slate to a camera – The slate signal is also present at the output jack,
which can be connected to the mic input on a camera and recorded by its
audio.
Stop a recording - Hitting the STOP button will remotely terminate
recordings on the target DARs. This can be enabled/disabled by the the
Use of Config Files.
Questions? Contact juicedLink
11 - jump to CONTENTS
Little DARling System User Guide
4 Little DARling Distributed Audio Recorders
4.1
Part Number Key
This revision of the User Manual was written for the following part numbers:
4.1.1
Little DARling Distributed Audio Recorder
• DAR123
4.1.2
Little DARling Distributed Audio Recorder with DARlink
• DAR124
4.1.3
DARlink Hand-held Remote Control Transmitters
• DAR-CMD-HHLR-433-MD
◦ This is a Linx Technologies CMD-HHLR-433-MD with an additional label for
the proper button names. Linx Technologies has obtained US FCC Part 15,
Industry Canada, and European CE compliance.
4.2
Firmware Version
The version of firmware running on the Little DARling can be obtained by viewing
the F menu. This User Manual was written for the following revisions:
• DSP
◦ XXXX – Initial Release (ROZAK)
• Supervisor
◦ XXXX – Initial Release (ROZAK)
• Wireless-RX
◦ XXXX – Initial Release (ROZAK)
The latest version of this User Manual document, and the latest versions of
firmware, can be obtained from the Little DARling Downloads page. The appendix
contains the Firmware Update Procedure.
4.3
Control Descriptions
Most of the control and user interface descriptions have already been covered in the
Quick Start Guide and videos. The Navigation of Menus section and video covers
the front panel buttons, display, and menu system. The available commands for the
Questions? Contact juicedLink
12 - jump to CONTENTS
Little DARling System User Guide
configuration file are described in the Use of Config Files section.
4.4
4.4.1
Theory of Operation
Audio Signal Path
4.4.1.1
Microphone Input and Plug-in Power
The input is a 3.5mm locking TRS (tip/ring/sleeve) jack. Plug-in power (which is not
the same as phantom power) is provided on the tip and ring for electret elements
common in lavaliere mics. The audio feeding the low-noise preamp input is taken
from the connector tip.
4.4.1.2
Preamplifier and Codec Input
Audio from the microphone connector tip feeds the input of the low-noise
preamplifier. The output of the low-noise preamp is then split into two signals. One
signal feeds input channel of the codec directly. The other signal is sent through an
attenuator and feeds a second channel of the codec. This provides for a second
track recorded at a safe lower level, in the event that the main channel gets blown
out (perhaps, by a loud signal event, such as your talent screaming).
4.4.1.3
Headphone Output
The left channel of the output connector contains the headphone signal coming from
the codec headphone amplifier. The headphone mutes when a recording is started.
For more details, see the System Actions During Record section.
4.4.2
Slate Tone
For a Little DARling with DARlink receiver, a slate tone can be generated by the
DAR, initiated by a DARlink wireless transmitter. The tone is capacitively injected at
the low-noise preamplifier output, passively mixing with the preamplifier output
signal. The tone is also buffered and capacitively coupled to the right output, so a
DAR could be used with a camera microphone input to inject a slate tone into the
camera's audio recording. The buttons on the DARlink transmitter can be
customized to control the duration of the tone and the number of tone impulses per
event, as described in the Use of Config Files section.
4.4.3
Buzzer
For a Little DARling with DARlink receiver, a buzzer can sound when a wireless
Questions? Contact juicedLink
13 - jump to CONTENTS
Little DARling System User Guide
command is received. This can be customized as described in the Use of Config
Files section.
4.4.4
Output
The output connector is a 3.5mm locking TRS (tip/ring/sleeve) jack. The left
channel has the headphone signal. The headphone mutes when a recording is
started. For more details, see the System Actions During Record section. For a
Little DARling with DARlink receiver, the right channel has a signal from the slate
tone generator, initiated by a DARlink wireless transmitter. So, a DAR could be
used with a camera microphone input to inject a slate tone into the camera's audio
recording.
4.4.5
Recording
4.4.5.1
Audio File
The audio file saved contains 2 channels of audio. The first track contains the main
signal, and the second track contains the backup track recorded at a safe lower
level, in the event that the main channel gets blown out (perhaps, by a loud signal
event, such as your talent screaming).
The file name can be specified by the Use of Config Files.
The file extension is .WAV. Each individual track is 16b/48KHz. Acknowledging that
marketing of audio recorders has pushed higher sample rates on consumers, we
base this specification on the Meyer/Moran paper published by the Audio
Engineering Society that demonstrates that humans can not perceive the difference
between CD quality (16b/44.1KHz) and higher bit rates (such as what is used with
SACD or DVD-A). As an example, even the highest quality lav microphone (which
may, at best, provide 70dB SNR for a lav with an unrealistically high 1Pa signal
input) can not come close to utilizing the 144dB of dynamic range from even an
ideal 24bit A/D, and is serviced with plenty of margin by 16bits. Over-designing a
system (beyond what humans can perceive) has consequences for other system
parameters, such as battery life, file size, and SD card selection.
4.4.5.2
File Corruption Avoidance
If a recording is terminated without properly closing down the file on the SD card (for
instance, running out of room on the SD card, or a power failure), then it can
become corrupted. Although some techniques can sometimes recover corrupted
files, it is better to avoid this situation in the first place. There are a number of
Questions? Contact juicedLink
14 - jump to CONTENTS
Little DARling System User Guide
techniques and options for the DAR:
• Stop recording when battery or space on card becomes low
◦ This is enabled by default. The disadvantage is that the recording will stop
while there is still some useful battery or memory left.
• Sequential 10 minute recordings
◦ This is an option that can be specified by the Use of Config Files. The
advantage here is that recording will run right up until the end of useful
battery and memory. The disadvantage is that there will be a sequence of
numerous 10min recordings that will have to be managed.
• When battery or space on card becomes low, then switch over to 10min
recordings.
◦ This is an option that can be specified by the Use of Config Files. The
advantage here is that recording will run right up until the end of useful
battery and memory, with a minimal number of files.
4.4.5.3
System Actions During Record
When a recording starts, the display will go blank with the exception of a blinking
decimal point indicating recording in progress, and the R and L buttons will lock to
prevent undesired changes to settings while the DAR is on your talent. Also, the
headphone out will mute, so the only signal present at the output jack will be the
slate signal initiated by a DARlink wireless remote.
Although the headphone is muted and both the L and R buttons are disabled during
a recording event, the unit can be put into a temporary state to check and adjust
limited audio parameters, without having to completely stop a recording. This is
described in the Basic Recording/Playback section. This temporary state will
timeout, and return to mute the headphones and disable the L and R buttons.
4.5
Other Operational Items
4.5.1
Microphone Selection and Performance
Lav mic selection (polar pattern and signal-to-noise performance) as well as proper
microphone placement will effect the recording quality of your talent. This is beyond
the scope of this User Manual, but more information can be found in the free
juicedLink Field Guide to Audio Production.
There, you will learn the
“SANASENECYA” techniques for achieving excellent audio, even on a budget.
Questions? Contact juicedLink
15 - jump to CONTENTS
Little DARling System User Guide
4.5.2
Batteries and Battery Life
Battery life discussed in this section are from typical measurements. Results may
vary for any number of reasons.
The unit requires a single AA battery for power. Illustration 1 shows the battery life
for various battery types (alkaline, lithium, NiMH rechargeable, NiCD rechargeable)
in a Little DARling with DARlink. The units recorded until the battery could no longer
keep the unit operational (alkaline ~ 12hrs, NiMH ~ 12hrs, Lithium ~ 20hrs, NiCD ~
6hrs). So, this shows that a full production day can easily be covered by a standard
alkaline battery, or common NiMH rechargeable battery. Use of an expensive
lithium battery is not necessary.
Illustration 1: Battery Life Plots
The type of battery chemistry used can be specified by the Use of Config Files. This
will set the voltage threshold to be used in the decision logic for when to shutdown
the unit for File Corruption Avoidance. It also sets calibrates the battery battery
indicator in the b menu. Illustration 1 also shows the limitation in the accuracy of the
battery indicator, as a number of the plots show how the battery voltage flattens over
a significant duration of its discharge. So, for those batteries, the voltage
measurement is not a great indicator of the amount of battery life remaining.
Questions? Contact juicedLink
16 - jump to CONTENTS
Little DARling System User Guide
5 DARlink Hand-held Remote Control Transmitters
5.1
Part Number Key
This revision of the User Manual was written for the following part numbers:
• DARlink Hand-held Remote Control Transmitters
◦ DAR-CMD-HHLR-433-MD
▪ This is a Linx Technologies CMD-HHLR-433-MD with an additional label
for the proper button names. Linx Technologies has obtained US FCC
Part 15, Industry Canada, and European CE compliance.
• Compatible Transmitters
◦ Linx Technologies CMD-HHLR-433-MD
◦ Linx Technologies CMD-HHCP-433-MD
Questions? Contact juicedLink
17 - jump to CONTENTS
Little DARling System User Guide
6 Advanced Topics
6.1
Use of Config Files
6.2
General
In the field, it is handy to be able to view the contents of the Config File for making
your configuration selection. You can get it to your smart phone a variety of ways.
Probably, the easiest method is to email it to yourself.
6.3
Command List
Command
#
0
1
2
3
Description
Comment character. Use at beginning of line. The text
following this character is ignored.
- Alkaline
- NiMH rechargeable
- NiCD rechargeable
- Lithium
10MIN_STITCH = 0
1
Sets the battery voltage threshold for Batteries and
Battery Life decisions.
- OFF
- ON
10MIN_SAFETY = 0
1
File Corruption Avoidance using sequential 10 minute
recordings, up until the battery dies or the SD card fills up.
- OFF
- ON
BATT =
FILENAME =
Questions? Contact juicedLink
File Corruption Avoidance, switching over to sequential 10
minute recordings when the battery is low or the card is
nearly full, up until the battery dies or the SD card fills up.
5 characters maximum. Used as the base filename for
saving recordings (FILENAME-001.WAV, and so on).
18 - jump to CONTENTS
Little DARling System User Guide
SS =
ST =
RS_BUZZ =
SLATE1
SLATE2
SLATE3
SLATE4
SLATE5
SLATE6
6.4
=
=
=
=
=
=
0
1
- OFF
- ON
0
1
Allows wireless control of recording start.
- OFF
- ON
0
1
Allows wireless control of recording stop
- OFF
- ON
AB
AB
AB
AB
AB
AB
Enables use of buzzer for recording start/stop.
A:
0 = Buzzer OFF
1 = Buzzer ON
B:
1 = 1 slate tone generated
2 = 2 slate tone generated
3 = 3 slate tone generated
4 = 4 slate tone generated
5 = 5 slate tone generated
6 = 6 slate tone generated
Example
# ********************* Begin config0.ini ********************
#
# Specify Filename:
FILENAME = AUDIO
# Specify battery as alkaline:
BATT = 0
# When battery starts to get low or card begins to fill up,
# switch over to 10min recordings:
10MIN_SAFETY = 1
# Allow wireless control of start/stop:
SS = 1
Questions? Contact juicedLink
19 - jump to CONTENTS
Little DARling System User Guide
# Turn on buzzer for record/stop
RS_BUZZ = 1
# Specify slate buttons:
SLATE1 = 11
SLATE2 = 12
SLATE3 = 13
SLATE4 = 14
SLATE5 = 15
SLATE6 = 16
#
# ********************* End config0.ini **********************
6.5
Codec Register Commands
During development, we created direct access to the Texas Instruments
TLV320AIC3204 codec registers via the config file. The codec has numerous other
features that are not used or necessary for this application, such as filters, AGC,
limiters, etc. We believe that it is much better to perform any wind noise filtering in
post, where much better granularity to the filter parameters are available, trial-anderror can be done without consequence, and different filters can be patched in (or,
not at all) at different times during the recording. It is also our intention to set up the
gain structure for the lowest noise performance, and achieve extended dynamic
range via the safety track recorded at a lower level, than using AGC or limiter
techniques. That said, you are welcome to play around with codec parameters, but
we will not be supporting inquiries on this, and will direct you to the TLV320AIC3204
datasheet and app notes and the Texas Instruments engineering forum online. The
headphone muting during recording can not be overridden.
Questions? Contact juicedLink
20 - jump to CONTENTS
Little DARling System User Guide
7 Appendix
7.1
Transmitter DIP Switch Map
Illustration 2 shows back of the transmitter with both the switch and battery cover
removed. First, note S2 (circled) should be set in the S position. Next, the 10 DIP
switches (set to either the “0” or “1” position) need to be matched up with what has
been selected as the decode sequence selected in the t menu of the DAR. The
first 5 DIP switches will correspond to the setting in the left display in the t menu of
the DAR, and the last 5 DIP switches will correspond to the setting in the right
display of the t menu of the DAR. The next sections contain the switch/display
relationship table, and some examples.
Illustration 2: Transmitter DIP Switches
7.1.1
Left Display Settings for Transmitter Switches 1-5
Display
Transmitter DIP Switches
L R
1234567890
0
00000
0.
10000
1
00001
Questions? Contact juicedLink
21 - jump to CONTENTS
Little DARling System User Guide
1.
2
2.
3
3.
4
4.
5
5.
6
6.
7
7.
8
8.
9
9.
A
A.
b
b.
c
c.
d
d.
E
E.
f
F.
7.1.2
10001
00010
10010
00011
10011
00100
10100
00101
10101
00110
10110
00111
10111
01000
11000
01001
11001
01010
11010
01011
11011
01100
11100
01101
11101
01110
11110
01111
11111
Right Display Settings for Transmitter Switches 6-0
Display
Transmitter DIP Switches
L R
1234567890
0
00000
0.
10000
Questions? Contact juicedLink
22 - jump to CONTENTS
Little DARling System User Guide
1
1.
2
2.
3
3.
4
4.
5
5.
6
6.
7
7.
8
8.
9
9.
A
A.
b
b.
c
c.
d
d.
E
E.
f
F.
7.1.3
00001
10001
00010
10010
00011
10011
00100
10100
00101
10101
00110
10110
00111
10111
01000
11000
01001
11001
01010
11010
01011
11011
01100
11100
01101
11101
01110
11110
01111
11111
Display Setting to Ignore DIP Settings (not recommended)
Display
Transmitter DIP Switches
L R
1234567890
- any setting
Questions? Contact juicedLink
23 - jump to CONTENTS
Little DARling System User Guide
7.1.4
Examples
Display
L R
1 0
2 0
3. 0
3. F
3. f.
Transmitter DIP Switches
1234567890
0000100000
0001000000
1001100000
1001101111
1001111111
7.2
Firmware Update Procedure
There are no firmware updates at this time.
7.3
Document Revision History
• 0.90 – 07/23/2015: Pre-release revision
Questions? Contact juicedLink
24 - jump to CONTENTS
Little DARling System User Guide