1
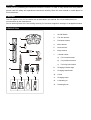
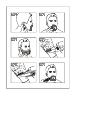
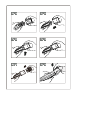
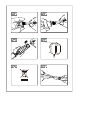
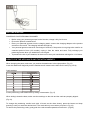
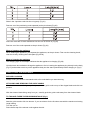
WELCOME
Thank you for purchasing the Personal Groomer SY-HC26. In order to fully benefit from this product,
please read the safety and operations instructions carefully. Store the user manual in a safe place for
future reference.
CAUTION
Use this appliance only for its intended use as described in this manual. Do not use attachments not
recommended by the manufacturer.
Do not use this product if it is not working correctly, if it has been dropped or damaged, or dropped into water.
DESCRIPTION
1.
On/Off Switch
2.
Full size trimmer
3.
Precision trimmer
4.
Micro shaver
5.
Nose trimmer
6.
Body trimmer
7.
3 Guide combs
a)
For full size trimmer
b)
For precision trimmer
c)
For body hair trimmer
8.
Charging indicator light
9.
Charging transformer
10.
Comb
11.
Charging stand
12.
Lubricating oil
13.
Cleaning brush
GETTING STARTED
CHARGING YOUR PERSONAL GROOMER
•
•
•
Before using your personal groomer for the first time, charge it fully for 8 hours.
Ensure the product is switched off.
Place your personal groomer into the charging stand, connect the charging adaptor to the product
and then to the mains. The charging indicator will light up.
•
Your personal groomer cannot be overcharged. However, if the product is not going to be used for an
extended period of time (2-3 months), unplug it from the mains and store. Fully recharge your
personal groomer when you would like to use it again.
•
To preserve the life of your batteries, let them run out every six months then recharge for 14-16 hours.
HOW TO FIX THE APPLIANCE AND THE ATTACHMENTS
When changing the parts, make sure you position the attachment in the right position. (Fig.13)
Insert the attachment diagonally and the attachment will rotate into the base until it locks (Fig.15/16)
Comb settings:
Put the positioning comb attachment by sliding it downwards. (Fig.17)
When sliding it down the base, make sure the markings on the side and the comb are properly aligned.
(Fig.18)
To change the positioning comb’s level (with 10 levels as the chart shows), press the button and keep
pressing it until you reach the desired level. The comb will only move when you press it. Fig.19)
To remove the positioning comb, gently push the comb towards upwards and remove it .(Fig.20)
Slide in the 4 position comb into the unit gently. (Fig.21)
Remove out of the positioning comb upwards (as the pic shows.)(Fig.22)
Place the comb with 3 levels attachment into the unit as shown in (Fig.23)
Remove out of the comb upwards as the pic shows (Fig.24)
Ways of cleaning the appliance
When cleaning the appliance, just separate the appliance, as the pic shows. Then use the cleaning brush,
clear the dust by cleaning the inside parts (Fig.25-26)
Ways of charging the appliance
The charging light on the adaptor indicates that the appliance is charging (Fig.28)
Here there are two methods to charge the appliance. One is inserting the appliance plug directly into the body
(Fig.27) and another one is to put the appliance body into the stand (downwards) before charging it. (Fig.6)
HOW TO USE THE APPLIANCE
BEFORE YOU BEGIN
Always comb your beard or moustache with a fine comb before you start trimming.
ATTACHING AND REMOVING THE GUIDE COMBS
With the trimmer blade facing away from you, slide the guide comb on top of the clipper blade and click into
position.
With the trimmer blade facing away from you, carefully push the guide comb away from the trimmer blade.
TO THIN AND TAPER THE BEARD/MOUSTACHE (Fig.1)
Attach a guide comb to full size trimmer. If you are trimmer for the first time start with the maximum trimming
length setting.
Turn the unit on.
Place the flat top of the trimmer comb against the skin.
Slowly slide the personal groomer through the hair. Repeat from different directions as necessary.
If hair builds up in the trimmer comb during the trimming process, switch the unit off, pull off the comb and
brush/rinse off.
TO DEFINE THE BEARD/MOUSTACHE LINE (Fig.2)
Hold the personal groomer with precision Trimmer Blade facing you.
Start with edge of beard/moustache line and gently lower the trimmer blade onto your skin. Use motions
towards edge of beard/moustache line to trim to desired locations in facial area and away from beard in neck
area.
TRIMMING EDGE OF SIDEBURNS (Fig.3)
Hold the personal groomer with precision Trimmer Blade facing you.
Start with edge of sideburn, and with the trimmer blades resting lightly against your skin, use motions towards
edge of the sideburns line to trim to desired locations in facial area.
USING THE MICRO SHAVER TRIMMER (Fig.4)
Attach the micro shaver trimmer
Hold the groomer so the micro shaver gently touches your face in a 45 degree angle.
Use short, well-controlled movements to shave around your Beard/Moustache. Use your free hand to stretch
your skin. This encourages the hair to stand upright, making it easier to shave.
NOTE: The micro shaver was designed to shave the detail areas around your beard/moustache/sideburns. It
was not designed to shave your entire face.
TRIMMING THE NAPE OF YOUR NECK (Fig.5)
NOTE: You will need a hand mirror for this operation if performing it alone.
Before you begin, attach the full size Trimmer Blade.
Use your fingers to lift the hair at the base of your head up off the neck.
Your index finger should be covering the roots of the hairs you are lifting to prevent accidental removal by the
personal groomer.
Using your other hand, hold the personal groomer to the base of your neck with the cutting unit facing up, and
move the personal groomer up the length of the neck until it touches your finger covering the hair roots at the
base of your head.
Be sure to move the unit slowly when performing this operation and to keep the hair roots at the base of your
head out of the way of the trimmer.
TO REMOVE HAIR FROM EAR (Fig.7)
Attach eyebrow trimmer attachment.
Insert the personal groomer gently into or ear.
Gently move the groomer in and out of the ear and at the same time rotate.
Avoid inserting the cutting unit more than 6mm into your nostril or ear.
TO REMOVE HAIR FROM NOSE (Fig.8)
Attach nose trimmer attachment
Insert the personal groomer gently into nostril.
Gently move the groomer in and out of the nostril and at the same time rotate.
Avoid inserting the cutting unit more than 6mm into your nostril.
To trim in the most effective way, move the appliance slowly against the direction of hair growth (Fig.9)
To trim the body hair in an efficient way, remove what you want and where you like, as the pic shows (Fig.10)
To trim the detailed beard and moustache with positioning comb, as the pic shows (Fig.12)
ATTACHING AND REMOVING THE TRIMMER COMB ATTACHMENT
NOTE: Always ensure the personal groomer is switched off before changing any attachments.
To remove, hold the personal groomer with one hand and turn the trimmer head anticlockwise with the other.
Tips for best results
Beard, moustache and sideburn hairs should be dry.
Avoid using lotions before using your personal groomer. Comb your hair in the direction that it grows.
Remove trimmer comb attachment if you are: defining hairline edges such as sideburns, trimming the nape of
your neck, trimming your beard line on front of neck.
CARE FOR YOUR PERSONAL GROOMER
CLEANING AND MAINTAINING YOUR PERSONAL GROOMER
AFTER EACH USE
1. Turn the personal groomer off.
2. Gently brush the remaining hairs away/rinse under warm water from the guide comb and trimmer blade.
CLEANING CAUTIONS
With IPX7 Standards the unit can be rinsed directly under water. You may also wash and rinse all the
attachments under water. (Fig.31)
Only the guide comb attachment and trimmer blade may be removed from the product for cleaning.
Cleaning should only be done with a soft brush, such as the brush supplied with the product.
Only use the light-grade oil supplied or sewing machine oil on the blades.
Do not use harsh or corrosive cleaners on the units or their blades.
Do not use harsh or corrosive cleaners on the units or their blades.
STORAGE
Always store this appliance and cord in a moisture-free area. Do not store it in temperatures exceeding 140ºF
(60ºC)
Do not wrap the cord of the charging adaptor around the appliance.
IMPORTANT SAFETY INSTRUCTION
WARNING-TO REDUCE THE RISK OF BURNS, ELECTROCUTION, FIRE, OR INJURY TO PERSONS:
An appliance should never be left unattended when plugged into a power outlet.
Keep the power plug and cord away from heated surfaces.
Make sure the power plug and cord do not get wet.
Do not plug or unplug the product with wet hands.
Do not use the product with a damaged cord. A replacement can be obtained via our service centres
Charge, use and store the product at a temperature between 15ºC and 35ºC.
Always unplug from the mains when cleaning.
Only use the parts supplied with the appliance.
Keep this product out of reach of children. The use of this appliance by persons with reduced physical,
sensory or mental capabilities or lack of experience and knowledge can give cause to hazards. Persons
responsible for their safety should give explicit instructions or supervise the use of the appliance.
Children shall not play with appliance.
Cleaning and user maintenance shall not be made by children without supervision.
PROTECT THE ENVIRONMENT
The product contains a Nickel Metal Hydride cell unit. Do not dispose the trimmer in household waste at the
end of its useful life.
CAUTION: Do not put in fire or mutilate your battery packs they may burst or release toxic materials.
BATTERY REMOVAL
Lift the battery out of housing by using a scissor cut down the connection between the body and the power
line. Twist the connecting wires until they break (Fig.30)
The battery must be removal from the appliance before it is scrapped.
The battery is to be disposed of safely.
1. Unplug groomer from outlet to avoid risk of electrical shock.
2. Remove rear groomer cover by first prying the rubber panel from the product with a flat head screwdriver.
Pry the on/off switch from the product by head screwdriver. Unscrew the upper housing by head
screwdriver and pry the upper housing from the product with a flat head screwdriver. This will expose the
batteries.
3. With wire cutters, clip the wires leading to batteries.
4. Remove the batteries from the product. Contact your local authorities for proper disposal.
SPECIFICATIONS
9-in-1 Electric rechargeable multifunction Hair clipper
Waterproof IPX7
Sliding switch
Indicator light
Includes:
- Full size trimmer
- Precision trimmer
- Micro shaver
- Nose trimmer
- Body trimmer
- 3 combs - For precision trimmer: 3.5-5mm 4 levels
For full size trimmer: 12-24mm 10 levels
For body trimmer: 3.8-9.8mm 3 levels
Stainless steel blades
Fully interchangeable accessories according to the type of cut
Accessories washable with water
Charging base and storage of accessories
Included accessories: AC charger, charging base, lubricant oil bottle, comb, cleaning brush
Voltage: 220~240 v. 50hz. DC. 2,4V.
Consumption: 3 Watts
Complete charging time: 8 hours
Usage time: 45 minutes
Battery capacity: Ni-Cd batteries: 600mAh. X 2
DECLARATION OF CONFORMITY
Manufacturer Name: Satyatrade S. L.
Address: Pol. Ind. La Raya. C/ Guadalquivir, 2.
Camarma de Esteruelas, 28816 Madrid
Tel: 902 430 967
Fax: 91 8864285
NIF: B83254763
Manufacturing country: China
Description: Personal Groomer
Sytech® SY-HC26 complies with the following directives:
CE standard: Directive 2004/108/EC
Low Voltage standards : Directive 2006/95/EC
ROHS standard: Directive 2011/65/EU Restriction of Hazardous Substance
IPX7 Standard: GB4208-2008 (IEC 60529: 2001, IDT)
Signed: Ajeet Nebhwani Utamchandani
Sole Administrator